


准备工作:
考虑这个自定义view需要什么属性来方便在xml布局里面改。
在values/attrs.xml里面添加自定义属性,分别是尺寸,颜色,变大的倍数。
<span style="font-size:14px;"><resources>
    <declare-styleable name="CustomView">
        <attr name="size" format="dimension" />
        <attr name="color" format="color" />
        <attr name="maxValue" format="float"/>
    </declare-styleable>
</resources></span>
format是定义的属性的类型,配置完成后,就可以在xml布局中使用这些属性了。
继承view之后,会有三个构造方法
<span style="font-size:14px;">public class CustomView extends View{

    private int DEFAULT_SIZE = 100;//默认半径
    private int DEFAULT_COLOR = Color.GREEN;//默认颜色
    private float DEFAULT_MAXVALUE = 1.6f;//默认放大倍数

    private int mSize;//半径
    private int mColor;
    private Paint mPaint;
    private int mHeight;
    private int mWidth;
    private Float value = 1f;
    private Float maxValue;//实际放大的倍数

    private ValueAnimator anim;

    public CustomView(Context context) {
        super(context);
    }

    public CustomView(Context context, AttributeSet attrs) {
        super(context, attrs);
        TypedArray typedArray = context.getTheme().obtainStyledAttributes(
                attrs,R.styleable.CustomView,0,0);
        mSize = typedArray.getDimensionPixelSize(R.styleable.CustomView_size,DEFAULT_SIZE);
        mColor = typedArray.getColor(R.styleable.CustomView_color,DEFAULT_COLOR);
        maxValue = typedArray.getFloat(R.styleable.CustomView_maxValue,DEFAULT_MAXVALUE);

        typedArray.recycle();
    }

    public CustomView(Context context, AttributeSet attrs, int defStyleAttr) {
        super(context, attrs, defStyleAttr);
}</span><span style="font-size:14px;"> CustomView view = new CustomView(this);</span>第三个是需要指定style是调用。
然后开始自定义View。。。
主要会涉及三个方法,分别是onDraw(),onLayout(),onMeasure()。
1、onDraw():
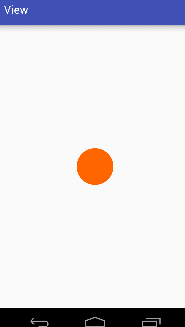
就是把要显示的view画出来,就是一个圆,很简单。
<span style="font-size:14px;">@Override
    protected void onDraw(Canvas canvas) {
        mPaint = new Paint();
        mPaint.setColor(mColor);
        mPaint.setAntiAlias(true);//抗锯齿效果
        //画圆,前两个参数确定圆心,第三个参数是半径
        canvas.drawCircle(mWidth/2,mHeight/2,mSize *value,mPaint);
    }</span>
2,、onLayout():
这个方法主要是确定当前view在父视图中的位置
@Override
    protected void onLayout(boolean changed, int left, int top, int right, int bottom) {
        super.onLayout(changed, left, top, right, bottom);
        // 重设圆半径,防止超出视图大小
        mHeight = getMeasuredHeight();
        mWidth = getMeasuredWidth();
        int maxSize = (int) Math.min(mHeight/(2 * maxValue),mWidth/(2 * maxValue));
        mSize = mSize > maxSize ? maxSize : mSize;
}其实没必要重写onLayout(),这里只是为了防止半径设置的过大。。
在这里重写onLayout()后,有个弊端,就是当在布局中宽高设置固定大小时,显示的圆的半径是所设置宽高的一半,例如宽高都
设置为20dp,所显示的半径为10dp。设置成wrap_content或者match_parent或者不重写onLayout()就没影响了。
3、onMeasure():
先提一句:onMeasure()方法不是每个自定义view都需要重写的。下面简单的了解一下onMeasure的用法。
在xml布局中,我们会设置wrap_content或者match_parent。
但是系统给我们测量得到的宽度和高度都是match_parent。
当我们用到wrap_content时,需要的是实际宽度或高度,而不是系统测量得到的match_parent,就需要我们自己测量,即重写
onMeasure();这里的自定义view就不需要重写onMeasure(),因为这里所需要的宽高就是match_parent,我们只是通
过宽高得到中心点画圆即可。
4.view花完了,开始动画部分,使用ValueAnimator实现的。
public void startAnimation(){
        anim = ValueAnimator.ofFloat(value,maxValue);
        anim.setRepeatCount(ValueAnimator.INFINITE);//设置无限重复
        anim.setRepeatMode(ValueAnimator.REVERSE);//设置重复模式
        anim.setDuration(500);
        anim.addUpdateListener(new ValueAnimator.AnimatorUpdateListener() {
            @Override
            public void onAnimationUpdate(ValueAnimator animation) {
                value = (Float) animation.getAnimatedValue();
                postInvalidate();
            }
        });

        anim.start();
    }
anim = ValueAnimator.ofFloat(value,maxValue);在监听方法中,通过调用getAnimateValue()方法获取动画在播放过程中属性值的变化,也就是上面参数变化过程中的一系列值。
通过postInvalidate()实现刷新,在onDraw()方法中
<span style="font-size:14px;">canvas.drawCircle(mWidth/2,mHeight/2,mSize *value,mPaint);</span>半径 = mSize * value,半径不断变化,实现了圆放大过程。
想要实现复杂的动画可以了解了解ValueAnimator和ObjectAnimator。
最后在Activity中启动动画和关闭动画
public class MainActivity extends AppCompatActivity {
    private CustomView customView;

    @Override
    protected void onCreate(Bundle savedInstanceState) {
        super.onCreate(savedInstanceState);
        setContentView(R.layout.activity_main);

        customView = (CustomView) findViewById(R.id.custom_view);
        customView.startAnimation();

        //customView.endAnimation();
    }
}


 1174
1174

 被折叠的 条评论
为什么被折叠?
被折叠的 条评论
为什么被折叠?
 到【灌水乐园】发言


