


登录页面的开发-样式开发
一、切片3:设计框架图
1.1、原型图(axure)
用axure现场画
1.2、实现需求
1.2.1、需求分析
需求分解:
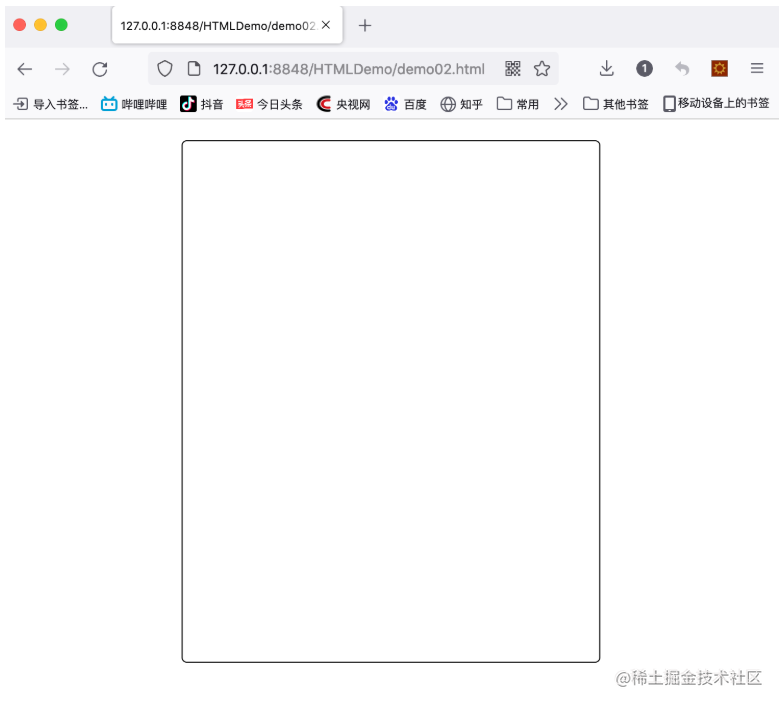
1、绘制外边框
2、设置外边框横向居中显示
3、设置外边框上边距
4、设计文本框居中
1.2.2、需求实现
<!DOCTYPE html>
<html>
    <head>
        <meta charset="utf-8">
        <title></title>
    </head>
    <body>
        <div style="margin-top:20px; margin-left:auto; margin-right: auto; border: 1px solid black; border-radius: 5px; width:400px; height: 300px">

        </div>
    </body>
</html>
1.3、知识点补充
给区块设置边框
border: 1px solid black;
给控件设置圆角边框
border-radius:5px
<div style="width:200px; height:200px; background: blue; border-radius:5px;"></div>
1.4、案例拓展
1.4.1、案例一
按图实现效果

使用到的知识点
表单控件、边距、样式
参考代码
<!DOCTYPE html>
<html>
    <head>
        <meta charset="utf-8">
        <title></title>
    </head>
    <body>
        <div style="margin-left: auto; margin-right: auto; width: 500px;">
            <div style="width: 400px;height: 200px; font-size: 0;"><!-- 解决两个div不紧扣问题-->
                <div style="width: 200px; height: 200px; background-color: red; display: inline-block;text-align: center; line-height: 200px;">
                    <span style="font-size: 50px; color: #F59A23;">恭</span>
                </div>
                <div style="width: 200px; height: 200px; background-color: pink; display: inline-block;text-align: center; line-height: 200px;">
                    <span style="font-size: 50px; color: #00BFBF;">喜</span>
                </div>
            </div>
            <div style="width: 400px;height: 200px; font-size: 0;"><!-- 解决两个div不紧扣问题-->
                <div style="width: 200px; height: 200px; background-color: #00BFBF; display: inline-block;text-align: center; line-height: 200px;">
                    <span style="font-size: 50px; color: pink;">发</span>
                </div>
                <div style="width: 200px; height: 200px; background-color: #F59A23; display: inline-block;text-align: center; line-height: 200px;">
                    <span style="font-size: 50px; color: red;">财</span>
                </div>
            </div>
        </div>
    </body>
</html>
1.4.2、案例二
按图实现效果
使用到的知识点
表单控件、边距、样式
参考代码
略
1.5、小结
现场提问
1、如何给控件添加样式?
2、如何让一个控件在页面居中?
3、设置控件之间边距的关键字是什么?
4、如何给区块(div)设置一个实心的边框?
5、在区块中,如何让文本居中显示(横向居中、纵向居中)?
二、切片4:完善登陆页面效果
2.1、原型图(axure)
用axure现场画
2.2、实现需求
2.2.1、需求分析
需求分解:
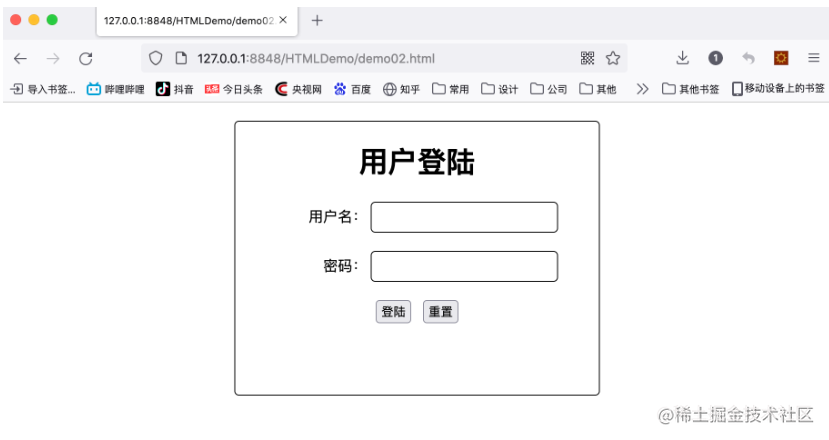
1、设置外边框圆角
2、设置样式
2.2.2、需求实现
<!DOCTYPE html>
<html>
<head>
<meta charset="utf-8">
<title></title>
</head>
<body>
<div style="margin-top:20px; margin-left:auto; margin-right: auto; border: 1px solid black; border-radius: 5px; width:400px; height: 300px">
<form>
<h1 style="text-align: center;">用户登陆</h1>
<div style="text-align: center;">
<div style="width: 100px; text-align: right; display: inline-block;">用户名:</div>
<input type="text" style="width: 200px; height: 30px; border: 1px solid black; border-radius: 5px;"/>
</div>
<div style="text-align: center; margin-top: 20px;">
<div style="width: 100px; text-align: right; display: inline-block;">密码:</div>
<input type="text" style="width: 200px; height: 30px; border: 1px solid black; border-radius: 5px;"/>
</div>
<div style="text-align: center; margin-top: 20px;">
<input type="button" value="登陆"/>
<input type="reset" value="重置"/>
</div>
</form>
</div>
</body>
</html>
2.3、知识点补充
2.3.1、CSS三种引入方式
在HTML网页中根据编写CSS方式的不同可以将CSS分为三类:行内样式、内部(嵌)样式、外部样式
行内样式
行内样式通过style属性直接编写在标签中,多个样式规则之间使用分号隔开
语法:
   <p style="样式规则"></p>
注意:行内样式只对当前标签生效
<p style="color: red; font-size: 20px;">大家好</p>
内嵌样式
内嵌样式一般写在<head>部分
语法:
   <style type="text/css">
        选择器selector  {样式规则;}
   </style>
注意:内嵌样式在当前页面中有效
<!DOCTYPE html>
<html>
    <head>
        <meta charset="utf-8">
        <style>
            p{
                color: red;
                font-size: 20px;
            }
        </style>
    </head>
    <body>
        <p>大家好</p>
    </body>
</html>
外部样式
外部样式定义在单独的*.css 文件中,一般放置在站点一个CSS目录中,通过<link>标签在<head>部分引用。一般外部样式的文件名和网页名称一致
   语法:
       <link href="外部样式路径" rel="stylesheet">
注意:外部样式可以用在同一个网站的多个网页中,只需要在各个页面中去引用外部样式即可

<!DOCTYPE html>
<html>
    <head>
        <meta charset="utf-8">
        <!-- 引入外部样式-->
        <link href="css/index.css" rel="stylesheet"/>
    </head>
    <body>
        <p>大家好</p>
    </body>
</html>
样式使用规则
不同的规则,该如何选择和取舍呢?
行内样式表、内嵌样式表、外部样式表各有优势,实际的开发中常常需要混合使用:
1.有关整个网站统一风格的样式代码,放置在独立的样式文件*.css
2.某些样式不同的页面,除了链接外部样式文件,还需定义内嵌样式
3.某张网页内,部分内容”与众不同“,采用行内样式
2.3.2、盒子模型
1.外边距 -上下外边距重叠 -左右外边距相加 -margin : 上右下左 [或者margin-top:x;margin-left:y;…] 2.内边距 -块内部的内容是否顶着边框,看内边距. -padding : 上右下左 套路与margin相同 3.居中 -块居中(横向居中) : margin:0 auto -块内内容居中 : text-align:center
页面中的所有元素都可以看成一个盒子,占据着一定的页面空间。一个盒子的完整大小由:内容content+内边距padding+边框border+外边距margin组成

外边距相关属性
margin:外间距,边框和边框外层的元素的距离
margin写法:
   margin:10px;/*上下左右四个方向距离相同*/
   margin: 10px 20px 30px 40px;/*四个方向:上,右,下,左(顺时针)*/
   margin: 10px 20px;/*四个方向:上下,右左(顺时针)*/
   margin:10px 20px 30px;   /*第一个用于上,第二个用于右-左,第三个用于下*/
| 属性名 | 描述 | 取值 |
|---|---|---|
| margin | 四个方向的距离 | top;right;bottom;left |
| margin-top | 上间距 | 数值 |
| margin-bottom | 下间距 | 数值 |
| margin-left | 左间距 | 数值 |
| margin-right | 右间距 | 数值 |
如果想让一个元素居中显示,只需设置:margin:0 atuo;即可
内边距相关属性
padding:内间距,元素内容和边框之间的距离((top right bottom left))
用法与margin相同
| 属性名 | 描述 | 取值 |
|---|---|---|
| padding | 四个方向的距离 | top;right;bottom;left |
| padding-top | 上间距 | 数值 |
| padding-bottom | 下间距 | 数值 |
| padding-left | 左间距 | 数值 |
| padding-right | 右间距 | 数值 |
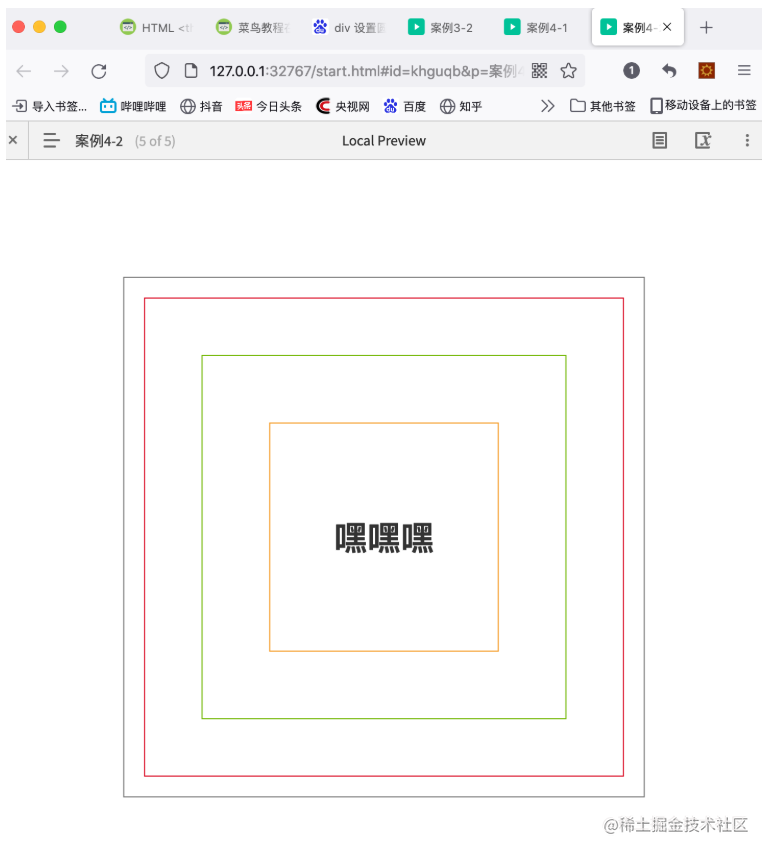
2.4、案例拓展
案例一
按图实现效果
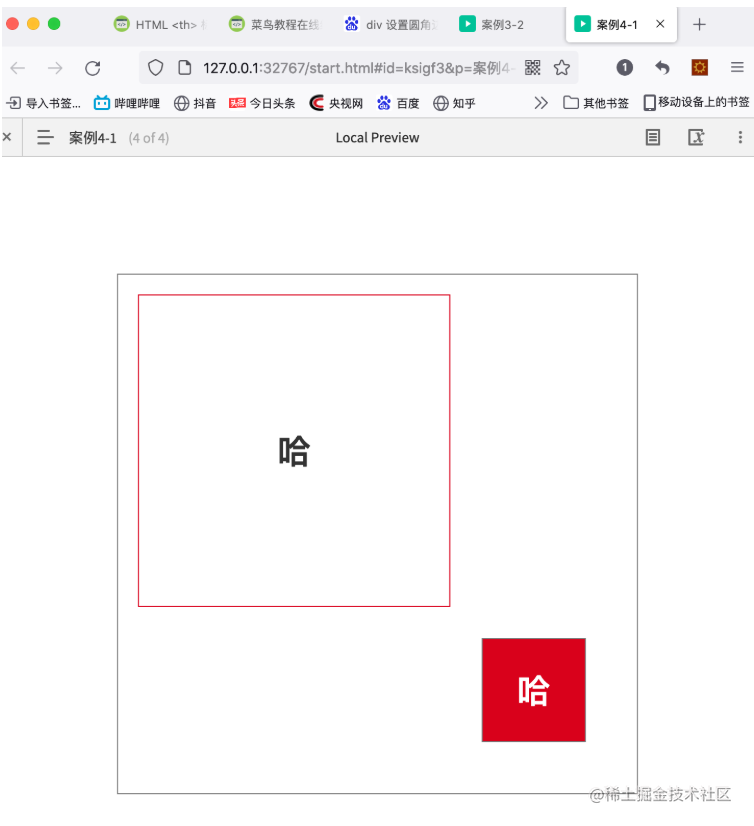
使用到的知识点
外边距、内填充、浮动
参考代码
<div style="width: 500px; height: 500px; border: 1px solid black;">
			<div style="width: 300px; height: 300px; margin: 20px 0px 0px 20px; text-align: center; line-height: 300px; border: 1px solid red; float: left;">哈</div>
			<div style="width: 100px; height: 100px; margin: 0px 20px 20px 0px; background-color: red; text-align: center; line-height: 100px; clear: both; float: right;">哈</div>
		</div>
知识点补充
清除浮动:
clear: both
- both:左右浮动都清除
- left:仅
案例二
按图实现效果
使用到的知识点
外边距、内填充
参考代码
略
2.5、小结
1、两个区块之间设置20个像素的间隔,该如何实现?
2、如何让区块中的内容不定格?
3、如何让两个区块显示在同一行?
三、课程小结
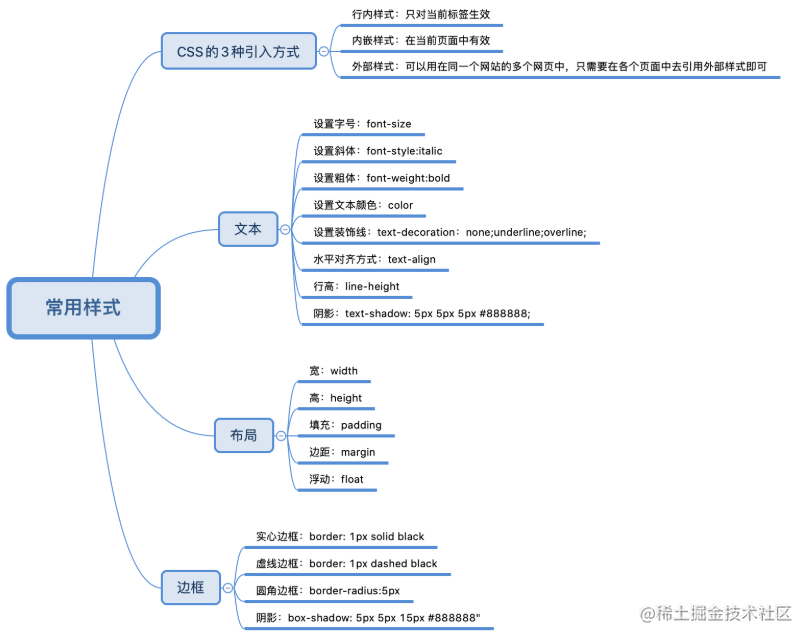
3.1、知识框架图
现场提问,用XMind现场总结,再次加深学生印象
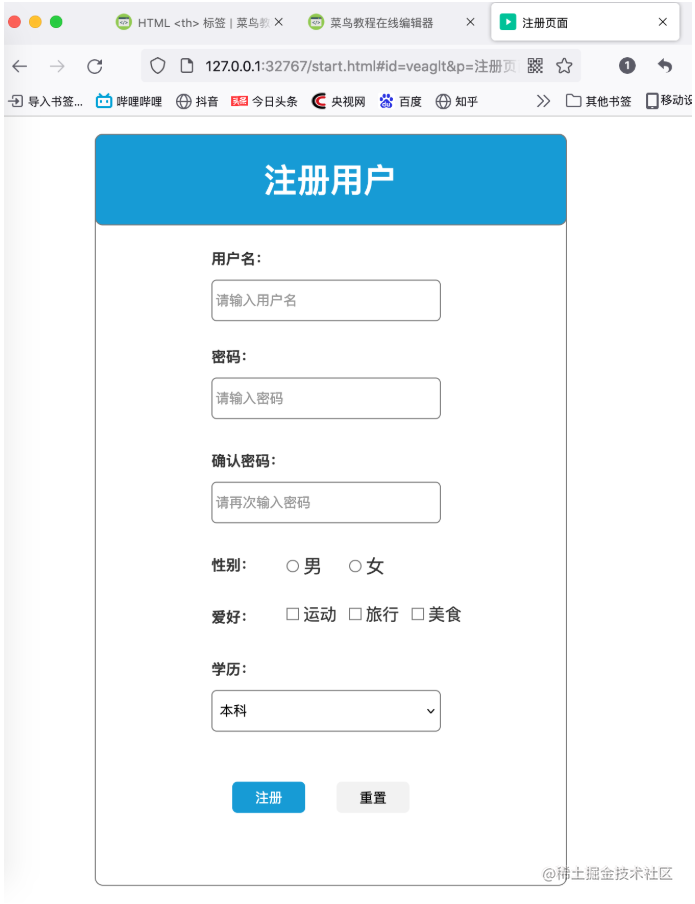
3.2、课后作业
需求定义
完成昨天用户注册页面的样式设计
需求分解
需求分解:
1、使用css样式设计整体框架样式
2、设置控件样式
3、设置文字样式
原型设计


 3184
3184


 被折叠的 条评论
为什么被折叠?
被折叠的 条评论
为什么被折叠?
 到【灌水乐园】发言


