


在项目开发过程中,我们或多或少的使用过很多网络请求库。基本点的就是原生的http请求框架,好比HttpClient以及HttpUrlConnection等,略懂android开发的估计无人不知android-async-http或者volley啥的,再往上走,你可能会接触okhttp等。今天我们将来介绍一个新的http请求框架,隆重推荐Retrofit
Retrofit是何方神圣
retrofit是Square公司出品的,为android和java提供一个类型安全的Http网络请求库,这里是官网地址。
Retrofit的优点
使用注解来描述http请求
1.URL参数的替换和query参数的支持
2.对象转化为请求体(如:JSON,protocol buffers等)
3.多重请求体和文件上传
以上都是官网描述
使用流程
- 权限
<uses-permission android:name="android.permission.INTERNET" />这个没什么好说的,没有网络权限什么都做不了
- 导包
compile 'com.squareup.retrofit2:retrofit:2.0.0'
compile 'com.squareup.retrofit2:converter-gson:2.0.0'
compile 'com.squareup.retrofit2:adapter-rxjava:2.0.0'
compile 'io.reactivex:rxjava:1.1.2'
compile 'io.reactivex:rxandroid:1.1.0'
这里几个库的含义是:我们使用retrofit2.0去进行网络请求操作,同时我们使用gson去进行数据解析,并且结合rxjava去进行相应的代码编写
- 基本配置
new Retrofit.Builder().addCallAdapterFactory(RxJavaCallAdapterFactory.create()).addConverterFactory(GsonConverterFactory.create()).client(okhttpBuilder.build()).baseUrl(baseUrl).build();这段就是使用RxJava,利用gson做解析(这边解析器可以设置注入Jackson之类的,甚至可以自定义),http引擎框架是okhttp
- API说明
Retrofit需要通过注解请求方法以及请求参数来表明应该如何去进行一个Http请求,目前内置了5种注解方式GET、POST、PUT、DELETE以及HEAD。同时资源的相对URL要在注解中明确的指出。比如请求方法
@Get("/a/b")- api使用
配置都OK之后,现在就开始写URL接口了。
案例1
假设有这么一个请求
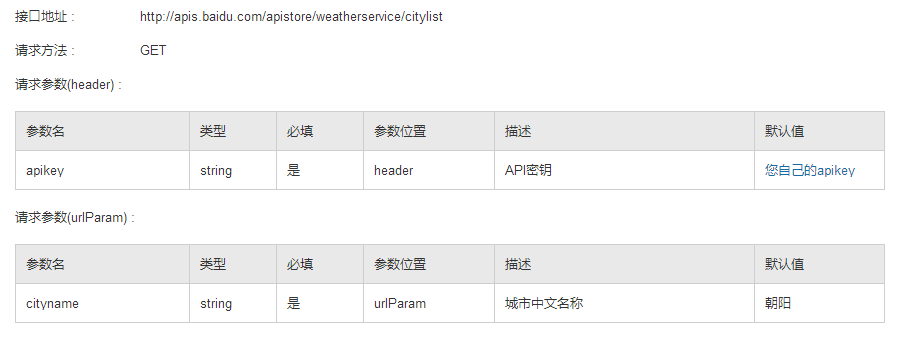
看看这个GET请求,有header也有urlParam。我们可以使用@Header对header部分进行描述,后面使用@Query去添加每一个跟随urlParam
@GET("weatherservice/cityname")
Observable<WeatherModel> getWeatherModels(@Header("apikey") String apikey, @Query("cityname") String cityname);同时如果你觉得一个一个的@Query写的有点烦,Retrofit支持使用@QueryMap,将请求的urlParam都存储在一个Map里
案例2
假设有这么一个请求,来自gankio

看看这个GET请求,跟之前的区别在于,他没有urlParam,但是参数是在url里面,这个时候我们就要采用动态替换url里面的参数的方法,如何做呢?用{}来表明url中的哪部分参数需要替换,相应的参数用@Path来注解同样的字符串
@GET("{type}/{pagenum}/{page}")
public Observable<GankioModel> getGankioModels(@Path("type") String type, @Path("pagenum") int pagenum, @Path("page") int page);
案例3
假设有这么一个请求,
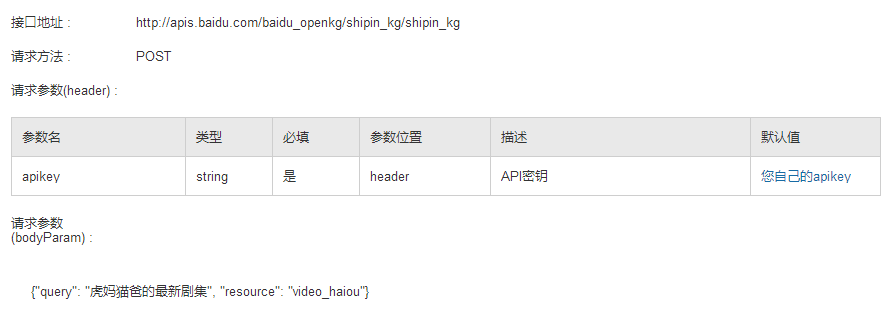
看看这个post请求,与之前的get请求基本类似,只不过请求参数在bodyparams里面了,这个也很简单,通过@Body注解来指定一个方法作为HTTP请求主体
@POST("shipin_kg/shipin_kg")
public Observable<MovieModel> getMovieLists(@Header("apikey") String apikey, @Body MoviePostModel postModel);
案例4
我们在post请求的时候会遇到一种情况就是content-type被指定为某一种格式了
如果服务端告诉你,我们的请求一定要用x-www-form-urlencoded,那么之前说的那种@body就不起作用了,这个时候我们@FormUrlEncoded去表明这个content-type类型,同时要用@Field去处理每一个键值对
@FormUrlEncoded
@POST("product_tool/tool/stagequan")
Observable<ResponseModel> upload(@FieldMap Map<String, String> params);
当然一个个写@Field也很烦,可以直接用@FieldMap去统一用map来处理
案例5
上传文件时候content-type一般都是multipart/form-data,所以这边要加上 @Multipart 注解,同时每个请求部分需要使用 @Part 来注解。这边用七牛上传文件来说明
@Multipart
@POST("http://upload.qiniu.com/")
Call<ResponseBody> uploadImage(@PartMap Map<String, RequestBody> params);同样使用了@PartMap
来看看RequestBody是怎么创建的
public static RequestBody create(final MediaType contentType, final File file)
public static RequestBody create(MediaType contentType, String content)
public static RequestBody create(final MediaType contentType, final byte[] content)
找了3个基本方法,它是为了告诉我们,你可以通过contentType以及内容组成任意一个RequestBody对象
RequestBody body = RequestBody.create(MediaType.parse("image/jpeg"), new File(Environment.getExternalStorageDirectory().getPath() + "/PictureTest/saveTemp.jpg"));
params.put("file", body);
params.put("token", RequestBody.create(MediaType.parse("text/plain"), token));
params.put("x:jsonbody", RequestBody.create(MediaType.parse("text/plain"), "{}"));
案例6
刚才看过了上传,现在来看看下载。这边只要借鉴了小凳子提供的下载方法
一般情况下retrofit是将整个文件都读进内存里面的,这样会造成OOM,所以大文件下载需使用@Streaming,同时我们也需要使用动态地址以便于下载不同的文件,这边使用@Url来填充
@Streaming
@GET
Call<ResponseBody> downloadFileWithFixedUrl(@Url String url);
剩下的就是保存文件了
Response<ResponseBody> response=api.downloadFileWithFixedUrl("http://7b1g8u.com1.z0.glb.clouddn.com/app_newkey_release_8_4.apk").execute();
try {
    if (response != null && response.isSuccessful()) {
        //文件总长度
        long fileSize = response.body().contentLength();
        long fileSizeDownloaded = 0;
        is = response.body().byteStream();
        File file = new File(Environment.getExternalStorageDirectory().getPath() + File.separator + "app_newkey_release_8_4.apk");
        if (file.exists()) {
            file.delete();
        } else {
            file.createNewFile();
        }
        fos = new FileOutputStream(file);
        int count = 0;
        byte[] buffer = new byte[1024];
        while ((count = is.read(buffer)) != -1) {
            fos.write(buffer, 0, count);
            fileSizeDownloaded += count;
            subscriber.onNext("file download: " + fileSizeDownloaded + " of " + fileSize);
        }
        fos.flush();
        subscriber.onCompleted();
    } else {
        subscriber.onError(new Exception("接口请求异常"));
    }
} catch (Exception e) {
    subscriber.onError(e);
} finally {
    if (is != null) {
        try {
            is.close();
        } catch (IOException e) {
            e.printStackTrace();
        }
    }
    if (fos != null) {
        try {
            fos.close();
        } catch (IOException e) {
            e.printStackTrace();
        }
    }
}
具体使用
无论你是何种请求方式,在app上面调用的方式基本上都是差不多的,我就拿第一个天气预报的接口加以说明
WeatherApi api = Retrofit2Utils.getInstance(getApplicationContext()).enableCache(true).getRetrofit("http://apis.baidu.com/apistore/").create(WeatherApi.class);
subscription = api.getWeatherModels("a7802d983b3d58ed6e70ed71bb0c7f14", "南京")
       .subscribeOn(Schedulers.io())
       .observeOn(AndroidSchedulers.mainThread())
       .unsubscribeOn(AndroidSchedulers.mainThread())
       .subscribe(new Subscriber<WeatherModel>() {
           @Override
           public void onCompleted() {

           }

           @Override
           public void onError(Throwable e) {

           }

           @Override
           public void onNext(WeatherModel weatherModel) {
               if (!subscription.isUnsubscribed()) {
                   Log.d("MainActivity", (weatherModel.getRetData().getCity() + " " + weatherModel.getRetData().getDate() + "-" + weatherModel.getRetData().getTime() + " " + weatherModel.getRetData().getWeather()));
               }
           }
       });
我这里使用了缓存操作,这个后面会加以说明。同时使用了Rxjava对请求的线程切换以及对返回结果进行调度
缓存
可以通过这篇文章Retrofit 源码解读之离线缓存策略的实现学习到Retrofit缓存的一些知识,真正实践时我是在这里发现如何使用的Github
public class CacheInterceptor implements Interceptor {
    @Override
    public Response intercept(Interceptor.Chain chain) throws IOException {
        Request request = chain.request();
        //如果没有网络,则启用 FORCE_CACHE
        if(!isNetworkConnected()) {
            request = request.newBuilder()
                    .cacheControl(CacheControl.FORCE_CACHE)
                    .build();
        }

        Response originalResponse = chain.proceed(request);
        if(isNetworkConnected()) {
            //有网的时候读接口上的@Headers里的配置
            String cacheControl = request.cacheControl().toString();
            return originalResponse.newBuilder()
                    .header("Cache-Control", cacheControl)
                    .removeHeader("Pragma")
                    .build();
        } else {
            return originalResponse.newBuilder()
                    .header("Cache-Control", "public, only-if-cached, max-stale=3600")
                    .removeHeader("Pragma")
                    .build();
        }
    }

    public static boolean isNetworkConnected() {
        Context context = Retrofit2Utils.context;
        if (context != null) {
            ConnectivityManager mConnectivityManager = (ConnectivityManager) context.getSystemService(Context.CONNECTIVITY_SERVICE);
            NetworkInfo mNetworkInfo = mConnectivityManager.getActiveNetworkInfo();
            if (mNetworkInfo != null) {
                return mNetworkInfo.isAvailable();
            }
        }
        return false;
    }
}


 224
224

 被折叠的 条评论
为什么被折叠?
被折叠的 条评论
为什么被折叠?
 到【灌水乐园】发言


