


    //获取指定的构造器

    try {

        //获取指定的构造器;因为参数要传入原类的属性,所以用String.class 也是一种“类名.class”的方式

        Constructor<Dog> constructor = dogClass.getConstructor(String.class, int.class, String.class);

        //调用带参数的构造器来实例化对象,因为有参所以这里newInstance()需要传入具体的参数

        Dog dog = constructor.newInstance("haha", 3, "white");


    } catch (NoSuchMethodException e) {

        e.printStackTrace();

    } catch (IllegalAccessException e) {

        e.printStackTrace();

    } catch (InstantiationException e) {

        e.printStackTrace();

    } catch (InvocationTargetException e) {

        e.printStackTrace();

    }


}


//获取属性

@Test

public void test3(){

    Class<Dog> dogClass = Dog.class;

    //获取目标类的所有属性的的一个抽象对象,返回的是一个数组;且这种只能获取公有的属性

    Field[] fields = dogClass.getFields();

    //System.out.println(fields.length);


    //获取私有的以及公有的属性;即所有的属性

    Field[] declaredFields = dogClass.getDeclaredFields();

    //System.out.println(declaredFields.length);


    int len = declaredFields.length;

    for (int i = 0; i <len ; i++) {

        int modifiers = declaredFields[i].getModifiers();   //获取每个属性的修饰符,但是这么获取的是修饰符的整数值(JVM自动给转换了)

        String modifilesName = Modifier.toString(modifiers); //因此可用修饰符的一个类Modifier.toString()方法再转换成字符串

        System.out.println(modifilesName+" "+declaredFields[i].getType()+" "+declaredFields[i].getName());


    }


}
}
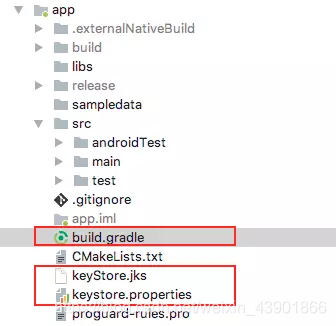
[]( )三、Android 配置打包签名信息的两种方法
==========================================================================================
目录结构如下:
**有2种方式:**
**第一种,直接配置:**
signingConfigs {
debug {
storeFile file("app/keystore.properties")

storePassword "111111"

keyAlias "key"

keyPassword "111111"
}
release {
storeFile file("app/keystore.properties")

storePassword "111111"

keyAlias "key"

keyPassword "111111"
}
}
buildTypes {
debug {
signingConfig signingConfigs.debug
}
release {
minifyEnabled false

proguardFiles getDefaultProguardFile('proguard-android.txt'), 'proguard-rules.pro'

signingConfig signingConfigs.release
}
}
第二种,通过读取文件


新建keystore.properties文件
storeFile=keyStore.jks
storePassword=123456
keyAlias=encrypt
keyPassword=123456
build.gradle配置
signingConfigs {
// 从keystore.properties文件中读取信息
def keystorePropertiesFile = rootProject.file("app/keystore.properties")
def keystoreProperties = new Properties()
keystoreProperties.load(new FileInputStream(keystorePropertiesFile))
debug {
println("======== debug mode: set key ========")
storeFile file(keystoreProperties['storeFile'])
storePassword keystoreProperties['storePassword']
keyAlias keystoreProperties['keyAlias']
keyPassword keystoreProperties['keyPassword']
}
release {
println("======== release mode: set key ========")
storeFile file(keystoreProperties['storeFile'])
storePassword keystoreProperties['storePassword']
keyAlias keystoreProperties['keyAlias']
keyPassword keystoreProperties['keyPassword']
}
}
buildTypes {
debug {
signingConfig signingConfigs.debug
}
release {
minifyEnabled false
proguardFiles getDefaultProguardFile('proguard-android.txt'), 'proguard-rules.pro'
signingConfig signingConfigs.release
}
}
```
[]( )四、Hook动态注入代码
===============================================================================
Hook机制是回调机制的一种,普通的回调是静态的,我们必须提前写好回调接口;而Hook机制在Java中则可以利用反射,针对切入点(通常是一个成员变量),采用替换的手段,使代码在运行时改变,听起来有些抽象,下面简单介绍下,然后我看代码。
寻找适合Hook点,它应该是一个成员变量,并且应该在我们需要注入的方法中调用过它的方法,或者使用了它的的值;
创建继承自Hook点的对象的子类,根据需求修改其相应的方法;
使用反射将我们自己创建的对象替换对象实例中的对象,达到偷梁换柱的目的。
```
public class Hero {
private Weapon weaponMain;
public Hero(Weapon weaponMain) {
this.weaponMain = weaponMain;
}
public void attack(){
weaponMain.attack();
}
}
public class Weapon {
int damage = 10;
public void attack(){
System.out.println(String.format("对目标造成 %d 点伤害",damage));
}
}
public class Game{
public static void main(String[] args){
Hero hero = new Hero(new Weapon());
hero.attack();
}
}
//对于上面这段程序,游戏对我们隐藏了Weapon的伤害值,但现在我们想要在每次攻击的时候知道这个伤害值是多少。
//下面看看使用Hook机制如何来实现。
//首先我们通过观察,发现切入点就是weaponMain,我们要对它下手。
//创建一个Weapon的复制品WeaponHook,我们需要用自己的人WeaponHook打入内部。
//WeaponHook一切看起来都和Weapon那么相似,但是我们给它留了一个后门,使得我们可以进行监控。
public class WeaponHook extends Weapon{
private OnUseWeaponAttackListener onUseWeaponAttackListener;
@Override
public void attack(){
super.attack();
if (onUseWeaponAttackListener != null){
onUseWeaponAttackListener.onUseWeaponAttack(damage);
}
}
public void setOnUseWeaponAttackListener(OnUseWeaponAttackListener onUseWeaponAttackListener) {
this.onUseWeaponAttackListener = onUseWeaponAttackListener;
}
//这就是我们的后门
public static interface OnUseWeaponAttackListener {
int onUseWeaponAttack(int damage);
}
}
//下面看看如何来进行“偷天换日”
public class Game{
public static void main(String[] args){
Hero hero = new Hero(new Weapon());
try {
Field weapon = ReflectUtils.getVariable(hero.getClass(), "weaponMain");
weapon.setAccessible(true);
Weapon weaponHook = new WeaponHook();
((WeaponHook) weaponHook).setOnUseWeaponAttackListener(damage -> {
//通过后门进行操作,这其实就是我们注入的代码
System.out.println("damage = " + damage);
return damage;
});
weapon.set(hero, weaponHook); //tou tian偷天换日
hero.attack();
} catch (NoSuchFieldException e) {
e.printStackTrace();
} catch (IllegalAccessException e) {
e.printStackTrace();
}Hero hero = new Hero(new Weapon());
hero.attack();
# 学习分享,共勉
**Android高级架构师进阶之路**
**[CodeChina开源项目:《Android学习笔记总结+移动架构视频+大厂面试真题+项目实战源码》](https://codechina.csdn.net/m0_60958482/android_p7)**
题外话,我在阿里工作多年,深知技术改革和创新的方向,Android开发以其美观、快速、高效、开放等优势迅速俘获人心,但很多Android兴趣爱好者所需的进阶学习资料确实不太系统,完整。今天我把我搜集和整理的这份学习资料分享给有需要的人
* **Android进阶知识体系学习脑图**

* **Android进阶高级工程师学习全套手册**

* **对标Android阿里P7,年薪50w+学习视频**

* **大厂内部Android高频面试题,以及面试经历**
项目实战源码》](https://codechina.csdn.net/m0_60958482/android_p7)**
题外话,我在阿里工作多年,深知技术改革和创新的方向,Android开发以其美观、快速、高效、开放等优势迅速俘获人心,但很多Android兴趣爱好者所需的进阶学习资料确实不太系统,完整。今天我把我搜集和整理的这份学习资料分享给有需要的人
* **Android进阶知识体系学习脑图**
[外链图片转存中...(img-yxIoDzAt-1631094514661)]
* **Android进阶高级工程师学习全套手册**
[外链图片转存中...(img-2BbxhTJe-1631094514663)]
* **对标Android阿里P7,年薪50w+学习视频**
[外链图片转存中...(img-8ygWa1aZ-1631094514664)]
* **大厂内部Android高频面试题,以及面试经历**


 511
511


 被折叠的 条评论
为什么被折叠?
被折叠的 条评论
为什么被折叠?
 到【灌水乐园】发言


