


android.util.Log常用的方法有以下5个:Log.v() Log.d() Log.i() Log.w() 以及 Log.e() 。根据首字母对应VERBOSE,DEBUG,INFO, WARN,ERROR。
1、Log.v 的调试颜色为黑色的,任何消息都会输出,这里的v代表verbose啰嗦的意思,平时使用就是Log.v("","");
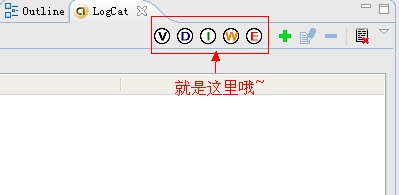
2、Log.d的输出颜色是蓝色的,仅输出debug调试的意思,但他会输出上层的信息,过滤起来可以通过DDMS的Logcat标签来选择.
3、Log.i的输出为绿色,一般提示性的消息information,它不会输出Log.v和Log.d的信息,但会显示i、w和e的信息
4、Log.w的意思为橙色,可以看作为warning警告,一般需要我们注意优化Android代码,同时选择它后还会输出Log.e的信息。
5、Log.e为红色,可以想到error错误,这里仅显示红色的错误信息,这些错误就需要我们认真的分析,查看栈的信息了。
下面是我做的一个简单的LogDemo(Step By Step):
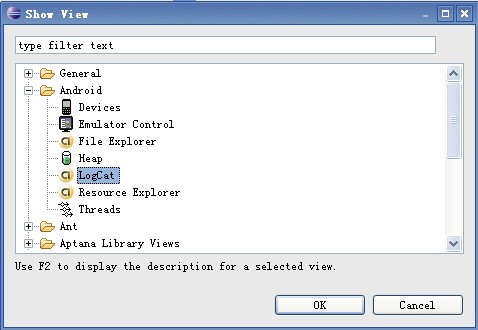
Step 1:准备工作(打开LogCat视窗).
启动Eclipse,在Window->Show View会出来一个对话框,当我们点击Ok按钮时,会在控制台窗口出现LogCat视窗.如下图:
Step 2:新建一个Android工程,命名为LogDemo.
Step 3:设计UI界面,我们在这里就加了一个Button按钮(点击按钮出现Log日志信息).
Main.xml代码如下:
<?xml version="1.0" encoding="utf-8"?>
<LinearLayout xmlns:android="http://schemas.android.com/apk/res/android"
android:orientation="vertical"
android:layout_width="fill_parent"
android:layout_height="fill_parent"
>
<TextView
android:layout_width="fill_parent"
android:layout_height="wrap_content"
android:text="@string/hello"
/>
<Button
android:id="@+id/bt"
android:layout_width="wrap_content"
android:layout_height="wrap_content"
android:text="Presse Me Look Log"
/>
</LinearLayout>
Step 4:设计主类LogDemo.java,代码如下:
package com.android.test;
import android.app.Activity;
import android.os.Bundle;
import android.util.Log;
import android.view.View;
import android.widget.Button;
public class LogDemo extends Activity {
private static final String ACTIVITY_TAG="LogDemo";
private Button bt;
public void onCreate(Bundle savedInstanceState) {
super.onCreate(savedInstanceState);
setContentView(R.layout.main);
//通过findViewById找到Button资源
bt = (Button)findViewById(R.id.bt);
//增加事件响应
bt.setOnClickListener(new Button.OnClickListener(){
@Override
public void onClick(View v) {
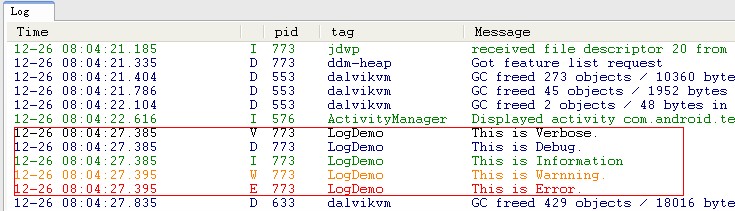
Log.v(LogDemo.ACTIVITY_TAG, "This is Verbose.");
Log.d(LogDemo.ACTIVITY_TAG, "This is Debug.");
Log.i(LogDemo.ACTIVITY_TAG, "This is Information");
Log.w(LogDemo.ACTIVITY_TAG, "This is Warnning.");
Log.e(LogDemo.ACTIVITY_TAG, "This is Error.");
}
});
}
}
Step 5:运行LogDemo工程,效果如下:
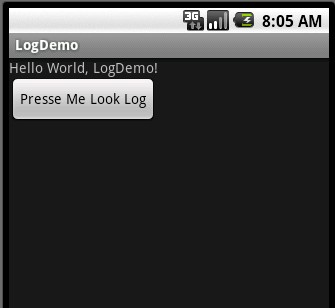
当我们点击按钮时,会触发事件,在Logcat视窗下有如下效果:
如何统一控制 Log 的输出和关闭。
一般我们会在 debug 的版本中输出 log,而在 release 版本的产品中关闭 log 的输出。这一点是如何做到的呢,下面来看代码。
在你当前工作的工程中建一个新的类文件 Log.java 。这个类文件放在当前工作的包中,(也可以单独建一个包来放这个类文件)
在下面的类文件中,我们把 android中原始的10个 log 函数重新包了一层。定义了一个常量 DEBUG ,当 DEBUG 为 true 时才输出 Log 信息
[java]package com.android.gallery3d.util;
public class Log {
private static final boolean DEBUG = true;
public static void v(String tag, String msg) {
if(DEBUG) {
android.util.Log.v(tag, msg);
}
}
public static void v(String tag, String msg, Throwable tr) {
if(DEBUG) {
android.util.Log.v(tag, msg, tr);
}
}
public static void d(String tag, String msg) {
if(DEBUG) {
android.util.Log.d(tag, msg);
}
}
public static void d(String tag, String msg, Throwable tr) {
if(DEBUG) {
android.util.Log.d(tag, msg, tr);
}
}
public static void i(String tag, String msg) {
if(DEBUG) {
android.util.Log.i(tag, msg);
}
}
public static void i(String tag, String msg, Throwable tr) {
if(DEBUG) {
android.util.Log.i(tag, msg, tr);
}
}
public static void w(String tag, String msg) {
if(DEBUG) {
android.util.Log.w(tag, msg);
}
}
public static void w(String tag, String msg, Throwable tr) {
if(DEBUG) {
android.util.Log.w(tag, msg, tr);
}
}
public static void w(String tag, Throwable tr) {
if(DEBUG) {
android.util.Log.w(tag, tr);
}
}
public static void e(String tag, String msg) {
if(DEBUG) {
android.util.Log.e(tag, msg);
}
}
public static void e(String tag, String msg, Throwable tr) {
if(DEBUG) {
android.util.Log.e(tag, msg, tr);
}
}
}
package com.android.gallery3d.util;
public class Log {
private static final boolean DEBUG = true;
public static void v(String tag, String msg) {
if(DEBUG) {
android.util.Log.v(tag, msg);
}
}
public static void v(String tag, String msg, Throwable tr) {
if(DEBUG) {
android.util.Log.v(tag, msg, tr);
}
}
public static void d(String tag, String msg) {
if(DEBUG) {
android.util.Log.d(tag, msg);
}
}
public static void d(String tag, String msg, Throwable tr) {
if(DEBUG) {
android.util.Log.d(tag, msg, tr);
}
}
public static void i(String tag, String msg) {
if(DEBUG) {
android.util.Log.i(tag, msg);
}
}
public static void i(String tag, String msg, Throwable tr) {
if(DEBUG) {
android.util.Log.i(tag, msg, tr);
}
}
public static void w(String tag, String msg) {
if(DEBUG) {
android.util.Log.w(tag, msg);
}
}
public static void w(String tag, String msg, Throwable tr) {
if(DEBUG) {
android.util.Log.w(tag, msg, tr);
}
}
public static void w(String tag, Throwable tr) {
if(DEBUG) {
android.util.Log.w(tag, tr);
}
}
public static void e(String tag, String msg) {
if(DEBUG) {
android.util.Log.e(tag, msg);
}
}
public static void e(String tag, String msg, Throwable tr) {
if(DEBUG) {
android.util.Log.e(tag, msg, tr);
}
}
}
而当前的包中可以使用 Log.v, Log.i, Log.w, Log.e, Log.d 来打 Log。
在其它的包中要打Log 也很简单,只要import 該类名就可以了。以上面的类文件为例,只要在其它包的类文件中 import com.android.gallery3d.util.Log;
就可以使用原来的 Log 函数来打 Log 了。
在Release 版本的软件上将 DEBUG 置为 false 即可关闭 Log 输出了。


 3939
3939


 被折叠的 条评论
为什么被折叠?
被折叠的 条评论
为什么被折叠?
 到【灌水乐园】发言


