


Dart汇总请点击这里
如果你不知道如何使用Future 请参考: Dart 异步模型
如果你不了解Dart的事件循环机制 请参考:Dart 事件循环
文章目录
同步代码和异步代码;
同步代码:就是一行行写下来的代码
异步代码:就是以Future等修饰的代码
这两类代码的不同
1.运行顺序不同
同步代码和异步代码运行的顺序是不同的:
先运行同步代码,在运行异步代码
复制代码就是,即使我异步代码写在最前面,同步代码写在最后面,我也是先运行后面的同步代码,同步代码都运行完后,在运行前面的异步代码。
一下代码的输出结果是什么?
import 'dart:async';
main() {
  print('main #1 of 2');
  scheduleMicrotask(() => print('microtask #1 of 2'));

  new Future.delayed(new Duration(seconds:1),
                     () => print('future #1 (delayed)'));
  new Future(() => print('future #2 of 3'));
  new Future(() => print('future #3 of 3'));

  scheduleMicrotask(() => print('microtask #2 of 2'));

  print('main #2 of 2');
}
main #1 of 2
main #2 of 2
microtask #1 of 2
microtask #2 of 2
future #2 of 3
future #3 of 3
future #1 (delayed)
2.运行的机制不同
异步代码是运行在event loop里的,event loop不断的从事件队列里取事件然后运行。
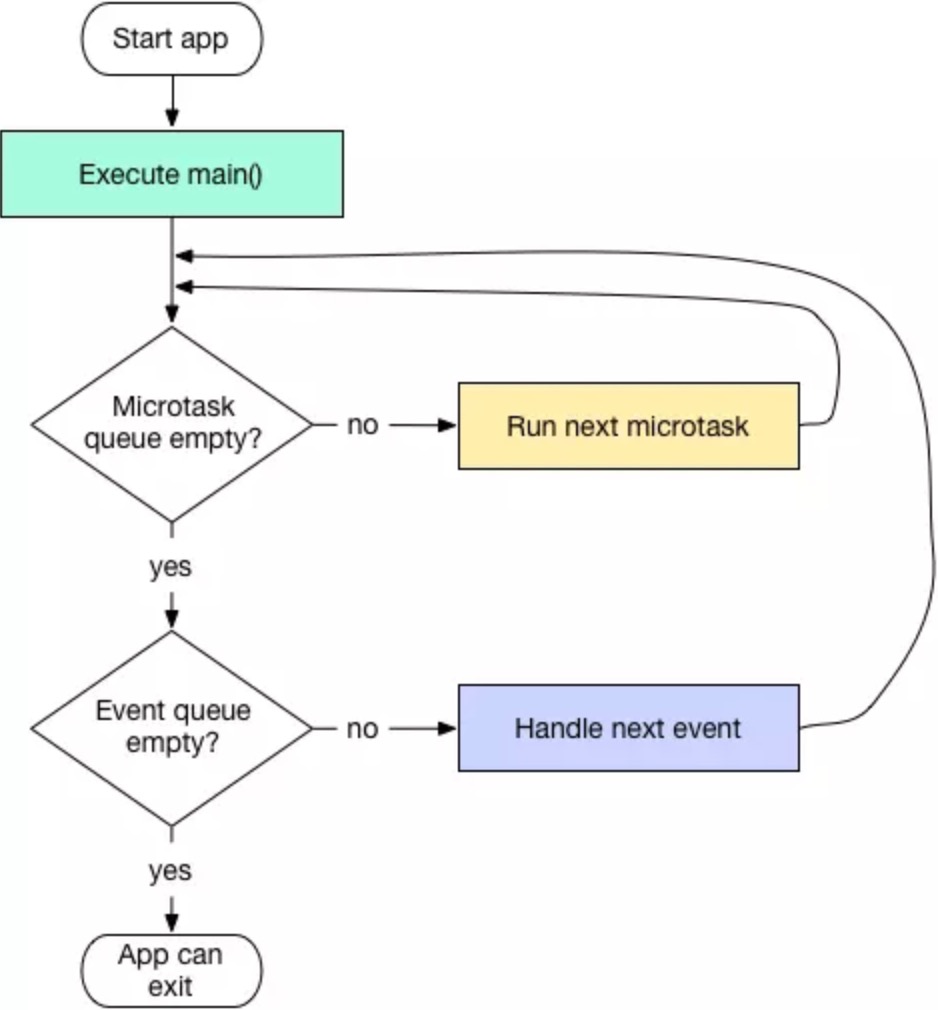
Dart事件循环执行如上图所示
- 先查看MicroTask队列是否为空,不是则先执行MicroTask队列
- 一个MicroTask执行完后,检查有没有下一个MicroTask,直到MicroTask队列为空,才去执行Event队列
- 在Evnet 队列取出一个事件处理完后,再次返回第一步,去检查MicroTask队列是否为空
注意:我们可以看出,将任务加入到MicroTask中可以被尽快执行,但也需要注意,当事件循环在处理MicroTask队列时,Event队列会被卡住,应用程序无法处理鼠标单击、I/O消息等等事件。
控制任务调度
将任务添加到MicroTask队列有两种方法
- 使用 scheduleMicrotask 方法添加
- 使用Future对象添加
import  'dart:async';
//我的任务队列
void  myTask(){
    print("this is my task");
}

void  main() {
    # 1. 使用 scheduleMicrotask 方法添加
    scheduleMicrotask(myTask);

    # 2. 使用Future对象添加
    new  Future.microtask(myTask);
}
将任务添加到Event队列
使用Future对象添加
import  'dart:async';
//我的任务
void  myTask(){
    print("this is my task");
}

void  main() {
 # 1. 使用Future对象添加
  new Future(myTask);
}
验证
import 'dart:async'

void main() {

  print('main Start');

  new Future((){
    print('this is my task');
  });

  new Future.microtask((){
    print('this is microtask');
  });

  print('main Stop');

}
main start
main stop
this is microtask
this is my task
可以看到,代码的运行顺序并不是按照我们的编写顺序来的,将任务添加到队列并不等于立刻执行,它们是异步执行的,当前main方法中的代码执行完之后,才会去执行队列中的任务,且MicroTask队列运行在Event队列之前。
使用合理的队列
有可能的还是尽量使用Future来向event队列添加事件。使用event队列可以保持microtask队列的简短,以此减少microtask的过度使用导致event队列的堵塞。
如果一个任务确实要在event队列的任何一个事件前完成,那么你应该尽量直接写在main方法中而不是使用这两个队列。如果你不能那么就用scheduleMicrotask来向microtask添加一个微任务。

通过链接的方式指定任务顺序
如果你的代码之间存在依赖,那么尽量让他们之间的依赖关系明确一点。明确的依赖关系可以很好的帮助其他开发者理解你的代码,并且可以让你的代码更稳定也更容易重构。
先来看看下面这段
错误的写法:
// 这样写错误的原因就是没有明确体现出设置变量和使用变量之间的依赖关系
future.then(...set an important variable...);
Timer.run(() {...use the important variable...});
正确的写法:
// 明确表现出了后者依赖前者设置的变量值
future.then(...set an important variable...)
  .then((_) {...use the important variable...});
为了表示明确的前后依赖关系,我们可以使用then()()来表明要使用变量就必须要等设置完这个变量。这里可以使用whenComplete()来代替then,它与then的不同点在于哪怕设置变量出现了异常也会被调用到。这个有点像java中的finally。
如果上面这个使用变量也要花费一段时间,那么可以考虑将其放入一个新的Future中:
future.then(...set an important variable...)
  .then((_) {new Future(() {...use the important variable...})});
使用一个新的Future可以给事件循环一个机会先去处理列队中的其他事件。
延时任务
如需要将任务延伸执行,则可使用Future.delayed方法
new  Future.delayed(new  Duration(seconds:1),(){
    print('task delayed');
});
表示在延迟时间到了之后将任务加入到Event队列。需要注意的是,这并不是准确的,万一前面有很耗时的任务,那么你的延迟任务不一定能准时运行。
import  'dart:async';
import  'dart:io';

void  main() {
    print("main start");

    new Future.delayed(new  Duration(seconds:1),(){
        print('task delayed');
    });

    new Future((){
        // 模拟耗时5秒
        sleep(Duration(seconds:5));
        print("5s task");
    });

    print("main stop");
}
运行结果:
main start
main stop
5s task
task delayed
从结果可以看出,delayed方法调用在前面,但是它显然并未直接将任务加入Event队列,而是需要等待1秒之后才会去将任务加入,但在这1秒之间,后面的new Future代码直接将一个耗时任务加入到了Event队列,这就直接导致写在前面的delayed任务在1秒后只能被加入到耗时任务之后,只有当前面耗时任务完成后,它才有机会得到执行。这种机制使得延迟任务变得不太可靠,你无法确定延迟任务到底在延迟多久之后被执行。
如何处理重量级任务
如果有必要可以使用isolate或worker
如果你想要完成一些重量级的任务,为了保证你应用可响应,你应该将任务添加到isolate或者worker中。isolate可能会运行在不同的进程或线程中.这取决于Dart的具体实现。那一般情况下你应该使用多少个isolate来完成你的工作呢?通常情况下可以根据你的cpu的个数来决定。
但你也可以使用超过cpu个数的isolate,前提是你的app能有一个好的架构。让不同的isolate来分担不同的代码块运行,但这前提是你能保证这些isolate之间没有数据的共享。
测试一下你的理解程度
目前为止你已经掌握了调度任务的基本知识,下面来测试一下你的理解程度。
问题1
下面这段代码的输出是什么?
import 'dart:async';
main() {
  print('main #1 of 2');
  scheduleMicrotask(() => print('microtask #1 of 2'));

  new Future.delayed(new Duration(seconds:1),
                     () => print('future #1 (delayed)'));
  new Future(() => print('future #2 of 3'));
  new Future(() => print('future #3 of 3'));

  scheduleMicrotask(() => print('microtask #2 of 2'));

  print('main #2 of 2');
}
main #1 of 2
main #2 of 2
microtask #1 of 2
microtask #2 of 2
future #2 of 3
future #3 of 3
future #1 (delayed)
上面的答案是否就是你所期望的呢?这段代码一共执行了三个分支:
main()方法
microtask队列
event队列(先new Future后new Future.delayed)
main方法中的普通代码都是同步执行的,所以肯定是main打印先全部打印出来,等main方法结束后会开始检查microtask中是否有任务,若有则执行,执行完继续检查microtask,直到microtask列队为空。所以接着打印的应该是microtask的打印。最后会去执行event队列。由于有一个使用的delay方法,所以它的打印应该是在最后的。
问题2
import 'dart:async';
main() {
  print('main #1 of 2');
  scheduleMicrotask(() => print('microtask #1 of 3'));

  new Future.delayed(new Duration(seconds:1),
      () => print('future #1 (delayed)'));

  new Future(() => print('future #2 of 4'))
      .then((_) => print('future #2a'))
      .then((_) {
        print('future #2b');
        scheduleMicrotask(() => print('microtask #0 (from future #2b)'));
      })
      .then((_) => print('future #2c'));

  scheduleMicrotask(() => print('microtask #2 of 3'));

  new Future(() => print('future #3 of 4'))
      .then((_) => new Future(
                   () => print('future #3a (a new future)')))
      .then((_) => print('future #3b'));

  new Future(() => print('future #4 of 4'));
  scheduleMicrotask(() => print('microtask #3 of 3'));
  print('main #2 of 2');
}
main #1 of 2
main #2 of 2
microtask #1 of 3
microtask #2 of 3
microtask #3 of 3
future #2 of 4
future #2a
future #2b
future #2c
microtask #0 (from future #2b)
future #3 of 4
future #4 of 4
future #3a (a new future)
future #3b
future #1 (delayed)
总结
以下有几点关于dart的事件循环机制需要牢记于心:
- Dart事件循环执行两个队列里的事件:event队列和microtask队列。
event队列的事件来自dart(future,timer,isolate message等)和系统(用户输入,I/O等)。 - 目前为止,microtask队列的事件只来自dart。
- 事件循环会优先清空microtask队列,然后才会去处理event队列。
- 当两个队列都清空后,dart就会退出。
- main方法,来自event队列和microtask队列的所有事件都运行在Dart的main isolate中。
当你要安排一个任务时,请遵守以下规则:
- 如果可以,尽量将任务放入event队列中。
- 使用Future的then方法或whenComplete方法来指定任务顺序。
- 为了保持你app的可响应性,尽量不要将大计算量的任务放入这两个队列。
- 大计算量的任务放入额外的isolate中。


 493
493

 被折叠的 条评论
为什么被折叠?
被折叠的 条评论
为什么被折叠?
 到【灌水乐园】发言


