


 本文详细介绍了Spring框架的启动逻辑、配置扫描、依赖注入、BeanPostProcessor和AOP模拟实现,以及Spring事务的相关概念,包括传播机制和隔离级别。
手写Spring框架
准备工作
- 准备一个空的工程
- 创建
spring的容器类,它是Spring IOC理念的实现,负责对象的实例化、对象和对象之间依赖关系配置、对象的销毁、对外提供对象的查找等操作,对象的整个生命周期都是由容器来控制。传统使用方法是传入一个spring的配置文件或配置类根据用户的配置来创建这个容器。
package com.spring;
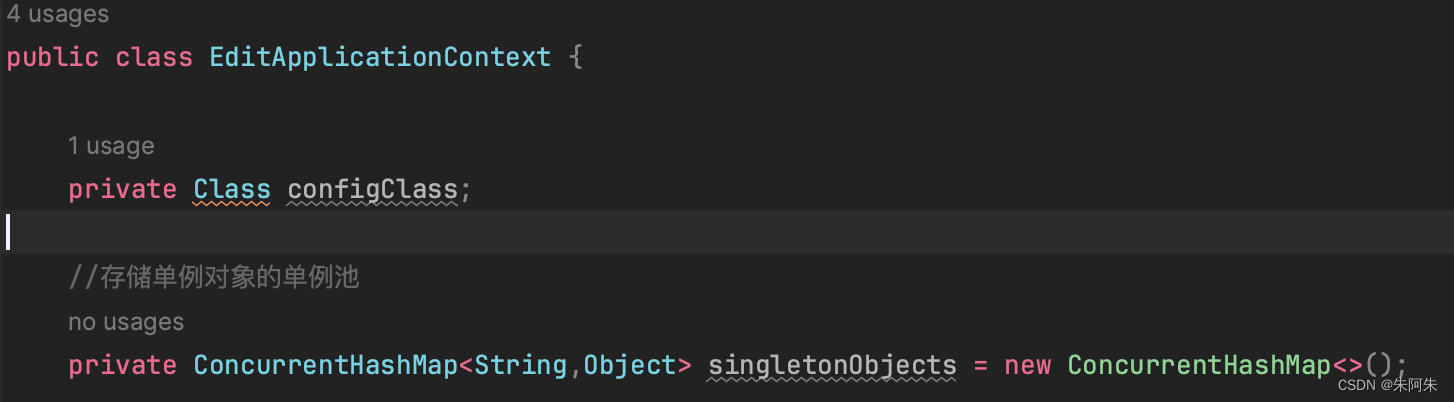
public class EditApplicationContext {
//传入配置类
private Class configClass;
public EditApplicationContext(Class configClass) {
this.configClass = configClass;
}
//定义根据别名获取类的方法
public Object getBean(String name){
return null;
}
}
- 定义一个配置类,相当于配置文件
package com.zedit;

import com.spring.ComponentScan;

//指定包扫描路径
@ComponentScan("com.zedit.service")
public class AppConfig {
}
- 如何定义包扫描路径,编写一个注解类
@Retention(RetentionPolicy.RUNTIME)
//规定只能写在类上
@Target(ElementType.TYPE)
public @interface ComponentScan {

    //接收属性值,指定扫描路径
    String value() default "";
}
- 定义一个Component注解,它的作用就是将类交给spring容器,实现bean的注入
@Retention(RetentionPolicy.RUNTIME)
//规定只能写在类上
@Target(ElementType.TYPE)
public @interface Component {

    //提供默认值
    String value() default "";
}
Spring启动和扫描逻辑实现
- 传入配置类对于spring而言 它只需要判断配置类有没有它提供的注解,获取扫描路径值,根据路径值
- 通过类加载器加载目录下的类,首先获取所有文件,然后获取全限定类名
public EditApplicationContext(Class configClass) {
    this.configClass = configClass;

    //解析配置类
    //Component注解->扫描路径->扫描

    ComponentScan declaredAnnotation = (ComponentScan)configClass.getDeclaredAnnotation(ComponentScan.class);
    String path = declaredAnnotation.value();
    // 全限定类名加工成能用的路径名 "com/xuhua/service"
    path = path.replace(".", "/");

    ClassLoader classLoader = EditApplicationContext.class.getClassLoader();
    //根据AppClassLoader加载器目录获取 classPath目录下中的‘path’目录下的资源
    URL resource = classLoader.getResource(path);
    //判断是否是文件夹而不是单个文件
    if (file.isDirectory()) {
        File[] files = file.listFiles();
        for (File f : files) {
            String fileName = f.getAbsolutePath();
            // /Users/zhuxuhua/Desktop/project/spring-edit/target/classes/com/zedit/service/XxxUtils.class
            // 转换成 com.zedit.service.XxxUtils
            if (fileName.endsWith(".class")) {
                String className = fileName.substring(fileName.indexOf("com"), fileName.indexOf(".class"));
                className = className.replace("/", ".");
                try {
                	//根据全限定类名加载类
                    Class<?> clazz = classLoader.loadClass(className);
                    //判断扫描到的类是不是一个bean注解
                    if (clazz.isAnnotationPresent(Component.class)){

                    }

                } catch (ClassNotFoundException e) {
                    throw new RuntimeException(e);
                }
            }
        }
    }
}
- 根据
@Scope注解判断bean是单例还是原型
@Retention(RetentionPolicy.RUNTIME)
@Target(ElementType.TYPE)
public @interface Scope {
    String value();
}
- 定义单例池
- 由于在使用bean和初始化bean时都要去解析bean的定义与他的注解,如果不做设计每次的解析就会显得冗余繁琐,所以spring在Context扫描阶段定义了一个BeanDefinition定义类,它记录了bean的各种信息,先将扫描到的bean填入BeanDefinitionMap随后处理单例对象
//存储单例对象的单例池
private ConcurrentHashMap<String,Object> singletonObjects = new ConcurrentHashMap<>();
//存储所有bean的定义
private ConcurrentHashMap<String,BeanDefinition> beanDefinitionMap = new ConcurrentHashMap<>();
-------
try {

   Class<?> clazz = classLoader.loadClass(className);
   if (clazz.isAnnotationPresent(Component.class)) {
       //表示当前这个类有Component注解是一个bean对象
       //解析类,判断scope注解是单例的bean还是 prototype的bean
       //每扫描到一个bean就定义一个BeanDefinition对象
       Component componentAnnotation = clazz.getDeclaredAnnotation(Component.class);
       String beanName = componentAnnotation.value();
       BeanDefinition beanDefinition = new BeanDefinition();

       //spring bean默认为多例模式
       beanDefinition.setScpoe("prototype");
       if (clazz.isAnnotationPresent(Scope.class)){
           Scope annotation = clazz.getAnnotation(Scope.class);
           String value = annotation.value();
           if (value.equals("singleton")){
               beanDefinition.setScpoe("singleton");
           }
       }

       beanDefinition.setClazz(clazz);
		//扫描到的所有bean都存入这个map
       beanDefinitionMap.put(beanName,beanDefinition);

   }

} catch (ClassNotFoundException e) {
   throw new RuntimeException(e);
}
- 扫描完后根据存储的beanDefinitionMap填入单例池
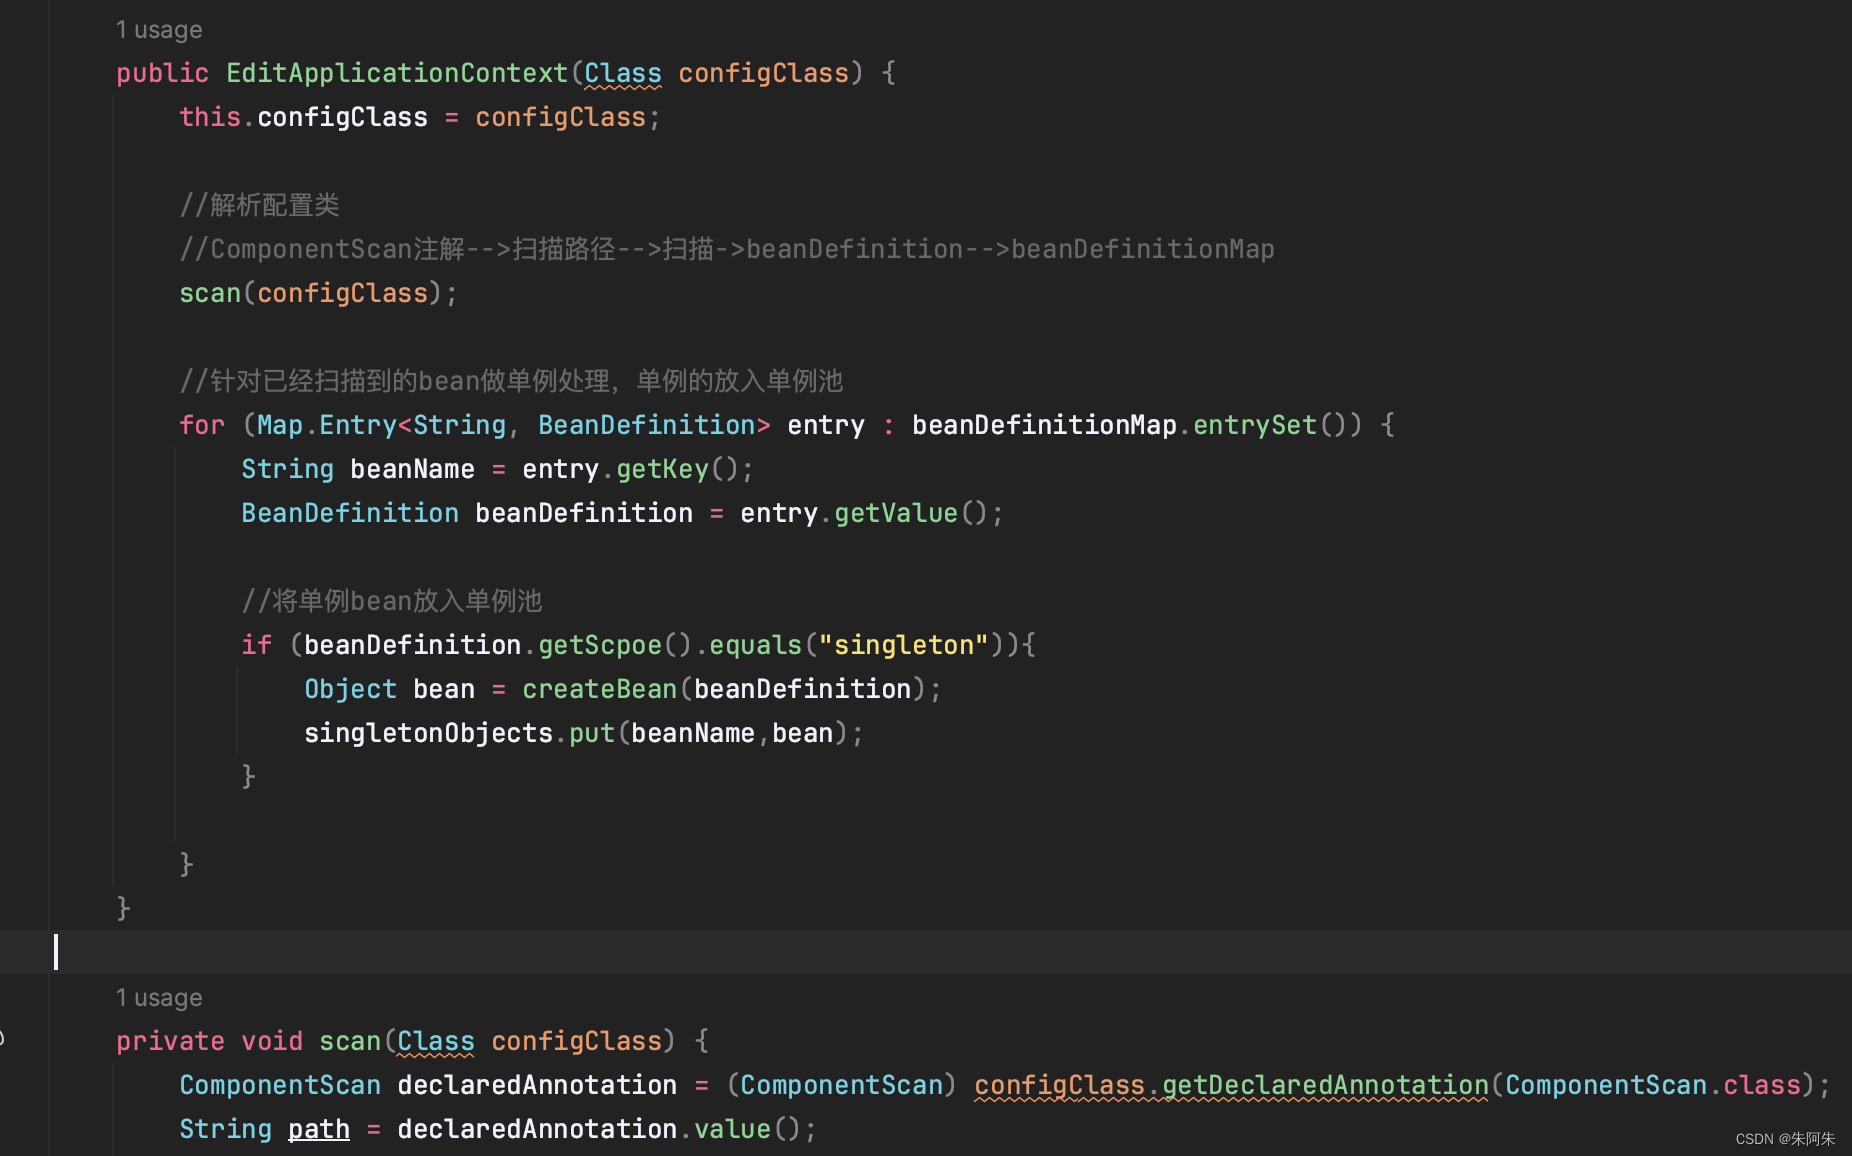
- 获取bean方法中判断是否是单例bean,如果是直接从单例池中取,如果不是则创建bean
public Object getBean(String beanName){
    //获取bean 如果map中没有就抛出异常,说明她不是一个bean,没有被扫描到
    if (beanDefinitionMap.containsKey(beanName)){
        BeanDefinition beanDefinition = beanDefinitionMap.get(beanName);
        //判断scope值,单例直接从单例池中取
        if (beanDefinition.getScpoe().equals("singleton")){
            return singletonObjects.get(beanName);
        }else {
            //原型bean每次从新创建
            return createBean(beanDefinition);
        }
    }else {
        throw new NullPointerException();
    }

}

//用beanDefinition中的clazz信息通过反射创建bean
public Object createBean(BeanDefinition beanDefinition){
    Class clazz = beanDefinition.getClazz();
    try {
        Object instance = clazz.getDeclaredConstructor().newInstance();
        return instance;
    } catch (InstantiationException e) {
        throw new RuntimeException(e);
    } catch (IllegalAccessException e) {
        throw new RuntimeException(e);
    } catch (InvocationTargetException e) {
        throw new RuntimeException(e);
    } catch (NoSuchMethodException e) {
        throw new RuntimeException(e);
    }
}
依赖注入的实现
首先注解,能标注在成员变量上
Retention(RetentionPolicy.RUNTIME)
@Target(ElementType.FIELD)
public @interface Autowired {

}
@Component("userService")
@Scope("singleton")
public class UserService {

    @Autowired
    private OrderService orderService;


    public void test(){
        System.out.println(orderService);
    }
}
依赖注解的实现原理就是在启动扫描初始化阶段 spring创建bean时 给@Autowired的成员变量赋值
    //用beanDefinition中的clazz信息通过反射创建bean
    public Object createBean(BeanDefinition beanDefinition){
        Class clazz = beanDefinition.getClazz();
        try {
            Object instance = clazz.getDeclaredConstructor().newInstance();

            //依赖注入实现原理
            for (Field declaredField : clazz.getDeclaredFields()) {
                if (declaredField.isAnnotationPresent(Autowired.class)){
                    Object bean = getBean(declaredField.getName());
                    declaredField.setAccessible(true);
                    declaredField.set(instance,bean);
                }
            }

            return instance;
        } catch (InstantiationException e) {
            throw new RuntimeException(e);
        } catch (IllegalAccessException e) {
            throw new RuntimeException(e);
        } catch (InvocationTargetException e) {
            throw new RuntimeException(e);
        } catch (NoSuchMethodException e) {
            throw new RuntimeException(e);
        }
    }

Aware回调模拟实现和初始化机制模拟实现
需要回调的实现接口方法,在初始化阶段bean的创建阶段将beanName通过反射设置值
//回调接口
public interface BeanNameAware {
    void setBeanName(String name);
}

-------

public interface InitializingBean {
    void afterPropertySet();
}
@Component("userService")
@Scope("singleton")
public class UserService implements BeanNameAware, InitializingBean {

    @Autowired
    private OrderService orderService;

    private String beanName;

    @Override
    public void setBeanName(String name) {
        beanName = name;
    }

    @Override
    public void afterPropertySet() {
        System.out.println("初始化");
    }
    //用beanDefinition中的clazz信息通过反射创建bean
    public Object createBean(String beanName,BeanDefinition beanDefinition){
        Class clazz = beanDefinition.getClazz();
        try {
            Object instance = clazz.getDeclaredConstructor().newInstance();

            //依赖注入
            for (Field declaredField : clazz.getDeclaredFields()) {
                if (declaredField.isAnnotationPresent(Autowired.class)){
                    Object bean = getBean(declaredField.getName());
                    declaredField.setAccessible(true);
                    declaredField.set(instance,bean);
                }
            }
			//aware 回调
            if (instance instanceof BeanNameAware){
                ((BeanNameAware) instance).setBeanName(beanName);
            }
			//反射调用初始化bean的方法
            if (instance instanceof InitializingBean){
                ((InitializingBean) instance).afterPropertySet();
            }
            return instance;
        } catch (InstantiationException e) {
            throw new RuntimeException(e);
        } catch (IllegalAccessException e) {
            throw new RuntimeException(e);
        } catch (InvocationTargetException e) {
            throw new RuntimeException(e);
        } catch (NoSuchMethodException e) {
            throw new RuntimeException(e);
        }
    }
BeanPostProcessor (Bean的后置处理器) 模拟实现
spring的扩展机制,在bean初始化前后调用
//定义接口  有初始化前后两种操作,也可以添加更多
public interface BeanPostProcessor {

    Object postProcessorBeforeInitialization(Object bean,String beanName);

    Object postProcessorAfterInitialization(Object bean,String beanName);
}

----------------

//自定义 BeanPostProcessor 实现BeanPostProcessor接口
@Component
public class ZhuZhuBanPostProcessor implements BeanPostProcessor {
    @Override
    public Object postProcessorBeforeInitialization(Object bean, String beanName) {
        System.out.println("初始化前");
        //定制操作
        if (beanName.equals("userService")) {
            System.out.println("userService 初始化前");
        }
        return null;
    }

    @Override
    public Object postProcessorAfterInitialization(Object bean, String beanName) {
        System.out.println("初始化后");
        return null;
    }
}

--------

//同其他bean一样在扫描时 加载 判断是否实现了BeanPostProcessor,如果实现了就放入 专门的List存储

//scan方法中  判断此类是否实现了BeanPostProcessor,并存入list
if (BeanPostProcessor.class.isAssignableFrom(clazz)) {
    BeanPostProcessor beanPostProcessorInstance
    = (BeanPostProcessor) clazz.getDeclaredConstructor().newInstance();
    beanPostProcessorList.add(beanPostProcessorInstance);
}

---------

//createBean方法中

//createBean 时调  初始化前调用
for (BeanPostProcessor beanPostProcessor : beanPostProcessorList) {
    //在调用初始化方法前 重新赋值对象
    instance = beanPostProcessor.postProcessorBeforeInitialization(instance,beanName);
}

//初始化
if (instance instanceof InitializingBean){
    try {
        ((InitializingBean) instance).afterPropertySet();
    } catch (Exception e) {
        throw new RuntimeException(e);
    }
}

//createBean 时调  初始化后调用
for (BeanPostProcessor beanPostProcessor : beanPostProcessorList) {
    //在调用初始化方法后 重新赋值对象
    instance = beanPostProcessor.postProcessorAfterInitialization(instance, beanName);
}
Spring AOP 模拟实现
使用jdk动态代理 实现
@Component("userService")
@Scope("singleton")
public class UserServiceImpl implements UserService{

    @Autowired
    private OrderService orderService;

    private String beanName;

    @Override
    public void setBeanName(String name) {
        beanName = name;
    }

    @Override
    public void afterPropertySet() {
        System.out.println("初始化");
    }

    @Override
    public void test(){
        System.out.println(orderService+"orderService test");
        System.out.println(beanName);
    }

}


--------

public interface UserService {

    void test();
}
结合 BeanPostProcessor 完成jdk动态的实现
    @Override
    public Object postProcessorAfterInitialization(Object bean, String beanName) {
        System.out.println("初始化后");
        if (beanName.equals("userService")){

            Object proxyInstance = Proxy.newProxyInstance(ZhuZhuBanPostProcessor.class.getClassLoader(), bean.getClass().getInterfaces(), new InvocationHandler() {
                @Override
                public Object invoke(Object proxy, Method method, Object[] args) throws Throwable {
                    System.out.println("被代理的逻辑");

                    return method.invoke(bean,args);
                }
            });

            return proxyInstance;

        }
        return bean;
    }
被动态代理后的类,执行类中的任意方法 都会经过 jdk的代理逻辑进行增强
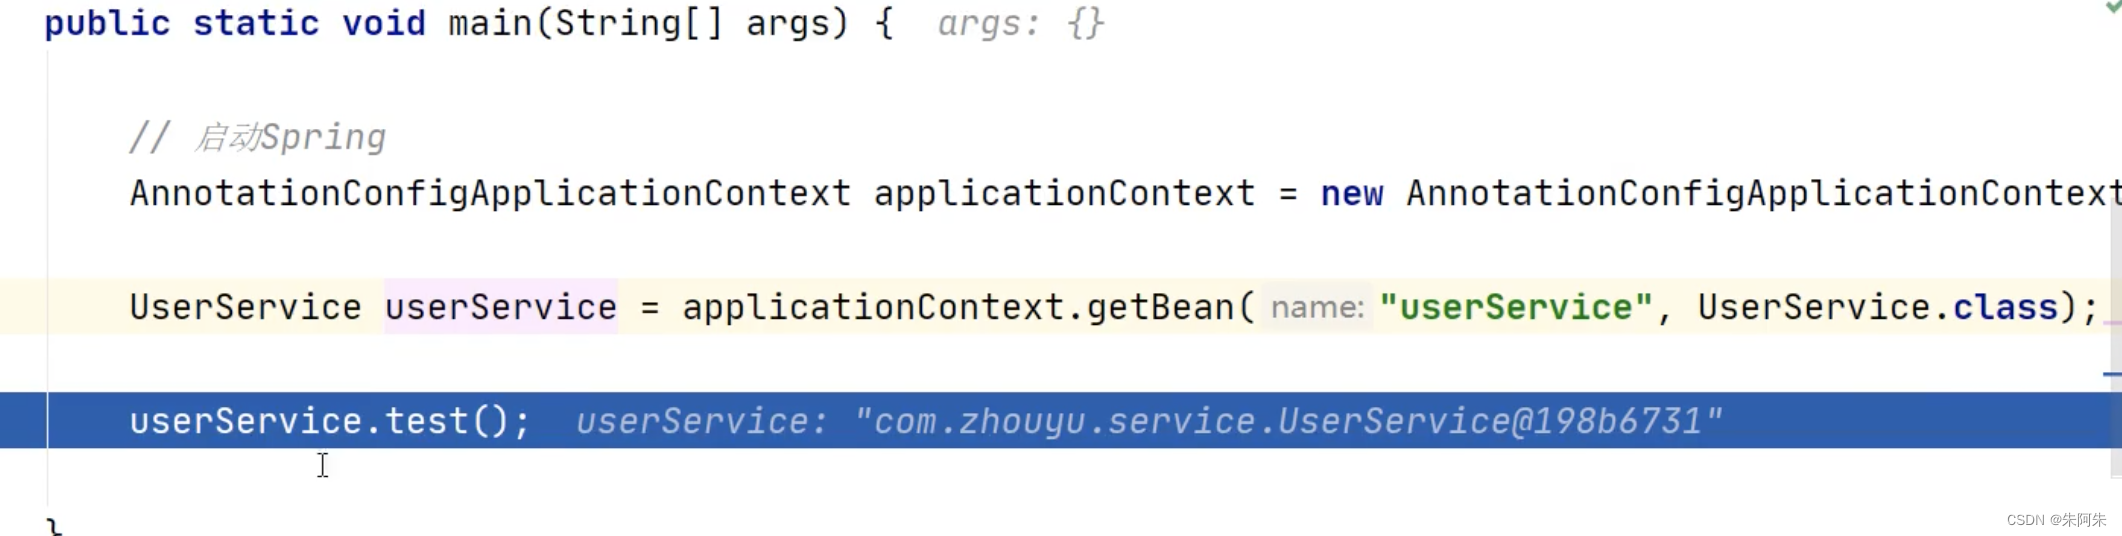
//测试
public static void main(String[] args) {
    EditApplicationContext application = new EditApplicationContext(AppConfig.class);
    //Object bean1 = application.getBean("userService");
    //Object bean2 = application.getBean("userService");
    //Object bean3 = application.getBean("userService");
    //System.out.println(bean1);
    //System.out.println(bean2);
    //System.out.println(bean3);

    UserService userService = (UserService) application.getBean("userService");
    //userService.test();
    userService.example();

}
Spring Bean生命周期
SpringBean 推断构造方法,Bean中两个或以上有参构造器会报错,

准备阶段大概生命周期
-
实例化
-
属性填充
-
初始化
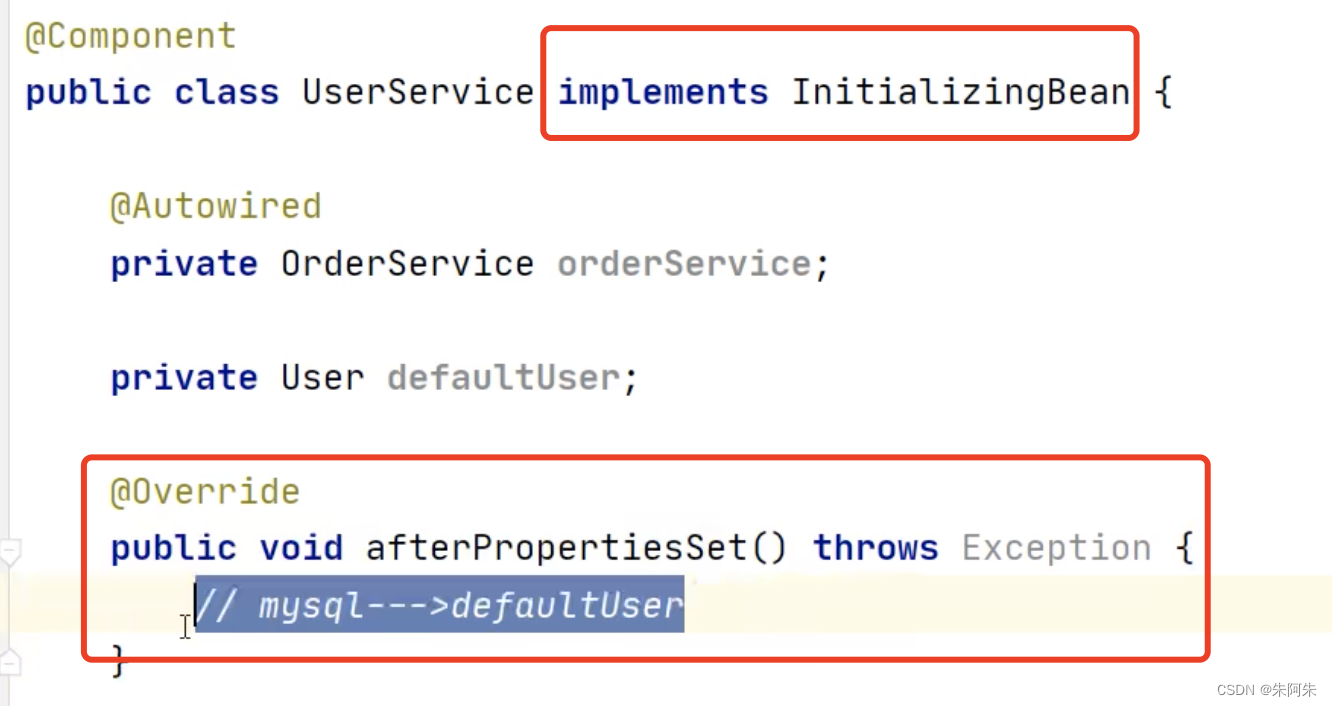
初始化机制,实现Spring提供的 initializingBean 接口 ,在Bean属性填充后自动执行after方法,可以在使用SpringBean容器的情况下做更多操作
源码分析
DefaultListableBeanFactory的父类 AbstractAutowireCapableBeanFactory 中 的 doCreateBean 类似 我们上面写scan方法
实例化
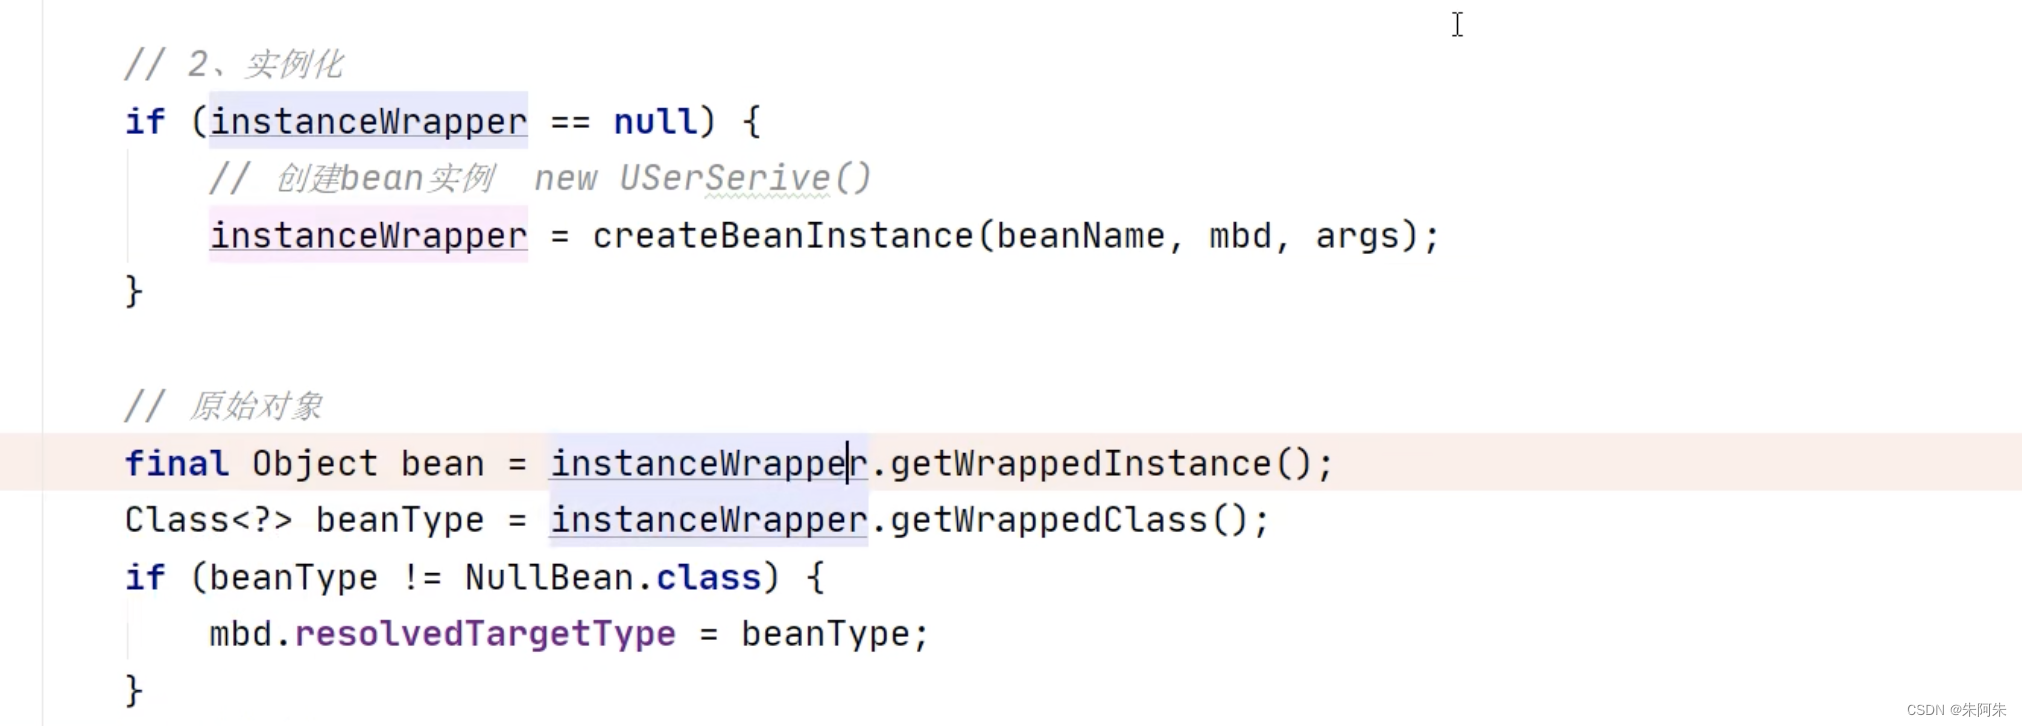
属性填充
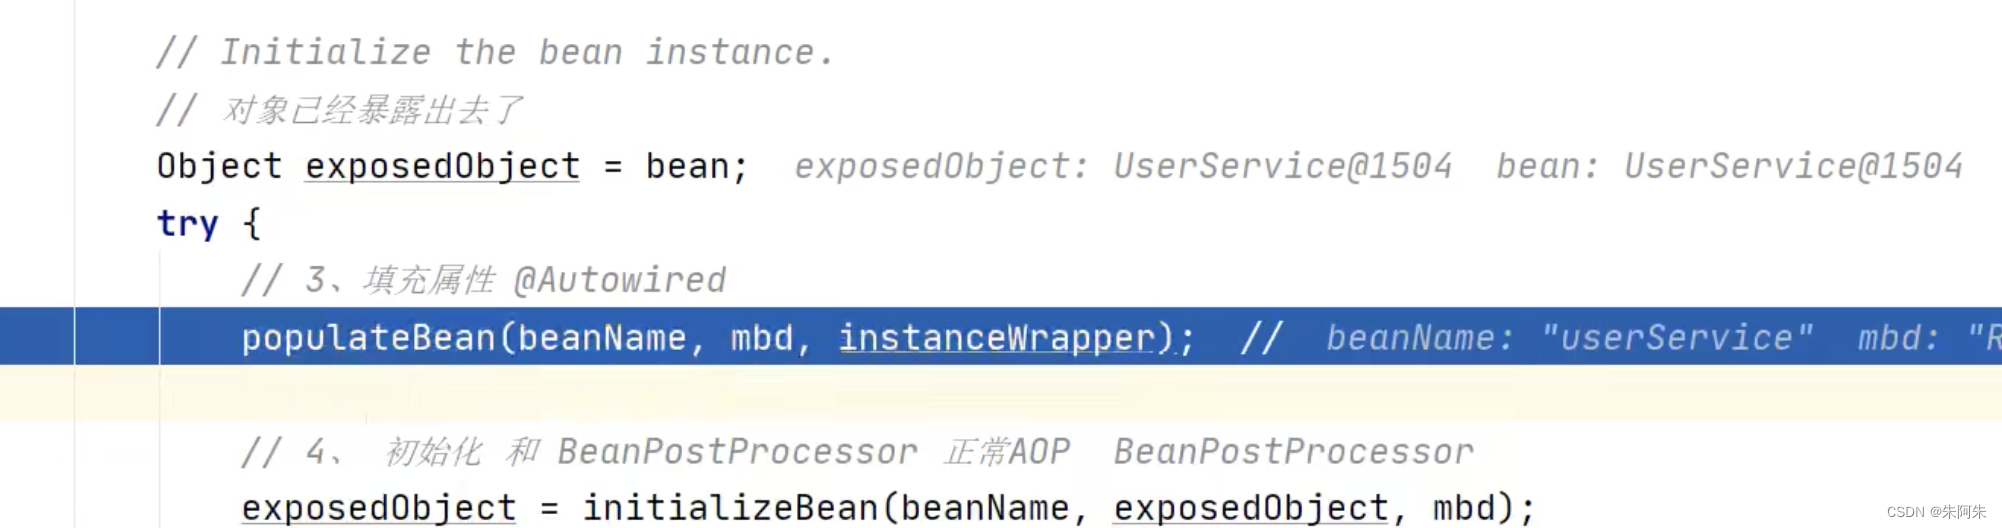
初始化操作
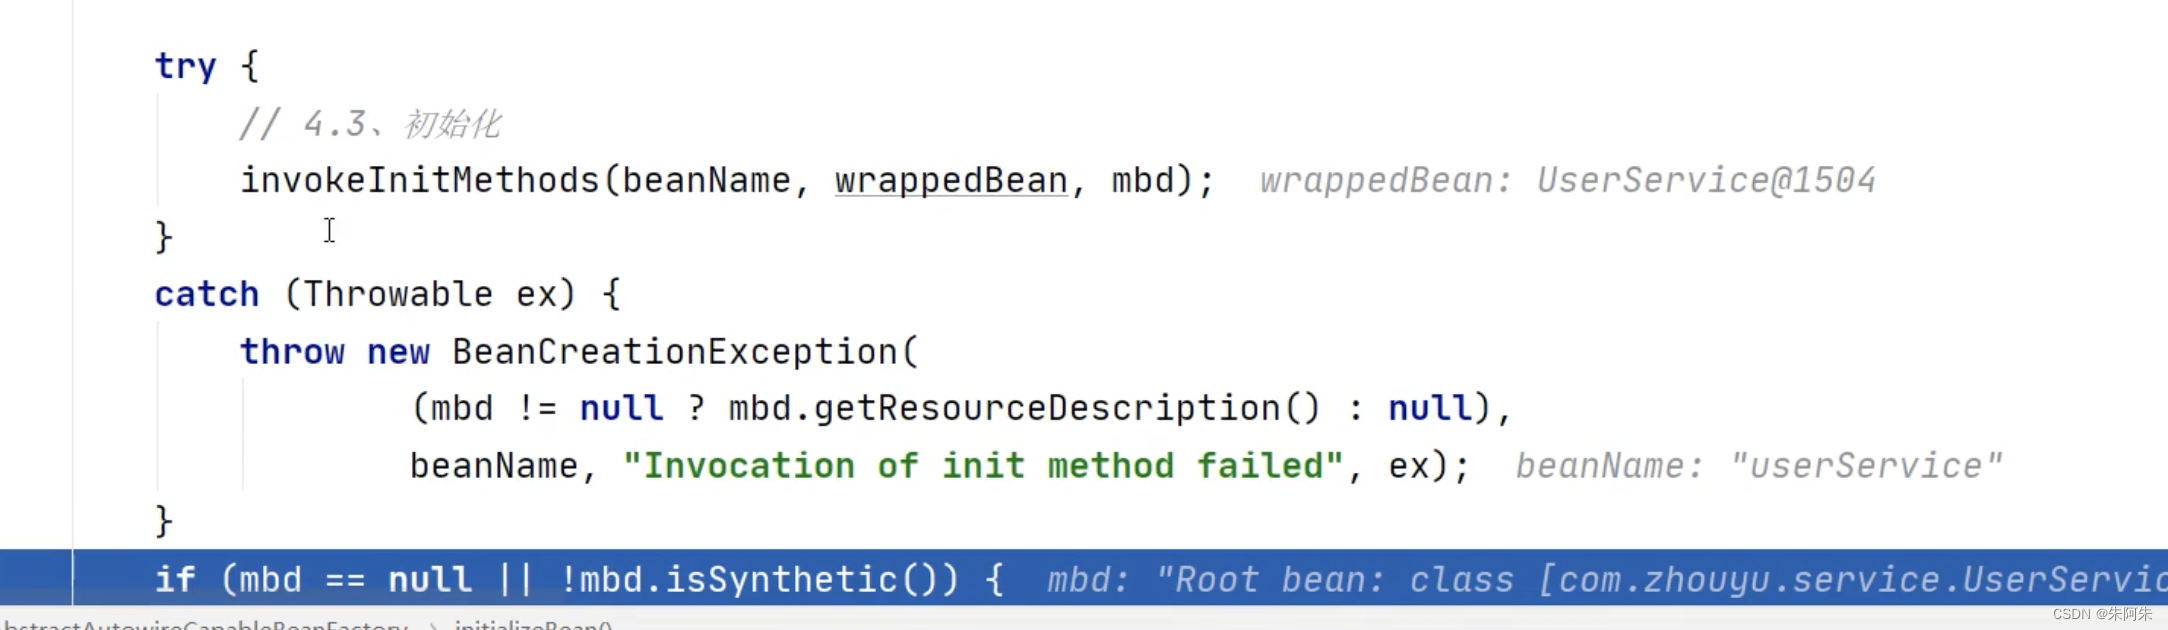
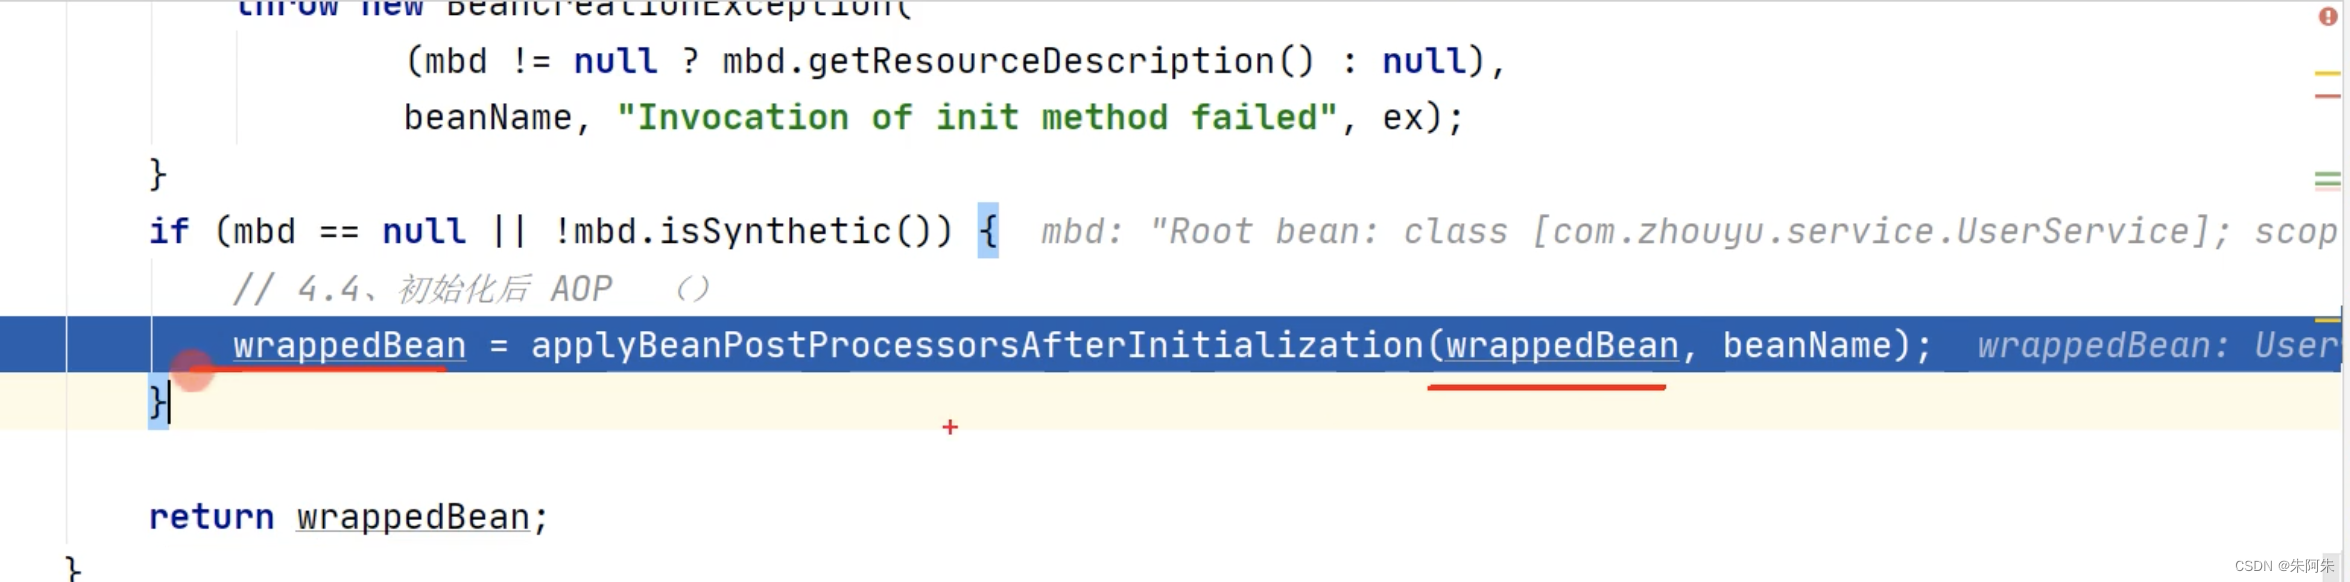
初始化源码内

初始化方法中同时判断是否有AOP操作
判断是否
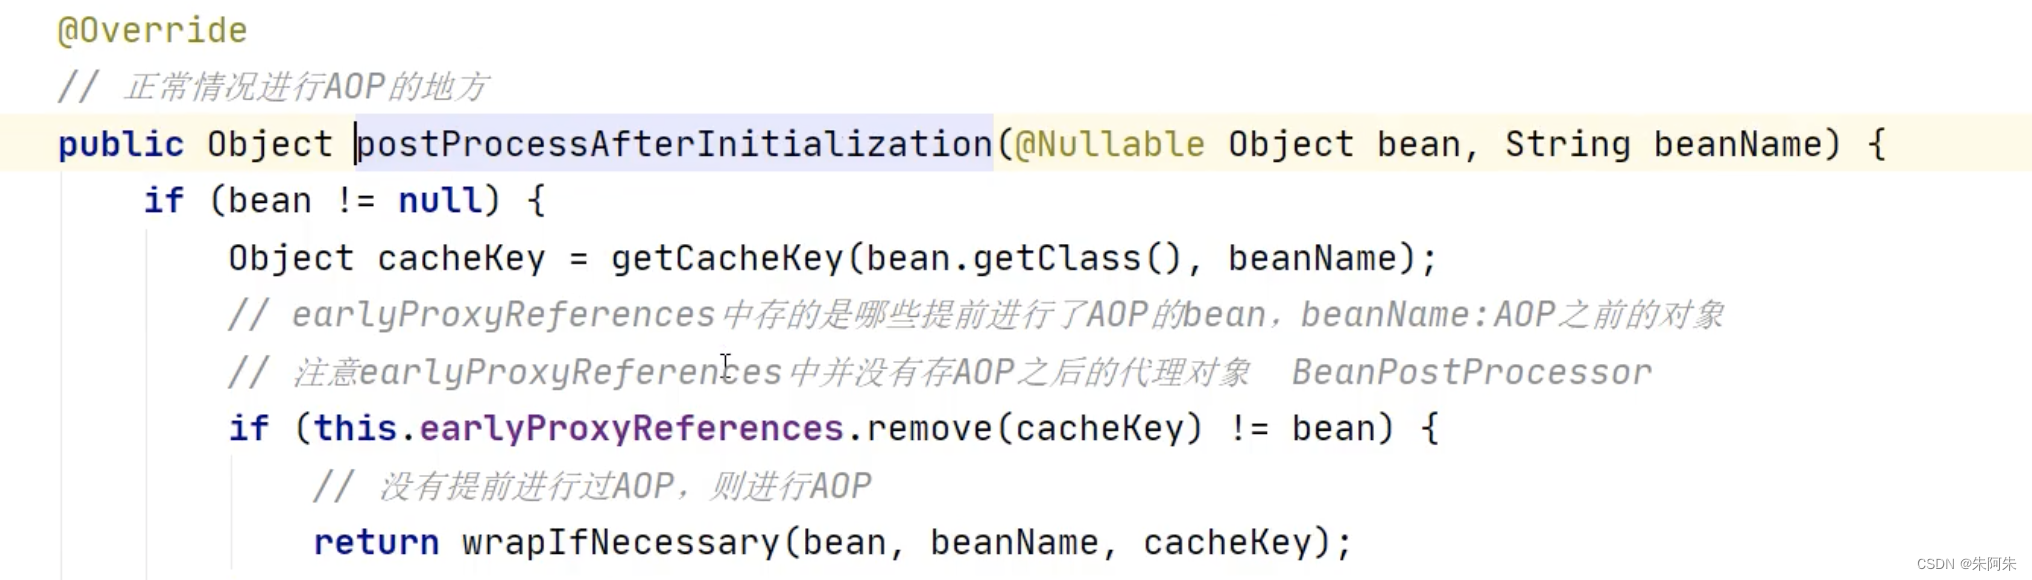
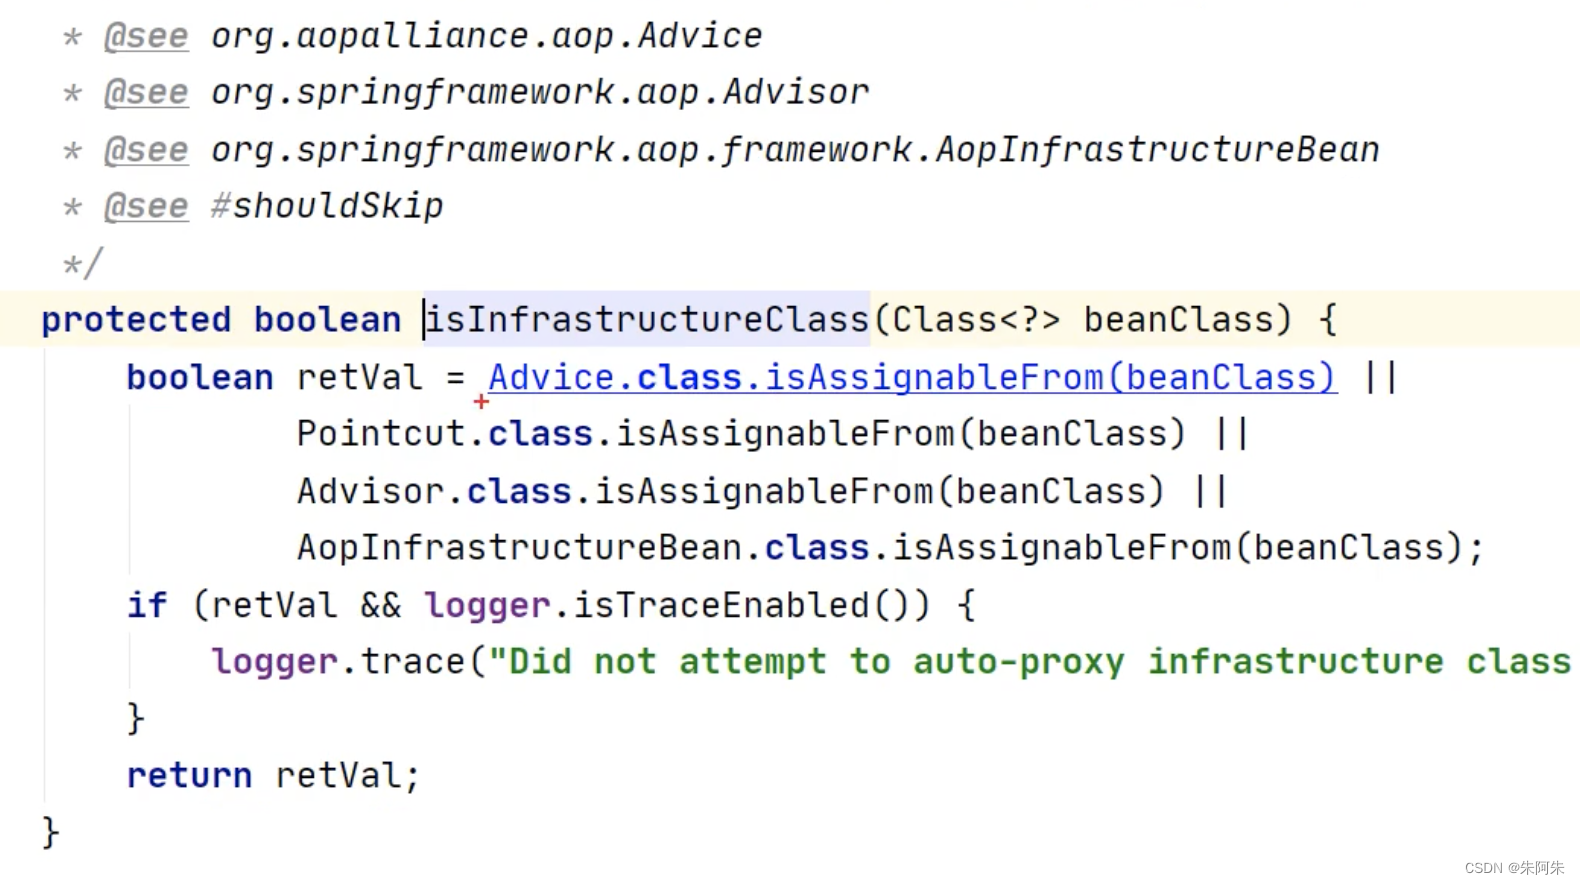
判断Bean的类型
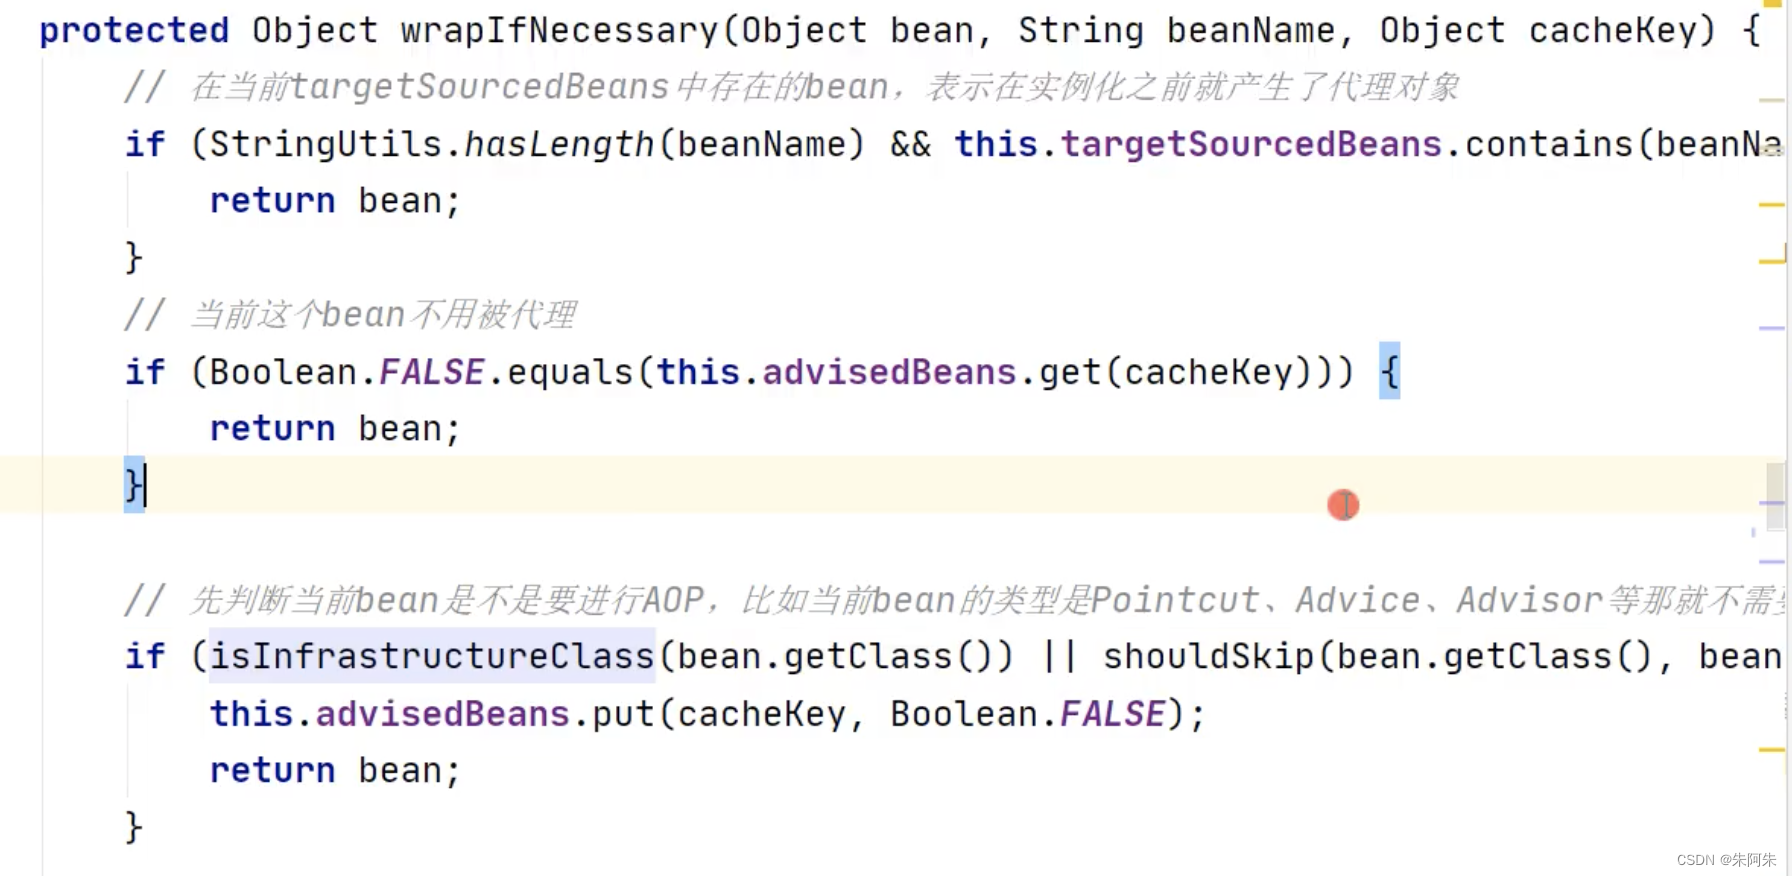
class的类型判断如果是这些类 则不需要AOP
上面是不做AOP的操作,在Spring中判断要做AOP的操作
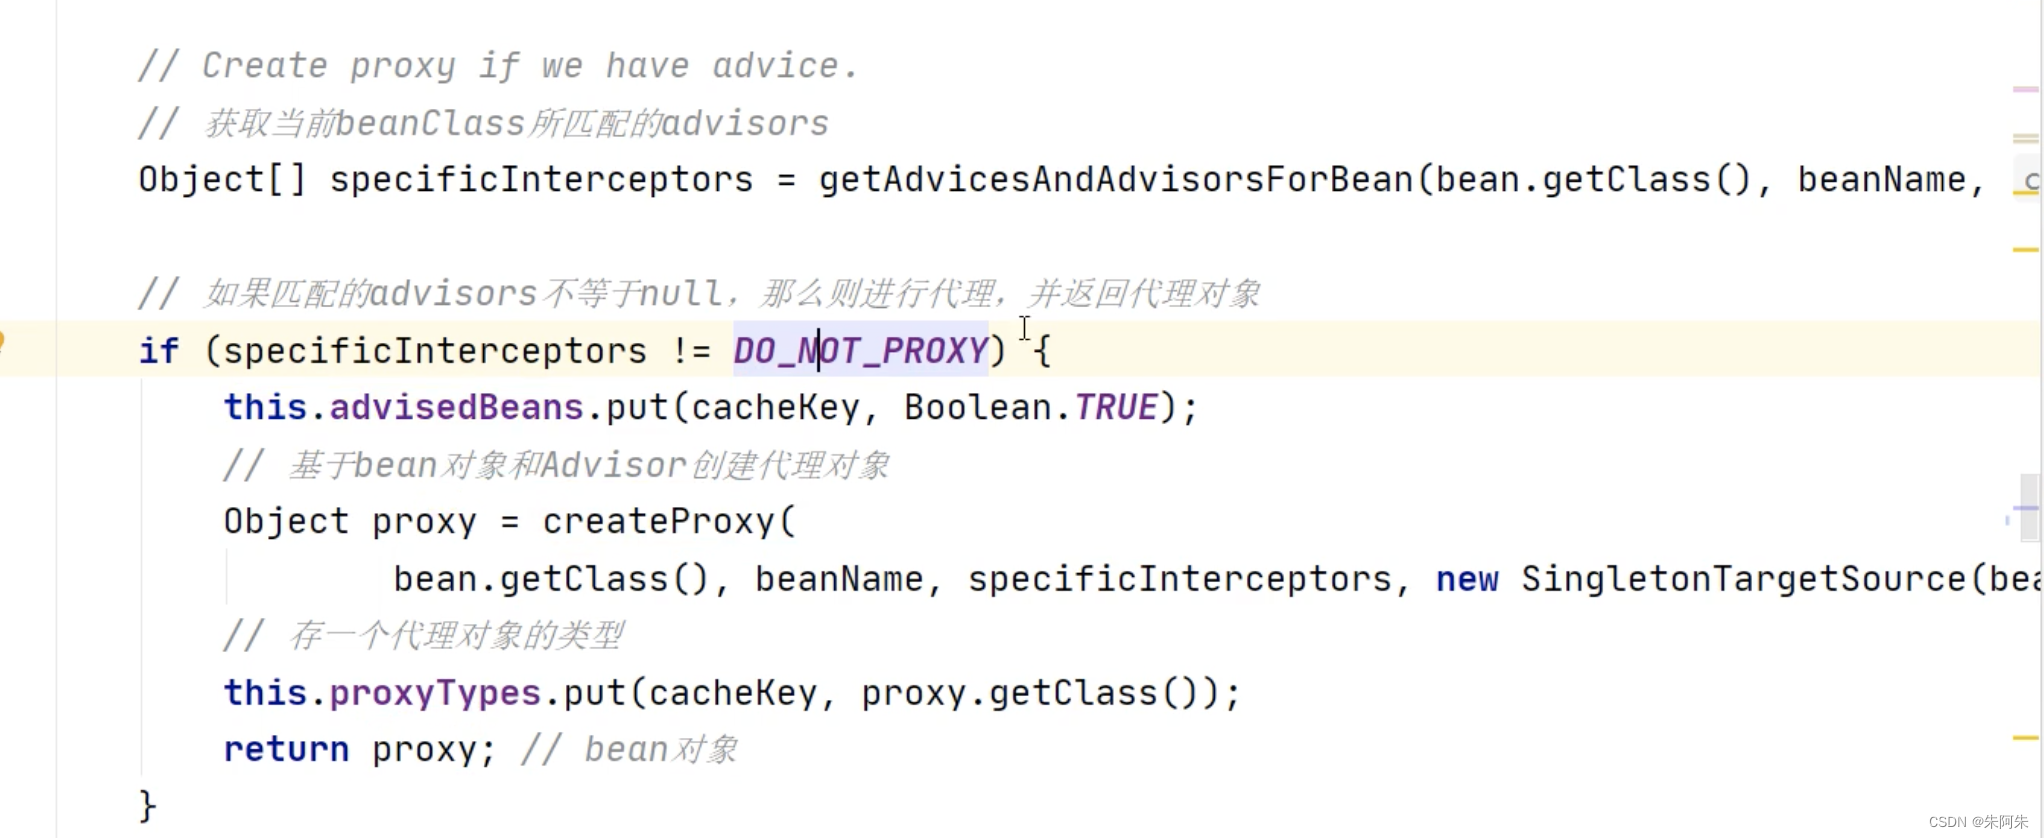
- 找出当前项目所有切面类型的Bean,如下图的切点Bean,缓存起来

2. 从缓存的切点Bean中是否有当前Bean匹配的 pointCut 如上图的 @Before , 如果有 则需要AOP
匹配成功 createProxy 创建代理对象 进行 AOP操作
Spring中两种生成代理的方式
- JDK
- Cglib,Cglib基于类的继承来实现,Cglib会创建一个类去继承被代理类,从而重写被代理类中的方法
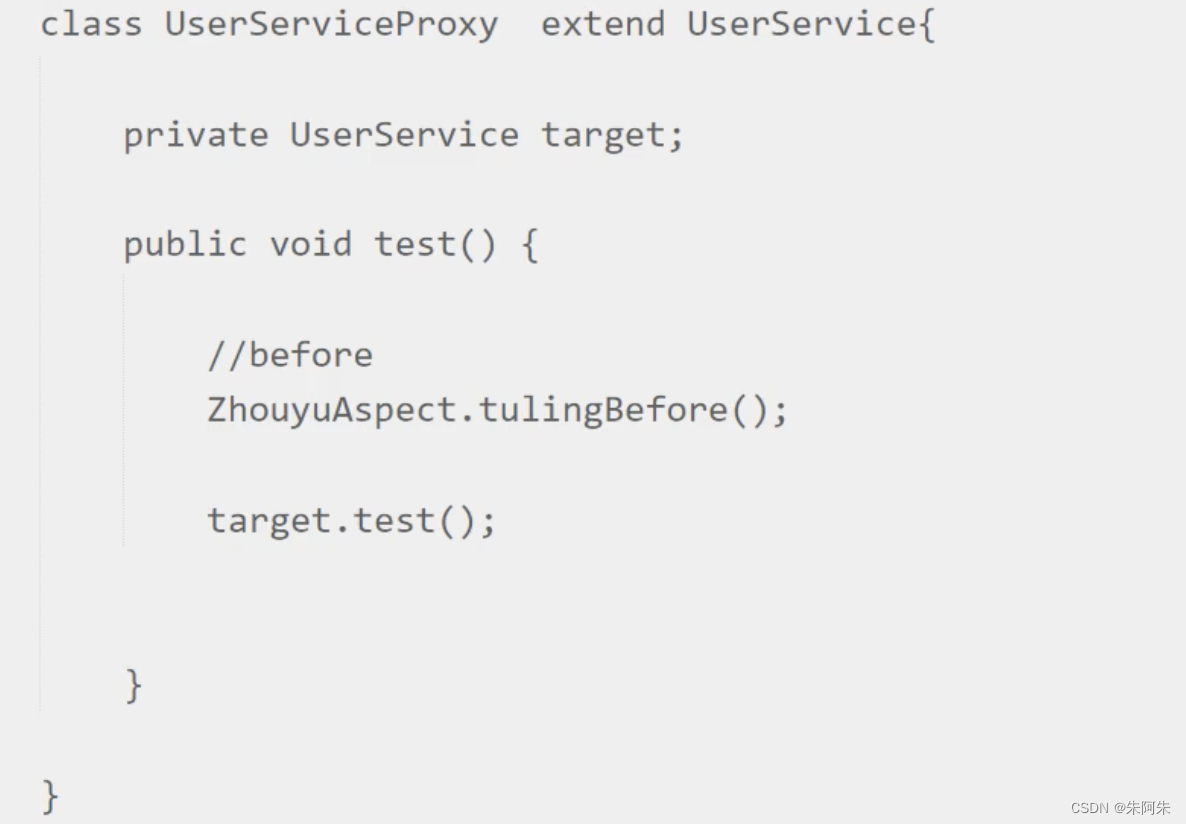
题外话
被AOP代理过的类没有进行再次的属性填充
所以获取到的userService 中的属性都为null,日常使用时,不会去获取 被代理后的类,AOP的目的是在执行Bean的某一个方法时 额外的去执行定义的切点方法,所以被代理的Bean只是在 调用方法时才使用到,真实使用场景中,都是使用的一开始实例化的Bean ,它是有被属性填充的
Spring事务相关
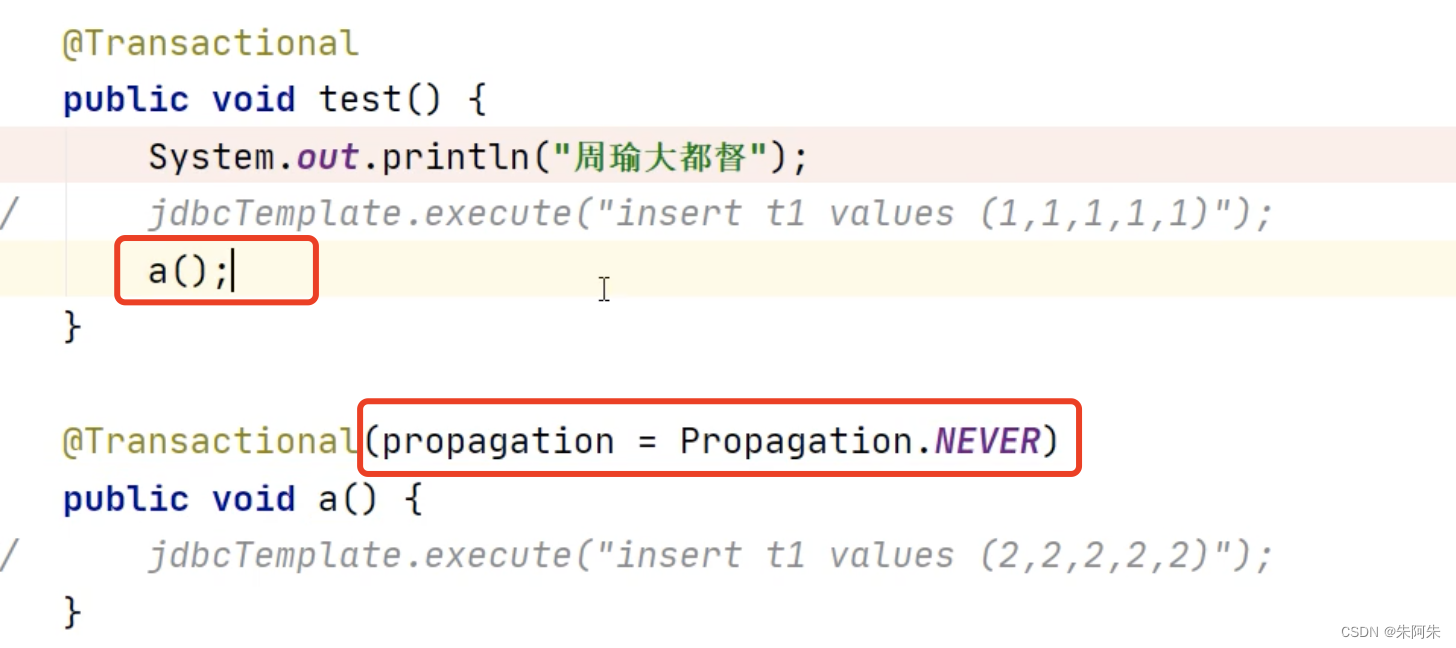
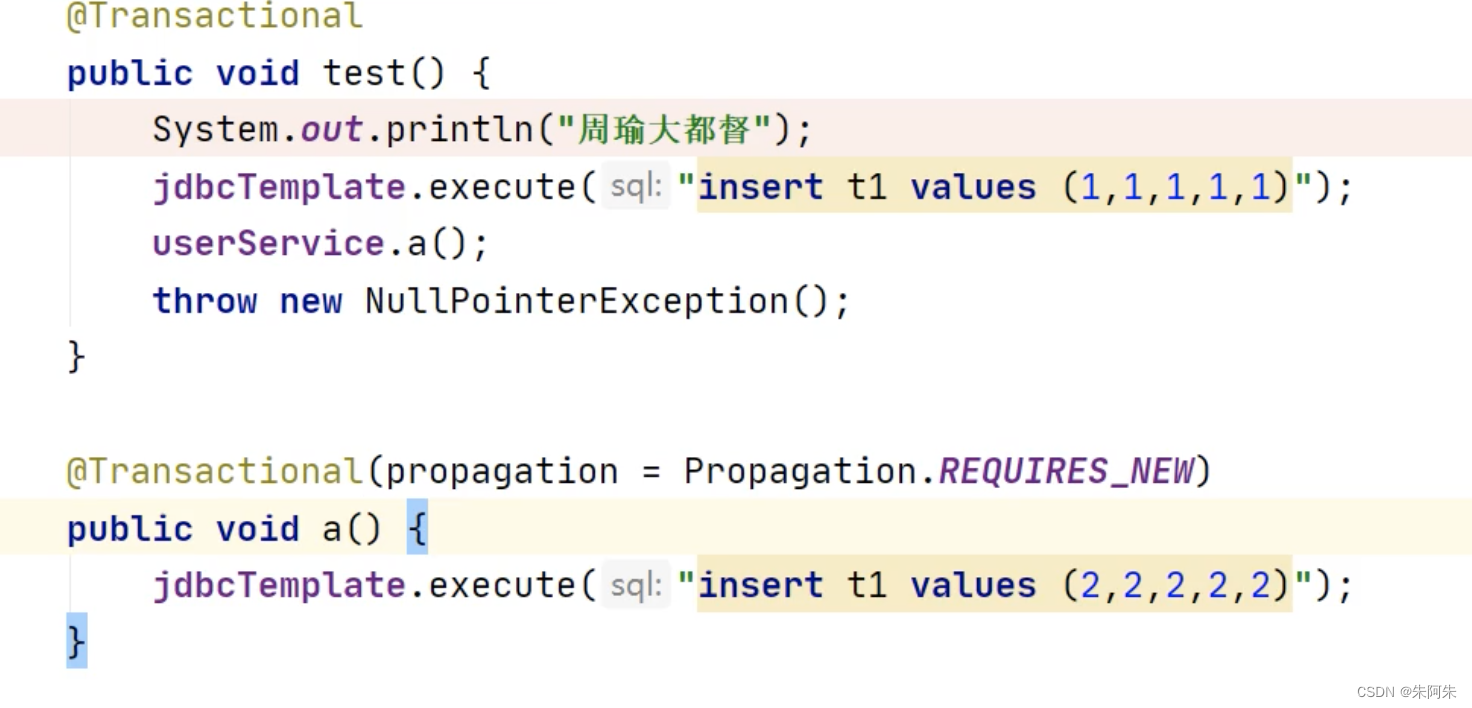
Spring事务传播机制
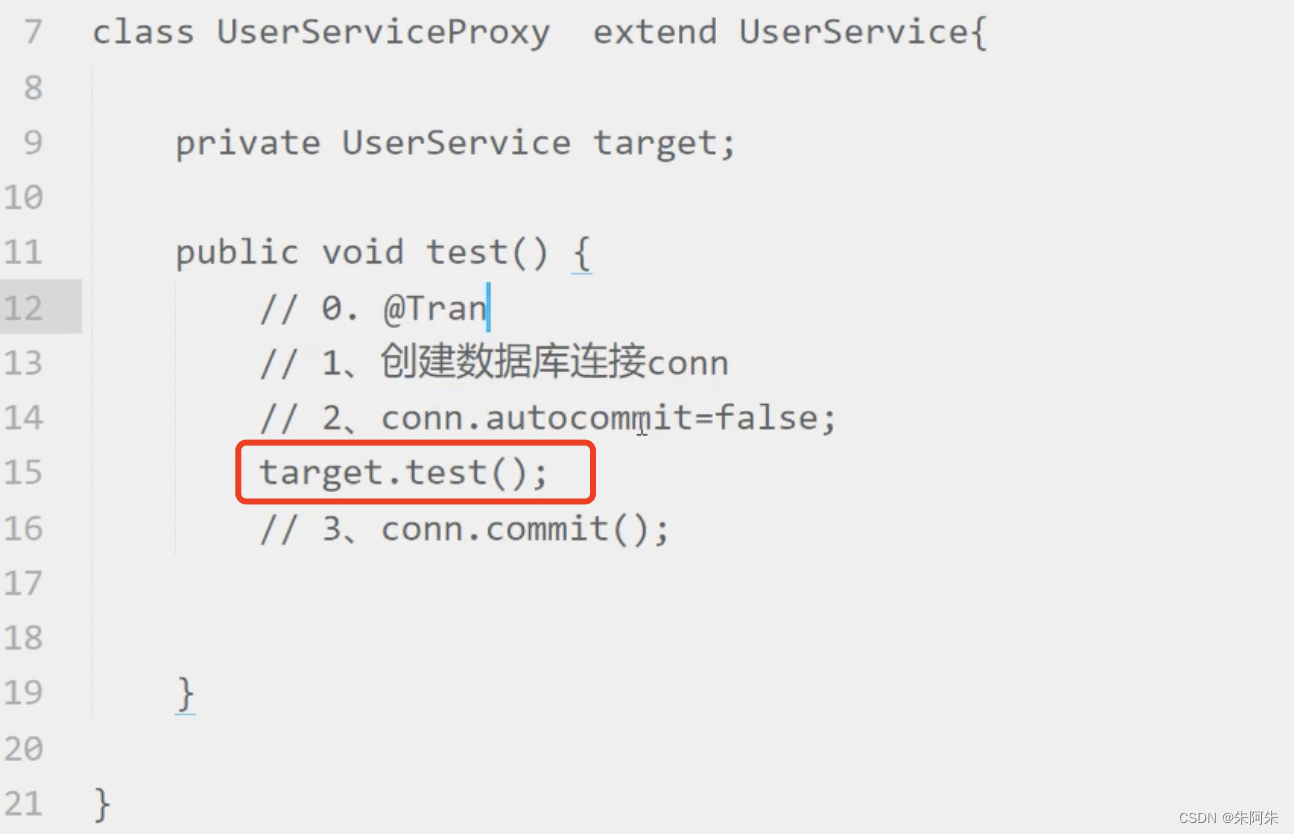
如此在方法中再次事务方法,a方法的事务注解不会生效,因为此时调用test方法的是没有被aop增强的bean
示例 target为bean生命周期中 aop之前的bean
要使事务注解a方法生效,可以通过@Autwired注入bean在调用

如此直接调用也不会生效
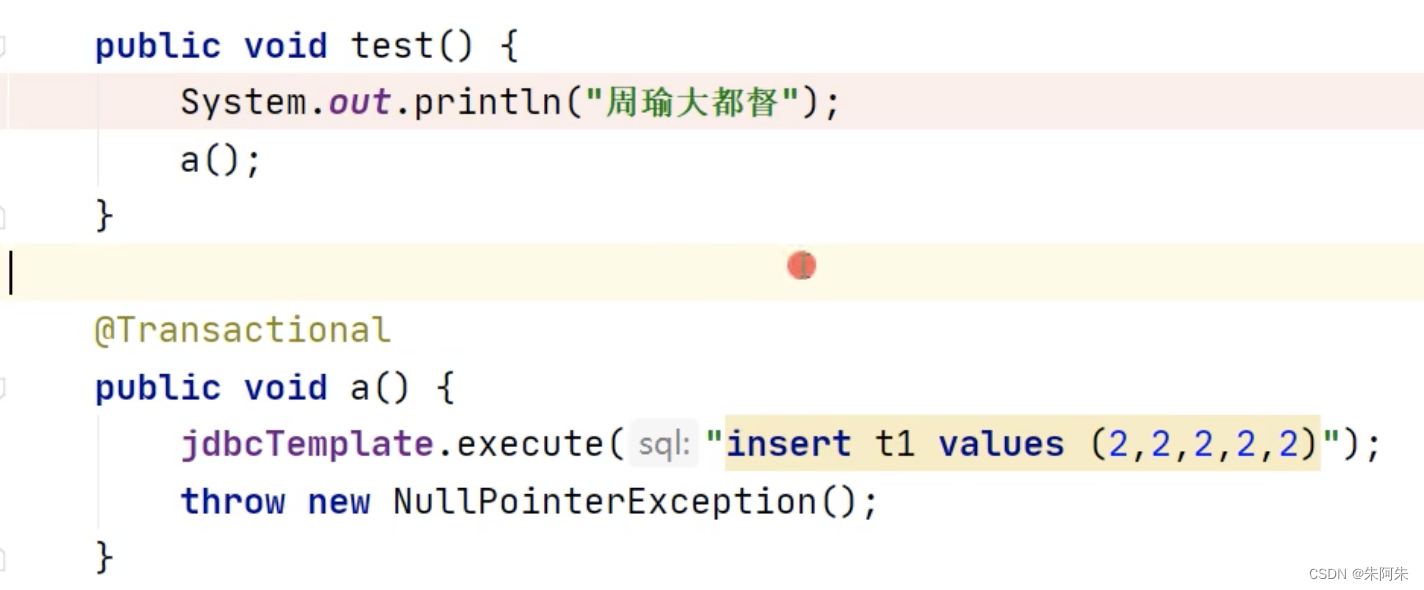
所以使用事务时,务必使用注入bean来调用事务方法
如此传播级别为 REQUIRES_NEW时 实物方法中再调用事务方法为新建一个事务
Spring事务的隔离级别
Spring事务的隔离级别和MySQL隔离级别一一对应


 5915
5915


 被折叠的 条评论
为什么被折叠?
被折叠的 条评论
为什么被折叠?
 到【灌水乐园】发言


