


【原文链接】基于openEuler虚拟机执行mugen测试脚本
(1)首先需要准备一台openEuler虚拟机,若未安装,可参考 VMware安装openEuler-22.03-LTS版本的虚拟机 安装一台openEuler虚拟机
(2)安装git工具,若已安装,则直接跳过
dnf install -y git
(3)下载mugen代码
cd /opt/
git clone https://gitee.com/openeuler/mugen.git
(4)安装依赖
cd mugen/
chmod 777 dep_install.sh
bash dep_install.sh
(5)查看命令帮助信息
[root@openEuler-1 mugen]# bash mugen.sh --help
mugen.sh:非法选项 -- -
Usage:

    -c: configuration environment of test framework

    -a: execute all use cases

    -f: designated test suite

    -r: designated test case

    -x: the shell script is executed in debug mode

    -b: do make for test suite if test suite path have makefile or Makefile file

    -s: runing test case at remote NODE1


    Example:
        run all cases:
          normal mode:
            bash mugen.sh -a
          debug mode:
            bash mugen.sh -a -x

        run test suite:
          normal mode:
            bash mugen.sh -f test_suite
          debug mode:
            bash mugen.sh -f test_suite -x

        run test case:
          normal mode:
            bash mugen.sh -f test_suite -r test_case
          debug mode:
            bash mugen.sh -f test_suite -r test_case -x

        run at remote:
          normal mode:
            bash mugen.sh -a -s
            bash mugen.sh -f test_suite -s
            bash mugen.sh -f test_suite -r test_case -s
          debug mode:
            bash mugen.sh -a -s
            bash mugen.sh -f test_suite -s
            bash mugen.sh -f test_suite -r test_case -s


        configure env of test framework:
            bash mugen.sh -c --ip $ip --password $passwd --user $user --port $port

          if want run at remote should add --run_remote
          if want run at remote copy all testcase once add --put_all


    do make for test suite:
        for all test suite:
            bash mugen.sh -b -a
        for one test suite:
            bash mugen.sh -b test_suite
(6)配置环境变量
因为这里使用的本机作为被测虚拟机,因此ip设置为127.0.0.1
bash mugen.sh -c --ip 127.0.0.1 --password xxxxxx --user root --port 22
(7)配置环境后,会自动生成confg/env.json环境变量文件
[root@openEuler-1 mugen]# cat conf/env.json
{
    "NODE": [
        {
            "ID": 1,
            "LOCALTION": "local",
            "MACHINE": "physical",
            "FRAME": "x86_64",
            "NIC": "",
            "MAC": "",
            "IPV4": "127.0.0.1",
            "USER": "root",
            "PASSWORD": "xxxxxx",
            "SSH_PORT": 22,
            "BMC_IP": "",
            "BMC_USER": "",
            "BMC_PASSWORD": ""
        }
    ]
}[root@openEuler-1 mugen]#
(8)测试脚本目录说明
mugen测试目录如下,suite2cases 目录定义了所有的测试套,testcases目录下则是所有的脚本,testcases中的每个sh文件即为一个测试脚本,而目录只是用来分类管理测试用例的,测试套的名字并不是从testcases中的文件夹名。

如下,展开suite2cases目录,这里可以看到每个json的文件名(去掉后缀),比如这里acl就是一个测试套,而json文件中定义了当前测试套包含哪些用例,用例的路径这了也给出了对应关系。

(9)然后就可以执行测试脚本了,这里如下几个参数需要关注一下:
- -f:指定测试套
- -r:指定测试用例
- -a:执行所有用例
- -x:输出debug模式的信息,即控制套输出更加详细的内容
比如执行测试套acl的的用例
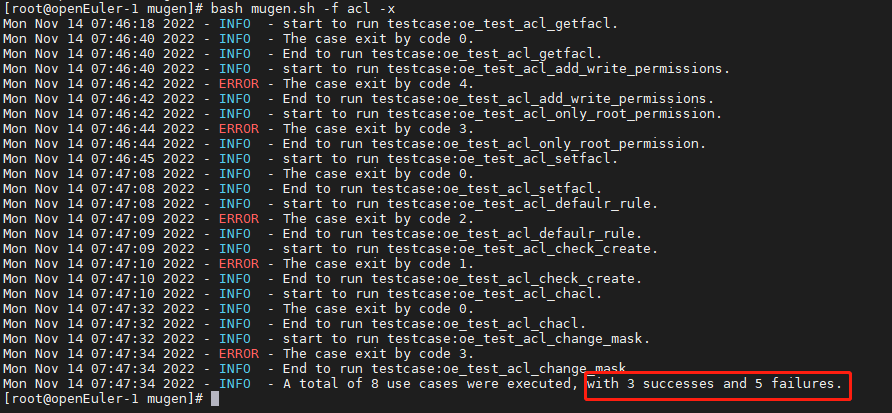
bash mugen.sh -f acl -x
执行结果如下,可以看出这里有三个成功,五个失败,具体失败原因,这里暂时不去深究,只作为演示执行的示例
比如想执行这里面具体一个用例

则使用如下命令
bash mugen.sh -f acl -r oe_test_acl_add_write_permissions -x
执行结果如下:

比如要执行所有脚本,则执行如下命令(这里就不演示了,数量比较多)
bash mugen.sh -a -x


 415
415


 被折叠的 条评论
为什么被折叠?
被折叠的 条评论
为什么被折叠?
 到【灌水乐园】发言


