


12 Flannel for Docker
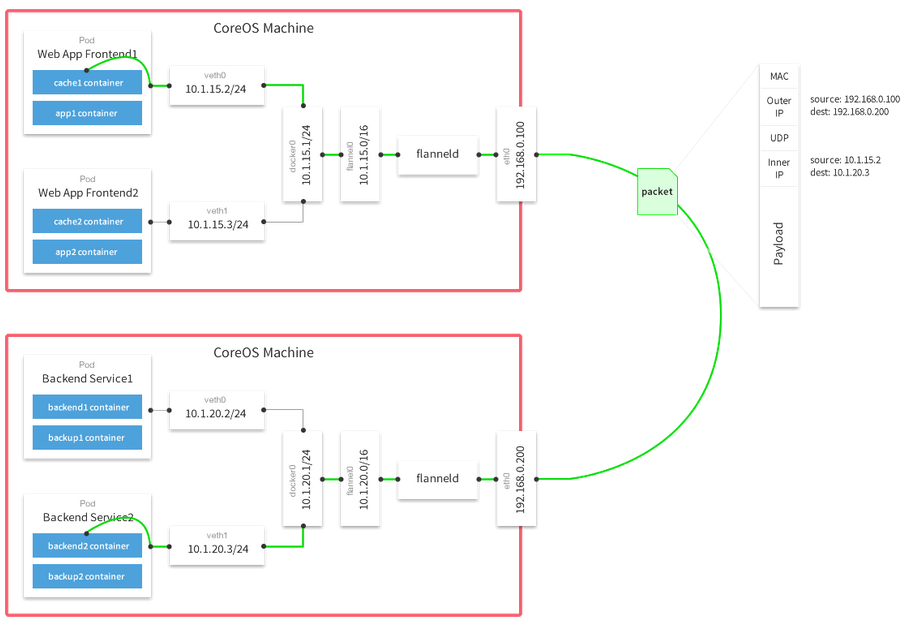
Flannel,类似于Calico,VXLAN和Weave,为Docker提供一种可配置的虚拟重叠网络。Flannel在每一台主机上运行一个 agent, flanneld,负责在提前配置好的地址空间中分配子网租约。Flannel使用etcd来存储网络配置。我们看一下Flannel GitHub上的图来描述在重叠网络中数据库传输的细节 。
下载运行Etcd
由于Flannel依赖Etcd,我们需要在启动 flanneld 之前配置好Etcd,我们需要两台Linux主机(裸机或虚机),主机名和IP分别是:Node1:192.168.56.10,
Node2:192.168.56.20,在两个节点上下载运行Etcd:
下载etcd
$ curl -L  https://github.com/coreos/etcd/releases/download/v2.3.6/etcd-v2.3.6-linux-amd64.tar.gz -o etcd-v2.3.6-linux-amd64.tar.gz
$ tar zxvf etcd-v2.3.6-linux-amd64.tar.gz
$ cd etcd-v2.3.6-linux-amd64/
NODE1
./etcd -name node1 -initial-advertise-peer-urls http://192.168.56.10:2380 \
  -listen-peer-urls http://0.0.0.0:2380 \
  -listen-client-urls http://0.0.0.0:2379,http://127.0.0.1:4001 \
  -advertise-client-urls http://0.0.0.0:2379 \
  -initial-cluster-token etcd-cluster \
  -initial-cluster node1=http://192.168.56.10:2380,node2=http://192.168.56.20:2380 \
  -initial-cluster-state new
NODE2
./etcd -name node2 -initial-advertise-peer-urls http://192.168.56.20:2380 \
  -listen-peer-urls http://0.0.0.0:2380 \
  -listen-client-urls http://0.0.0.0:2379,http://127.0.0.1:4001 \
  -advertise-client-urls http://0.0.0.0:2379 \
  -initial-cluster-token etcd-cluster \
  -initial-cluster node1=http://192.168.56.10:2380,node2=http://192.168.56.20:2380 \
  -initial-cluster-state new
配置Etcd
Flannel从etcd中读取配置,默认从 /coreos.com/network/config 中读取配置(可以通过–etcd-prefix覆盖),我们需要使用etcdctl工具在etcd中设置值,
在下载etcd的目录中,运行如下命令:
./etcdctl set /coreos.com/network/config '{ "Network": "10.0.0.0/8","SubnetLen": 20, "SubnetMin": "10.10.0.0","SubnetMax": "10.99.0.0","Backend": { "Type": "udp", "Port": 7890 } }'我们可以在node2上查看上面保存的值
$ ./etcdctl get /coreos.com/network/config
{ "Network": "10.0.0.0/8","SubnetLen": 20, "SubnetMin": "10.10.0.0","SubnetMax": "10.99.0.0","Backend": { "Type": "udp", "Port": 7890 } }
构造运行Flannel
构造Flannel
* 第一步,在Ubuntu上运行 sudo apt-get install linux-libc-dev golang gcc,在Fedora/Redhat,运行sudo yum install kernel-headers golang gcc
* 第二步,使用Git clone Flannel仓库: git clone https://github.com/coreos/flannel.git
* 第三步,运行构造脚本: cd flannel;./build
如果在build时报如下错误,查看一下go 语言的版本,如果低于1.4请更新
ubuntu@node2:~/flannel$ ./build
Building flanneld...
# github.com/coreos/flannel/Godeps/_workspace/src/github.com/coreos/etcd/client
gopath/src/github.com/coreos/flannel/Godeps/_workspace/src/github.com/coreos/etcd/client/client.go:46: unknown net.Dialer field 'KeepAlive' in struct literal
gopath/src/github.com/coreos/flannel/Godeps/_workspace/src/github.com/coreos/etcd/client/client.go:48: unknown http.Transport field 'TLSHandshakeTimeout' in struct literal
更新go语言
$ wget https://storage.googleapis.com/golang/go1.6.2.linux-amd64.tar.gz
$ sudo tar -C /usr/local -xzf go1.6.2.linux-amd64.tar.gz
$ sudo echo 'export PATH=$PATH:/usr/local/go/bin' >> ~/.profile
$ source ~/.profile
$ sudo mv /usr/bin/go /usr/bin/go1.2
$ cd /usr/bin/
$ sudo ln -s /usr/local/go/bin/go go
$ go version
go version go1.6.2 linux/amd64
运行Flannel
Etcd配置好后,我们在两台节点上运行 flanneld
$ sudo ./bin/flanneld &
使用ifconfig来确认flanned的网络配置成功,输出应该类似于:
flannel0  Link encap:UNSPEC  HWaddr 00-00-00-00-00-00-00-00-00-00-00-00-00-00-00-00
          inet addr:10.14.128.0  P-t-P:10.14.128.0  Mask:255.0.0.0
          UP POINTOPOINT RUNNING NOARP MULTICAST  MTU:1472  Metric:1
          RX packets:0 errors:0 dropped:0 overruns:0 frame:0
          TX packets:0 errors:0 dropped:0 overruns:0 carrier:0
          collisions:0 txqueuelen:500
          RX bytes:0 (0.0 B)  TX bytes:0 (0.0 B)
Flannel 运行后,我们需要为docker0配置网络并使用Flannel网络重新启动docker进程
$ sudo service docker stop
$ source  /run/flannel/subnet.env
$ sudo ifconfig docker0 ${FLANNEL_SUBNET}
$ sudo docker daemon --bip=${FLANNEL_SUBNET} --mtu=${FLANNEL_MTU} &
启动Docker
Flannel配置好后,我们就可以启动docker了,跟没有Flannel的时候一样。
Node1
$ docker run -itd --name=worker-1 ubuntu:14.04
$ docker run -itd --name=worker-2 ubuntu:14.04
Node2
$ docker run -itd –name=worker-3 ubuntu:14.04
我们使用sudo docker exec worker-N ifconfig 来获取IP地址,在node1上,测试到work-3的连通性。
worker-1: 10.16.48.2
worker-2: 10.16.48.3
worker-3: 10.14.128.2
ubuntu@node1:~$ sudo docker exec worker-2 ping -c2 10.14.128.2
PING 10.14.128.2 (10.14.128.2) 56(84) bytes of data.
64 bytes from 10.14.128.2: icmp_seq=1 ttl=60 time=0.948 ms
64 bytes from 10.14.128.2: icmp_seq=2 ttl=60 time=1.07 ms

--- 10.14.128.2 ping statistics ---
2 packets transmitted, 2 received, 0% packet loss, time 1000ms
rtt min/avg/max/mdev = 0.948/1.012/1.076/0.064 ms

ubuntu@node1:~$ sudo docker exec worker-2 ping -c2 www.baidu.com
PING www.a.shifen.com (220.181.112.244) 56(84) bytes of data.
64 bytes from 220.181.112.244: icmp_seq=1 ttl=46 time=3.59 ms
64 bytes from 220.181.112.244: icmp_seq=2 ttl=46 time=3.46 ms

--- www.a.shifen.com ping statistics ---
2 packets transmitted, 2 received, 0% packet loss, time 1001ms
rtt min/avg/max/mdev = 3.463/3.528/3.593/0.065 ms
简单的性能测试
至此对于Docker的 Flannel配置完成,所有的容器也能够互相连通,下面我们做一个简单的测试
首先我们看一下在本地网络上的性能:
ubuntu@node1:~$ iperf  -c 192.168.56.10
------------------------------------------------------------
Client connecting to 192.168.56.10, TCP port 5001
TCP window size: 2.50 MByte (default)
------------------------------------------------------------
[  4] local 192.168.56.10 port 5001 connected with 192.168.56.10 port 45555
[  3] local 192.168.56.10 port 45555 connected with 192.168.56.10 port 5001
[ ID] Interval       Transfer     Bandwidth
[  3]  0.0-10.0 sec  17.7 GBytes  15.2 Gbits/sec
[  4]  0.0-10.0 sec  17.7 GBytes  15.2 Gbits/sec
docker 在不同的主机上
root@6eafb8bb4e78:/# iperf -c 10.14.128.2
------------------------------------------------------------
Client connecting to 10.14.128.2, TCP port 5001
TCP window size: 85.0 KByte (default)
------------------------------------------------------------
[  3] local 10.16.48.2 port 56516 connected with 10.14.128.2 port 5001
[ ID] Interval       Transfer     Bandwidth
[  3]  0.0-10.0 sec   106 MBytes  89.1 Mbits/sec
docker在相同的主机上
root@6eafb8bb4e78:/# iperf -c 10.16.48.2
------------------------------------------------------------
Client connecting to 10.16.48.2, TCP port 5001
TCP window size: 2.50 MByte (default)
------------------------------------------------------------
[  3] local 10.16.48.2 port 49316 connected with 10.16.48.2 port 5001
[ ID] Interval       Transfer     Bandwidth
[  3]  0.0-10.0 sec  18.9 GBytes  16.3 Gbits/sec
Flannel支持两种后端:UDP后端和VxLAN后端,试一下VxLAN后端,速度会快很多并接近本地网络性能 。
UDP 和 VxLAN 后端
Flannel有两种不同的后端,前面配置的是UDP后端,那是比较慢的方案,因为所有的包都是在用户空间中封装的。VxLAN后端使用Linux内核VxLAN支持,一些硬件特性来实现更快的网络 。
非常容易切换到VxLAN后端,在配置Etcd时,在定义 backend时使用 vxlan。
./etcdctl set /coreos.com/network/config '{ "Network": "10.0.0.0/8","SubnetLen": 20, "SubnetMin": "10.10.0.0","SubnetMax": "10.99.0.0","Backend": { "Type": "vxlan", "Port": 7890 } }'


 1万+
1万+

 被折叠的 条评论
为什么被折叠?
被折叠的 条评论
为什么被折叠?
 到【灌水乐园】发言


