


1、依赖:
        <!-- websocket  依赖  -->
        <dependency>
            <groupId>org.springframework.boot</groupId>
            <artifactId>spring-boot-starter-websocket</artifactId>
        </dependency>
2.加配置
新建一个Java配置类,注入ServerEndpointExporter 配置,如果是使用springboot内置的tomcat此配置必须,如果是使用的是外部tomcat容器此步骤请忽略:
@Configuration
public class WebSocketConfig {
    @Bean
    public ServerEndpointExporter serverEndpointExporter() {
        return new ServerEndpointExporter();
    }

}
3.新建API实现类
@ServerEndpoint(value = "/wsdemo") 前端通过此URI 和后端交互,建立连接
@Component 不用说将此类交给spring管理
@OnOpen websocket建立连接的注解,前端触发上面URI时会进入此注解标注的方法,和之前关于DWR文章中的onpage方法类似
@OnClose 顾名思义关闭连接,销毁session
@OnMessage 收到前端传来的消息后执行的方法
@ServerEndpoint(value = "/wsdemo")
@Component
public class MyWebSocket {
    /**静态变量,用来记录当前在线连接数。应该把它设计成线程安全的。*/
    private static int onlineCount = 0;

    /** concurrent包的线程安全Set,用来存放每个客户端对应的MyWebSocket对象。
        在外部可以获取此连接的所有websocket对象,并能对其触发消息发送功能,我们的定时发送核心功能的实现在与此变量 */
    private static CopyOnWriteArraySet<MyWebSocket> webSocketSet = new CopyOnWriteArraySet<MyWebSocket>();

    /**与某个客户端的连接会话,需要通过它来给客户端发送数据*/
    private Session session;

    /**
     * 连接建立成功调用的方法
     *
     * 类似dwr的onpage方法,参考之前文章中demo有
     * */
    @OnOpen
    public void onOpen(Session session) {
        this.session = session;
        webSocketSet.add(this);     //加入set中
        addOnlineCount();           //在线数加1
        System.out.println("有新连接加入!当前在线人数为" + getOnlineCount());
        try {
            sendMessage("连接已建立成功.");
        } catch (Exception e) {
            System.out.println("IO异常");
        }
    }

    /**
     * 连接关闭调用的方法
     *
     * 参考dwrsession摧毁方法
     */
    @OnClose
    public void onClose() {
        webSocketSet.remove(this);  //连接关闭后,将此websocket从set中删除
        subOnlineCount();           //在线数减1
        System.out.println("有一连接关闭!当前在线人数为" + getOnlineCount());
    }

    /**
     * 收到客户端消息后调用的方法
     *
     * @param message 客户端发送过来的消息*/
    @OnMessage
    public void onMessage(String message, Session session) {
        System.out.println("来自客户端的消息:" + message);
    }

     // 错误提示
     @OnError
     public void onError(Session session, Throwable error) {
         System.out.println("发生错误");
         error.printStackTrace();
     }

     // 发送消息,在定时任务中会调用此方法
     public void sendMessage(String message) throws IOException {
        this.session.getBasicRemote().sendText(message);

     }


    public static synchronized int getOnlineCount() {
        return onlineCount;
    }

    public static synchronized void addOnlineCount() {
        MyWebSocket.onlineCount++;
    }

    public static synchronized void subOnlineCount() {
        MyWebSocket.onlineCount--;
    }


    public Session getSession() {
        return session;
    }

    public void setSession(Session session) {
        this.session = session;
    }

    public static CopyOnWriteArraySet<MyWebSocket> getWebSocketSet() {
        return webSocketSet;
    }

    public static void setWebSocketSet(CopyOnWriteArraySet<MyWebSocket> webSocketSet) {
        MyWebSocket.webSocketSet = webSocketSet;
    }
}
4.使用spring的Schedule建立定时任务
@EnableScheduling 开启spring定时任务功能
@Scheduled(cron = "0/3 * * * * ?") 用于标识定时执行的方法,此处主要方法返回值一定是void,没有入参。对应定时时间配置可以百度cron语法,根据自己的业务选择合适的周期
在这类中,我们通过上面MyWebSocket提供的静态方法获取其中的webSocketSet ,来获取所有此业务相关的所有websocketsession,可以在定时任务中对session内容进行验证判断(权限验证等),进行发送消息
@Component
@EnableScheduling
public class TimeTask
{
private static Logger logger = LoggerFactory.getLogger(TimeTask.class);
@Scheduled(cron = "0/3 * * * * ?") //3秒钟执行一次
public void test(){
System.err.println("********* 定时任务执行 **************");
CopyOnWriteArraySet<MyWebSocket> webSocketSet =
MyWebSocket.getWebSocketSet();
int i = 0 ;
webSocketSet.forEach(c->{
try {
c.sendMessage(" 定时发送 " + new Date().toLocaleString());
} catch (IOException e) {
e.printStackTrace();
}
});
System.err.println("/n 定时任务完成.......");
}
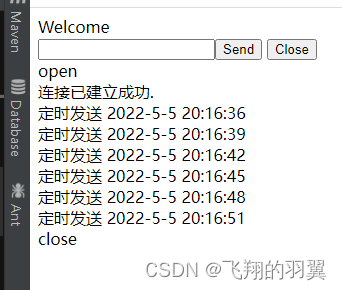
}5.新建一个测试页面作为静态资源:(端口换成本地项目端口)
<!DOCTYPE HTML>
<html>
<head>
    <title>My WebSocket</title>
</head>

<body>
Welcome<br/>
<input id="text" type="text" /><button onclick="send()">Send</button>    <button onclick="closeWebSocket()">Close</button>
<div id="message">
</div>
</body>

<script type="text/javascript">
    var websocket = null;

    //判断当前浏览器是否支持WebSocket  ,主要此处要更换为自己的地址
    if('WebSocket' in window){
        websocket = new WebSocket("ws://localhost:8886/wsdemo");
    }
    else{
        alert('Not support websocket')
    }

    //连接发生错误的回调方法
    websocket.onerror = function(){
        setMessageInnerHTML("error");
    };

    //连接成功建立的回调方法
    websocket.onopen = function(event){
        setMessageInnerHTML("open");
    }

    //接收到消息的回调方法
    websocket.onmessage = function(event){
        setMessageInnerHTML(event.data);
    }

    //连接关闭的回调方法
    websocket.onclose = function(){
        setMessageInnerHTML("close");
    }

    //监听窗口关闭事件,当窗口关闭时,主动去关闭websocket连接,防止连接还没断开就关闭窗口,server端会抛异常。
    window.onbeforeunload = function(){
        websocket.close();
    }

    //将消息显示在网页上
    function setMessageInnerHTML(innerHTML){
        document.getElementById('message').innerHTML += innerHTML + '<br/>';
    }

    //关闭连接
    function closeWebSocket(){
        websocket.close();
    }

    //发送消息
    function send(){
        var message = document.getElementById('text').value;
        websocket.send(message);
    }
</script>
</html>
6.演示效果:


 167
167


 被折叠的 条评论
为什么被折叠?
被折叠的 条评论
为什么被折叠?
 到【灌水乐园】发言


