


前言
VGG网络是在Very Deep Convolutional Network For Large-Scale Image Recognition这篇论文中提出,论文翻译详见这篇文章,本篇文章介绍VGG网络,并对VGG-D进行代码实现。
VGG网络
VGG是2014年被提出的,与之前的state-of-the-art的网络结构,错误率大幅下降,并取得了ILSVRC2014比赛分类项目的第二名和定位项目的第一名。同时,VGG的拓展性很强,迁移到其他图片数据上的泛化性非常好。VGG的结构简洁,整个网络都使用同样大小的卷积核尺寸(3x3)和最大池化尺寸(2x2)。到目前为止,VGG仍然被用来提取图像特征。
VGG的论文中全部使用3x3的卷积核和2x2的池化核,通过不断加深网络结构来提升性能。下图为VGG各级别的网络结构图。
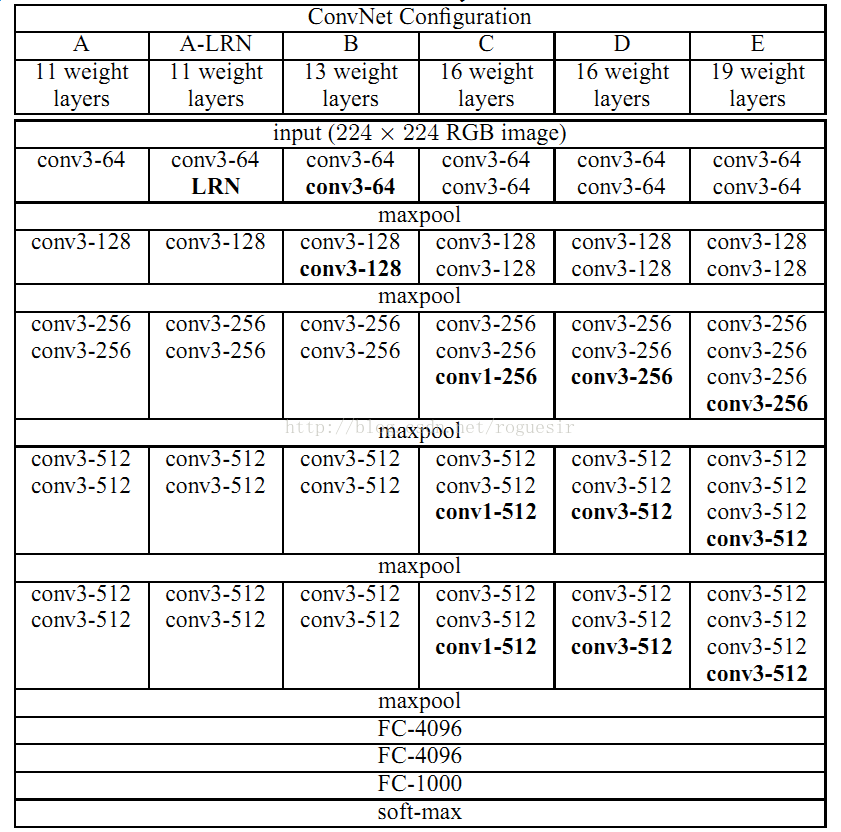
VGG拥有5段卷积,每段有多个卷积层,同时,每段结束都会连接一个最大池化层,池化层的作用是特征增强,同时缩小Feature Map的尺寸。在VGG网络中,只有C结构设置了1x1的卷积核,其余都是3x3的卷积,这种操作减小了参数量,论文中给出的参数量对比如下:

可见,虽然从A结构到E结构,网络由11层增加至19层,但参数量并未发生太大变化,这是因为在网络中,参数主要集中在全连接层。
结构特点
代码实现
定义卷积函数:
def conv2d(x, W, b, strides=1):
    # Conv2D wrapper, with bias and relu activation
    x = tf.nn.conv2d(x, W, strides=[1, strides, strides, 1], padding='SAME')
    x = tf.nn.bias_add(x, b)
return tf.nn.relu(x)def maxpool2d(x, k=2):
# MaxPool2D wrapper
return tf.nn.max_pool(x, ksize=[1, k, k, 1], strides=[1, k, k, 1],
padding='SAME')
定义VGG结构:
def conv_net(x, weights, biases, dropout):
    # Reshape input picture  x.shape:(128,128,3)
    x = tf.reshape(x, shape=[-1, 128, 128, 3])

    # Convolution Layer
    conv1 = conv2d(x, weights['wc1'], biases['bc1'])
    conv2 = conv2d(conv1, weights['wc2'], biases['bc2'])
    # Max Pooling (down-sampling)
    pool1 = maxpool2d(conv2, k=2)
    print(pool1.shape) #(64,64,64)

    # Convolution Layer
    conv3 = conv2d(pool1, weights['wc3'], biases['bc3'])
    conv4 = conv2d(conv3, weights['wc4'], biases['bc4'])
    # Max Pooling (down-sampling)
    pool2 = maxpool2d(conv4, k=2)
    print(pool2.shape) #(32,32,128)

    # Convolution Layer
    conv5 = conv2d(pool2, weights['wc5'], biases['bc5'])
    conv6 = conv2d(conv5, weights['wc6'], biases['bc6'])
    conv7 = conv2d(conv6, weights['wc7'], biases['bc7'])
    # Max Pooling
    pool3 = maxpool2d(conv7, k=2)
    print(pool3.shape) #(16,16,256)

    # Convolution Layer
    conv8 = conv2d(pool3, weights['wc8'], biases['bc8'])
    conv9 = conv2d(conv8, weights['wc9'], biases['bc9'])
    conv10 = conv2d(conv9, weights['wc10'], biases['bc10'])
    # Max Pooling
    pool4 = maxpool2d(conv10, k=2)
    print(pool4.shape) #(8,8,512)

    conv11 = conv2d(pool4, weights['wc11'], biases['bc11'])
    conv12 = conv2d(conv11, weights['wc12'], biases['bc12'])
    conv13 = conv2d(conv12, weights['wc13'], biases['bc13'])
    # Max Pooling
    pool5 = maxpool2d(conv13, k=2)
    print(pool5.shape) #(4,4,512)

    # Fully connected layer
    # Reshape conv2 output to fit fully connected layer input
    fc1 = tf.reshape(pool5, [-1, weights['wd1'].get_shape().as_list()[0]])
    fc1 = tf.add(tf.matmul(fc1, weights['wd1']), biases['bd1'])
    fc1 = tf.nn.relu(fc1)
    # Apply Dropout
    fc1 = tf.nn.dropout(fc1, dropout)

    #fc2 = tf.reshape(fc1, [-1, weights['wd2'].get_shape().as_list()[0]])
    fc2 = tf.add(tf.matmul(fc1, weights['wd2']), biases['bd2'])
    fc2 = tf.nn.relu(fc2)
    # Apply Dropout
    fc2 = tf.nn.dropout(fc2, dropout)
    '''
    fc3 = tf.reshape(fc2, [-1, weights['out'].get_shape().as_list()[0]])
    fc3 = tf.add(tf.matmul(fc2, weights['out']), biases['bd2'])
    fc3 = tf.nn.relu(fc2)
    '''
    # Output, class prediction
    out = tf.add(tf.matmul(fc2, weights['out']), biases['out'])
return outweights = {
# 3x3 conv, 3 input, 24 outputs
'wc1': tf.Variable(tf.random_normal([3, 3, 3, 64])),
'wc2': tf.Variable(tf.random_normal([3, 3, 64, 64])),
'wc3': tf.Variable(tf.random_normal([3, 3, 64, 128])),
'wc4': tf.Variable(tf.random_normal([3, 3, 128, 128])),
'wc5': tf.Variable(tf.random_normal([3, 3, 128, 256])),
'wc6': tf.Variable(tf.random_normal([3, 3, 256, 256])),
'wc7': tf.Variable(tf.random_normal([3, 3, 256, 256])),
'wc8': tf.Variable(tf.random_normal([3, 3, 256, 512])),
'wc9': tf.Variable(tf.random_normal([3, 3, 512, 512])),
'wc10': tf.Variable(tf.random_normal([3, 3, 512, 512])),
'wc11': tf.Variable(tf.random_normal([3, 3, 512, 512])),
'wc12': tf.Variable(tf.random_normal([3, 3, 512, 512])),
'wc13': tf.Variable(tf.random_normal([3, 3, 512, 512])),
# fully connected, 32*32*96 inputs, 1024 outputs
'wd1': tf.Variable(tf.random_normal([4*4*512, 1024])),
'wd2': tf.Variable(tf.random_normal([1024, 1024])),
# 1024 inputs, 10 outputs (class prediction)
'out': tf.Variable(tf.random_normal([1024, 10]))biases = {
'bc1': tf.Variable(tf.random_normal([64])),
'bc2': tf.Variable(tf.random_normal([64])),
'bc3': tf.Variable(tf.random_normal([128])),
'bc4': tf.Variable(tf.random_normal([128])),
'bc5': tf.Variable(tf.random_normal([256])),
'bc6': tf.Variable(tf.random_normal([256])),
'bc7': tf.Variable(tf.random_normal([256])),
'bc8': tf.Variable(tf.random_normal([512])),
'bc9': tf.Variable(tf.random_normal([512])),
'bc10': tf.Variable(tf.random_normal([512])),
'bc11': tf.Variable(tf.random_normal([512])),
'bc12': tf.Variable(tf.random_normal([512])),
'bc13': tf.Variable(tf.random_normal([512])),
'bd1': tf.Variable(tf.random_normal([1024])),
'bd2': tf.Variable(tf.random_normal([1024])),
'out': tf.Variable(tf.random_normal([10]))# Construct model
pred = conv_net(x, weights, biases, keep_prob)
# Define loss and optimizer
cost = tf.reduce_mean(tf.nn.softmax_cross_entropy_with_logits(logits=pred, labels=y))
optimizer = tf.train.AdamOptimizer(learning_rate=learning_rate).minimize(cost)
# Evaluate model
correct_pred = tf.equal(tf.argmax(pred, 1), tf.argmax(y, 1))
accuracy = tf.reduce_mean(tf.cast(correct_pred, tf.float32))
# Initializing the variables
init = tf.global_variables_initializer()
saver=tf.train.Saver()


 1万+
1万+

 被折叠的 条评论
为什么被折叠?
被折叠的 条评论
为什么被折叠?
 到【灌水乐园】发言


