


1.Spring Boot
通过 Spring Boot 可以快速构建⼀个基于 Spring 框架的 Java Application,简化配置,⾃动装配。
JavaConfifiguration ⽤ Java 类替代 XML 的配置⽅式。
Spring Boot 对常⽤的第三⽅库提供了配置⽅案,可以很好地和 Spring 进⾏整合,⼀键式搭建功能完备
的 Java 企业级应⽤。
开箱即⽤是 Spring Boot 的特点
1.Spring Boot 的优势:
- 不需要任何 XML 配置⽂件
- 内嵌 Tomcat,可以直接部署
- 默认⽀持 JSON 数据,不需要进⾏转换
- ⽀持 RESTful
- 配置⽂件⾮常简单,⽀持 YAML 格式
Spring Boot 是⼀种只需要极少配置就可以快速搭建 Spring 应⽤,并且集成了常⽤的第三⽅类库,让开发者可以快速进⾏企业级应⽤发。
Spring Boot 2.x 要求必须基于 Spring 5.x,Spring 5.x 要求 Java 版本必须是 8 以上
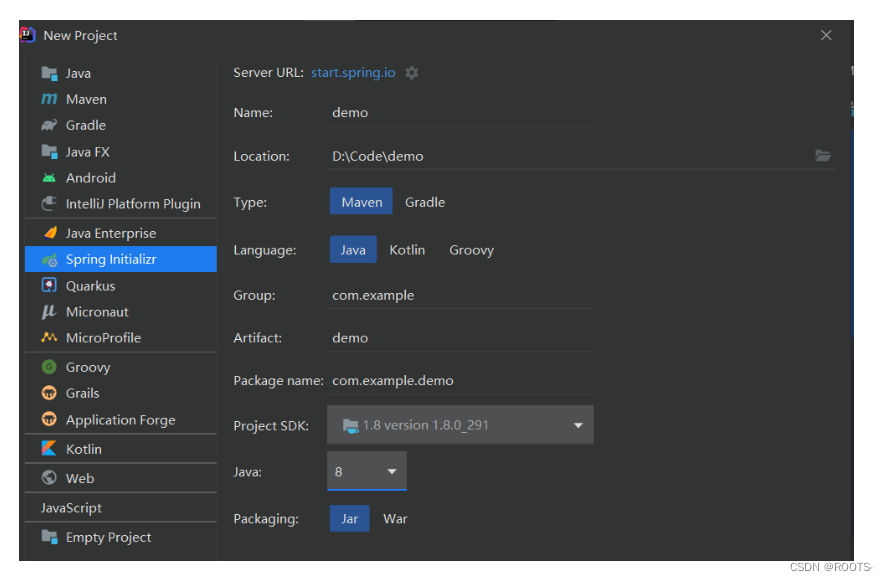
2.Spring Boot的简单使用
第一步:创建工程
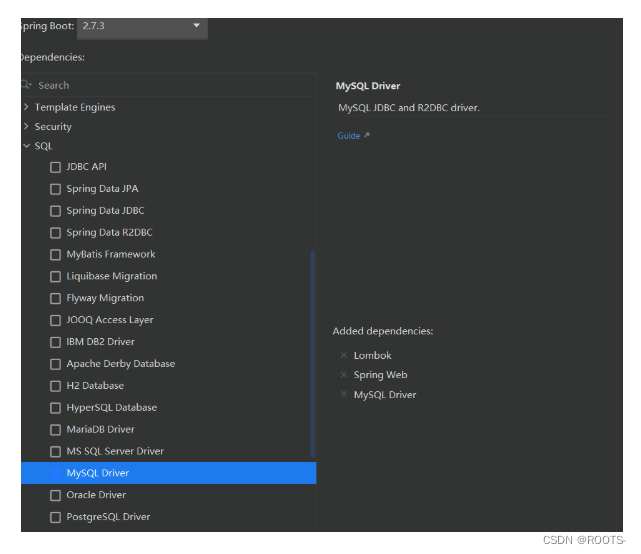
第二步:选择导入的依赖
第三步:创建 Handler
package com.ag.springboot02.controller;

import org.springframework.web.bind.annotation.GetMapping;
import org.springframework.web.bind.annotation.RequestMapping;
import org.springframework.web.bind.annotation.RestController;

//@RestController 是 @Controller 和 @ResponseBody 两个注解的结合体。
@RestController
@RequestMapping("/hello")
public class HelloHandler {

    @GetMapping("/index")
    public String index(){
        return "Hello My First Spring Boot Project";
    }
}
第四步:运行启动类
package com.ag.springboot02;

import org.springframework.boot.SpringApplication;
import org.springframework.boot.autoconfigure.SpringBootApplication;

@SpringBootApplication
public class SpringBoot02Application {

    public static void main(String[] args) {
        SpringApplication.run(SpringBoot02Application.class, args);
    }

}
成功:
![[外链图片转存失败,源站可能有防盗链机制,建议将图片保存下来直接上传(img-2hBbyov4-1662126833659)(C:\Users\AnGeng\AppData\Roaming\Typora\typora-user-images\image-20220827180203352.png)]](https://img-blog.csdnimg.cn/c93225194e86487fb92462d6306f19f9.png)
真的好方便啊!!!
启动类必须覆盖所有与业务相关的类:启动类所在的包必须是业务类所在包的同包或者⽗包,如果没有覆盖,业务类就不会⾃动装配到 IoC 容器中
2.Spring Boot 配置⽂件
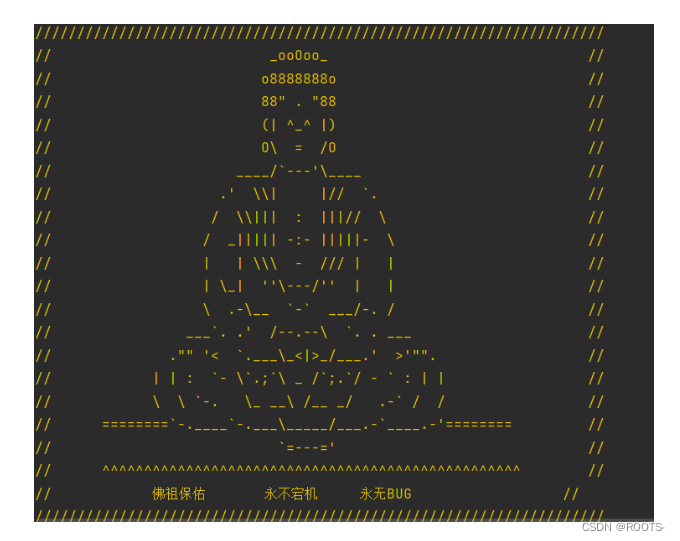
1.自定义banner
写一个banner.txt放到resource目录下
![[外链图片转存失败,源站可能有防盗链机制,建议将图片保存下来直接上传(img-Qmwn6w8s-1662126833661)(C:\Users\AnGeng\AppData\Roaming\Typora\typora-user-images\image-20220827184623236.png)]](https://img-blog.csdnimg.cn/967da133cdcc45bf82475d8c7cf0529d.png)
${AnsiColor.BRIGHT_YELLOW}

//                          _ooOoo_                               //
//                         o8888888o                              //
//                         88" . "88                              //
//                         (| ^_^ |)                              //
//                         O\  =  /O                              //
//                      ____/`---'\____                           //
//                    .'  \\|     |//  `.                         //
//                   /  \\|||  :  |||//  \                        //
//                  /  _||||| -:- |||||-  \                       //
//                  |   | \\\  -  /// |   |                       //
//                  | \_|  ''\---/''  |   |                       //
//                  \  .-\__  `-`  ___/-. /                       //
//                ___`. .'  /--.--\  `. . ___                     //
//              ."" '<  `.___\_<|>_/___.'  >'"".                  //
//            | | :  `- \`.;`\ _ /`;.`/ - ` : | |                 //
//            \  \ `-.   \_ __\ /__ _/   .-` /  /                 //
//      ========`-.____`-.___\_____/___.-`____.-'========         //
//                           `=---='                              //
//      ^^^^^^^^^^^^^^^^^^^^^^^^^^^^^^^^^^^^^^^^^^^^^^^^^^        //
//            佛祖保佑       永不宕机     永无BUG                  //
效果:
2.Properties
在application.properties中可以配置一些信息
#端⼝
server.port=8081
#项⽬访问路径
server.servlet.context-path=/springboot
#cookie失效时间
server.servlet.session.cookie.max-age=100
#session失效时间
server.servlet.session.timeout=100
#编码格式
server.tomcat.uri-encoding=UTF-8
![[外链图片转存失败,源站可能有防盗链机制,建议将图片保存下来直接上传(img-0yUTM1g8-1662126833664)(C:\Users\AnGeng\AppData\Roaming\Typora\typora-user-images\image-20220827185810109.png)]](https://img-blog.csdnimg.cn/08e65ab60f784739b5faf8e5b92bb191.png)
3.YAML
YAML 是不同于 Properties 的另外⼀种⽂件格式,同样可以⽤来写配置⽂件,Spring Boot 默认⽀持YAML 格式,YAML 的优点在于编写简单,结构清晰,利⽤缩紧的形式来表示层级关系。
相⽐于 Properties,YAML 可以进⼀步简化配置⽂件的编写,更加⽅便。
server:
  port: 8181
  servlet:
    context-path: /springboot
    session:
      cookie:
        max-age: 100
      timeout: 100
  tomcat:
   uri-encoding: UTF-8
需要注意的是 YAML 格式书写规范⾮常严格,属性名和属性值之间必须⾄少⼀个空格。如果 Properties 和 YAML 两种类型的⽂件同时存在,Properties 的优先级更⾼。
配置⽂件除了可以放置在 resources 路径下之外,还有 3 个地⽅可以放置,如下图所示。

优先级顺序如下所示:
1、根路径下的 confifig 中的配置⽂件
2、根路径下的配置⽂件
3、resources 路径下的 confifig 中的配置⽂件
4、resources 路径下的配置⽂件
可以直接在 Handler 中读取 YAML ⽂件中的数据,⽐如在业务⽅法中向客户端返回当前服务的端⼝信息。
package com.ag.springboot02.controller;

import org.springframework.beans.factory.annotation.Value;
import org.springframework.web.bind.annotation.GetMapping;
import org.springframework.web.bind.annotation.RequestMapping;
import org.springframework.web.bind.annotation.RestController;

//@RestController 是 @Controller 和 @ResponseBody 两个注解的结合体。
@RestController
@RequestMapping("/hello")
public class HelloHandler {

    /**
     * SpEL Spring Expression Language
     */
    @Value("${server.port}")
    private String port;

    @GetMapping("/index")
    public String index(){
        return "Hello My First Spring Boot Project"+"当前端口为:"+port;
    }
}
![[外链图片转存失败,源站可能有防盗链机制,建议将图片保存下来直接上传(img-jtmIsHdR-1662126833667)(C:\Users\AnGeng\AppData\Roaming\Typora\typora-user-images\image-20220827193237463.png)]](https://img-blog.csdnimg.cn/e20bfb207b9f45d6af4f1dddb9a236a2.png)
@Value 注解同样适⽤于 Properties ⽂件。
3.Spring Boot 整合 JSP
pring Boot 与视图层的整合
- JSP
- Thymeleaf
Java Server Page,是 Java 提供的⼀种动态⽹⻚技术,底层是 Servlet,可以直接在 HTML 中插⼊ Java代码。
JSP 底层原理:
JSP 是⼀种中间层组件,开发者可以在这个组件中将 Java 代码与 HTML 代码进⾏整合,由 JSP 引擎将组件转为 Servlet,再把开发者定义在组件中的混合代码翻译成 Servlet 的响应语句,输出给客户端
第一步:创建基于 Maven 的 Web 项⽬,pom.xml
<parent>
  <groupId>org.springframework.boot</groupId>
  <artifactId>spring-boot-starter-parent</artifactId>
  <version>2.2.4.RELEASE</version>
</parent>

<dependencies>
  <dependency>
    <groupId>org.springframework.boot</groupId>
    <artifactId>spring-boot-starter-web</artifactId>
    <version>2.2.4.RELEASE</version>
  </dependency>
  <dependency>
    <groupId>org.apache.tomcat.embed</groupId>
    <artifactId>tomcat-embed-jasper</artifactId>
    <version>9.0.19</version>
  </dependency>
</dependencies>
第二步:创建启动类 Application
package com.ag;

import org.springframework.boot.SpringApplication;
import org.springframework.boot.autoconfigure.SpringBootApplication;

@SpringBootApplication
public class Application {
    public static void main(String[] args) {
        SpringApplication.run(Application.class,args);
    }
}
第三步:创建处理器 handler
package com.ag.controller;

import org.springframework.stereotype.Controller;
import org.springframework.web.bind.annotation.RequestMapping;
import org.springframework.web.servlet.ModelAndView;

@Controller
@RequestMapping("/index")
public class HelloHandler {

    @RequestMapping("/hello")
    public ModelAndView index(){
        ModelAndView modelAndView = new ModelAndView();
        modelAndView.setViewName("index");
        modelAndView.addObject("lolit","hello");
        return modelAndView;

    }
}
第四步:jsp
<%@ page contentType="text/html;charset=UTF-8" language="java" %>
<%@ page isELIgnored="false" %>
<html>
<head>
    <title>Title</title>
</head>
<body>
<h1>index</h1>
${lolit}
</body>
</html>
第五步:创建application.yml 配置视图解析器
spring:
  mvc:
    view:
      prefix: /
      suffix: .jsp
项目结构图:
![[外链图片转存失败,源站可能有防盗链机制,建议将图片保存下来直接上传(img-3VljF3aC-1662126833670)(C:\Users\AnGeng\AppData\Roaming\Typora\typora-user-images\image-20220827234528383.png)]](https://img-blog.csdnimg.cn/5b392cd8d8714f46b2a1078efb2c1b40.png)
成功:
![[外链图片转存失败,源站可能有防盗链机制,建议将图片保存下来直接上传(img-EseybJ2N-1662126833671)(C:\Users\AnGeng\AppData\Roaming\Typora\typora-user-images\image-20220827234542307.png)]](https://img-blog.csdnimg.cn/d8260e267726446ca9631bcfc1c552fc.png)
小的实际应用
1.导入依赖 pom.xml
Lombok 的功能是简化实体类代码的编写⼯作,常⽤的⽅法 getter、setter、toString 等⽅法都可以由Lombok ⾃动⽣成,开发者不需要⾃⼰⼿动编写,Lombok 的使⽤需要安装插件。
<dependency>
    <groupId>jstl</groupId>
    <artifactId>jstl</artifactId>
    <version>1.2</version>
  </dependency>

  <dependency>
  <groupId>org.projectlombok</groupId>
  <artifactId>lombok</artifactId>
  <version>1.18.10</version>
</dependency>
2.创建实体类
package com.ag.entity;

import lombok.AllArgsConstructor;
import lombok.Data;

@Data
@AllArgsConstructor
public class User {
    private Integer id;
    private String name;
}
3.repository包创建接口 UserRepository
package com.ag.repository;

import com.ag.entity.User;

import java.util.Collection;

public interface UserRepository {
    public Collection<User> findAll();
    public User findByID(Integer id);
    public void save(User user);
    public void delectByID(Integer id);
    public void update(User user);
}
4.repository包写一个接口的实现类UserRepositoryImpl
package com.ag.repository.impl;

import com.ag.entity.User;
import com.ag.repository.UserRepository;
import org.springframework.stereotype.Repository;

import java.util.Collection;
import java.util.HashMap;
import java.util.Map;

@Repository
public class UserRepositoryImpl implements UserRepository {
    //    创建一个map集合来代替数据库
    private static Map<Integer, User> map;

    static {
        map=new HashMap<>();
        map.put(1,new User(1,"loli01"));
        map.put(2,new User(1,"loli02"));
        map.put(3,new User(1,"loli03"));
    }

    @Override
    public Collection<User> findAll() {
        return map.values();
    }

    @Override
    public User findByID(Integer id) {
        return map.get(id);
    }

    @Override
    public void save(User user) {
        map.put(user.getId(),user);
    }

    @Override
    public void delectByID(Integer id) {
        map.remove(id);
    }

    @Override
    public void update(User user) {
        map.put(user.getId(),user);
    }
}
5.service包中写一个接口UserService
package com.ag.service;

import com.ag.entity.User;

import java.util.Collection;

public interface UserService {
    public Collection<User> findAll();
    public User findByID(Integer id);
    public void save(User user);
    public void delectByID(Integer id);
    public void update(User user);

}
6.service包写一个接口的实现类UserServiceImpl
package com.ag.service.impl;

import com.ag.entity.User;
import com.ag.repository.UserRepository;
import com.ag.service.UserService;
import org.springframework.beans.factory.annotation.Autowired;
import org.springframework.stereotype.Service;

import java.util.Collection;
import java.util.HashMap;
import java.util.Map;

@Service
public class UserServiceImpl implements UserService {

@Autowired
private UserRepository userRepository;

    @Override
    public Collection<User> findAll() {
        return userRepository.findAll();
    }

    @Override
    public User findByID(Integer id) {
        return userRepository.findByID(id);
    }

    @Override
    public void save(User user) {
       userRepository.save(user);
    }

    @Override
    public void delectByID(Integer id) {
        userRepository.delectByID(id);

    }

    @Override
    public void update(User user) {
        userRepository.update(user);

    }
}
7.写一个处理器handler
package com.ag.controller;

import com.ag.entity.User;
import com.ag.service.UserService;
import org.springframework.beans.factory.annotation.Autowired;
import org.springframework.stereotype.Controller;
import org.springframework.web.bind.annotation.GetMapping;
import org.springframework.web.bind.annotation.PathVariable;
import org.springframework.web.bind.annotation.PostMapping;
import org.springframework.web.bind.annotation.RequestMapping;
import org.springframework.web.servlet.ModelAndView;

@Controller
@RequestMapping("/user")
public class UserHandler {

    @Autowired
    private UserService userService;

    @GetMapping("/findAll")
    public ModelAndView findAll(){
        ModelAndView modelAndView = new ModelAndView();
        modelAndView.setViewName("index");
        modelAndView.addObject("list",userService.findAll());
        return modelAndView;
    }

    @GetMapping("/findByID/{id}")
    public ModelAndView findByID(@PathVariable("id") Integer id){
        ModelAndView modelAndView = new ModelAndView();
        modelAndView.setViewName("update");
        modelAndView.addObject("user",userService.findByID(id));
        return modelAndView;
    }

    @PostMapping("/save")
    public String save(User user){
        userService.save(user);
        return "redirect:/user/findAll";
    }

    @GetMapping("/deleteByID/{id}")
    public String deleteByID(@PathVariable("id") Integer id){
        userService.delectByID(id);
        return "redirect:/user/findAll";
    }

    @PostMapping("/update")
    public String update(User user){
        userService.update(user);
        return "redirect:/user/findAll";
    }
}
8.index.jsp
<%--
 Created by IntelliJ IDEA.
 User: southwind
 Date: 2020-02-23
 Time: 18:03
 To change this template use File | Settings | File Templates.
--%>
<%@ page contentType="text/html;charset=UTF-8" language="java" %>
<%@ page isELIgnored="false" %>
<%@ taglib prefix="c" uri="http://java.sun.com/jsp/jstl/core" %>
<html> <head>
    <title>Title</title>
</head> <body>
<h1>Index</h1>
<table>
    <tr>
        <th>编号</th>
        <th>姓名</th>
        <th>操作</th>
    </tr>
    <c:forEach items="${list}" var="user">
        <tr>
            <td>${user.id}</td>
            <td>${user.name}</td>
            <td>
                <a href="/user/deleteByID/${user.id}">删除</a>
                <a href="/user/findByID/${user.id}">修改</a>
            </td>
        </tr>
    </c:forEach>
</table>
</body>
</html>
9.save.jsp
<%--
 Created by IntelliJ IDEA.
 User: southwind
 Date: 2020-02-24
 Time: 13:04
 To change this template use File | Settings | File Templates.
--%>
<%@ page contentType="text/html;charset=UTF-8" language="java" %>
<html> <head>
  <title>Title</title>
</head> <body>
<form action="/user/save" method="post">
  <input type="text" name="id"/><br/>
  <input type="text" name="name"/><br/>
  <input type="submit"/>
</form>
</body>
</html>
10.update.jsp
<%--
  Created by IntelliJ IDEA.
  User: AnGeng
  Date: 2022/8/28
  Time: 0:48
  To change this template use File | Settings | File Templates.
--%>
<%@ page contentType="text/html;charset=UTF-8" language="java" %>
<%@ page isELIgnored="false" %>
<html> <head>
  <title>Title</title>
</head> <body>
<form action="/user/update" method="post">
  <input type="text" name="id" value="${user.id}" readonly/><br/>
  <input type="text" name="name" value="${user.name}"/><br/>
  <input type="submit"/>
</form>
</body>
</html>
成功:
![[外链图片转存失败,源站可能有防盗链机制,建议将图片保存下来直接上传(img-vHGA2mrn-1662126833673)(C:\Users\AnGeng\AppData\Roaming\Typora\typora-user-images\image-20220828122252039.png)]](https://img-blog.csdnimg.cn/5467aedf79b64f5899307b9b75d25fa6.png)
4.Spring Boot 整合 Thymeleaf
Thymeleaf 是⽬前较为流⾏的视图层技术,Spring Boot 官⽅推荐使⽤ Thymeleaf。
1.什么是 Thymeleaf
Thymeleaf 是⼀个⽀持原⽣ THML ⽂件的 Java 模版,可以实现前后端分离的交互⽅式,即视图与业务数据分开响应,它可以直接将服务端返回的数据⽣成 HTML ⽂件,同时也可以处理 XML、JavaScript、CSS 等格式。
Thymeleaf 最⼤的特点是既可以直接在浏览器打开(静态⽅式),也可以结合服务端将业务数据填充到HTML 之后动态⽣成的⻚⾯(动态⽅法),Spring Boot ⽀持 Thymeleaf,使⽤起来⾮常⽅便。
1、创建 Maven ⼯程,不需要创建 Web ⼯程,pom.xml
<?xml version="1.0" encoding="UTF-8"?>
<project xmlns="http://maven.apache.org/POM/4.0.0"
         xmlns:xsi="http://www.w3.org/2001/XMLSchema-instance"
         xsi:schemaLocation="http://maven.apache.org/POM/4.0.0 http://maven.apache.org/xsd/maven-4.0.0.xsd">
    <modelVersion>4.0.0</modelVersion>

    <groupId>org.example</groupId>
    <artifactId>SpringBootThymeleaf</artifactId>
    <version>1.0-SNAPSHOT</version>

    <parent>
        <groupId>org.springframework.boot</groupId>
        <artifactId>spring-boot-starter-parent</artifactId>
        <version>2.2.4.RELEASE</version>
    </parent>

    <dependencies>
        <dependency>
            <groupId>org.springframework.boot</groupId>
            <artifactId>spring-boot-starter-web</artifactId>
        </dependency>
        <dependency>
            <groupId>org.springframework.boot</groupId>
            <artifactId>spring-boot-starter-thymeleaf</artifactId>
        </dependency>
    </dependencies>

    <properties>
        <maven.compiler.source>8</maven.compiler.source>
        <maven.compiler.target>8</maven.compiler.target>
    </properties>

</project>
2.application.yml
spring:
  thymeleaf:
    prefix: classpath:/templates/  #模版路径
    suffix: .html #模版后缀
    servlet:
      content-type: text/html  #设置 Content-type
    encoding: utf-8 #编码⽅式
    mode: HTML5 #校验 H5 格式
    cache: false #关闭缓存,在开发过程中可以⽴即看到⻚⾯修改的结果
![[外链图片转存失败,源站可能有防盗链机制,建议将图片保存下来直接上传(img-aRlTe6kN-1662126833675)(C:\Users\AnGeng\AppData\Roaming\Typora\typora-user-images\image-20220828155958847.png)]](https://img-blog.csdnimg.cn/7cf394fe9d004339975e62b31b86b8cf.png)
3.配置启动类
package com.ag;

import org.springframework.boot.SpringApplication;
import org.springframework.boot.autoconfigure.SpringBootApplication;

@SpringBootApplication
public class Application {
    public static void main(String[] args) {
        SpringApplication.run(Application.class,args);
    }
}
4.处理器handler
package com.ag.controller;

import org.springframework.stereotype.Controller;
import org.springframework.web.bind.annotation.GetMapping;
import org.springframework.web.bind.annotation.RequestMapping;
import org.springframework.web.servlet.ModelAndView;

@Controller
@RequestMapping("/hello")
public class HelloHandler {

    @GetMapping("/index")
    public ModelAndView index(){
        ModelAndView modelAndView = new ModelAndView();
        modelAndView.setViewName("index");
        modelAndView.addObject("name","lolit");
        return modelAndView;
    }
}
5.界面 index.html
<!DOCTYPE html>
<html lang="en">
<html xmlns:th="http://www.thymeleaf.org">
<head>
    <meta charset="UTF-8">
    <title>Title</title>
</head>
<body>
<h1>index</h1>
<p th:text="${name}">hello</p>
</body>
</html>
![[外链图片转存失败,源站可能有防盗链机制,建议将图片保存下来直接上传(img-olnd3ljm-1662126833676)(C:\Users\AnGeng\AppData\Roaming\Typora\typora-user-images\image-20220828162333414.png)]](https://img-blog.csdnimg.cn/f24d3b24a4924443aa10636339978dd6.png)
这是运行后的界面
![[外链图片转存失败,源站可能有防盗链机制,建议将图片保存下来直接上传(img-TxqUgTTM-1662126833678)(C:\Users\AnGeng\AppData\Roaming\Typora\typora-user-images\image-20220828162114008.png)]](https://img-blog.csdnimg.cn/799a7fc838d44102a05147c54e495717.png)
这是后台代码:
![[外链图片转存失败,源站可能有防盗链机制,建议将图片保存下来直接上传(img-K2CA5d8A-1662126833680)(C:\Users\AnGeng\AppData\Roaming\Typora\typora-user-images\image-20220828162152945.png)]](https://img-blog.csdnimg.cn/8a3fb2e307af41e1b2246290b4f119cb.png)
这是直接访问的界面:
![[外链图片转存失败,源站可能有防盗链机制,建议将图片保存下来直接上传(img-g9EEr9d9-1662126833682)(C:\Users\AnGeng\AppData\Roaming\Typora\typora-user-images\image-20220828162224956.png)]](https://img-blog.csdnimg.cn/a8f793b07676402bb8c32b6cad3d0792.png)
这是直接访问的源代码:
![[外链图片转存失败,源站可能有防盗链机制,建议将图片保存下来直接上传(img-gP7GkVZE-1662126833683)(C:\Users\AnGeng\AppData\Roaming\Typora\typora-user-images\image-20220828162250131.png)]](https://img-blog.csdnimg.cn/cdc97c3ab67a4610b64d8905c88a1bc0.png)
这样可以实时的查看前端界面的情况,比jsp好用
使用Thymeleaf:
需要引⼊模版标签
<html xmlns:th="http://www.thymeleaf.org">
通过特定的标签完成操作
<p th:text="${name}">Hello World</p>
Thymeleaf 模版标签不同于 JSTL,Thymeleaf 模版标签是直接嵌⼊到 HTML 原⽣标签内部。
2.Thymeleaf 常⽤标签
1.th:text
th:text ⽤于⽂本的显示,将业务数据的值填充到 HTML 标签中
2.th:if
th:if ⽤于条件判断,对业务数据的值进⾏判断,如果条件成⽴,则显示内容,否则不显示,具体的使⽤如下所示。
处理器handler:
@GetMapping("/if")
public ModelAndView ifTest(){
    ModelAndView modelAndView = new ModelAndView();
    modelAndView.addObject("score",85);
    modelAndView.setViewName("test");
    return modelAndView;
}
<!DOCTYPE html>
<html lang="en">
<html xmlns:th="http://www.thymeleaf.org">
<head>
    <meta charset="UTF-8">
    <title>Title</title>
</head>
<body>
<h1>index</h1>
<p th:if="${score>=80}">优秀</p>
<p th:if="${score<80}">还行</p>
</body>
</html>
![[外链图片转存失败,源站可能有防盗链机制,建议将图片保存下来直接上传(img-pivHSQyK-1662126833685)(C:\Users\AnGeng\AppData\Roaming\Typora\typora-user-images\image-20220828163847680.png)]](https://img-blog.csdnimg.cn/b8eb75fd0b6c4442a2d017ae249e4878.png)
页面源码:
![[外链图片转存失败,源站可能有防盗链机制,建议将图片保存下来直接上传(img-2t2DGzUq-1662126833687)(C:\Users\AnGeng\AppData\Roaming\Typora\typora-user-images\image-20220828163946220.png)]](https://img-blog.csdnimg.cn/329b3276bfba4640b22e4978df328b54.png)
3.th:unless
th:unless 也⽤作条件判断,逻辑与 th:if 恰好相反,如果条件不成⽴则显示,否则不显示。
处理器用上面的
<!DOCTYPE html>
<html lang="en">
<html xmlns:th="http://www.thymeleaf.org">
<head>
    <meta charset="UTF-8">
    <title>Title</title>
</head>
<body>
<h1>index</h1>
<p th:unless="${score>=80}">优秀</p>
<p th:unless="${score<80}">还行</p>
</body>
</html>
![[外链图片转存失败,源站可能有防盗链机制,建议将图片保存下来直接上传(img-Xc48wsiI-1662126833695)(C:\Users\AnGeng\AppData\Roaming\Typora\typora-user-images\image-20220828164250293.png)]](https://img-blog.csdnimg.cn/e35b9e4ac51c4d0ba75c912fcc037006.png)
![[外链图片转存失败,源站可能有防盗链机制,建议将图片保存下来直接上传(img-q2vCgHN4-1662126833696)(C:\Users\AnGeng\AppData\Roaming\Typora\typora-user-images\image-20220828164259865.png)]](https://img-blog.csdnimg.cn/b607960b3111442ebe0961772dc51796.png)
4.th:switch th:case
th:switch th:case 两个结合起来使⽤,⽤作多条件等值判断,逻辑与 Java 中的 switch-case ⼀致,当switch 中的业务数据等于某个 case 时,就显示该 case 对应的内容。
处理器:
@GetMapping("/switch")
public ModelAndView switchTest(){
    ModelAndView modelAndView = new ModelAndView();
    modelAndView.setViewName("test");
    modelAndView.addObject("lolit",16);
    return modelAndView;
}
html:
<div th:switch="${lolit}">
    <p th:case="16">lolit16</p>
    <p th:case="17">lolit17</p>
    <p th:case="18">lolit18</p>
</div>
![[外链图片转存失败,源站可能有防盗链机制,建议将图片保存下来直接上传(img-du7sLosN-1662126833697)(C:\Users\AnGeng\AppData\Roaming\Typora\typora-user-images\image-20220828170110621.png)]](https://img-blog.csdnimg.cn/a5b1e00503734429837c978f1ce8ac99.png)
5.th:action
⽤来指定请求的 URL,相当于 form 表单中的 action 属性
handler:
@GetMapping("/redirect/{url}")
public String redirect(@PathVariable("url") String url, Model model)
{
    model.addAttribute("url","/hello/login");
    return url;
}
@PostMapping("/login")
@ResponseBody
public String lohin(){
    return "login";
}
html
<form th:action="${url}" method="post">
    <input type="submit"/>
</form>
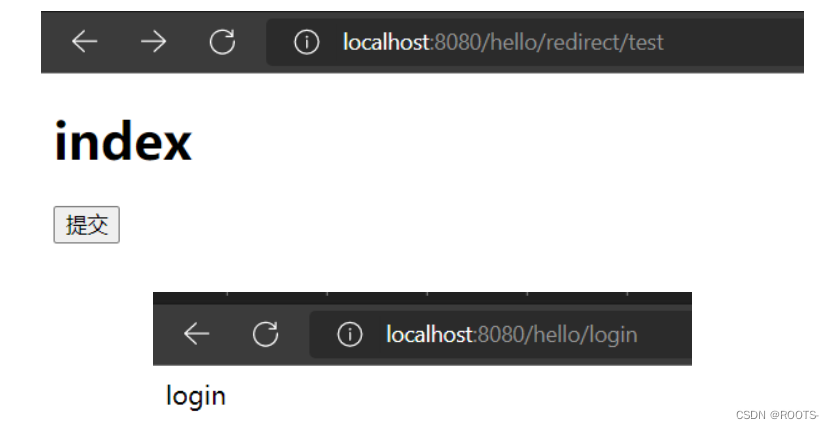
如果 action 的值直接写在 HTML 中,则需要使⽤ @{},如果是从后台传来的数据,则使⽤${}
6.th:each
⽤来遍历集合
实体类:
package com.ag.entity;

import lombok.AllArgsConstructor;
import lombok.Data;

@Data
@AllArgsConstructor
public class User {
    private Integer id;
    private String name;
}
handler
@GetMapping("/each")
public ModelAndView eachTest(){
    ModelAndView modelAndView = new ModelAndView();
    modelAndView.setViewName("test");
    List<User> list= Arrays.asList(
            new User(1,"lolit01"),
            new User(2,"lolit02"),
            new User(3,"lolit03")
    );
    modelAndView.addObject("list",list);
    return modelAndView;
}
html
<table>
    <tr>
        <th>编号</th>
        <th>姓名</th>
    </tr>
    <tr th:each="userss:${list}">
        <td th:text="${userss.id}"></td>
        <td th:text="${userss.name}"></td>
    </tr>
</table>
![[外链图片转存失败,源站可能有防盗链机制,建议将图片保存下来直接上传(img-MRa1ocoa-1662126833700)(C:\Users\AnGeng\AppData\Roaming\Typora\typora-user-images\image-20220828191840753.png)]](https://img-blog.csdnimg.cn/15f163d7082e49ac9ebd7fb6ebea20e7.png)
7.th:value
⽤来给标签赋值。
handler
@GetMapping("/value")
public ModelAndView valueTest(){
    ModelAndView modelAndView = new ModelAndView();
    modelAndView.setViewName("test");
    modelAndView.addObject("name","lolit");
    return modelAndView;
}
<input type="text" th:value="${name}">
![[外链图片转存失败,源站可能有防盗链机制,建议将图片保存下来直接上传(img-WzctVP7L-1662126833701)(C:\Users\AnGeng\AppData\Roaming\Typora\typora-user-images\image-20220828192330957.png)]](https://img-blog.csdnimg.cn/ef5012e18f834306aeada11ac5f57573.png)
8.th:src
⽤来引⼊静态资源,相当于 HTML 原⽣标签 img、script 的 src 属性。
图⽚,css,js,静态加载的 html 都需要放置在 resources/static ⽂件中
![[外链图片转存失败,源站可能有防盗链机制,建议将图片保存下来直接上传(img-qikq7CjA-1662126833701)(C:\Users\AnGeng\AppData\Roaming\Typora\typora-user-images\image-20220828194325851.png)]](https://img-blog.csdnimg.cn/cbc93baa38f842e2a36f3bcdd00d704a.png)
@GetMapping("/src")
public ModelAndView srcTest(){
    ModelAndView modelAndView = new ModelAndView();
    modelAndView.setViewName("test");
    modelAndView.addObject("src","/1.png");
    return modelAndView;
}
<img th:src="${src}"/>
如果 src 的值直接写在 HTML 中
<img th:src="@{/1.png}"/>
![[外链图片转存失败,源站可能有防盗链机制,建议将图片保存下来直接上传(img-JTjM6MKE-1662126833702)(C:\Users\AnGeng\AppData\Roaming\Typora\typora-user-images\image-20220828194311026.png)]](https://img-blog.csdnimg.cn/55e6bb1d17ec45628ce13da6ac61bd3e.png)
9.th:href
⽤作设置超链接的 href
@GetMapping("/href")
public ModelAndView hrefTest(){
    ModelAndView modelAndView = new ModelAndView();
    modelAndView.setViewName("test");
    modelAndView.addObject("href","https://www.bilibili.com");
    return modelAndView;
}
<a th:href="${href}">b站</a>
如果把网页写道页面中:
<a th:href="@{https://www.bilibili.com/}">b站</a>
${}解析处理器传的值,@{}处理直接的数据
![[外链图片转存失败,源站可能有防盗链机制,建议将图片保存下来直接上传(img-DT2eE1SN-1662126833703)(C:\Users\AnGeng\AppData\Roaming\Typora\typora-user-images\image-20220828195431704.png)]](https://img-blog.csdnimg.cn/7046e7e19a0941208e0876848c5360f9.png)
10.th:selected
⽤作给 HTML 元素设置选中,条件成⽴则选中,否则不选中
@GetMapping("/select")
public ModelAndView selectTest(){
    List<User> list = Arrays.asList(
            new User(1,"张三"),
            new User(2,"李四"),
            new User(3,"王五")
    );
    ModelAndView modelAndView = new ModelAndView();
    modelAndView.setViewName("test");
    modelAndView.addObject("list",list);
    modelAndView.addObject("name","李四");
    return modelAndView; }
<select>
    <option
            th:each="user:${list}"
            th:value="${user.id}"
            th:text="${user.name}"
            th:selected="${user.name == name}"
    ></option>
</select>
![[外链图片转存失败,源站可能有防盗链机制,建议将图片保存下来直接上传(img-eCzfzKWD-1662126833703)(C:\Users\AnGeng\AppData\Roaming\Typora\typora-user-images\image-20220829000308911.png)]](https://img-blog.csdnimg.cn/159d701cdbf1455d94a18e7061cc8966.png)
结合 th:each 来使⽤,⾸先遍历 list 集合动态创建 option 元素,根据每次遍历出的 user.name 与业务数据中的 name 是否相等来决定是否要选择。
11.th:attr
给 HTML 标签的任意属性赋值
@GetMapping("/attr")
public ModelAndView attrTest(){
    ModelAndView modelAndView = new ModelAndView();
    modelAndView.setViewName("test");
    modelAndView.addObject("name","lolit");
    return modelAndView;
}
<input th:attr="value=${name}"><br/>
<input th:value=${name}><br/>
![[外链图片转存失败,源站可能有防盗链机制,建议将图片保存下来直接上传(img-31hrRd81-1662126833713)(C:\Users\AnGeng\AppData\Roaming\Typora\typora-user-images\image-20220829002046215.png)]](https://img-blog.csdnimg.cn/f262a9b0363a43ffbec997236db049b8.png)
3.Thymeleaf 对象
Thymeleaf ⽀持直接访问 Servlet Web 原⽣资源,HttpServletRequest、HttpServletResponse、HttpSession、ServletContext。
#request: 获取 HttpServletRequest 对象
#response: 获取 HttpServletResponse 对象
#session: 获取 HttpSession 对象
#servletContext: 获取 ServletContext 对象
@GetMapping("/servlet")
public String servlet(HttpServletRequest request){
    request.setAttribute("value","request");
    request.getSession().setAttribute("value","session");
    request.getServletContext().setAttribute("value","servletcontext");
    return "test";
}
<p th:text="${#request.getAttribute('value')}"></p>
<p th:text="${#session.getAttribute('value')}"></p>
<p th:text="${#servletContext.getAttribute('value')}"></p>
<p th:text="${#response}"></p>
![[外链图片转存失败,源站可能有防盗链机制,建议将图片保存下来直接上传(img-m8t0GzHd-1662126833714)(C:\Users\AnGeng\AppData\Roaming\Typora\typora-user-images\image-20220829193035122.png)]](https://img-blog.csdnimg.cn/18297a7fbf22451d861f93b512732df7.png)
Thymeleaf ⽀持直接访问 session, ${#request.getAttribute(‘name’)} 也可以简化 ${name}
@GetMapping("/servlet2")
public ModelAndView servlet2(HttpSession session){
    session.setAttribute("name","lolit");
    ModelAndView modelAndView = new ModelAndView();
    modelAndView.addObject("name","oololit");
    modelAndView.setViewName("test");
    return modelAndView;

}
<p th:text="${name}"></p>
<p th:text="${#request.getAttribute('name')}"></p>
<p th:text="${session.name}"></p>
<p th:text="${#session.getAttribute('name')}"></p>
![[外链图片转存失败,源站可能有防盗链机制,建议将图片保存下来直接上传(img-z2Z2iiCT-1662126833716)(C:\Users\AnGeng\AppData\Roaming\Typora\typora-user-images\image-20220829194152933.png)]](https://img-blog.csdnimg.cn/a6714e95157e4564a492fa97ed4b24b3.png)
4.Thymeleaf 内置对象
- dates:⽇期格式化
- calendars:⽇期操作
- numbers:数字格式化
- strings:字符串格式化
- bools:boolean
- arrays:数组内置对象
- lists:List 集合内置对象
- sets:Set 集合内置对象
- maps:Map 集合内置对象
@GetMapping("/ut")
public ModelAndView ut(){
    ModelAndView modelAndView = new ModelAndView();
    modelAndView.setViewName("test");
    modelAndView.addObject("date",new Date());
    Calendar calendar = Calendar.getInstance();
    calendar.set(2022,2,22);
    modelAndView.addObject("calendar",calendar);
    modelAndView.addObject("number",3.14);
    modelAndView.addObject("string","lolit");
    modelAndView.addObject("boolean",true);
    modelAndView.addObject("arry",Arrays.asList("张三","李四","王五"));
    List<User> list = new ArrayList<>();
    list.add(new User(1,"lolit01"));
    list.add(new User(2,"lolit02"));
    modelAndView.addObject("list",list);
    Set<User> set= new HashSet<>();
    set.add(new User(1,"lolit01"));
    set.add(new User(2,"lolit02"));
    modelAndView.addObject("set",set);
    Map<Integer,User>map=new HashMap<>();
    modelAndView.addObject("map",map);
    return modelAndView;
}
date格式化:<span th:text="${#dates.format(date,'yyyy-MM-dd')}"></span><br/>
当前日期:<span th:text="${#dates.createToday()}"></span>
Calendar格式化:<span th:text="${#calendars.format(calendar,'yyyy-MM-dd')}"></span><br/>
number百分⽐格式化:<span th:text="${#numbers.formatPercent(number,2,2)}"></span> <br/>
name是否为空:<span th:text="${#strings.isEmpty(string)}"></span><br/>
name⻓度:<span th:text="${#strings.length(string)}"></span><br/>
name拼接:<span th:text="${#strings.concat('Good',string)}"></span><br/>
boolean是否为true:<span th:text="${#bools.isTrue(boolean)}"></span><br/>
arrays的⻓度:<span th:text="${#arrays.length(array)}"></span><br/>
arrays是否包含张三:<span th:text="${#arrays.contains(array,'张三')}"></span> <br/>
List是否为空:<span th:text="${#lists.isEmpty(list)}"></span><br/>
List的⻓度:<span th:text="${#lists.size(list)}"></span><br/>
Set是否为空:<span th:text="${#sets.isEmpty(set)}"></span><br/>
Set的⻓度:<span th:text="${#sets.size(set)}"></span><br/>
Map是否为空:<span th:text="${#maps.isEmpty(map)}"></span><br/>
Map⻓度:<span th:text="${#maps.size(map)}"></span>
![[外链图片转存失败,源站可能有防盗链机制,建议将图片保存下来直接上传(img-LLS5ipRb-1662126833718)(C:\Users\AnGeng\AppData\Roaming\Typora\typora-user-images\image-20220829230202448.png)]](https://img-blog.csdnimg.cn/86e62b524ded46b198f47c1f82ae9c0f.png)
5.Spring Boot 整合持久层
1.Spring Boot 整合 JdbcTemplate
JdbcTemplate 是 Spring ⾃带的 JDBC 模版组件,底层实现了对 JDBC 的封装,⽤法与 MyBatis 类似,需要开发者⾃定义 SQL 语句,JdbcTemplate 帮助我们完成数据库的连接,SQL 执⾏,结果集的封装。不⾜之处是灵活性不如 MyBatis,因为 MyBatis 的 SQL 语句定义在 XML 中,更有利于维护和扩展,JdbcTemplate 以硬编码的⽅式将 SQL 直接写在 Java 代码中,不利于扩展维护
1、pom.xml
<?xml version="1.0" encoding="UTF-8"?>
<project xmlns="http://maven.apache.org/POM/4.0.0"
         xmlns:xsi="http://www.w3.org/2001/XMLSchema-instance"
         xsi:schemaLocation="http://maven.apache.org/POM/4.0.0 http://maven.apache.org/xsd/maven-4.0.0.xsd">
    <modelVersion>4.0.0</modelVersion>

    <groupId>org.example</groupId>
    <artifactId>springbootdao</artifactId>
    <version>1.0-SNAPSHOT</version>

    <parent>
        <groupId>org.springframework.boot</groupId>
        <artifactId>spring-boot-starter-parent</artifactId>
        <version>2.2.4.RELEASE</version>
    </parent>

    <properties>
        <maven.compiler.source>8</maven.compiler.source>
        <maven.compiler.target>8</maven.compiler.target>
    </properties>

    <dependencies>
        <dependency>
            <groupId>org.springframework.boot</groupId>
            <artifactId>spring-boot-starter-web</artifactId>
        </dependency>
        <dependency>
            <groupId>org.springframework.boot</groupId>
            <artifactId>spring-boot-starter-jdbc</artifactId>
        </dependency>
        <dependency>
            <groupId>mysql</groupId>
            <artifactId>mysql-connector-java</artifactId>
        </dependency>
        <dependency>
            <groupId>org.projectlombok</groupId>
            <artifactId>lombok</artifactId>
        </dependency>
    </dependencies>

</project>
2.实体类
package com.ag.entity;

import lombok.Data;

@Data
public class User {
    private Integer id;
    private String username;
    private String password;
    private Integer age;
}
3.创建 UserRepository
package com.ag.Repository;

import com.ag.entity.User;

import java.util.List;

public interface UserRepository {
    public List<User> findAll();
    public User findbyId(Integer id);
    public int save(User user);
    public int update(User user);
    public int deleteById(Integer id);
}
4.创建实现类
package com.ag.Repository.impl;

import com.ag.Repository.UserRepository;
import com.ag.entity.User;
import org.springframework.beans.factory.annotation.Autowired;
import org.springframework.jdbc.core.BeanPropertyRowMapper;
import org.springframework.jdbc.core.JdbcTemplate;
import org.springframework.stereotype.Repository;

import java.util.List;

@Repository
public class UserRepositoryImpl implements UserRepository {

    @Autowired
    private JdbcTemplate jdbcTemplate;

    @Override
    public List<User> findAll() {
        return jdbcTemplate.query("select * from user",
                new BeanPropertyRowMapper<>(User.class));
    }

    @Override
    public User findbyId(Integer id) {
        return jdbcTemplate.queryForObject("select * from user where id=?",
                new Object[]{id},
                new BeanPropertyRowMapper<>(User.class)
                );
    }

    @Override
    public int save(User user) {
        return jdbcTemplate.update("insert into user(id,username,password,age) values (?,?,?,?)",
                user.getId(),
                user.getUsername(),
                user.getPassword(),
                user.getAge());
    }

    @Override
    public int update(User user) {
        return jdbcTemplate.update("update user set username=?,password=?,age=? where id=?",
                user.getUsername(),
                user.getPassword(),
                user.getAge(),
                user.getId());
    }

    @Override
    public int deleteById(Integer id) {
        return jdbcTemplate.update("delete from user where id=?",id);
    }
}
5.Handler
package com.ag.controller;
import com.ag.Repository.impl.UserRepositoryImpl;
import com.ag.entity.User;
import org.springframework.beans.factory.annotation.Autowired;
import org.springframework.web.bind.annotation.*;
import java.nio.channels.Pipe;
import java.util.List;
@RestController
@RequestMapping("/user")
public class UserHandler {
@Autowired
private UserRepositoryImpl userRepository;
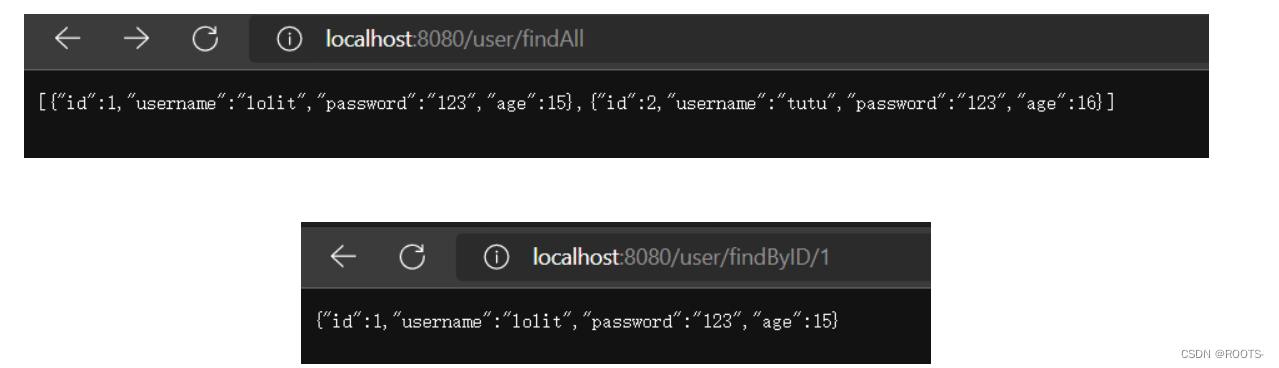
@GetMapping("/findAll")
public List<User> findAll(){
return userRepository.findAll();
}
@GetMapping("/findByID/{id}")
public User findById(@PathVariable("id") Integer id){
return userRepository.findbyId(id);
}
@PostMapping("/save")
// 主要用来接收前端传递给后端的json字符串中的数据的(请求体中的数据的);
public int save(@RequestBody User user){
return userRepository.save(user);
}
@PutMapping("/update")
public int update(@RequestBody User user){
return userRepository.update(user);
}
@DeleteMapping("/deleteById/{id}")
public int deleteById(@PathVariable("id") Integer id){
return userRepository.deleteById(id);
}
}
6.application.yml
spring:
  datasource:
    url: jdbc:mysql://localhost:3306/school?useUnicode=true&characterEncoding=UTF-8&serverTimezone=UTC
    driver-class-name: com.mysql.cj.jdbc.Driver
    username: root
    password: 123456
7.启动类
package com.ag;

import org.springframework.boot.SpringApplication;
import org.springframework.boot.autoconfigure.SpringBootApplication;

@SpringBootApplication
public class Application {
    public static void main(String[] args) {
        SpringApplication.run(Application.class,args);
    }
}
![[外链图片转存失败,源站可能有防盗链机制,建议将图片保存下来直接上传(img-37GkKH3Z-1662126833720)(C:\Users\AnGeng\AppData\Roaming\Typora\typora-user-images\image-20220830194720412.png)]](https://img-blog.csdnimg.cn/ce28a9024ff641daadeb38cf5f092798.png)
![[外链图片转存失败,源站可能有防盗链机制,建议将图片保存下来直接上传(img-E4nvh2cn-1662126833721)(C:\Users\AnGeng\AppData\Roaming\Typora\typora-user-images\image-20220830194734639.png)] [外链图片转存失败,源站可能有防盗链机制,建议将图片保存下来直接上传(img-YwB7DBbj-1662126833724)(C:\Users\AnGeng\AppData\Roaming\Typora\typora-user-images\image-20220830194749055.png)]](https://img-blog.csdnimg.cn/ef7203b73e7b4c608490b45ec723a514.png)
query
query(String sql,RowMapper rowMapper)
![[外链图片转存失败,源站可能有防盗链机制,建议将图片保存下来直接上传(img-Nnsp88Zk-1662126833726)(C:\Users\AnGeng\AppData\Roaming\Typora\typora-user-images\image-20220830194815942.png)]](https://img-blog.csdnimg.cn/d5c84335afbb45f8949085f58857b0ac.png)
RowMapper 是⼀个接⼝,作⽤是解析结果集,将 JDBC 查询出的 ResultSet 对象转换成对应的 POJO
queryForObject
该⽅法⽤来查询⼀条数据,并将结果封装成⼀个 POJO。
![[外链图片转存失败,源站可能有防盗链机制,建议将图片保存下来直接上传(img-mzbMkTOj-1662126833727)(C:\Users\AnGeng\AppData\Roaming\Typora\typora-user-images\image-20220830194911768.png)]](https://img-blog.csdnimg.cn/14051de1797843cf8305bf99b1220301.png)
update
需要传入sql,可变参数。增加、删除、修改的操作都可以调⽤个这个⽅法。
![[外链图片转存失败,源站可能有防盗链机制,建议将图片保存下来直接上传(img-NRJNDdIl-1662126833728)(C:\Users\AnGeng\AppData\Roaming\Typora\typora-user-images\image-20220830195007610.png)]](https://img-blog.csdnimg.cn/31ac41a5bcb743b09d31f88b841dc294.png)
2.Spring Boot 整合 MyBatis
1、pom.xml
<dependency>
    <groupId>org.mybatis.spring.boot</groupId>
    <artifactId>mybatis-spring-boot-starter</artifactId>
    <version>1.3.1</version>
</dependency>
2.实体类
package com.ag.entity;

import lombok.Data;

@Data
public class User {
    private Integer id;
    private String username;
    private String password;
    private Integer age;
}
3.创建 UserRepository
package com.ag.repository;

import com.ag.entity.User;

import java.util.List;

public interface UserRepository {
    public List<User> findAll();
    public User findById(Integer id);
    public int save(User user);
    public int update(User user);
    public int deleteById(Integer id);
}
4./resources/mapping 创建 UserRepository.xml
<?xml version="1.0" encoding="UTF-8" ?>
<!DOCTYPE mapper PUBLIC "-//mybatis.org//DTD Mapper 3.0//EN"
        "http://mybatis.org/dtd/mybatis-3-mapper.dtd">
<mapper namespace="com.ag.repository.UserRepository">

    <select id="findAll" resultType="com.ag.entity.User">
        select * from myuser
    </select>

    <select id="findById" parameterType="java.lang.Integer">
        select * from myuser where id=#{id}
    </select>

    <insert id="save" parameterType="com.ag.entity.User">
        insert into myuser(username,password,age) values(#{username,#{password},#{age})
    </insert>

    <update id="update" parameterType="com.ag.entity.User">
        update myuser set username=#{username},password=#{password},age=#{age}where id = #{id}
    </update>

    <delete id="deleteById" parameterType="java.lang.Integer">
        delete from myuser where id=#{id}
    </delete>


</mapper>
5.创建 Handler
package com.ag.controller;

import com.ag.entity.User;
import com.ag.repository.UserRepository;
import org.springframework.beans.factory.annotation.Autowired;
import org.springframework.web.bind.annotation.*;

import java.util.List;

@RestController
@RequestMapping("/user")
public class UserHandler {
    @Autowired
    private UserRepository userRepository;
    @GetMapping("/findAll")
    public List<User> findAll() {
        return userRepository.findAll();
    }
    @GetMapping("/findById/{id}")
    public User findById(@PathVariable("id") Integer id) {
        return userRepository.findById(id);
    }
    @PostMapping("/save")
    public int save(@RequestBody User user) {
        return userRepository.save(user);
    }
    @PutMapping("/update")
    public int update(@RequestBody User user){
        return userRepository.update(user);
    }
    @DeleteMapping("/deleteById/{id}")
    public int deleteById(@PathVariable("id") Integer id){
        return userRepository.deleteById(id);
    }
}
6.配置⽂件
spring:
  datasource:
    url: jdbc:mysql://localhost:3306/school?useUnicode=true&characterEncoding=UTF-8&serverTimezone=UTC
    driver-class-name: com.mysql.cj.jdbc.Driver
    username: root
    password: 123456
mybatis:
  mapper-locations: classpath:/mapping/*.xml
#  type-aliases-package: com.ag.entity
7.创建启动类
package com.ag;

import org.mybatis.spring.annotation.MapperScan;
import org.springframework.boot.SpringApplication;
import org.springframework.boot.autoconfigure.SpringBootApplication;

@SpringBootApplication
@MapperScan("com.ag.repository")
public class Application {
    public static void main(String[] args) {
        SpringApplication.run(Application.class,args);
    }
}
一直报这个错误
Error creating bean with name ‘userHandler’: Unsatisfied dependency expressed through field ‘userRepository’;
![[外链图片转存失败,源站可能有防盗链机制,建议将图片保存下来直接上传(img-3iPVOCmk-1662126833731)(C:\Users\AnGeng\AppData\Roaming\Typora\typora-user-images\image-20220901172359217.png)]](https://img-blog.csdnimg.cn/9a46d46d20c34b778a113912409a01ee.png)
找了一天bug找吐了,不找了,项目是SpringBootMybatis 后面涉及到再回来改
又找了一天经历了加各种注解,换各种jar包的版本,一直没成功,后来受不了了,就运行了楠哥的源码,在我的电脑上可以运行,后来慢慢发现,是sql语句写错了!!!!!!! 真的服
正确的xml文件如下:
<?xml version="1.0" encoding="UTF-8" ?>
<!DOCTYPE mapper PUBLIC "-//mybatis.org//DTD Mapper 3.0//EN" "http://mybatis.org/dtd/mybatis-3-mapper.dtd">
<mapper namespace="com.ag.repository.UserRepository">

    <select id="findAll" resultType="User">
        select * from myuser
    </select>

    <select id="findById" parameterType="java.lang.Integer" resultType="User">
        select * from myuser where id = #{id}
    </select>


    <insert id="save" parameterType="User">
        insert into myuser(username,password,age) values(#{username},#{password},#{age})
    </insert>

    <update id="update" parameterType="User">
        update myuser set username=#{username},password=#{password},age=#{age} where id = #{id}
    </update>
    <delete id="deleteById" parameterType="java.lang.Integer">
        delete from myuser where id = #{id}
    </delete>
</mapper>
6.Spring Boot 整合 Spring Data JPA
Spring Data JPA 是 Spring Data ⼤家族的⼀员
1.JPA 和 Spring Data JPA 的关系
JPA (Java Persistence API)Java 持久层规范,定义了⼀系列 ORM 接⼝,它本身是不能直接使⽤,接⼝必须实现才能使⽤,Hibernate 框架就是⼀个实现了 JPA 规范的框架。Spring Data JPA 是 Spring 框架提供的对 JPA 规范的抽象,通过约定的命名规范完成持久层接⼝的编写,在不需要实现接⼝的情况下,就可以完成对数据库的操作。
简单理解,通过 Spring Data JPA 只需要定义接⼝⽽不需要实现,就能完成 CRUD 操作。Spring Data JPA 本身并不是⼀个具体的实现,它只是⼀个抽象层,底层还是需要 Hibernate 这样的 JPA来提供⽀持。
2.Spring Data JPA 和 Spring JdbcTemplate 的关系
Spring JdbcTemplate 是 Spring 框架提供的⼀套操作数据库的模版,Spring Data JPA 是 JPA 的抽象。
3.使用
1、pom.xml
<!-- Spring Boot集成 Spring Data JPA -->
<dependency>
    <groupId>org.springframework.boot</groupId>
    <artifactId>spring-boot-starter-data-jpa</artifactId>
</dependency>
2.创建实体类 完成实体类与数据表的映射
package com.ag.controller.jpa.entity;

import lombok.Data;

import javax.persistence.*;

@Data
@Entity(name="myuser")
public class User {

    @Id
    @GeneratedValue(strategy=GenerationType.IDENTITY)
    private Integer id;
    @Column
    private String username;
    @Column
    private String password;
    @Column
    private Integer age;


}
- @Entity 将实体类与数据表进⾏映射
- @Id 将实体类中的成员变量与数据表的主键进⾏映射,⼀般都是 id
- @GeneratedValue 表示⾃动⽣成主键,strategy 为主键选择⽣成策略
- @Column 将实体类中的成员变量与数据表的普通字段进⾏映射
3.创建 UserRepository
package com.ag.controller.jpa.repository;


import com.ag.controller.jpa.entity.User;
import org.springframework.data.jpa.repository.JpaRepository;

public interface JpaUserRepository extends JpaRepository<User,Integer> {
}
4.创建 Handler
package com.ag.jpa.controller;
import com.ag.jpa.entity.User;
import com.ag.jpa.repository.JpaUserRepository;
import org.springframework.beans.factory.annotation.Autowired;
import org.springframework.web.bind.annotation.*;
import java.util.List;
@RestController("/jpaHandler")
@RequestMapping("/jpauser")
public class JpaUserHandler {
@Autowired
private JpaUserRepository userRepository;
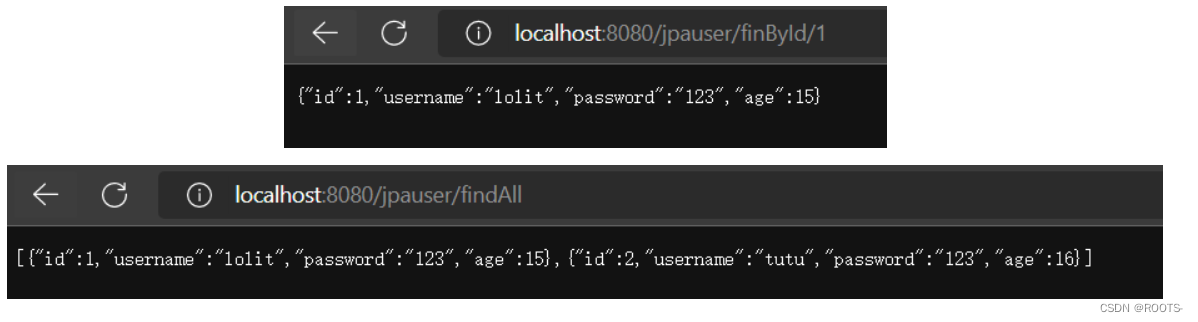
@GetMapping("/findAll")
public List<User> findAll(){
return userRepository.findAll();
}
@GetMapping("/finById/{id}")
public User findByID(@PathVariable("id") Integer id){
return userRepository.findById(id).get();
}
@PostMapping("/save")
public void save(@RequestBody User user){
userRepository.save(user);
}
@PutMapping("/update")
public void update(@RequestBody User user){
userRepository.save(user);
}
@DeleteMapping("/delectById/{id}")
public void delectById(@PathVariable("id") Integer id){
userRepository.deleteById(id);
}
}
5.配置启动类
package com.ag.jpa;

import org.springframework.boot.SpringApplication;
import org.springframework.boot.autoconfigure.SpringBootApplication;

@SpringBootApplication
public class JpaApplication {
    public static void main(String[] args) {
        SpringApplication.run(JpaApplication.class,args);
    }
}
6.可以在application.yml中配置打印sql
spring:
  datasource:
    url: jdbc:mysql://localhost:3306/school?useUnicode=true&characterEncoding=UTF-8&serverTimezone=UTC
    driver-class-name: com.mysql.cj.jdbc.Driver
    username: root
    password: 123456
  jpa:
    show-sql: true
    properties:
      hibernate:
        format_sql: true
![[外链图片转存失败,源站可能有防盗链机制,建议将图片保存下来直接上传(img-thRC1dD3-1662126833739)(C:\Users\AnGeng\AppData\Roaming\Typora\typora-user-images\image-20220902112229042.png)]](https://img-blog.csdnimg.cn/f573005d98c142a89c0503264e4f91bf.png)
7.在继承 JpaRepsitory 的基础上,开发者也可以⾃定义⽅法。
package com.ag.jpa.repository;


import com.ag.jpa.entity.User;
import org.springframework.data.jpa.repository.JpaRepository;

public interface JpaUserRepository extends JpaRepository<User,Integer> {
    public User findByUsername(String username);
}

    @GetMapping("/findByUserName/{username}")
    public User findByUserName(@PathVariable("username") String username){
        return userRepository.findByUsername(username);
    }
![[外链图片转存失败,源站可能有防盗链机制,建议将图片保存下来直接上传(img-ojqIW3dc-1662126833741)(C:\Users\AnGeng\AppData\Roaming\Typora\typora-user-images\image-20220902113024823.png)]](https://img-blog.csdnimg.cn/2536501fdfe24dc9be600adc068dac9f.png)
7.Spring Boot 整合 Spring Security
Spring Security是为基于Spring的应用程序提供声明式安全保护的安全性框架,它提供了完整的安全性解决方案,能够在web请求级别和方法调用级别处理身份证验证和授权。因为基于Spring框架,所以Spring Security充分利用了依赖注入和面向切面的技术。
Spring Security主要是从两个方面解决安全性问题:
- web请求级别:使用Servlet规范中的过滤器(Filter)保护Web请求并限制URL级别的访问。
- 方法调用级别:使用Spring AOP保护方法调用,确保具有适当权限的用户才能访问安全保护的方法。
![[外链图片转存失败,源站可能有防盗链机制,建议将图片保存下来直接上传(img-qNXnErrJ-1662126833742)(C:\Users\AnGeng\AppData\Roaming\Typora\typora-user-images\image-20220902122328032.png)]](https://img-blog.csdnimg.cn/3a9d56090d4c4873a0aee3f46de362f1.png)
1、创建 Maven ⼯程,pom.xml
<?xml version="1.0" encoding="UTF-8"?>
<project xmlns="http://maven.apache.org/POM/4.0.0"
         xmlns:xsi="http://www.w3.org/2001/XMLSchema-instance"
         xsi:schemaLocation="http://maven.apache.org/POM/4.0.0 http://maven.apache.org/xsd/maven-4.0.0.xsd">
    <modelVersion>4.0.0</modelVersion>

    <groupId>org.example</groupId>
    <artifactId>SpringSecurity</artifactId>
    <version>1.0-SNAPSHOT</version>

    <properties>
        <maven.compiler.source>8</maven.compiler.source>
        <maven.compiler.target>8</maven.compiler.target>
    </properties>

    <parent>
        <groupId>org.springframework.boot</groupId>
        <artifactId>spring-boot-starter-parent</artifactId>
        <version>2.2.4.RELEASE</version>
    </parent>

    <dependencies>
        <dependency>
            <groupId>org.springframework.boot</groupId>
            <artifactId>spring-boot-starter-web</artifactId>
        </dependency>
        <dependency>
            <groupId>org.springframework.boot</groupId>
            <artifactId>spring-boot-starter-thymeleaf</artifactId>
        </dependency>

        <dependency>
            <groupId>org.springframework.boot</groupId>
            <artifactId>spring-boot-starter-security</artifactId>
        </dependency>
    </dependencies>

</project>
2.Handler
package com.ag.conteoller;

import org.springframework.stereotype.Controller;
import org.springframework.web.bind.annotation.GetMapping;

@Controller
public class Securityhandler {

    @GetMapping("/index")
    public String index(){
        return "index";
    }
}
3.HTML
<!DOCTYPE html>
<html lang="en">
<head>
    <meta charset="UTF-8">
    <title>Title</title>
</head>
<body>
<p>index</p>
<form method="post" action="/logout">
  <input type="submit" value="退出">
</form>
</body>
</html>
4.application.yml
spring:
  thymeleaf:
    prefix: classpath:/templates/
    suffix: .html
5.启动类
package com.ag;

import org.springframework.boot.SpringApplication;
import org.springframework.boot.autoconfigure.SpringBootApplication;

@SpringBootApplication
public class Apllication {
    public static void main(String[] args) {
        SpringApplication.run(Apllication.class,args);
    }
}
这是spring security自带的界面,账户是user 密码是控制台随机生成的
输⼊⽤户名、密码才可以进⾏访问,默认的⽤户名是 user,密码是启动 Spring Security ⾃动⽣成的随
机密码。
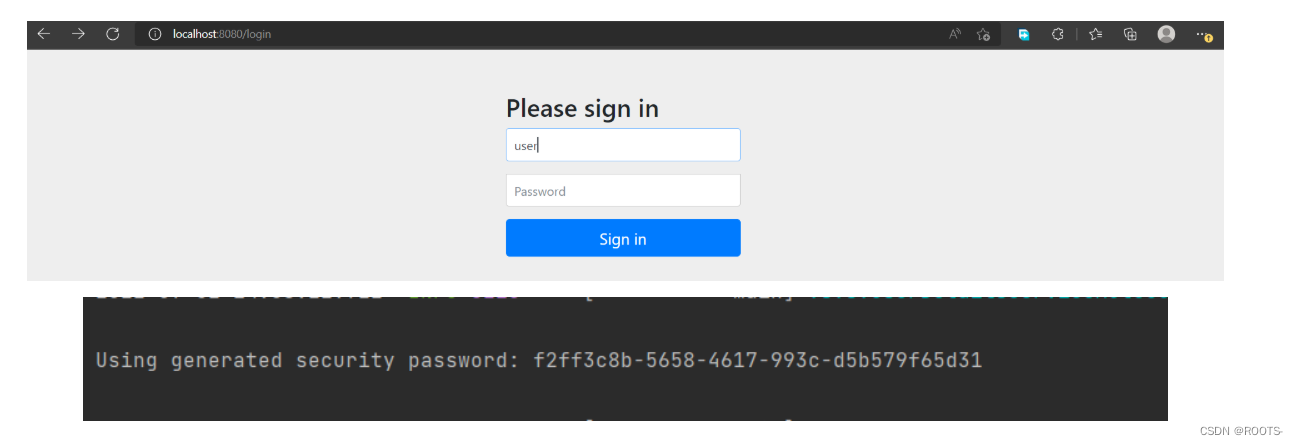
可以自己定义密码
![[外链图片转存失败,源站可能有防盗链机制,建议将图片保存下来直接上传(img-f3YNQXCy-1662126833747)(C:\Users\AnGeng\AppData\Roaming\Typora\typora-user-images\image-20220902150719897.png)]](https://img-blog.csdnimg.cn/6e8eae7370d24241a3369825137ffafc.png)
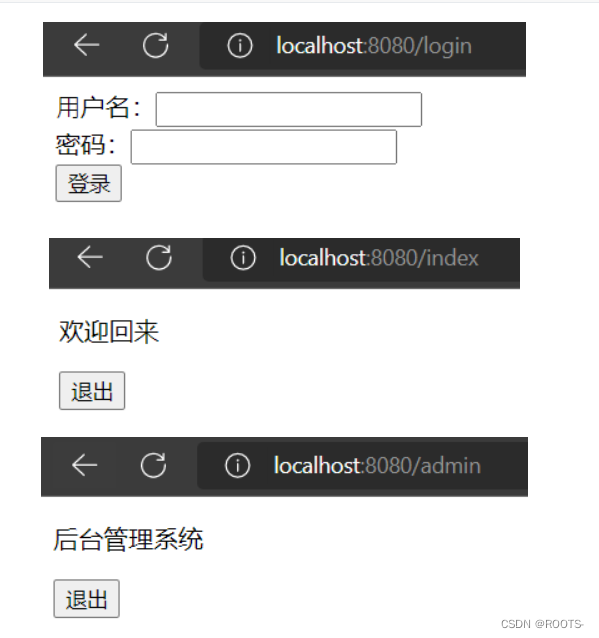
权限管理
定义两个资源
- index.html
- admin.html
定义两个⻆⾊
- ADMIN 访问 index.html 和 admin.html
- USER 访问 index.html
1、创建 SecurityConfifig 类
package com.ag.config;

import org.springframework.context.annotation.Configuration;
import org.springframework.security.config.annotation.authentication.builders.AuthenticationManagerBuilder;
import org.springframework.security.config.annotation.web.builders.HttpSecurity;
import org.springframework.security.config.annotation.web.configuration.EnableWebSecurity;
import org.springframework.security.config.annotation.web.configuration.WebSecurityConfiguration;
import org.springframework.security.config.annotation.web.configuration.WebSecurityConfigurerAdapter;

@Configuration
@EnableWebSecurity
public class SecurityConfig extends WebSecurityConfigurerAdapter {

    /**
     * ⻆⾊和资源的关系
     * @param http
     * @throws Exception
     */
    @Override
    protected void configure(HttpSecurity http) throws Exception {

             http.authorizeRequests().antMatchers("/admin").hasRole("ADMIN")
                     .antMatchers("/index").access("hasRole('ADMIN') or hasRole('USER')")
                     .anyRequest().authenticated()
                     .and()
                     .formLogin()
                     .loginPage("/login")
                     .permitAll()
                     .and()
                     .logout()
                     .permitAll()
                     .and()
                     .csrf()
                     .disable();
    }


    /**
     * ⽤户和⻆⾊的关系
     * @param auth
     * @throws Exception
     */
    @Override
    protected void configure(AuthenticationManagerBuilder auth) throws Exception {
        auth.inMemoryAuthentication().passwordEncoder(new MyPassowrdEncoder())
                .withUser("user").password(new MyPassowrdEncoder()
        .encode("000")).roles("USER")
                .and()
                .withUser("admin").password(new MyPassowrdEncoder()
        .encode("123")).roles("ADMIN","USER");


    }
}
2.⾃定义 MyPassowrdEncoder 用来判断密码是否相等
package com.ag.config;

import org.springframework.security.crypto.password.PasswordEncoder;

public class MyPassowrdEncoder implements PasswordEncoder {
    @Override
    public String encode(CharSequence charSequence) {
        return charSequence.toString();
    }


    @Override
    public boolean matches(CharSequence charSequence, String s) {
        return s.equals(charSequence.toString());
    }
}
3.Handler
package com.ag.conteoller;

import org.springframework.stereotype.Controller;
import org.springframework.web.bind.annotation.GetMapping;

@Controller
public class Securityhandler {

    @GetMapping("/index")
    public String index(){
        return "index";
    }
    @GetMapping("/admin")
    public String admin(){
        return "admin";
    }
    @GetMapping("/login")
    public String login(){
        return "login";
    }
}
4.login.html
<!DOCTYPE html>
<html lang="en"> <html xmlns:th="http://www.thymeleaf.org"> <head>
  <meta charset="UTF-8">
  <title>Title</title>
</head> <body>
<p th:if="${param.error}">
  ⽤户名或密码错误
</p>
<form  method="post">
  ⽤户名:<input type="text" name="username"/><br/>
  密码:<input type="password" name="password"/><br/>
  <input type="submit" value="登录"/>
</form>
</body>
5.index.html
<!DOCTYPE html>
<html lang="en"> <head>
    <meta charset="UTF-8">
    <title>Title</title>
</head> <body>
<p>欢迎回来</p>
<form method="post" action="/logout">
    <input type="submit" value="退出"/>
</form>
</body>
</html>
6.admin.html
<!DOCTYPE html>
<html lang="en"> <head>
  <meta charset="UTF-8">
  <title>Title</title>
</head> <body>
<p>后台管理系统</p>
<form method="post" action="/logout">
  <input type="submit" value="退出"/>
</form>
</body>
</html>


 1316
1316


 被折叠的 条评论
为什么被折叠?
被折叠的 条评论
为什么被折叠?
 到【灌水乐园】发言


