


有的时候想在自己的云服务器上搭建svn供Android开发团队使用,百度了许多linux搭建svn的教程,可是想找到一篇比较完整的教程太少了,因此自己总结了一下linux服务器搭建svn的教程和客户端TortoiseSVN的使用方法。
一、svn服务器有2种运行方式
1、独立服务器 (例如:svn://xxx.com/xxx);
2、借助apache。(例如:http://svn.xxx.com/xxx);
下面为了不依赖apache,选择第一种方式-独立的svn服务器。
二、svn存储版本数据也有2种方式:
1、bdb;
2、fsfs。
因为BDB方式在服务器中断时,有可能锁住数据(搞ldap时就深受其害,没法根治),所以还是FSFS方式更安全一点,我也选择这种方式。
我的系统环境:Linux + Php + Mysql + subversion
三、下载相关软件
wget http://subversion.tigris.org/downloads/subversion-1.6.6.tar.gz
wget http://subversion.tigris.org/downloads/subversion-deps-1.6.6.tar.gz
四、编辑
1、查看是否安装了svn工具
命令:
rpm -qa | grep subversion
如果服务器已经安装了则不需要进行安装,如果没有安装可以进行全新的安装
2、首先检测系统有没有安装SSL:
find / -name opensslv.h
如果找不到,就执行如下命令进行安装:
yum install openssl
yum install openssl-devel
安装之后用find / -name opensslv.h命令找到opensslv.h所在的目录,即下列–with-openssl=后面的路径,
3、解压svn安装文件
subversion-1.6.6.tar.gz
subversion-deps-1.6.6.tar.gz
命令如下:
tar zxvf subversion-1.6.6.tar.gz
tar zxvf subversion-deps-1.6.6.tar.gz
tar 为解压命令,zxvf为tar命令的参数,用于解压tar.gz格式压缩的文9件。
解压后生成 subversion-1.6.6 子目录,两个压缩包解压后都会自动放到此目录下,不用手动更改。
进入解压子目录 cd subversion-1.6.6 进行编译。
4、编译:
./configure –prefix=/usr/local/svn –with-openssl=/usr/include/openssl –without-berkeley-db
后面以svnserve方式运行,所以不加apache编译参数。以fsfs格式存储版本库,不编译berkeley-db
如果编译时报如下错误:
no acceptable C compiler found in $PATH
说明没有gcc库,使用如下命令安装gcc后再编译:
yum -y install gcc
如果最后出现下面WARNING,我们直接忽略即可,因为不使用BDB存储。
configure: WARNING: we have configured without BDB filesystem support
You don’t seem to have Berkeley DB version 4.0.14 or newer
installed and linked to APR-UTIL. We have created Makefiles which
will build without the Berkeley DB back-end; your repositories will
use FSFS as the default back-end. You can find the latest version of
Berkeley DB here:
http://www.sleepycat.com/download/index.shtml
5、安装
make
make install
如果 make install 出现下面错误:
/home/upload/subversion-1.6.6/subversion/svnversion/.libs/lt-svnversion: error while loading shared libraries: libiconv.so.2: cannot open shared object file: No such file or directory
make: * [revision-install] Error 127
解决办法:
1)编辑/etc/ld.so.conf文件
vi /etc/ld.so.conf
添加下面一行代码
/usr/local/lib
2)保存后运行ldconfig:
/sbin/ldconfig
注:ld.so.conf和ldconfig用于维护系统动态链接库。
3)然后再安装
make
make install
6、测试是否安装成功
/usr/local/svn/bin/svnserve –version
如果显示如下,svn安装成功:
svnserve, version 1.6.6 (r40053)
compiled Dec 25 2012, 13:14:38
Copyright (C) 2000-2009 CollabNet.
Subversion is open source software, see http://subversion.tigris.org/
This product includes software developed by CollabNet
(http://www.Collab.Net/).
The following repository back-end (FS) modules are available:
* fs_fs : Module for working with a plain file (FSFS) repository.
Cyrus SASL authentication is available.
7、为了方便下操作,把svn相关的命令添加到环境变量中:
echo “export PATH=$PATH:/usr/local/svn/bin/” >> /etc/profile
source /etc/profile
五、配置SVN
1、建立SVN的根目录
mkdir -p /opt/svn/
2、建立一个产品仓库
mkdir -p /opt/svn/tongleer/
svnadmin create /opt/svn/tongleer/
如果你们的研发中心有多个产品组,每个产品组可以建立一个SVN仓库
3、修改版本配置库文件
vi /opt/svn/tongleer/conf/svnserve.conf
修改后的文件内容如下:
### This file controls the configuration of the svnserve daemon, if you
### use it to allow access to this repository.  (If you only allow
### access through http: and/or file: URLs, then this file is
### irrelevant.)
### Visit http://subversion.tigris.org/ for more information.
[general]
### These options control access to the repository for unauthenticated
### and authenticated users.  Valid values are "write", "read",
### and "none".  The sample settings below are the defaults.
anon-access = none # 注意这里必须设置,否则所有用户不用密码就可以访问
auth-access = write
### The password-db option controls the location of the password
### database file.  Unless you specify a path starting with a /,
### the file's location is relative to the directory containing
### this configuration file.
### If SASL is enabled (see below), this file will NOT be used.
### Uncomment the line below to use the default password file.
password-db = passwd
### The authz-db option controls the location of the authorization
### rules for path-based access control.  Unless you specify a path
### starting with a /, the file's location is relative to the the
### directory containing this file.  If you don't specify an
### authz-db, no path-based access control is done.
### Uncomment the line below to use the default authorization file.
authz-db = authz
### This option specifies the authentication realm of the repository.
### If two repositories have the same authentication realm, they should
### have the same password database, and vice versa.  The default realm
### is repository's uuid.
realm = tongleer
[sasl]
### This option specifies whether you want to use the Cyrus SASL
### library for authentication. Default is false.
### This section will be ignored if svnserve is not built with Cyrus
### SASL support; to check, run 'svnserve --version' and look for a line
### reading 'Cyrus SASL authentication is available.'
# use-sasl = true
### These options specify the desired strength of the security layer
### that you want SASL to provide. 0 means no encryption, 1 means
### integrity-checking only, values larger than 1 are correlated
### to the effective key length for encryption (e.g. 128 means 128-bit
### encryption). The values below are the defaults.
# min-encryption = 0
# max-encryption = 256
对用户配置文件的修改是立即生效的,不必重启svn。
4、开始设置passwd用户账号信息
vi /opt/svn/tongleer/conf/passwd
修改完之后的内容如下:
### This file is an example password file for svnserve.
### Its format is similar to that of svnserve.conf. As shown in the
### example below it contains one section labelled [users].
### The name and password for each user follow, one account per line.
### 在下面添加用户和密码,每行一组username = password
[users]
# harry = harryssecret
# sally = sallyssecret
###===========下面是我添加的用户信息========#######
jim = 111111
tom = 222222
5、开始设置authz. 用户访问权限
vi /opt/svn/tongleer/conf/authz
修改完之后的内容如下:
### This file is an example authorization file for svnserve.
### Its format is identical to that of mod_authz_svn authorization
### files.
### As shown below each section defines authorizations for the path and
### (optional) repository specified by the section name.
### The authorizations follow. An authorization line can refer to:
###  - a single user,
###  - a group of users defined in a special [groups] section,
###  - an alias defined in a special [aliases] section,
###  - all authenticated users, using the '$authenticated' token,
###  - only anonymous users, using the '$anonymous' token,
###  - anyone, using the '*' wildcard.
###
### A match can be inverted by prefixing the rule with '~'. Rules can
### grant read ('r') access, read-write ('rw') access, or no access
### ('').
[aliases]
# joe = /C=XZ/ST=Dessert/L=Snake City/O=Snake Oil,
        Ltd./OU=Research Institute/CN=Joe Average
# [groups]
# harry_and_sally = harry,sally
# harry_sally_and_joe = harry,sally,&joe
# [/foo/bar]
# harry = rw
# &joe = r
# * =
# [repository:/baz/fuz]
# @harry_and_sally = rw
# * = r
###--------------------下面我新加的------------------------###
###屏蔽掉上面的[groups] 因为在下面添加了
[groups]
myteam = jim, tom #devteam 项目组包括两个用户iitshare,itblood
[/]
jim = rw
tom =
[tongleer:/jimproject]
@myteam = rw
tom =
[tongleer:/tomproject]
@myteam = rw
tom = r
其中,1个用户组可以包含1个或多个用户,用户间以逗号分隔。
说明:
myteam = jim, tom#myteam 项目组包括两个用户jim,tom
[/]
jim = rw #jim对根目录有读写权限
tom= #tom对根目录没有任何权限
如果需要配置jimproject、tomproject项目的权限,前提条件是tongleer仓库下面需要有这两个项目
如果没有的话,tongleer都将不能访问
[tongleer:/jimproject] #对tongleer仓库的jimproject项目进行权限控制
@myteam = rw #控制 myteam 组对jimproject项目有读写权限
tom= #限制 tom所有权限,其它用户有读写权限
[tongleer:/tomproject] #对 tongleer: 仓库的tomproject项目进行权限控制
@myteam = rw #限制 myteam 组对tomproject项目有读写权限
tom = r #限制tom只有读权限,其它用户有读写权限
6、注意:
- 权限配置文件中出现的用户名必须已在用户配置文件中定义。
- 对权限配置文件的修改立即生效,不必重启svn。
用户组格式:
[groups] = ,
其中,1个用户组可以包含1个或多个用户,用户间以逗号分隔。
版本库目录格式:
[<版本库>:/项目/目录]
@<用户组名> = <权限>
<用户名> = <权限>
其中,方框号内部分可以有多种写法:
[/],表示根目录及以下,根目录是svnserve启动时指定的,我们指定为/home/svndata,[/]就是表示对全部版本库设置权限。
[tshop:/] 表示对版本库tshop设置权限;
[tshop:/abc] 表示对版本库tshop中的abc项目设置权限;
[tshop:/abc/aaa] 表示对版本库tshop中的abc项目的aaa目录设置权限;
权限主体可以是用户组、用户或,用户组在前面加@,表示全部用户。
权限可以是w、r、wr和空,空表示没有任何权限。
7、建立启动svn的用户
useradd svn
根据提示,为用户svn设置密码
允许用户svn访问版本库:
chown -R svn:svn /opt/svn
8、启动svn:
方式一:svnserve -d -r /opt/svn/ #默认的启动端口号为3690
方式二:su – svn -c “svnserve -d –listen-port 9999 -r /opt/svn/”
其中:
su – svn表示以用户svn的身份启动svn;
-d表示以daemon方式(后台运行)运行;
–listen-port 9999表示使用9999端口,可以换成你需要的端口。但注意,使用1024以下的端口需要root权限;
-r /opt/svn 指定根目录是/opt/svn。
9、检查是否启动
netstat -tunlp | grep svn
如果显示以下信息说明启动成功
tcp 0 0 0.0.0.0:9999 0.0.0.0:* LISTEN 10973/svnserve
10、将svn加入到开机启动
编辑rc.local文件:
vi /etc/rc.d/rc.local
加入如下启动命令:
/usr/local/svn/bin/svnserve -d –listen-port 9999 -r /opt/svn
11、如果想停止svn,则使用如下命令:
killall svnserve
12、如果想将svn作为服务:
在/etc/rc.d/init.d/目录下新建名为svn的文件
并设置权限为755:
chmod 755 /etc/rc.d/init.d/svn
编辑svn文件:
vi /etc/rc.d/init.d/svn
在里面添加如下代码:
#!/bin/bash
# build this file in /etc/rc.d/init.d/svn
# chmod 755 /etc/rc.d/init.d/svn
# centos下可以用如下命令管理svn: service svn start(restart/stop)
SVN_HOME=/opt/svn
if [ ! -f "/usr/local/svn/bin/svnserve" ]
then
    echo "svnserver startup: cannot start"
    exit
fi
case "$1" in
    start)
        echo "Starting svnserve..."
        /usr/local/svn/bin/svnserve -d --listen-port 9999 -r $SVN_HOME
        echo "Finished!"
        ;;
    stop)
        echo "Stoping svnserve..."
        killall svnserve
        echo "Finished!"
        ;;
    restart)
        $0 stop
        $0 start
        ;;
    *)
        echo "Usage: svn { start | stop | restart } "
        exit 1
esac
之后便可以以service svn start(restart/stop)方式启动SVN。
通过web方式访问svn有很多方法,请参阅配置websvn或配置bsSvnBrowser的方法
六、TortoiseSVN客户端访问使用方法
1、下载安装文件
window 64位的话下载:TortoiseSVN-1.7.6.22632-x64-svn-1.7.4.msi
window 32位的话下载:TortoiseSVN-1.6.5.16974-win32-svn-1.6.5.msi
具体的下载文件可以在网上下载下,一找一大堆
2、通过客户端进行访问
地址如下:
svn://{your-server-ip}:3690/tongleer/ 或者 svn://{your-server-ip}:3690/tongleer/
注意:
1)不要在浏览器中通过http的方式进行访问,如下地址:
http://{your-server-ip}:3690/tongleer/ 或者 http://{your-server-ip}:3690/tongleer/
那样肯定是不行的,因为你没有配置http的服务,上面是安装独立的SVN服务器。
2)初次使用TortoiseSVN需要上传代码到svn服务器仓库,上传方法(创建资源库)如下:
在某个磁盘创建一个文件夹,如E:\repos
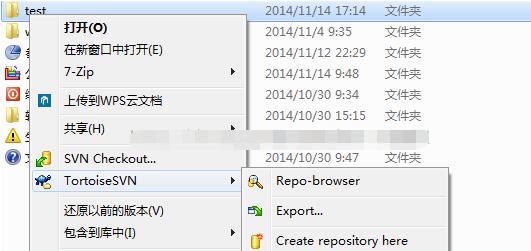
鼠标选中这个目录,右键TortioiseSVN->Create repository here,创建成功会弹出提示.
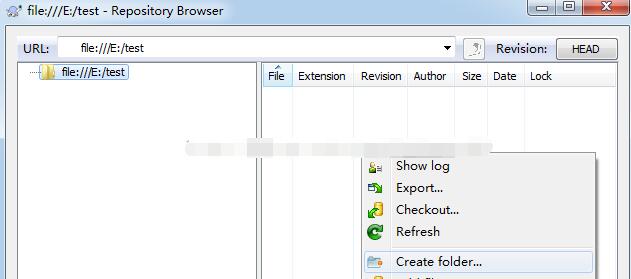
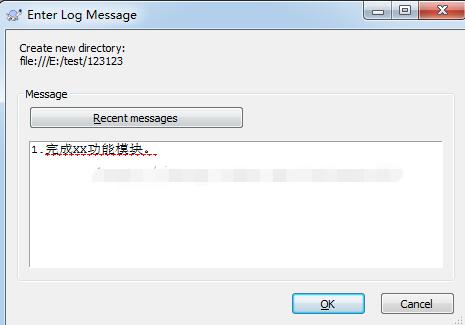
到目前为止已经创建一个资源库,可以通过选中E:\repos之后右键TortoiseSVN->Repo-browser来测试资源库是否创建成功; 在出现的界面里在右边的窗口右键选择create folder, 起了名字之后弹出以下的窗口是要你输入日志,svn提交代码或相关操作都是可以回退的,写日志就是为了看日志知道那个版本是做什么的.创建好的目录会出现右边。TortoiseSVN的界面操作可以说就是windows的资源管理器的操作方式,左边目录,右边子目录和文件。如图:
3)之后就可以浏览svn仓库中的代码了
浏览项目文件
右键 TortoiseSVN -》Repo-browser-》弹出来窗口输入项目地址,如本地地址:
file:///E:/test/123123

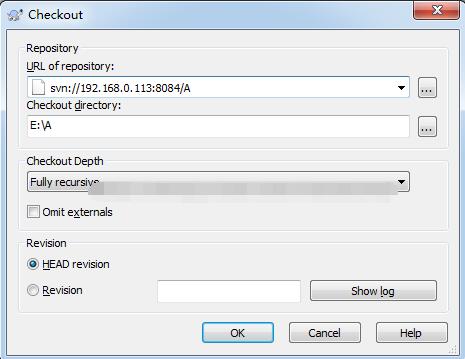
4)检出Checkout
checkout代码意思就是访问授权的svn地址把源代码,包括它当前的版本信息从服务器复制下来。
比如你想checkout某个项目A到本地.
– 选择你想checkout到本地的目录,比如E:\A
– 在资源管理器E盘空白处,右键选 SVN Checkout,弹出的对话框,
URL of repository: 填A项目的地址。本机项目可以填刚创建的目录file:///E:/test/123123
Checkout directory: 填E:\A
其他是设置具体到某个版本号的,每次提交svn都会分配一个全局版本号,可以根据SVN的LOG看到对应的版本号,这里用不着暂时不管了.
备注: 因为checkout出来svn会保留一份文件的备份,所以项目的大小会比较大。如果显式通过查看文件选项里的显示隐藏文件,会发现A目录下有一个.svn隐藏目录,这就是.svn保留版本信息的地方,不熟悉的不能删除.
5)导出:
svn的导出和checkout操作一样的,不同就是export不需要检出版本信息,对应比较大的不常改变的库最好用export,不然checkout会超级慢,比如boost库,目录层级太多(svn在每个目录下都有文件).
步骤:
右键 TortoiseSVN-> Export,之后操作和checkout一样.
6)更新:
更新意思是别人修改了某个文件,你需要从资源库同步过来的。这里涉及到一个如果别人和你修改了一个同一个文件怎么处理的问题(merge),暂时不管.
选中文件或目录:
右键 SVN Update.
7)提交:
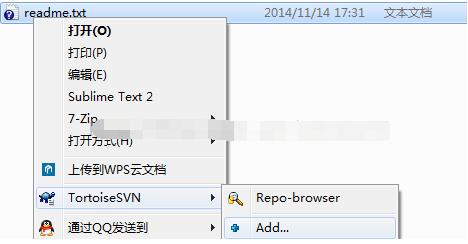
当有文件提交时,就需要commit文件,如果是新文件,需要先add再commit, 如果是修改的文件提交可以直接commit.
你也可以commit某个目录,因为svn默认有些后缀的文件不提交,所以要检查下提交后出现的日志窗口。
步骤:
选中文件-》右键TortoiseSVN->add
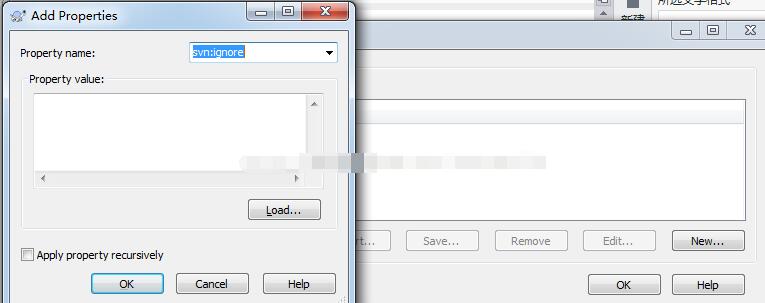
8)设置忽略属性(svn:ignore)
项目有些生成的输出文件是不能提交到代码里,不然会造成资源库增大几倍,所以设立需要设置忽略到某些文件或文件夹.比如输出目录Debug,Release
– 选中文件夹 右键-》TortoiseSVN->Properties.
– New… 弹出来的选择下拉条Property name: svn:igore
– Property value里填一行填一个过滤文本
Debug
Release
– 之后选中A文件夹commit设置.
注意: 如果之前不小心提交了Debug和Release的话,需要先在版本库里Delete掉这两个目录再commit svn:ignore.
已经提交的设置ignore是过滤不了的.
到此为止Linux搭建SVN的整个过程已经结束了,您是不是已经看的累了,那就休息休息休息吧。


 9278
9278

 被折叠的 条评论
为什么被折叠?
被折叠的 条评论
为什么被折叠?
 到【灌水乐园】发言


