1. 简介
Spring Cloud Stream 消息驱动组件帮助我们更快速,更方便,更友好的去构建消息驱动微服务的。
MQ消息中间件广泛应用在应用解耦合、异步消息处理、流量削峰等场景中。
不同的MQ消息中间件内部机制包括使用方式都会有所不同,比如RabbitMQ中有Exchange(交换机/交 换器)这一概念,kafka有Topic、Partition分区这些概念,MQ消息中间件的差异性不利于我们上层的 开发应用,当我们的系统希望从原有的RabbitMQ切换到Kafka时,我们会发现比较困难,很多要操作可 能重来(因为应用程序和具体的某一款MQ消息中间件耦合在一起了)。
Spring Cloud Stream进行了很好的上层抽象,可以让我们与具体消息中间件解耦合,屏蔽掉了底层具 体MQ消息中间件的细节差异,就像Hibernate屏蔽掉了具体数据库(Mysql/Oracle一样)。如此一 来,我们学习、开发、维护MQ都会变得轻松。
目前Spring Cloud Stream支持RabbitMQ和Kafka。
2. Stream重要概念
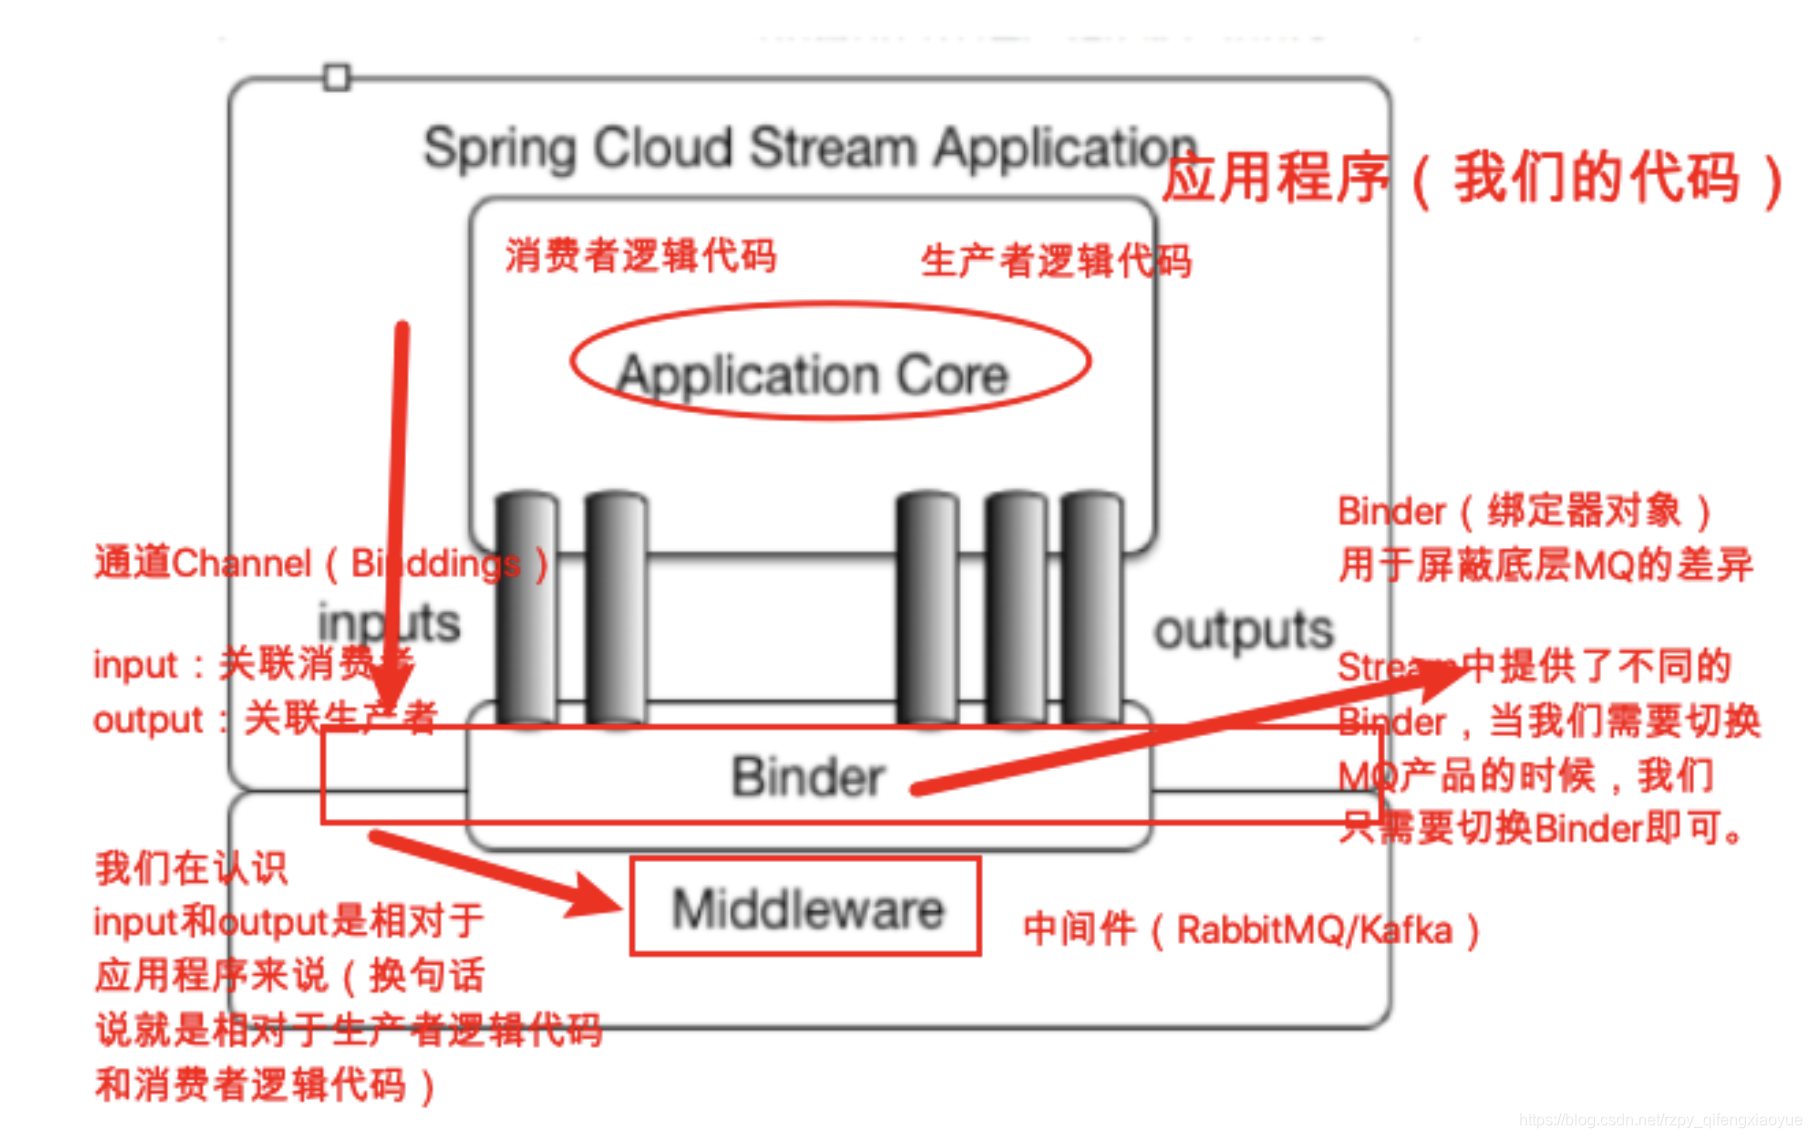
Spring Cloud Stream 是一个构建消息驱动微服务的框架。应用程序通过inputs(相当于消息消费者 consumer)或者outputs(相当于消息生产者producer)来与Spring Cloud Stream中的binder对象交 互,而Binder对象是用来屏蔽底层MQ细节的,它负责与具体的消息中间件交互。
下面是官网的图

Binder绑定器是Spring Cloud Stream 中非常核心的概念,就是通过它来屏蔽底层不同MQ消息中间件 的细节差异,当需要更换为其他消息中间件时,我们需要做的就是更换对应的Binder绑定器而不需要修 改任何应用逻辑(Binder绑定器的实现是框架内置的,Spring Cloud Stream目前支持Rabbit、Kafka两 种消息队列)
3. 传统MQ模型与Stream消息驱动模型

4. Stream消息通信方式及编程模型
- Stream消息通信方式
Stream中的消息通信方式遵循了发布—订阅模式。
在Spring Cloud Stream中的消息通信方式遵循了发布-订阅模式,当一条消息被投递到消息中间件之 后,它会通过共享的 Topic 主题进行广播,消息消费者在订阅的主题中收到它并触发自身的业务逻辑处 理。这里所提到的 Topic 主题是Spring Cloud Stream中的一个抽象概念,用来代表发布共享消息给消 费者的地方。在不同的消息中间件中, Topic 可能对应着不同的概念,比如:在RabbitMQ中的它对应 了Exchange、在Kakfa中则对应了Kafka中的Topic。
- Stream编程注解
如下的注解无非在做一件事,把我们结构图中那些组成部分上下关联起来,打通通道(这样的话生产者 的message数据才能进入mq,mq中数据才能进入消费者工程)。
| 注解 | 说明 |
|---|---|
| @Input(在消费者工程中使用) | 注解标识输入通道,通过该输入通道接收到的 消息进入应用程序 |
| @Output(在生产者工程中使用) | 注解标识输出通道,发布的消息将通过该通道 离开应用程序 |
| @StreamListener(在消费者工程中使用,监 听message的到来) | 监听队列,用于消费者的队列的消息的接收 (有消息监听…) |
| @EnableBinding | 把Channel和Exchange(对于RabbitMQ)绑 定在一起 |
接下来,我们创建三个工程(我们基于RabbitMQ,RabbitMQ的安装和使用这里不再说明)
lagou-cloud-stream-producer-9090, 作为生产者端发消息
lagou-cloud-stream-consumer-9091,作为消费者端接收消息
lagou-cloud-stream-consumer-9092,作为消费者端接收消息
- Stream消息驱动之开发生产者端
- 在lagou_parent下新建子module:lagou-cloud-stream-producer-9090
- pom.xml中添加依赖
<dependencies>
    <!--eureka client 客户端依赖引入-->
    <dependency>
        <groupId>org.springframework.cloud</groupId>
        <artifactId>spring-cloud-starter-netflix-eureka-client</artifactId>
    </dependency>

    <!--spring cloud stream 依赖(rabbit)-->
    <dependency>
        <groupId>org.springframework.cloud</groupId>
        <artifactId>spring-cloud-starter-stream-rabbit</artifactId>
    </dependency>
</dependencies>
- application.yml添加配置
server:
  port: 9090
spring:
  application:
    name: lagou-cloud-stream-producer
  cloud:
    stream:
      binders: # 绑定MQ服务信息(此处我们是RabbitMQ)
        lagouRabbitBinder: # 给Binder定义的名称,用于后面的关联
          type: rabbit # MQ类型,如果是Kafka的话,此处配置kafka
          environment: # MQ环境配置(用户名、密码等)
            spring:
              rabbitmq:
                host: localhost
                port: 5672
                username: guest
                password: guest
      bindings: # 关联整合通道和binder对象
        output: # output是我们定义的通道名称,此处不能乱改
          destination: lagouExchange # 要使用的Exchange名称(消息队列主题名称)
          content-type: text/plain # application/json # 消息类型设置,比如json
          binder: lagouRabbitBinder # 关联MQ服务
eureka:
  client:
    serviceUrl:
      # eureka server的路径
      #把 eureka 集群中的所有 url 都填写了进来,也可以只写一台,因为各个 eureka server 可以同步注册表
      defaultZone: http://localhost:8761/eureka/,http://localhost:8762/eureka/
    instance:
      prefer-ip-address: true #使用ip注册
- 启动类
@SpringBootApplication
@EnableDiscoveryClient
public class StreamProducerApplication {

    public static void main(String[] args) {
        SpringApplication.run(StreamProducerApplication.class,args);
    }
}
- 业务类开发(发送消息接口、接口实现类、Controller)
接口:
public interface IMessageProducer {

    public void sendMessage(String content);
}
实现类:
import com.lagou.edu.service.IMessageProducer;
import org.springframework.beans.factory.annotation.Autowired;
import org.springframework.cloud.stream.annotation.EnableBinding;
import org.springframework.cloud.stream.messaging.Source;
import org.springframework.messaging.support.MessageBuilder;

// Source.class里面就是对输出通道的定义(这是Spring Cloud Stream内置的通道封装)
@EnableBinding(Source.class)
public class MessageProducerImpl implements IMessageProducer {

    // 将MessageChannel的封装对象Source注入到这里使用
    @Autowired
    private Source source;


    @Override
    public void sendMessage(String content) {
        // 向mq中发送消息(并不是直接操作mq,应该操作的是spring cloud stream)
        // 使用通道向外发出消息(指的是Source里面的output通道)
        source.output().send(MessageBuilder.withPayload(content).build());
    }
}
测试类:
@SpringBootTest(classes = {StreamProducerApplication.class})
@RunWith(SpringJUnit4ClassRunner.class)
public class MessageProducerTest {

    @Autowired
    private IMessageProducer iMessageProducer;

    @Test
    public void testSendMessage() {
        iMessageProducer.sendMessage("hello world");
    }

}
- Stream消息驱动之开发消费者端
此处我们记录lagou-cloud-stream-consumer-9091编写过程,9092工程类似
-
application.yml,如下,只有端口和通道类型不一样

-
启动类
@SpringBootApplication
@EnableDiscoveryClient
public class StreamConsumerApplication9091 {

    public static void main(String[] args) {
        SpringApplication.run(StreamConsumerApplication9091.class,args);
    }
}
- 消息消费者监听
import org.springframework.cloud.stream.annotation.EnableBinding;
import org.springframework.cloud.stream.annotation.StreamListener;
import org.springframework.cloud.stream.messaging.Sink;
import org.springframework.messaging.Message;

@EnableBinding(Sink.class)
public class MessageConsumerService {

    @StreamListener(Sink.INPUT)
    public void recevieMessages(Message<String> message) {
        System.out.println("=========接收到的消息:" + message);
    }

}
5. Stream高级之自定义消息通道
Stream 内置了两种接口Source和Sink分别定义了 binding 为 “input” 的输入流和 “output” 的输出流, 我们也可以自定义各种输入输出流(通道),但实际我们可以在我们的服务中使用多个binder、多个输 入通道和输出通道,然而默认就带了一个input的输入通道和一个output的输出通道,怎么办?
我们是可以自定义消息通道的,学着Source和Sink的样子,给你的通道定义个自己的名字,多个输入通 道和输出通道是可以写在一个类中的。
import org.springframework.cloud.stream.annotation.Input;
import org.springframework.cloud.stream.annotation.Output;
import org.springframework.messaging.MessageChannel;
import org.springframework.messaging.SubscribableChannel;

public interface CustomChannel {

    String INPUT_LOG = "inputLog";
    String OUTPUT_LOG = "outputLog";

    @Input(INPUT_LOG)
    SubscribableChannel inputLog();

    @Output(OUTPUT_LOG)
    MessageChannel outputLog();
}
如何使用?
1.在 @EnableBinding 注解中,绑定自定义的接口
import com.lagou.edu.service.IMessageProducer;
import org.springframework.beans.factory.annotation.Autowired;
import org.springframework.cloud.stream.annotation.EnableBinding;
import org.springframework.messaging.support.MessageBuilder;

// Source.class里面就是对输出通道的定义(这是Spring Cloud Stream内置的通道封装)
@EnableBinding(CustomChannel.class)
public class MessageProducerImpl implements IMessageProducer {

    // 将MessageChannel的封装对象Source注入到这里使用
    @Autowired
    private CustomChannel customChannel;

    @Override
    public void sendMessage(String content) {
        // 向mq中发送消息(并不是直接操作mq,应该操作的是spring cloud stream)
        // 使用通道向外发出消息(指的是Source里面的output通道)
        customChannel.outputLog().send(MessageBuilder.withPayload(content).build());
    }
}
2.使用 @StreamListener 做监听的时候,需要指定 CustomChannel.INPUT_LOG
@EnableBinding(CustomChannel.class)
public class MessageConsumerService {

    @StreamListener(CustomChannel.INPUT_LOG)
    public void recevieMessages(Message<String> message) {
        System.out.println("=========接收到的消息:" + message);
    }

}
bindings:
  inputLog:
    destination: lagouExchange
  outputLog:
    destination: eduExchange
上述配置表示既可以作为消费发送者也可以作为消息消费者。
6. Stream高级之消息分组
上面的示例中,消费者端有两个(消费同一个MQ的同一个主题),但是我们的业务场景中希望这个主题的一个Message只能被一个消费者端消费处理,此时我们就可以使用消息分组,以此来解决消息重复消费问题。
我们仅仅需要在服务消费者端设置 spring.cloud.stream.bindings.input.group 属性,多个消费者实例配置为同一个group名称(在同一个group中的多个消费者只有一个可以获取到消息并消费)。
bindings: # 关联整合通道和binder对象
 input: # output是我们定义的通道名称,此处不能乱改
   destination: lagouExchange # 要使用的Exchange名称(消息队列主题名称)
   content-type: text/plain # application/json # 消息类型设置,比如json
   binder: lagouRabbitBinder # 关联MQ服务
   #消息分组
   group: lagou001


 450
450


 被折叠的 条评论
为什么被折叠?


