


1、USB上网
用本地连接给BBB的那个网口做Internet共享,一点确定就蓝屏,蓝屏了十次以后我打算放弃了,期间还想着重装系统。后来试了试交叉网线,居然成功了,也因此发现了问题所在。享受Internet共享的那个网口,它在被提供服务时IP会被迫变成192.168.137.1,而BBB的那个网口可不允许你做这种事情,它的默认IP必须是192.168.7.1。所以,这种改动直接让驱动程序崩溃了,导致了蓝屏。所以,用多增一个新的网口来做这个事情是可行的。但是,但是,但是,应该也有人可以直接用BBB的那个USB网口来通过Internet连接访问互联网,因为从各种教程来看,确实看起来可行,只是我这里做不到。
TZ='Asia/Shanghai'; export TZ
ifconfig eth0 192.168.137.2
/sbin/route add default gw 192.168.137.1
2、时区时钟
tzselect命令选一通就差不多了,剩下的是调成24小时制的问题。
网上看到说在/etc/default/locale里添加LC_TIME=en_DK.UTF-8,这当然可以搞定,但是en_DK不觉得看着难受么。我试了试就用中国的zh_CN,也可以达到目的。毕竟AM和PM不是中国的,所以就想了这招,直接修改LC_TIME=zh_CN.UTF-8,实测可以,这样心里舒服一点。另外,ntpdate命令没有就安装ntpdate包。
3、root用户shell没有颜色
拷贝有颜色用户的.bashrc文件即可。
4、Linux关机时提示A stop job is running for ..导致关机慢。
/etc/systemd/system.conf

DefaultTimeoutStartSec=30s
DefaultTimeoutStopSec=30s

systemctl daemon-reload
PS:BBB串口问题困扰了我很久,原来是设置的10s太短了,还是设置为30s吧。
5、Linux分区的讲究
HOWTO: Multi Disk System Tuning: Introduction
6、设置登录root用户桌面(图形界面)
vim  /usr/share/lightdm/lightdm.conf.d/50-ubuntu.conf

在最后一行添加greeter-show-manual-login=true

修改root用户配置文件 vim /root/.profile

修改mesg n 所在行为 tty -s && mesg n || true7、文件占用空间
du -h --max-depth=1

du -h -d1
8、cp复制、rm删除目录下的所有文件(目录)
cp -a /dir/*  /mnt/   不包括隐藏文件

cp -a  /dir/.  /mnt/ 包括隐藏文件
注意就是那个点很关键,如果用*的话就只拷贝正常文件了。
cp -r /[路径]/.[^.]*   只拷贝隐藏文件,如:

cp -r ./.[^.]*       /home/test211/
删除当前目录下所有隐藏文件
rm -rf .*删除当前目录下所有普通文件
rm -rf *一起删的,还不知道
-
删除目录下的所有目录,除了普通文件

find . -name d -print -exec rm -rf {} \;

这个我觉得不是好方法,但现在只能想到它,以后知道再加吧。
9、开启SSH服务的root登录
/etc/ssh/sshd_config 这里别搞错了,
还有一个ssh_config配置客户端的文件
PermitRootLogin yes
PermitEmptyPasswords yes
systemctl restart ssh
10、history命令使用
-
使用
!n重复执行第n条命令 -
使用
!!重复执行上条命令 -
使用
!字符串重复执行最后一条以该字符串开头的命令 -
使用
!$重复执行上一条命令最后一个参数
11、kernel with non-retpoline compiler
CONFIG_RETPOLINE=n
12、值得安装的一些软件
查看硬件的图形工具:hwinfo
查看系统基本信息:neofetch
艺术字生成器:figlet、toilet
ASCII艺术框:boxes,在配置文件中查看设计样式 /etc/boxes/boxes-config
诗词:fortune-mod和fortunes-zh
结合上面的boxes工具就可以做出那些曾经以为很难搞的酷酷的东西。
/usr/games/fortune | boxes -d mouse -a c
放在.bashrc文件中
Last login: Sat Nov 19 09:43:31 2022 from 192.168.7.1
.--, .--,
( ( \.---./ ) )
'.__/o o\__.'
{= ^ =}
> - <
__________________.""`-------`"".__________________
/ \
\ A visit to a strange place will bring fresh work. /
/ \
\___________________________________________________/
___)( )(___
(((__) (__)))
debian@BBB:~$
更多详尽的内容可以参考这里,很有趣,但我没那么多时间来学习。40个有趣的Linux命令行彩蛋和游戏
13、默认不支持exfat,安装exfat-utils,立竿见影。
14、默认系统自动软件升级的那两个软件叫做update-manager和update-notifier
15、Option "UseDisplayDevice" "DFP"
16、bash linux-gnueabi-gcc not found
64位系统需要安装32位支持库,lib32stdc++,后面还有个版本号,比如ib32stdc++6
不知道这招能不能解决另一个错误?——
CONFIG_X86_X32 enabled but no binutils support
17、多行合并成一行
cat file | xargs echo  //自动会用空格分开,非常好用

awk '{printf $0" "}'   //不加空格就全部黏在一起
18、国内镜像 sources.list 还是阿里云好点
deb http://mirrors.aliyun.com/debian/ buster main non-free contrib
deb-src http://mirrors.aliyun.com/debian/ buster main non-free contrib
deb http://mirrors.aliyun.com/debian-security buster/updates main
deb-src http://mirrors.aliyun.com/debian-security buster/updates main
deb http://mirrors.aliyun.com/debian/ buster-updates main non-free contrib
deb-src http://mirrors.aliyun.com/debian/ buster-updates main non-free contrib
deb http://mirrors.aliyun.com/debian/ buster-backports main non-free contrib
deb-src http://mirrors.aliyun.com/debian/ buster-backports main non-free contrib
19、远程图形界面(VNC和RDP)
默认vnc是连接不上的,问题出在用户主目录下没有 .Xresources文件,用touch命令建立后然后多试几遍就OK了。日志和启动脚本都在主目录的.vnc目录下,内容不复杂,看一看。不要被xrdb找不到吓到,它在的,不是它的问题,不用试图重装它。
PS:初始化是先用vncpasswd设定密码。
或者,装RDP简单,用Windows远程桌面访问,貌似还更好。
20、列出已安装的软件包大小,以便清理空间
dpkg-query -Wf '${Installed-Size}\t${Package}\n'|sort -n

放到.bashrc里起别名的话就得转义:
alias dpkg-sort="dpkg-query -Wf '\${Installed-Size}\t\${Package}\n' | sort -n"
21、查找一分钟前修改过的文件
find . -mmin -122、确定apt update修改了哪些文件
其实就是用上一条命令发现的,结论如下:
/var/lib/apt/lists/partial     这是空目录
/var/cache/apt/pkgcache.bin和/var/cache/apt/srcpkgcache.bin 这两个文件30MB
23、开机启动一条自己的命令或者程序
还是修改/etc/rc.local好使,不要直接上update-rc.d来添加服务,没必要。
apt update >/dev/null 2>&1 &

/usr/local/bin/bak_cfg.sh &
24、motion软件,刚装上是用不了的
-
先看看版本,再看看说明书
/usr/share/doc/motion/motion_guide.html#Basic_Setup
配置项各版本之间差别很大
| Version 3.2 | Version 3.4 | Version 4.0 | Current Version |
| area_detect | area_detect | area_detect | |
| auto_brightness | auto_brightness | auto_brightness | |
| brightness | brightness | brightness | |
| thread | thread | camera |
-
webcam_localhost改为stream_localhost
-
target_dir是/var/lib/motion
-
设置端口号,不要用已占用的8080。stream_port 8081 webcontrol_port 8089
-
调一下分辨率,帧数 width 1024 height 768
这样搞才能行,这个软件其实很复杂的!
PS:占用资源太大,玩不起,卸载了。留给那些树莓派玩家去耍吧,不过它耗的是CPU,还不是内存,内存还有许多空闲。也许是可以优化设置,不过我不深究了……
25、想把对一个系统进行配置过的文件平时都保存下来,以备将来万一重装时节约大量劳动。
还想让它每次开机运行,不过我想再优化一下就是没变的就不要拷贝了(加了cp -u命令,不知道结果如何,-u是为了源文件更新才拷贝,-p是为了保持权限),先休息一下。
      1 #!/bin/sh
      2 export DIR_CFG="/mnt/MMC/SCK_config"
      3 #export DIR_CFG="/media/debian/rootfs/SCK_config"
      4 export LST_CFG="scripts/bak_cfg.lst"
      5 FILE=$DIR_CFG/$LST_CFG
      6
      7 sudo mount /dev/mmcblk1p1 /mnt/MMC 2> /dev/null
      8
      9 if [ $# -eq 0 ]; then
     10     xargs -a $FILE -n1 -i cp -p -u {} $DIR_CFG
     11     echo "Bakuped to $DIR_CFG."
     12 elif [ $# -eq 1 ]; then
     13     realpath -e $1 >> $FILE
     14     if [ $? -eq 0 ]; then
     15         echo "New Config File:[$1] added to $FILE"
     16         sort -u $FILE -o $FILE
     17     fi
     18 fi
解释一下xargs那里:1、-a选项直接带文本文件,就不用cat再管道了;2、-n1是为了一行一行处理;3、-i是为了引用参数,只有这样才能让{}可以取代前面搞出来的东西,否则xargs默认会把所有东西放在最后最后最后;
26、把dmesg内容里的时间戳转换成人类可理解的格式,直接复制了网上代码,只做了测试能用。
#!/bin/sh

if [ $# -ne 1 ];then
    echo "input an dmesg time"
    exit 1
fi

unix_time=`echo "$(date +%s) - $(cat /proc/uptime | cut -f 1 -d' ') + ${1}" | bc`
echo ${unix_time}
date -d "@${unix_time}" '+%Y-%m-%d %H:%M:%S'
27、dd命令终于有进度条了
dd if=/dev/zero of=/dev/null status=progress28、BBB的Debian最新镜像地址
Debian 11.x (Bullseye) - Monthly Snapshots - General Discussion - BeagleBoardNetworkWe migrated from connman to Debian Systemd-Networkd debian@BeagleBone:~$ sudo networkctl IDX LINK TYPE OPERATIONAL SETUP 1 lo loopback carrier unmanaged 2 eth0 ether routable configured … https://forum.beagleboard.org/t/debian-11-x-bullseye-monthly-snapshots/31280
也不知道以前是怎么搜出来的,这个地址我从各种链接都找不到,还好以前收藏了,这个地方发布的镜像就是我现在用的,非常好非常好,真正的最新。
29、BBB自己的源 --- GPG error: Optional enable
Beagleboard:BeagleBoneBlack Debian - eLinux.org
wget https://rcn-ee.com/repos/debian/pool/main/r/rcn-ee-archive-keyring/rcn-ee-archive-keyring_2016.04.24~bpo70+20160424+1_all.deb
sudo dpkg -i rcn-ee-archive-keyring_*_all.deb
Add repo to /etc/apt/sources.list
sudo sh -c "echo 'deb [arch=armhf] Index of /debian wheezy main' >> /etc/apt/sources.list"
sudo sh -c "echo '#deb-src [arch=armhf] Index of /debian wheezy main' >> /etc/apt/sources.list"
Update packages:
sudo apt-get update
sudo apt-get upgrade
sudo apt-get install npm c9-core-installer --reinstall
30、BBB的System Reference Manual
SRM是在官方git上放着的,官方网站上反而没有。
https://github.com/beagleboard/beaglebone-black/archive/master.zip
https://github.com/beagleboard/beaglebone-black.git
31、apt和dpkg安装软件时如何解决依赖关系
 https://mp.weixin.qq.com/s/SAdwtziZnKaNJ2sSEZPnjw
这个已经写得很好了。看看吧。
32、查看文件系统block大小
-
stat -f /
-
tune2fs -l
-
blockdev --getbsz /dev/sda1
33、linux下查看Markdown文件(README.md)
 https://github.com/charmbracelet/glow/releases
34、apt update 提示gpg 无公钥
gpg --keyserver keyserver.ubuntu.com --recv-keys [提示的公钥]gpg --export --armor [提示的公钥] | sudo apt-key add -
虽然第二句命令提示apt-key过时,但是运行后确实解决了问题。
真正的解决方案应该是去镜像站下载那个gpg,然后在sources.list里指定
deb [signed-by=/usr/share/keyrings/EXAMPLE.gpg]35、samba咋配都配不好之Windows无权限写入Linux文件夹
smb.conf已经搞烂了,结果问题不出在那边。而是在Linux samba服务器端需要用smbpasswd -a root给root加一个用户。大部分情况下用root用户是很方便的,但是也要谨慎使用——我不是说安全问题,而是很多文件复制过去在树莓派那边用普通用户处理不了也是个麻烦事。
还是retropie上的共享ROMS的samba配置写得好,参考改写:
[debian]
comment = debian Home
path = "/home/debian"
writeable = yes
guest ok = yes
create mask = 0644
directory mask = 0755
force user = debian
36、retropie蓝牙音箱的连接(a2dp-sink profile protocol not availalbe)
修改下面的文件
-
在/etc/pulse/system.pa文件末尾加上下面内容:
### fix bug: a2dp-sink profile connect failed [...]: Protocol not available
load-module module-bluez5-device
load-module module-bluez5-discover-
在/etc/pulse/default.pa文件末尾加上下面内容:
### Automatically switch to newly-connected devices
load-module module-switch-on-connect-
在/etc/pulse/client.conf文件末尾加上下面内容
autospawn = no
daemon-binary = /bin/true-
修改/etc/pulse/daemon.conf文件
把 ;exit-idle-time = 20
替换成 exit-idle-time = -1
sudo bluetoothctl
输入power on打开蓝牙
输入agent on 打开代理
输入scan on 开启搜索
输入devices查看可用蓝牙列表,看是否有要连接的蓝牙耳机
如果有,输入scan off关闭搜索
输入pair xx:xx:xx:xx:xx:xx配对蓝牙耳机
输入 trust xx:xx:xx:xx:xx:xx信任蓝牙耳机
输入connect xx:xx:xx:xx:xx:xx连接蓝牙耳机
37、设置默认声卡(树莓派HDMI声音问题)
针对全局配置: 在/etc目录下创建文件asound.conf

defaults.ctl.card 1
defaults.pcm.card 1
defaults.timer.card 1
if [ "$INTERACTIVE" = True ]; then
AUDIO_OUT=$(whiptail --menu "Choose the audio output" 20 60 10 \
"0" "Auto" \
"1" "Force 3.5mm ('headphone') jack" \
"2" "Force HDMI" \
3>&1 1>&2 2>&3)
else
AUDIO_OUT=$1
fi
if [ $? -eq 0 ]; then
amixer cset numid=3 "$AUDIO_OUT"
fi
这里会产生一条命令:
amixer cset numid=3 2
这就是HDMI用户主目录下的 .asoundrc文件
pcm.!default {
type asym
playback.pcm {
type plug
slave.pcm "output"
}
capture.pcm {
type plug
slave.pcm "input"
}
}
pcm.output {
type hw
card $AUDIO_OUT
}
ctl.!default {
type hw
card $AUDIO_OUT
}38、仿照树莓派给BBB设置sudo不要密码
debian ALL=(ALL) NOPASSWD: ALL
-
注意/etc/sudoers.d/目录下有个admin文件,里面会覆盖debian用户的设置。所以有多种处理方法,我选择了直接让管理员组都不用输入密码:
-
%admin ALL=(ALL) NOPASSWD: ALLsudo -l命令此时是一个非常有用的调试命令。
39、盲目更新造成的降级需求
-
cat /var/log/apt/history.log 查看最近更新了哪些软件
-
apt-cache madison
-
apt install version=
40、查看BBB的CPU温度
需要安装低版本的镜像系统,比如Debian7.9
root@beaglebone:/sys/class/hwmon/hwmon0/device# cat temp1_input
59000
root@beaglebone:/sys/class/hwmon/hwmon0/device# cat /etc/dogtag
BeagleBoard.org Debian Image 2015-11-12
root@beaglebone:/sys/class/hwmon/hwmon0/device# cat /etc/issue
Debian GNU/Linux 7 \n \l

BeagleBoard.org Debian Image 2015-11-12

Support/FAQ: http://elinux.org/Beagleboard:BeagleBoneBlack_Debian

default username:password is [debian:temppwd]

The IP Address for eth0 is: 192.168.137.195
The IP Address for usb0 is: 192.168.7.2
root@beaglebone:/sys/class/hwmon/hwmon0/device# cat temp1_input
57000
root@beaglebone:/sys/class/hwmon/hwmon0/device#
41、Arduino红外收发模块细节
-
红外收发模块非常简单,是可以自己手工制作的,没有想象中那么复杂。买来的一收一发,发送的时候蓝灯亮,接收时红灯亮,非常方便。
-
Arduino无法在一块开发板上同时实现收发,严格来说是自己发出的自己接收,这个目标需要两块开发板来实现,这是细节,知道了之后反而不需要折腾两块了。
-
发送NEC信号的准确代码如下:irsend.sendNEC(0xFFA857, 32);
-
NEC信号就是32位的,不用犹豫了;前面是发送的具体代码,已经是不需要考虑“端”的;另外,前面看起来不足32位,其实会用0自动补齐的,所以等价于0x00FFA857。
-
1
2
3
1
CH-
A25D
CH
629D
CH+
E21D
2
PREV<
22DD
NEXT>
02FD
PAUSE
C23D
3
VOL-
E01F
VOL+
A857
EQ
906F
4
0
6897
100+
9867
200+
B04F
5
1
30CF
2
18E7
3
7A85
6
4
10EF
5
38C7
6
5AA5
7
7
42BD
8
4AB5
9
52AD
普通21键遥控
42、TypeError: 'encoding' is an invalid keyword argument
for this function
原因未知,不能确定是否是python2.7的问题,python3就没问题。
解决方法:
import io
with io.open('1.txt','r',encoding='utf-8') as f:
43、python明明路径就在那里,但是import却出错
解决方法:在那个目录下建立__init__.py文件就可以了。
44、xfce设置自动登录
编辑/etc/lightdm/lightdm.conf
BBB原版系统就是在[Seat:*]这下面改的两项:
autologin-user=debian
autologin-session=xfce
学网上改也行,如下:
[SeatDefaults]
autologin-user=debian
autologin-user-timeout=0
autologin-session=xfce
以下添加自动登录用户组的事情我没做,目前运作正常。
sudo groupadd -r autologin
sudo gpasswd -a debian autologin
45、串口研究
 http://0pointer.de/blog/projects/serial-console.html
46、创建一些大文件来,这是我为项目编写的第一个程序 :)
#!/bin/bash
echo "This tool will generate many large files(one file per 1GB size)"
echo "                                              by Safirst C. Ke"
echo "                          $(date)"
echo ""
mkdir -p db && cd db
read -p "Input the file size(GB) you want to generate, default(1GB):" n
n=${n:=1}
for ((i=1;i<=$n;i++))
do
    echo "Creating db$i..."
    dd if=/dev/random of="db""$i" iflag=fullblock count=128 bs=8M status=progress
done
echo "All files generated :)"
奇怪的是在那台服务器上只能用/dev/zero来创建文件,用random会奇慢无比。
47、dhcpd服务器
-
sudo apt-get install isc-dhcp-server -y
-
sudo vi /etc/dhcp/dhcpd.conf
subnet 192.168.5.0 netmask 255.255.255.0 {
range dynamic-bootp 192.168.5.9 192.168.5.19;
option broadcast-address 192.168.5.255;
option routers 192.168.5.11;
}
48、BBB更新Uboot
sudo dd  if =MLO of=/dev/mmcblk0 count= 1  seek= 1  conv=notrunc bs=128k
sudo dd  if =u-boot.img of=/dev/mmcblk0 count= 2  seek=1  conv=notrunc bs=384k
我找了全网,没有找到为什么是这样写的,也找不到如何更新eMMC里面的Uboot教程。最后千辛万苦找到了源代码,我估计以下就是“代代相传”的出处:
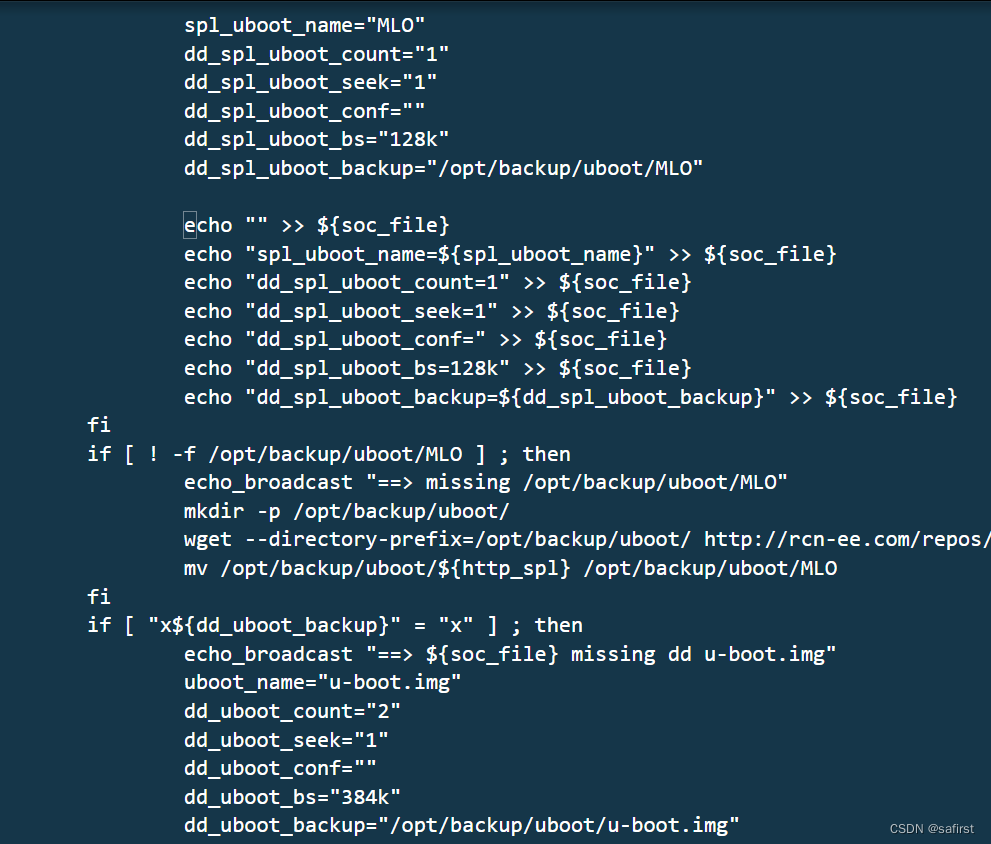
这个文件是/opt/scripts/tools/eMMC/function.sh
虽然这个shell脚本我还没有能力全部解读,但是仔细分析了$destination变量后,差不多能够确定要烧写eMMC的uboot使用的命令跟上述sd卡的是类似的,目标写mmcblk1就是了。不过经过测试,写这个目标直接完蛋了,呵呵,这下是有事做了。
哈哈,这是因祸得福呀,我在修复的时候看到了这条命令,这才是正解!!!
dd if=/opt/backup/uboot/MLO of=/dev/mmcblk0 count=2 seek=1 conv=notrunc bs=128k
dd if=/opt/backup/uboot/u-boot.img of=/dev/mmcblk0 count=4 seek=1 conv=notrunc bs=384k

#!/bin/bash

if ! id | grep -q root; then
        echo "must be run as root"
        exit
fi

wdir="/opt/u-boot/bb-u-boot-am335x-evm"

if [ -b /dev/mmcblk0 ] ; then
        echo "dd if=${wdir}/MLO of=/dev/mmcblk0 count=2 seek=1 bs=128k"
        dd if=${wdir}/MLO of=/dev/mmcblk0 count=2 seek=1 bs=128k
        echo "dd if=${wdir}/u-boot-dtb.img of=/dev/mmcblk0 count=4 seek=1 bs=384k"
        dd if=${wdir}/u-boot-dtb.img of=/dev/mmcblk0 count=4 seek=1 bs=384k
fi
看到没有,count的值一个是2,一个是4。跟上面的不同!继续测试完毕,看看这是不是就是正解!得来全不费工夫呀。。。
Writing bootloader to [/dev/mmcblk1]
----------------------------------------
==> Figuring out options for SPL U-Boot copy ...
===> Will use : count=2 seek=1 conv=notrunc bs=128k
==> Figuring out options for U-Boot copy ...
===> Will use : count=4 seek=1 conv=notrunc bs=384k
==> Copying SPL U-Boot with dd if=/opt/backup/uboot/MLO of=/dev/mmcblk1 count=2 seek=1 conv=notrunc bs=128k
------------------------------------------------------------
0+1 records in
0+1 records out
92564 bytes (93 kB, 90 KiB) copied, 0.0302154 s, 3.1 MB/s
------------------------------------------------------------
==> Copying U-Boot with dd if=/opt/backup/uboot/u-boot.img of=/dev/mmcblk1 count=4 seek=1 conv=notrunc bs=384k
------------------------------------------------------------
1+1 records in
1+1 records out
476424 bytes (476 kB, 465 KiB) copied, 0.0427297 s, 11.1 MB/s
------------------------------------------------------------
Writing bootloader completed
49、控制台内核输出信息太多,造成干扰
echo 4 4 1 4 > /proc/sys/kernel/printk
50、Vi编辑文件启动时卡死
仅在串口tty登录有此异常现象,怀疑是终端类型不兼容,默认是vt220,在/etc/profile中修改为xterm-color解决,而且还更好看了,一举两得。
51、BBB的虚拟串口登录
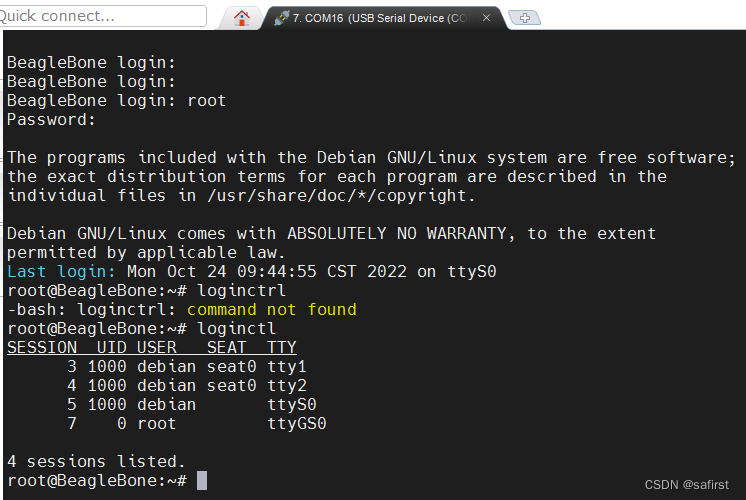
原来虚拟串口不是usb-gadget(这个是usb到以太网),我一直以为是它。今天安装好了CDC串口驱动之后,恍然发现原来它才对应着ttyGS0,并且登录成功。

安装驱动方法如下:将这段代码保存为usbser.inf,拷贝到C:\Windows\inf下,并进行普通驱动程序安装即可。
不过遗憾的是,BBB重启后,这个端口又不可用了。不慌,只需要在Windows设备管理器中将该设备卸载,重新再扫描添加就好了。毕竟这个串口还是不如板载的那个调试串口的,因为它需要Linux内核支持,这么一来其实是看不到Uboot和Linux启动信息的,一直到登录才会看见。
;/*++
;
;Copyright (c) Microsoft Corporation.  All rights reserved.
;
;Module Name:
;    usbser.inf
;
;Abstract:
;    INF file for installing the USB Serial driver
;
;--*/

;*****************************************
; Version section
;*****************************************
[Version]
Signature   = "$WINDOWS NT$"
Class       = Ports
ClassGUID   = {4D36E978-E325-11CE-BFC1-08002BE10318}
Provider    = %MSFT%
PnpLockdown = 1
DriverVer = 06/21/2006,10.0.18362.1

[DestinationDirs]
DefaultDestDir = 12
UsbSerial_CopyFiles = 12

;[SourceDisksNames]
;3426 = windows cd

;[SourceDisksFiles]
;usbser.sys = 3426

[ControlFlags]
ExcludeFromSelect = *

;*****************************************
; Install Section
;*****************************************

[Manufacturer]
%MSFT% = Standard, NTamd64

[Standard.NTamd64]
%UsbSerial.DeviceDesc% = UsbSerial_Install, USB\Class_02&SubClass_02&Prot_01
%UsbSerial.DeviceDesc% = UsbSerial_Install, USB\Class_02&SubClass_02

; USB modem filter driver for use with Include/Needs only
%UsbSerialModem.DeviceDesc% = UsbSerial_ModemFilter_Install

[UsbSerial_Install.NT]
CopyFiles   = UsbSerial_CopyFiles
AddReg      = UsbSerial_AddReg
AddProperty = UsbSerial_AddProperty

; intentionally blank so that in future if we ever put anything in here
; it will get get picked up via Include/Needs
[UsbSerial_Install.NT.Hw]

[UsbSerial_CopyFiles]
usbser.sys,,,0x100

[UsbSerial_AddReg]
HKR,,PortSubClass,%REG_BINARY%,02
HKR,,EnumPropPages32,,"MsPorts.dll,SerialPortPropPageProvider"

[UsbSerial_AddProperty]
GenericDriverInstalled,,,,1

;*****************************************
; Service installation section
;*****************************************

[UsbSerial_Install.NT.Services]
AddService = usbser,0x00000002,UsbSerial_Service_Install, UsbSerial_EventLog_Install

[UsbSerial_Service_Install]
DisplayName   = %UsbSerial.DriverDesc%
ServiceType   = 1           ; SERVICE_KERNEL_DRIVER
StartType     = 3           ; SERVICE_DEMAND_START
ErrorControl  = 1           ; SERVICE_ERROR_NORMAL
ServiceBinary = %12%\usbser.sys

[UsbSerial_EventLog_Install]
AddReg=UsbSerial_EventLog_AddReg

[UsbSerial_EventLog_AddReg]
HKR,,EventMessageFile,0x00020000,"%%SystemRoot%%\System32\IoLogMsg.dll;%%SystemRoot%%\System32\Drivers\usbser.sys"
HKR,,TypesSupported,0x00010001,7

;***********************************************************
; Modem install section to install usbser as a lower filter
; (Include/Needs from modem INFs)
;***********************************************************

[UsbSerial_ModemFilter_Install]
CopyFiles=UsbSerial_CopyFiles

[UsbSerial_ModemFilter_Install.Hw]
AddReg=UsbSerial_ModemFilter_AddReg

[UsbSerial_ModemFilter_AddReg]
HKR,,LowerFilters,%REG_MULTI_SZ%,"usbser"

[UsbSerial_ModemFilter_Install.Services]
AddService=usbser,,UsbSerial_Service_Install,UsbSerial_EventLog_Install

;*****************************************
; Strings section
;*****************************************

[Strings]
; localizable
MSFT                      = "Microsoft"
UsbSerial.DeviceDesc      = "USB Serial Device"
UsbSerialModem.DeviceDesc = "USB Serial Modem Device"
UsbSerial.DriverDesc      = "Microsoft USB Serial Driver"

; non-localizable
REG_BINARY   = 0x00000001
REG_MULTI_SZ = 0x00010000
52、od、dd命令研究
首先是od命令的格式,我直接改成
alias od='od -Ax -tx1 -v'
这就是WinHex默认的显示,熟悉的人直接起飞,也不需要研究太细了。
od -N 512 /dev/mmcblk0
显示设备上的512字节有以上两条就可以吃半边天了。
接下来是dd命令:
- 如何产生全1的文件
dd if=/dev/zero bs=64 count=1 | sed 's/\x00/\xff/g' > 64FF
以上命令产生64字节的全1文件。- 接下来是我一直想做的实验,来确认一些事情,现在有结论了:
- 如果if < of 大小,那么就算指定的bs*count超过了if,也是不要紧的,dd命令只会复制if文件那么多;
- 如果if > of 大小,那么就看bs*count的大小,如果它小,那么就从if文件中复制那么大来创建of;如果它大,那么又再次是以if为准;
- 综上,证实了一个我长期不敢确定的事情:就是如果我用个小文件,但是向dd命令指定一个大的空间来创建新文件,它会不会复制前面一部分后,后面空余的部分用0补齐?答案是:不会。
53、MB和MiB
这个概念虽然了解很多年了,但是一直需要一个明确的结论,今天来确认一下:
root@BeagleBone:~# dd if=/dev/zero of=2048 bs=2MB count=1
1+0 records in
1+0 records out
2000000 bytes (2.0 MB, 1.9 MiB) copied, 0.0396881 s, 50.4 MB/s
root@BeagleBone:~# dd if=/dev/zero of=2048i bs=2M count=1
1+0 records in
1+0 records out
2097152 bytes (2.1 MB, 2.0 MiB) copied, 0.039713 s, 52.8 MB/s

root@BeagleBone:~# du 2* -h
2.0M    2048
2.0M    2048i
root@BeagleBone:~# du 2*
1956    2048
2048    2048i
root@BeagleBone:~#
结论:和想当然的情况不同,计算机专业精确的描述(1024)方法是一个单字母“M”,而“MB”则留给了传统的、不精确的表达(1000)。反过来说,MB用了这么多年,错了也就错了,不去改了,想要精确,请使用,单字母——K、M、G... 大小写同义。
54、交叉编译工具链的INCLUDE和LIB
说是用
echo 'main(){}'| arm-linux-gnueabihf-gcc -E -v - 来查看,确实全都在了,但是这也太乱了,我花了半个小时才能准确解析,时间划不来。
还是给点指导吧:
- INCLUDE:在start here之后,写了条命令稍微人性化一点。其中gcc_env.txt是上面那条命令的全部输出,不过要记得2>&1。
book@100ask:~$ grep -A 4 "starts here" gcc_env.txt | tail -n +3 | xargs realpath
/home/book/100ask_imx6ull-sdk/ToolChain/gcc-linaro-6.2.1-2016.11-x86_64_arm-linux-gnueabihf/lib/gcc/arm-linux-gnueabihf/6.2.1/include
/home/book/100ask_imx6ull-sdk/ToolChain/gcc-linaro-6.2.1-2016.11-x86_64_arm-linux-gnueabihf/lib/gcc/arm-linux-gnueabihf/6.2.1/include-fixed
/home/book/100ask_imx6ull-sdk/ToolChain/gcc-linaro-6.2.1-2016.11-x86_64_arm-linux-gnueabihf/arm-linux-gnueabihf/include
/home/book/100ask_imx6ull-sdk/ToolChain/gcc-linaro-6.2.1-2016.11-x86_64_arm-linux-gnueabihf/arm-linux-gnueabihf/libc/usr/include
- LIB:看LIBRARY_PATH,同样的,写了一条命令。人生苦短,还是节约点生命吧。
book@100ask:~$ grep LIBRARY_PATH gcc_env.txt | sed 's/LIBRARY_PATH=//' | sed 's/:/\n/g'| xargs realpath
/home/book/100ask_imx6ull-sdk/ToolChain/gcc-linaro-6.2.1-2016.11-x86_64_arm-linux-gnueabihf/lib/gcc/arm-linux-gnueabihf/6.2.1
/home/book/100ask_imx6ull-sdk/ToolChain/gcc-linaro-6.2.1-2016.11-x86_64_arm-linux-gnueabihf/lib/gcc/arm-linux-gnueabihf
/home/book/100ask_imx6ull-sdk/ToolChain/gcc-linaro-6.2.1-2016.11-x86_64_arm-linux-gnueabihf/lib/gcc
/home/book/100ask_imx6ull-sdk/ToolChain/gcc-linaro-6.2.1-2016.11-x86_64_arm-linux-gnueabihf/arm-linux-gnueabihf/lib
/home/book/100ask_imx6ull-sdk/ToolChain/gcc-linaro-6.2.1-2016.11-x86_64_arm-linux-gnueabihf/arm-linux-gnueabihf/libc/lib
/home/book/100ask_imx6ull-sdk/ToolChain/gcc-linaro-6.2.1-2016.11-x86_64_arm-linux-gnueabihf/arm-linux-gnueabihf/libc/usr/lib
- 结论:拷贝到以上任意目录即可完成,但是细心对比阅读会发现,如果只是为了完成这个任务而不想了解太多的话,有条捷径:把编译出来的那些什么include、lib、share、man目录,通通直接拷贝到交叉工具链的根目录下的arm-linux-gnueabihf目录即可,那里刚好各种适配。再次,真爱生命,继续前行!
55、ld: warning: libpng16.so.16, needed by /home/book/100ask_imx6ull-sdk/ToolChain/gcc-linaro-6.2.1-2016.11-x86_64_arm-linux-gnueabihf/bin/../lib/gcc/arm-linux-gnueabihf/6.2.1/../../../../arm-linux-gnueabihf/lib/libfreetype.so, not found (try using -rpath or -rpath-link)
库文件明明在,就是找不到,苦啊哭啊。就是按照上面一条找到的精确位置,我确认100遍了,就在那里,但是就是提示找不到。无解,最终只能用提示的rpath-link命令,这确实能搞定,但不知其所以然。
arm-linux-gnueabihf-gcc freetype_show_font.c -lfreetype -Wl,-rpath-link,/home/book/100ask_imx6ull-sdk/ToolChain/gcc-linaro-6.2.1-2016.11-x86_64_arm-linux-gnueabihf/arm-linux-gnueabihf/lib这可以指定非标准的链接库位置。
另一条命令rpath,是用来指定运行时非标准库位置的。
-Wl,-rpath,/path/to/lib
都是些怪胎……
56、.vimrc配置文件
多年来,我也带过一个vimrc文件,带了20年,但是不好保存,那个可是我看了很多书一个一个积累的,不过算了,也就那样吧。自然有牛人收集整理更好的,我也就从今天起抛弃过去,用新的。
https://gitee.com/eccozhou/vimrc/tree/master
git clone https://git.oschina.net/eccozhou/vimrc.git ~/.vim_runtime
sh ~/.vim_runtime/install_awesome_vimrc.sh
57、IFS
笑死人了,书上明明写着IFS=$'\n',结果Bash不认,随即我百度后,正确的答案居然是
IFS='
'
WTF,这又是什么牛马蛇神操作,希望以后告诉我优雅的方案。
58、用命令行从Linux复制文件到Windows下的共享文件夹
smbclient -c "put bbb_configs.tgz" //192.168.7.1/Backup -U lenovo%password59、修改主机名 及 sudo: unable to resolve host
出了这个错误才知道,修改主机名仅仅靠/etc/hostname 是不够的的,还有/etc/hosts,都得改。
debian@BBB:/etc$ cat hosts
127.0.0.1       localhost
127.0.1.1       BBB.localdomain BBB
60、使用dpkg-reconfigure自动进行非交互式配置
比如我们想不参与交互而用脚本直接让Debian从默认的dash改成bash
root@100ask:/home/book# debconf-show dash
* dash/sh: true
root@100ask:/home/book# echo "dash dash/sh boolean false" | debconf-set-selections
root@100ask:/home/book# DEBIAN_FRONTEND=noninteractive dpkg-reconfigure dash
Removing 'diversion of /bin/sh to /bin/sh.distrib by dash'
Adding 'diversion of /bin/sh to /bin/sh.distrib by bash'
Removing 'diversion of /usr/share/man/man1/sh.1.gz to /usr/share/man/man1/sh.distrib.1.gz by dash'
Adding 'diversion of /usr/share/man/man1/sh.1.gz to /usr/share/man/man1/sh.distrib.1.gz by bash'
root@100ask:/home/book#
一共三步:
- debconf-show dash 看默认是什么值;
- 编辑值,再用debconf-set-selections设定,这一步难度最高;
- 加上非交互式命令执行dpkg-reconfigure。
61、Support for password authentication was removed on August 13, 2021
Github还是用SSH Key方便一点,密码那个事儿已经过时了,没办法,必须折腾。
remote: Support for password authentication was removed on August 13, 2021.
remote: Please see https://docs.github.com/en/get-started/getting-started-with-git/about-remote-repositories#cloning-with-https-urls for information on currently recommended modes of authentication.


book@100ask:~$ ssh-keygen -t ed25519 -C "zhongjizhuyi@163.com"
Generating public/private ed25519 key pair.
Enter file in which to save the key (/home/book/.ssh/id_ed25519):
Enter passphrase (empty for no passphrase):
Enter same passphrase again:
Your identification has been saved in /home/book/.ssh/id_ed25519.
Your public key has been saved in /home/book/.ssh/id_ed25519.pub.
The key fingerprint is:
SHA256:E8Sqsbzay4ZeSaI3lBqT61TAPEeQGFi5UHimdU0sK1Q zhongjizhuyi@163.com
The key's randomart image is:
+--[ED25519 256]--+
|+*=+E+...        |
|B.B o o..        |
| % + o ..        |
|..*.o .  .       |
|+ ++.+  S        |
| B.o+.   .       |
|+.o.o.           |
|o..=o            |
| ooo+.           |
+----[SHA256]-----+
book@100ask:~$ eval "$(ssh-agent -s)"
Agent pid 3737
book@100ask:~$ ssh-add ~/.ssh/id_ed25519
Identity added: /home/book/.ssh/id_ed25519 (zhongjizhuyi@163.com)
book@100ask:~$ cd .ssh
book@100ask:~/.ssh$ ls
id_ed25519  id_ed25519.pub  known_hosts
book@100ask:~/.ssh$ cat id_ed25519.pub
ssh-ed25519 AAAAC3NzaC1lZDI1NTE5AAAAIEfrA1F1GJY4if42j8PCX601For/FvTXSItch0X48EJT zhongjizhuyi@163.com
book@100ask:~/.ssh$ ssh -T git@github.com
The authenticity of host 'github.com (20.205.243.166)' can't be established.
ECDSA key fingerprint is SHA256:p2QAMXNIC1TJYWeIOttrVc98/R1BUFWu3/LiyKgUfQM.
Are you sure you want to continue connecting (yes/no)? yes
Warning: Permanently added 'github.com,20.205.243.166' (ECDSA) to the list of known hosts.
Hi safirst! You've successfully authenticated, but GitHub does not provide shell access.
book@100ask:~/.ssh$
62、给echo点颜色看看(使用Vim自定义快捷键)
nmap <F2> :s:echo "\(.*\)":echo -e "\\e[32m\1\\e[0m":g<CR>
PS:bash默认是不能直接输出"\n"来换行的,这有点难受哦,它是需要带上-e 才行的。
63、Git如何进行http与ssh的互相转化
这个需求起源于我用http clone了自己的项目后,想要push,却发现又要输入用户名密码,然后又没有然后了(参见第61条)。这次我再次研究了不要密码后的解决方案,还可以选择token,但是我发现ssh方式既稳定又快速,实在是强烈推荐。于是被我发现了这个,原来它们之间是可以转化的,开发者早就想到了这一点。
Switching remote URLs from SSH to HTTPS
Open Git Bash.
Change the current working directory to your local project.
List your existing remotes in order to get the name of the remote you want to change.
$ git remote -v
> origin  git@github.com:USERNAME/REPOSITORY.git (fetch)
> origin  git@github.com:USERNAME/REPOSITORY.git (push)
Change your remote's URL from SSH to HTTPS with the git remote set-url command.
$ git remote set-url origin https://github.com/USERNAME/REPOSITORY.git
Verify that the remote URL has changed.
$ git remote -v
# Verify new remote URL
> origin  https://github.com/USERNAME/REPOSITORY.git (fetch)
> origin  https://github.com/USERNAME/REPOSITORY.git (push)
The next time you git fetch, git pull, or git push to the remote repository, you'll be asked for your GitHub username and password. When Git prompts you for your password, enter your personal access token. Alternatively, you can use a credential helper like Git Credential Manager. Password-based authentication for Git has been removed in favor of more secure authentication methods. For more information, see "Creating a personal access token."

You can use a credential helper so Git will remember your GitHub username and personal access token every time it talks to GitHub.

Switching remote URLs from HTTPS to SSH
Open Git Bash.
Change the current working directory to your local project.
List your existing remotes in order to get the name of the remote you want to change.
$ git remote -v
> origin  https://github.com/USERNAME/REPOSITORY.git (fetch)
> origin  https://github.com/USERNAME/REPOSITORY.git (push)
Change your remote's URL from HTTPS to SSH with the git remote set-url command.
$ git remote set-url origin git@github.com:USERNAME/REPOSITORY.git
Verify that the remote URL has changed.
$ git remote -v
# Verify new remote URL
> origin  git@github.com: USERNAME/REPOSITORY.git (fetch)
> origin  git@github.com: USERNAME/REPOSITORY.git (push)
Managing remote repositories - GitHub Docs
64、su命令的-符号今天总算全部弄明白了
su - 的 - 跟root没有半毛钱关系,它代表使用即将切换的用户的环境变量,而root则被省略掉了。
如果是其他用户,反而就不会充满歧义:
标准写法
su - debian
su -l debian
-和-l是同义的,而l则代表login的意思。
如果想执行一条命令
su - debian -c "pwd"如果想执行一堆命令
#!/bin/bash
su - debian <<EOF
pwd;
exit;
EOF或者
su - debian -s /bin/bash shell.sh65、用什么命令可以直接以数字形式显示文件权限
debian@BBB:~$ stat -c '%a %n' /tmp /usr/bin/sudo
1777 /tmp
4755 /usr/bin/sudo
66、xargs如何执行多条命令
xargs -i sh -c 'chown root:root {}; chmod 666 {}'
1、用sh -c套住多个命令,需要启动一个子shell,那么如果要使用变量,记得export;
2、跟第25条一样,-i就是跟{}配合的,至于man手册里写的那什么跟-I的关系以及过时的信息,我是没完全搞懂。
67、git clone 提示fatal: Out of memory, calloc failed fatal: index-pack failed
root@BBB:~# git clone https://github.com/beagleboard/linux.git
Cloning into 'linux'...
remote: Enumerating objects: 10094502, done.
remote: Counting objects: 100% (385/385), done.
remote: Compressing objects: 100% (134/134), done.
fatal: Out of memory, calloc failed
fatal: index-pack failed
原因应该是出在Linux源码树已经达到了1GB的级别,恐怖如斯呀。
我先是根据网上修改配置文件.gitconfig,增大了一些参数至2GB,没卵用。
最后还是新建一个4GB的swap分区搞定的。
mkswap: swapfile: warning: wiping old swap signature.
Setting up swapspace version 1, size = 4 GiB (4294963200 bytes)
no label, UUID=d993c2a7-082c-4ff4-b69a-d6f71a7f5404
root@BBB:/# swapon -s
root@BBB:/# swapon swapfile
root@BBB:/# swapon -s
Filename                                Type            Size    Used    Priority
/swapfile                               file            4194300 0       -2
root@BBB:/# free
               total        used        free      shared  buff/cache   available
Mem:          495212       74644       15716        2492      404852      406480
Swap:        4194300           0     4194300
root@BBB:/# cd
root@BBB:~# git clone https://github.com/beagleboard/linux.git
Cloning into 'linux'...
remote: Enumerating objects: 10094502, done.
remote: Counting objects: 100% (385/385), done.
remote: Compressing objects: 100% (134/134), done.
Receiving objects:   9% (944091/10094502), 398.43 MiB | 1.53 MiB/s
68、ps aux | grep 不显示自己的优雅解决方案
root@BBB:~# ps aux |grep [a]getty
root      1040  0.0  0.0   4008   144 tty1     Ss+  Nov18   0:00 /sbin/agetty -o -p -- \u --noclear tty1 linux
root     11577  0.0  0.3   5532  1612 ttyGS0   Ss+  Nov21   0:00 /sbin/agetty -o -p -- \u --keep-baud 115200,57600,38400,9600 ttyGS0 vt220
因为[a]可以作为表达式存在,所以不影响正常搜索,
可是想让它匹配它自己的纯字符串,比如[开头就马上不行,非常巧妙。
69、Ubuntu编译内核
-
编译步骤
1、清理代码
make distclean  这个清理最多 > mrproper > clean
Cleaning targets:
  clean		  - Remove most generated files but keep the config and
                    enough build support to build external modules
  mrproper	  - Remove all generated files + config + various backup files
  distclean	  - mrproper + remove editor backup and patch files


2、复制旧config
cp /boot/config-xx .config

3、make menuconfig

4、make -j4

5、sudo make INSTALL_MOD_STRIP=1 modules_install
modules貌似已经在第4步全部编译了,现在只需要install,但是为了解决文件太大的问题,使用了参数。

6、sudo make install
这里就是系统的内核安装了,它会自动启动grub和initrd的一些程序。
它离开了内核编译,已经到了跟发行版有关的部分,很聪明。
safirst@ubuntu:~/linux-hwe-5.15-5.15.0$ sudo make install
arch/x86/Makefile:142: CONFIG_X86_X32 enabled but no binutils support
sh ./arch/x86/boot/install.sh 5.15.64 \
	arch/x86/boot/bzImage System.map "/boot"
run-parts: executing /etc/kernel/postinst.d/dkms 5.15.64 /boot/vmlinuz-5.15.64
 * dkms: running auto installation service for kernel 5.15.64                                                                                  [ OK ]
run-parts: executing /etc/kernel/postinst.d/initramfs-tools 5.15.64 /boot/vmlinuz-5.15.64
update-initramfs: Generating /boot/initrd.img-5.15.64

7、到这里好像就全部结束了。-
initrd.img过大
It could be possible that the create initrd.img is very large (over 100MB),
and the boot partiiton maybe don't have enough free space.
In this case, apply the strip parameter when installing modules:

make INSTALL_MOD_STRIP=1 modules_install

Similarly, for building the deb packages:
make INSTALL_MOD_STRIP=1 deb-pkg
-
No rule to make target 'debian/canonical-certs.pem', needed by 'certs/x509_certificate_list'
修改.config
CONFIG_SYSTEM_TRUSTED_KEYS="debian/canonical-certs.pem"
CONFIG_SYSTEM_REVOCATION_KEYS="debian/canonical-revoked-certs.pem"
将它们变成空值。- 卸载内核
custom compiled kernel you need to remove following files/dirs:

/boot/vmlinuz*KERNEL-VERSION*
/boot/initrd*KERNEL-VERSION*
/boot/System-map*KERNEL-VERSION*
/boot/config-*KERNEL-VERSION*
以上删除4个文件,其实可以用 rm /boot/*版本号* 一条命令删除的,不放心就用rm -i

/lib/modules/*KERNEL-VERSION*/
然后删除这个大大的模块文件夹

最后把grub的引导记录更新一下,自动的:update-grub
Update grub configuration file /etc/grub.conf or /boot/grub/menu.lst to point to correct kernel version.
70、Ubuntu添加armhf架构
Ubuntu 镜像
下载地址: https://mirrors.aliyun.com/ubuntu/

相关仓库
Ubuntu安装源(ubuntu-releases): https://developer.aliyun.com/mirror/ubuntu-releases
Ubuntu ARM源(ubuntu-ports): https://developer.aliyun.com/mirror/ubuntu-ports
Ubuntu过期源(oldubuntu-releases): https://developer.aliyun.com/mirror/oldubuntu-releases
Ubuntu其他架构安装镜像(ubuntu-cdimage): https://developer.aliyun.com/mirror/ubuntu-cdimage

从来没有注意这底下还有四行不一样的,ARM源是独立的。
语法上用sudo dpkg --add-architecture armhf却不好使,
于是sudo dpkg --remove-architecture armhf删除之后,
我参考了BBB的写法:
deb [arch=armhf] https://mirrors.aliyun.com/ubuntu-ports/ focal main restricted universe multiverse
这个好使,亲测。
但是安装的时候又出问题了,因为它不会在/usr/lib目录下处理架构,报错停止。
此时我才反应过来,sudo dpkg --add-architecture armhf也许是用来干这个的。
遂加之,pass!
# 默认注释了源码仓库,如有需要可自行取消注释
deb [arch=armhf] https://mirrors.aliyun.com/ubuntu-ports/ focal main restricted universe multiverse
# deb-src https://mirrors.aliyun.com/ubuntu-ports/ focal main main restricted universe multiverse
deb [arch=armhf] https://mirrors.aliyun.com/ubuntu-ports/ focal-updates main restricted universe multiverse
# deb-src https://mirrors.aliyun.com/ubuntu-ports/ focal-updates main restricted universe multiverse
deb [arch=armhf] https://mirrors.aliyun.com/ubuntu-ports/ focal-backports main restricted universe multiverse
# deb-src https://mirrors.aliyun.com/ubuntu-ports/ focal-backports main restricted universe multiverse
deb [arch=armhf] https://mirrors.aliyun.com/ubuntu-ports/ focal-security main restricted universe multiverse
# deb-src https://mirrors.aliyun.com/ubuntu-ports/ focal-security main restricted universe multiverse
# 预发布软件源,不建议启用
# deb [arch=armhf] https://mirrors.aliyun.com/ubuntu-ports/ focal-proposed main restricted universe multiverse
# deb-src [arch=armhf] https://mirrors.aliyun.com/ubuntu-ports/ focal-proposed main restricted universe multiverse
deb https://mirrors.aliyun.com/ubuntu/ focal main restricted universe multiverse
deb-src https://mirrors.aliyun.com/ubuntu/ focal main restricted universe multiverse
deb https://mirrors.aliyun.com/ubuntu/ focal-security main restricted universe multiverse
deb-src https://mirrors.aliyun.com/ubuntu/ focal-security main restricted universe multiverse
deb https://mirrors.aliyun.com/ubuntu/ focal-updates main restricted universe multiverse
deb-src https://mirrors.aliyun.com/ubuntu/ focal-updates main restricted universe multiverse
# deb https://mirrors.aliyun.com/ubuntu/ focal-proposed main restricted universe multiverse
# deb-src https://mirrors.aliyun.com/ubuntu/ focal-proposed main restricted universe multiverse
deb https://mirrors.aliyun.com/ubuntu/ focal-backports main restricted universe multiverse
deb-src https://mirrors.aliyun.com/ubuntu/ focal-backports main restricted universe multiverse71、tftp、tftpd服务器配置
这个东西要安装tftp-hpa tftpd-hpa这种版本就好整。
修改这个配置文件如下:
# /etc/default/tftpd-hpa

TFTP_USERNAME="tftp"
TFTP_DIRECTORY="/home/safirst/nfsboot"
TFTP_ADDRESS=":69"
TFTP_OPTIONS="-l -c -s"


然后重启并查看确认服务。
sudo service tftpd-hpa restart
ps -aux | grep “tftp” 


 被折叠的 条评论
为什么被折叠?
被折叠的 条评论
为什么被折叠?
 到【灌水乐园】发言


