


看了第一行代码的UI开发模块,想试试自定义控件
代码分析
1 新建自定义布局文件
<?xml version="1.0" encoding="utf-8"?>
<LinearLayout xmlns:android="http://schemas.android.com/apk/res/android"
    android:layout_width="fill_parent"
    android:layout_height="wrap_content"
    android:orientation="horizontal"
    android:background="#f00"
    >

    <Button
        android:id="@+id/back"
        android:layout_width="wrap_content"
        android:layout_height="wrap_content"
        android:text="上一步"
        android:textSize="18sp"
        />

    <TextView
        android:layout_width="0dp"
        android:layout_weight="1"
        android:layout_height="wrap_content"
        android:text="标题"
        android:textSize="18sp"
        android:gravity="center"
        />

    <Button
        android:id="@+id/next"
        android:layout_width="wrap_content"
        android:layout_height="wrap_content"
        android:text="下一步"
        android:textSize="18sp"
        />
</LinearLayout>
2 新建TitleLayout继承LinearLayout
package com.example.ubuntu.titlebar;
import android.app.Activity;
import android.content.Context;
import android.util.AttributeSet;
import android.view.LayoutInflater;
import android.view.View;
import android.widget.Button;
import android.widget.LinearLayout;
import android.widget.Toast;
/**
* Created by ubuntu on 16-7-19.
*/
public class TitleLayout extends LinearLayout implements View.OnClickListener
{
public TitleLayout(Context context, AttributeSet attrs)
{
super(context,attrs);
LayoutInflater.from(context).inflate(R.layout.title,this);
Button titleBack = (Button)findViewById(R.id.back);
titleBack.setOnClickListener(this);
Button titleNext = (Button)findViewById(R.id.next);
titleNext.setOnClickListener(this);
}
@Override
public void onClick(View view)
{
switch (view.getId())
{
case R.id.back:
((Activity)getContext()).finish();
break;
case R.id.next:
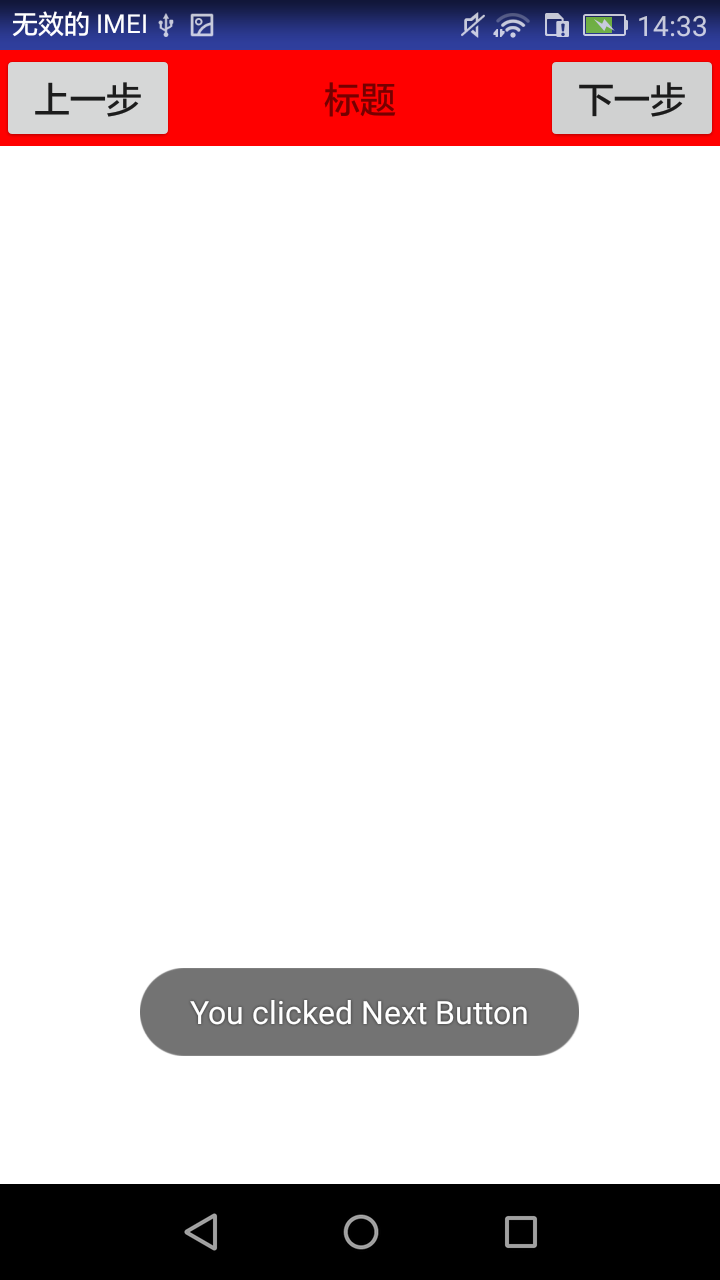
Toast.makeText(getContext(),"You clicked Next Button",Toast.LENGTH_SHORT).show();
break;
}
}
}3 添加自定义控件
<?xml version="1.0" encoding="utf-8"?>
<RelativeLayout xmlns:android="http://schemas.android.com/apk/res/android"
    android:layout_width="match_parent"
    android:layout_height="match_parent"
    android:background="#ffffff">

    <!--自定义标题栏布局1-->
    <!--<include-->
        <!--android:id="@+id/titlebar1"-->
        <!--layout="@layout/custom_title"/>-->

    <!--自定义标题栏布局2-->
    <!--<include-->
        <!--android:id="@+id/titlebar2"-->
        <!--layout="@layout/title" />-->

    <!--自定义标题栏控件-->
    <com.example.ubuntu.titlebar.TitleLayout
        android:layout_width="match_parent"
        android:layout_height="wrap_content">
    </com.example.ubuntu.titlebar.TitleLayout>
</RelativeLayout>
4 style.xml文件中修改默认主题AppTheme
<!-- Base application theme. -->
    <style name="AppTheme" parent="Theme.AppCompat.Light.DarkActionBar">
        <!-- Customize your theme here. -->
        <item name="colorPrimary">@color/colorPrimary</item>
        <item name="colorPrimaryDark">@color/colorPrimaryDark</item>
        <item name="colorAccent">@color/colorAccent</item>
        <!-- All customizations that are NOT specific to a particular API-level can go here. -->
        <item name="android:windowActionBar">false</item>
    </style>
5 最重要的是MainActivity.java 中继承Activity
package com.example.ubuntu.titlebar;

import android.app.Activity;
import android.os.Bundle;

public class MainActivity extends Activity {

    @Override
    protected void onCreate(Bundle savedInstanceState) {
        super.onCreate(savedInstanceState);
        setContentView(R.layout.activity_main);
    }
}
遇到问题
1 Question: You need to use a Theme.AppComp
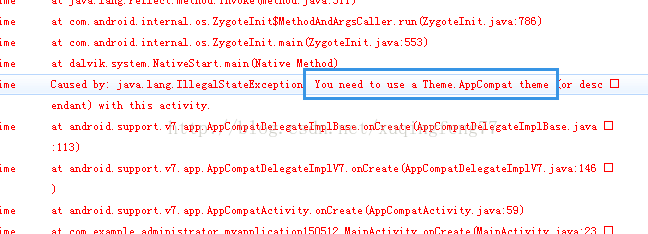
1 Answer: 上面步骤4+5
2 Q:android.util.AndroidRuntimeException: You cannot combine custom titles with other title features
2 A:造成这个出错的原因是因为在代码中使用了
this.requestWindowFeature(Window.FEATURE_CUSTOM_TITLE); 原因在android3.0以上的版本中已经默认帮你设这了title,而在3.0以下的版本可以正常使用,删除即可。
运行界面
查阅资料
http://blog.csdn.net/tingyuanss/article/details/46117129
http://blog.csdn.net/scyatcs/article/details/9003285
http://www.bubuko.com/infodetail-833638.html


 1694
1694

 被折叠的 条评论
为什么被折叠?
被折叠的 条评论
为什么被折叠?
 到【灌水乐园】发言


