


 这篇博客详细介绍了HTML的使用注意事项、CSS界面设计以及表单操作,特别是Jquery如何判断表单是否修改。同时,文章深入探讨了POST提交数据的四种常见方式:application/x-www-form-urlencoded、multipart/form-data、application/json和text/xml,包括每种方式的使用场景和示例。此外,还提供了相关的参考资料,如谷歌浏览器调试技巧和JSON数据处理方法。
目录
json对象赋值到表单,需要表单中控件的name值与json对象的key值匹配。... 16
application/x-www-form-urlencoded. 17
添加JSON Data到已经存在的JSON文件中... 19
json-c 的安装和使用(使用json-c读取文件中的json数据和保存json格式的数据至文件中) 20
C语言构建WEB管理系统(四):CGI程序解析POST数据... 24
嵌入式LINUX下CGI与HTML网页之间的通信... 27
[精华]编写CGI的C语言代码(文件名是getdata.c)设置一个Cookie,打印一个HTML,跳转到showCookie.html页面。... 29
一、Html使用注意
<!DOCTYPE html>
<!--
HTML页面加载和解析流程

1. 用户输入网址(假设是个html页面,并且是第一次访问),浏览器向服务器发出请求,服务器返回html文件。

2. 浏览器开始载入html代码,发现<head>标签内有一个<link>标签引用外部CSS文件。

3. 浏览器又发出CSS文件的请求,服务器返回这个CSS文件。

4. 浏览器继续载入html中<body>部分的代码,并且CSS文件已经拿到手了,可以开始渲染页面了。

5. 浏览器在代码中发现一个<img>标签引用了一张图片,向服务器发出请求。此时浏览器不会等到图片下载完,而是继续渲染后面的代码。

6. 服务器返回图片文件,由于图片占用了一定面积,影响了后面段落的排布,因此浏览器需要回过头来重新渲染这部分代码。

7. 浏览器发现了一个包含一行Javascript代码的<script>标签,赶快运行它。

8. Javascript脚本执行了这条语句,它命令浏览器隐藏掉代码中的某个<style>(style.display=”none”)。杯具啊,突然就少了这么一个元素,浏览器不得不重新渲染这部分代码。

9. 终于等到了</html>的到来,浏览器泪流满面

10. 等等,还没完,用户点了一下界面中的“换肤”按钮,Javascript让浏览器换了一下<link>标签的CSS路径。

11. 浏览器召集了在座的各位<div><span><ul><li>们,“大伙儿收拾收拾行李,咱得重新来过……”,浏览器向服务器请求了新的CSS文件,重新渲染页面。
-->

<html>
<!-- 保持页面简洁、减少资源的使用时最直接的,去除不必要加载项; 删除不必要的空格、注释。减少文件数量;减少页面上引用的文件数量可以减少HTTP连接数。优化页面元素加载顺序;首先加载页面最初显示的内容和与之相关的JavaScript和CSS,然后加载HTML相关的东西,像什么不是最初显示相关的图片、flash、视频等很肥的资源就最后加载。几种优化web页面加载速度的策略 -->
<head>

<!-- 合理设置HTTP缓存----很少变化的直接通过HTTP Header中的Expires设置 个很长的过期头。变化不频繁而又可能会变的资源可以使用Last-Modifed来做请求验证;
开启服务器的gzip gzip可以减少不少传输资源的体积;对重复使用的数据进行缓存  -->
<meta charset="utf-8">
<!--
<link rel="stylesheet" href="./font-awesome.min.css">
-->
<link rel="stylesheet" href="./style.css">
<style>
<!--将inline的script和css移到外部文件。使用外部的JavaScript和CSS,可缓存; 将CSS放在HEAD中,实际上浏览器对选择符的解析是从右往左进行的,简化;资源合并与压缩(合并脚本和样式) 合并CSS图片 使用在CSS中的图片;
样式表在下载完成后,将和以前下载的所有样式表一起进行解析,解析完成后,将对此前所有元素(含以前已经渲染的)重新进行渲染。JS、CSS中如有重定义,后定义函数将覆盖前定义函数。使用现代CSS来减少标签和图像,例如使用现代CSS+文字完全可以替代一些只有文字的图片。 -->
*{
    margin: 0;
    padding: 0;
}
.box{
    width: 80%;
    margin: 200px auto;
}
.box .title{

}
.box .title ul{
    display: flex;
}
.box .title ul li{
    list-style: none;
    border:1px solid #666;
    border-bottom: none;
    padding: 5px;
    margin-right: 10px;
}
.box .title ul li.current{
    border-bottom: 1px solid #fff;
    position: relative;
    top: 1px;
}
.box .content{
    border:1px solid #666;
    padding: 5px;
    min-height: 600px;

}
.box .content>div{
    display: none;
}
.box .content>div:first-child{
    display: block;
}


ul li{list-style:none;}	<!--取消默认的圆点和序号 -->
.content{
    border:1px solid #666;
    padding: 5px;
    min-height: 600px;

}

</style>


 <script type="text/javascript" language="javascript">
 <!-- 最初只加载核心模块,其他模块可以等到需要使用的时候才加载  将外部脚本置底(将脚本尽可能的往后挪,减少对并发下载的影响)异步执行inline脚本   使用setTimeout控制加载的时机,HTML5中引入了Web Workers的机制,        异步请求Callback-----可以考虑在DOMLoaded事件触发的时候加载,或者使用setTimeout方式来灵活的控制加载的时机;如果遇到语义解释性的标签嵌入文件(JS脚本,CSS样式),那么此时IE的下载过程会启用单独连接进行下载。减少域名查询,DNS查询和解析域名也是消耗时间的,所以要减少对外部JavaScript、CSS、图片等资源的引用,不同域名的使用越少越好。-->
 </script>

<!-- 使用Google的html5shiv包 推荐-->
<!--[if lt IE9]>
<script src="http://html5shiv.googlecode.com/svn/trunk/html5.js"></script>
<style>article,aside,dialog,footer,header,section,footer,nav,figure,menu{display:block}</style>
<![endif]-->


<!-- 可以引导用户开启脚本,或者直接跳转到HTML4标签设计的界面-->
<!--[if lte IE 8]>
<noscript>
     <style>.html5-wrappers{display:none!important;}</style>
     <div class="ie-noscript-warning">您的浏览器禁用了脚本,请<a href="">查看这里</a>来启用脚本!或者<a href="/?noscript=1">继续访问</a>.
     </div>
</noscript>
<![endif]-->

<title>(wangdaopo.com)</title>
</head>


 <!-- 避免重复的资源请求----由于疏忽或页面由多个模块拼接而成,然后每个模块中请求了同样的资源时;减少重构重绘; 减少DOM元素的数量;尽量减少DOM访问;--不要使用嵌套table,而使用非嵌套table或者div。将基于大块嵌套的table的layout分解成多个小table,这样就不需要等到整个页面(或大table)内容全部加载完才显示。如果浏览器可以立即决定图像或table的大小,那么它就可以马上显示页面而不要重新做一些布局安排的工作。这不仅加快了页面的显示,也预防了页面完成加载后布局的一些不当的改变。-->
<body>

 <!-- 在页面刚加载的时候可以只加载第一屏-->
<!--  当你在网页上添加图片或表格时,你应该指定它们的高度和宽度,也就是height和width参数-->
<div class="box"  style="width:1200px;">

<div id="top-container">

<div id="topBanner">
<div class="layoutRow"> <div class="left-pad"> <div class="gwt-HTML">VOIP</div> </div> <div class="right-pad"> <div class="feature"><a class="feature first" name="logout" id="gwt-uid-413">Admin Logout</a><a class="feature" name="support" aria-hidden="true" id="gwt-uid-414" style="display: none;">Support</a><a class="feature" name="reboot" id="gwt-uid-415">Reboot</a><a class="feature last" name="prov" aria-hidden="true" id="gwt-uid-416" style="display: none;">[[MISSING: PROV_NOW]]</a>

</div> <select class="gwt-ListBox"><option value="en">English</option><option value="zh">简体中文</option><option value="zh-tw">正體中文</option><option value="ar">العربية</option><option value="cs">Czech</option><option value="de">Deutsch</option><option value="es">Español</option><option value="fr">Français</option><option value="he">עברית</option><option value="it">Italiano</option><option value="ja">日本語</option><option value="ko">한국어</option><option value="nl">Nederlands</option><option value="pl">Polski</option><option value="pt">Português</option><option value="ru">Русский</option><option value="sk">Slovenčina</option><option value="sr">Srpski</option><option value="tr">Türkçe</option></select> </div></div>
</div>

  <!--
 <div id="midBanner"> <div class="layoutRow"> <div id="logo-pad"></div> <div class="pad-Menu"><div><div tabindex="0" role="menubar" class="gwt-MenuBar gwt-MenuBar-horizontal" hidefocus="true" aria-activedescendant="gwt-uid-53" style="outline: 0px;"><input type="text" tabindex="-1" role="presentation" style="opacity: 0; height: 1px; width: 1px; z-index: -1; overflow: hidden; position: absolute;">


 <table><tbody><tr><td class="gwt-MenuItem" id="gwt-uid-53" role="menuitem" aria-haspopup="true">Status</td><td class="gwt-MenuItem" id="gwt-uid-90" role="menuitem" aria-haspopup="true">Profiles</td><td class="gwt-MenuItem" id="gwt-uid-100" role="menuitem" aria-haspopup="true">DECT</td><td class="gwt-MenuItem" id="gwt-uid-106" role="menuitem" aria-haspopup="true">Settings</td><td class="gwt-MenuItem" id="gwt-uid-123" role="menuitem" aria-haspopup="true">Maintenance</td><td class="gwt-MenuItem" id="gwt-uid-127" role="menuitem" aria-haspopup="true">Phonebook</td></tr></tbody></table>

 </div></div></div> </div> </div>
  -->
 </div>

 <div class="title">
	<ul>
		<li class="current" index="0">Status</li>
		<li index="1">Profiles</li>
		<li index="2">DECT</li>
		<li index="3">Settings</li>
		<li index="4">Maintenance</li>
		<li index="5">Phonebook</li>
	</ul>
</div>


	<div class="content">
		<div>  <!-- 切换1-->


			<div id="header" style="background-color:#FFA500;">
			<h1 style="margin-bottom:0;">Status</h1>
			</div>
				<!--  当你在网页上添加图片或表格时,你应该指定它们的高度和宽度,也就是height和width参数-->

			<div id="content" style="background-color:#EEEEEE;float:left;">
			内容在这里

			</div>


		</div>
		<div>  <!-- 切换2-->
			  <div id="header" style="background-color:#FFA500;">
			     <h1 style="margin-bottom:0;">Profiles</h1>
		    </div>

		</div>
		<div>  <!-- 切换3-->
		     <div id="header" style="background-color:#FFA500;">
			     <h1 style="margin-bottom:0;">DECT</h1>
		    </div>
		   <!--  当你在网页上添加图片或表格时,你应该指定它们的高度和宽度,也就是height和width参数-->
			<div id="menu" style="background-color:#FFD700;float:left;">
				<ul>
					<li class="current" index="0">菜单</li> <!-- 子切换1-->
					<li index="1">HTML</li> <!-- 子切换2-->
					<li index="2">CSS</li>  <!-- 子切换3-->
					<li index="3">JavaScript</li> <!-- 子切换4-->
				</ul>
			</div>


			<div class="content">
				<div> <!-- 子切换1-->
				  1111111
				</div>
				<div>  <!-- 子切换2-->
				2222222
				</div>
				<div> <!-- 子切换3-->
				3333333
				</div>
				<div>   <!-- 子切换4-->
				444444
				</div>
			</div>

		</div>
		<div>   <!-- 切换4-->
			<div id="header" style="background-color:#FFA500;">
			<h1 style="margin-bottom:0;">Settings</h1>
			</div>
		</div>

		<div>   <!-- 切换5-->
			<div id="header" style="background-color:#FFA500;">
			<h1 style="margin-bottom:0;">Maintenance</h1>
			</div>
		</div>

		<div>   <!-- 切换6-->
			<div id="header" style="background-color:#FFA500;">
			<h1 style="margin-bottom:0;">Phonebook</h1>
			</div>
		</div>


	</div>


 <div id="footer"> <div class="layoutRow"> <div id="footerSupport" style="float: left;"> <a class="gwt-Anchor" href="" target="_blank">Voip Networks Support</a> </div> <div id="footerCopyright" style="float: right;"> <div class="gwt-HTML">Copyright ©  2021. All Rights Reserved.</div> </div> </div> </div>


</div>


<script src="./jquery-3.5.1.min.js"></script>


<script>
function loadPageDiv2LoacalGageDiv(url, loadPageDivSelector, localPageDivSelector)
{
	//url:这里是另一个静态页的地址,loadPageDivSelector:另一个html页面的指定的一部分,localPageDivSelector:本页面div
	$.ajax( {
			url: url, //这里是另一个静态页的地址
			type: "GET", //静态页用get方法,否则服务器会抛出405错误
			success: function(data){
				var result = $(data).find(loadPageDivSelector); //loadPageDivSelector:另一个html页面的指定的一部分
				$(localPageDivSelector).html(result); //localPageDivSelector:本页面div
			}
	});
}
 <!-- 将外部脚本置底(将脚本尽可能的往后挪,减少对并发下载的影响)js数量比较多合并js到几个大的js库内减少http请求;.如果js数量实在太多需要按需加载 JavaScript 文件,延迟加载和执行非必要脚本;异步执行inline脚本   使用setTimeout控制加载的时机,HTML5中引入了Web Workers的机制,输入的有效性验证,DOM行为----尽量将它转为数组后再访问, 保存到局部变量后再使用局部变量,避免使用eval和Function,局部变量缓存全局变量, 减少闭包的使用,访问超过一次,建议将数据放入局部变量,拼接的字符串较多时将其放在数组中最后调用其join方法得到结果,当页面中元素被移除或替换时,若元素绑定的事件仍没被移除,在IE中不会作出恰当处理,此时要先手工移除事件,不然会存在内存泄露。记得所有值类型做.运算之前先显式转换一下;在销毁对象的时候,要遍历属性中属性,依次删除;作用域中没用的属性可以删除,事件处理函数定义在外部,解除闭包;闭包中,作用域中没用的属性可以删除,以减少内存消耗。删除对dom的引用 obj=null;统计代码放在页尾(或者使用延迟加载);尽量减少DOM访问 缓存已访问过的元素的索引 先“离线”更新节点,再把它们添到DOM树上 避免用JavaScript修复布局问题  -->


 <!-- 菜单栏切换-->
var title_list = $(".box>.title>ul>li");
var content_list = $(".box>.content>div");
for(var i = 0; i < title_list.length; i++){
    //给每个title添加索引
    title_list[i].setAttribute("index",i);
    //给每个title添加点击事件
    title_list[i].onclick=function(){
        //便利所有的title,置空
        for(var i = 0; i < title_list.length; i++){
            title_list[i].className="";
        }
        //切换当前title的样式
        this.className = "current";
        //获取当前title的索引
        var current_index = this.getAttribute("index");
        //遍历显示对应的当前的title的content
        for(var j = 0; j < content_list.length; j++){
            if(current_index == j){
                content_list[j].style.display = "block";
            }
            else
            content_list[j].style.display = "none";
        }
    }
}


 <!-- 左边列表菜单子切换-->
var child_page_title_list = $(".box>.content>div>#menu>ul>li");
var child_page_content_list = $(".box>.content>div>.content>div");
for(var i = 0; i < child_page_title_list.length; i++){
    //给每个title添加索引
    child_page_title_list[i].setAttribute("index",i);
    //给每个title添加点击事件
    child_page_title_list[i].onclick=function(){
        //便利所有的title,置空
        for(var i = 0; i < child_page_title_list.length; i++){
            child_page_title_list[i].className="";
        }
        //切换当前title的样式
        this.className = "current";
        //获取当前title的索引
        var current_index = this.getAttribute("index");
        //遍历显示对应的当前的title的content
        for(var j = 0; j < child_page_content_list.length; j++){
            if(current_index == j){
                child_page_content_list[j].style.display = "block";
				loadPageDiv2LoacalGageDiv("./sample_ori.html","#content",content_list[j]);
            }
            else
            child_page_content_list[j].style.display = "none";
        }
    }
}


 </script>


</body>
</html>
二、界面设计(css)
<!DOCTYPE html>
<html>
<head>
<meta charset="utf-8">
<title>callManager</title>
<style>
*{
	padding: 0px;
	margin: 0px;
}
body {
  font-family: Arial;
  padding: 10px;
  background: #f1f1f1;
}


    header{

		/* background-color: #ff9900;*/

        width: 80%;
        height: 100px;
        margin-bottom: 5px;
		margin: auto;
        position: relative;

    }


    nav{

		/* left:160px;
           background-color: yellowgreen;

		*/
   bottom: 5px;
        font-weight: bold;

        position: absolute;
    }


    ul{
        list-style: none;

    }
    ul li{
        float: left;
		/* position: relative;*/
    }
    a{
        height: 40px;
        line-height: 40px;
        width: 100px;
        text-decoration: none;
        display: block;
        background-color: white;
        text-align: center;
        padding: 0px 10px;

		/* border: 1px solid white;*/
    }
    a:hover{
        background-color: green;
    }
    ul li ul{
        position: absolute;
        display: none;
    }
    ul li ul li{
        float: none;
        width: 100px;
        position: relative;
    }
    .first:hover .content1{
        display: block;
    }
    ul li ul li ul{
        position: absolute;
        left: 121px;  /*这里为什么要用121px而不是101px*/
        top: 0px;
        display: none;
        z-index: 1;
    }
    ul li ul li ul li{
        float: none;
    }
    .second:hover .content2{
        display: block;
    }


		/* 创建两列 */
	/* Left column */
	.leftcolumn {

	  width: 80%;
	  margin: 0  auto;
	}


	/* 图像部分 */
	.fakeimg {
	  background-color: #aaa;
	  padding: 20px;
	}

	/* 文章卡片效果 */
	.card {
	  background-color: white;
	  padding: 20px;
	  margin-top: 20px;
	}


	/* 列后面清除浮动 */
	.row:after {
	  content: "";
	  display: table;
	  clear: both;
	}

	/* 底部 */
	.footer {

	  /* padding: 20px; */
	   width: 80%;
	  text-align: center;
	  background: #ddd;
	  margin-top: 20px;
	  margin: auto;
	  background: #c0dcf9;
	}

	.titlebar {

	  /* padding: 20px; */
	   width: 100%;
	   height:40px;
	  text-align: center;
	  background: #ddd;
	  margin-top: 20px;
	  margin: auto;
	  background: #c0dcf9;
	}
    .titlebar ul li a {
	   height: 40px;
        line-height: 40px;
        width: 100px;
        text-decoration: none;
        display: block;
        background-color: #ffff0005;
        text-align: center;
        padding: 0px 10px;
      	/* border: 1px solid white;*/
	}


/* 响应式布局 - 屏幕尺寸小于 800px 时,两列布局改为上下布局 */
@media screen and (max-width: 800px) {
   header,  .leftcolumn, .footer {
    width: 100%;
    padding: 0;
  }
}

/* 响应式布局 -屏幕尺寸小于 400px 时,导航等布局改为上下布局 */
@media screen and (max-width: 400px) {
  .header {
    float: none;
    width: 100%;
  }
}


</style>
</head>
<body>


	<header>

	<div class="titlebar">
	 <ul  >
		<li    style="float:right"><a href="#"><select class="gwt-ListBox"><option value="en">English</option><option value="zh">简体中文</option><option value="zh-tw">正體中文</option><option value="ar">العربية</option><option value="cs">Czech</option><option value="de">Deutsch</option><option value="es">Español</option><option value="fr">Français</option><option value="he">עברית</option><option value="it">Italiano</option><option value="ja">日本語</option><option value="ko">한국어</option><option value="nl">Nederlands</option><option value="pl">Polski</option><option value="pt">Português</option><option value="ru">Русский</option><option value="sk">Slovenčina</option><option value="sr">Srpski</option><option value="tr">Türkçe</option></select>
</a></li>
		<li    style="float:right" ><a href="#">reboot</a></li>
		<li   style="float:right" ><a href="#">logout</a></li>
	</ul>

	</div>

		<nav>
			<ul>
				<li class="first"><a href="#">Status</a>
					<ul class="content1">
						<li class="second"><a href="#">Status1</a></li>
						<li class="second"><a href="#">Status2</a></li>
						<li class="second"><a href="#">Status3</a></li>
					</ul>
				</li>
				<li class="first"><a href="#">Profiles</a>
					<ul class="content1">
						<li class="second"><a href="#">Profile1</a>
							<ul class="content2">
								<li><a href="#">General</a></li>
								<li><a href="#">NetWork</a></li>
								<li><a href="#">SessionTimer</a></li>
								<li><a href="#">AudioSettings</a></li>
								<li><a href="#">CallSettings</a></li>
							</ul>

						</li>
						<li class="second"><a href="#">Profile2</a></li>
						<li class="second"><a href="#">Profile3</a></li>
						<li class="second"><a href="#">Profile4</a></li>
					</ul>
				</li>
			    <li class="first"><a href="#">Dect</a>
				   <ul class="content1">
						<li class="second"><a href="#">General</a></li>
						<li class="second"><a href="#">SipAcccount</a></li>
						<li class="second"><a href="#">LineSettings</a></li>
					</ul>
				</li>
				<li class="first"><a href="#">Settings</a>
				   <ul class="content1">
						<li class="second"><a href="#">Settings1</a></li>
						<li class="second"><a href="#">Settings2</a></li>
						<li class="second"><a href="#">Settings3</a></li>
					</ul>
				</li>
				<li class="first"><a href="#">Maintenance</a>
				    <ul class="content1">
				        <li class="second"><a href="#">Upgrade</a></li>
						<li class="second"><a href="#">Maintenance2</a></li>
						<li class="second"><a href="#">Maintenance3</a></li>
					</ul>
				</li>
				<li class="first"><a href="#">Phonebook</a>
				    <ul class="content1">
				        <li class="second"><a href="#">Phonebook1</a></li>
						<li class="second"><a href="#">Phonebook2</a></li>
						<li class="second"><a href="#">Phonebook3</a></li>
					</ul>

				</li>


			</ul>
		</nav>
	</header>

	<div class="row">
	  <div class="leftcolumn">
		<div class="card">

		   <!-- <h2>文章标题</h2> -->

		  <div class="fakeimg" style="height:700px;">图片</div>

	    </div>

	  </div>

	</div>

	<div class="footer">
	  <h2>Network Support</h2>
	</div>


</body>
</html>
三、表单使用
Jquery判断表单是否修改
$(document).ready(function()
{
$("form :input").change(function ()
{
$('form').data('changed',true);
// console.log($(this).val())
});
$("form").submit(function (){
if(!$('form').data('changed'))
{
alert('请至少选择一项条件进行搜索!');
return false;
}
});
}
);
表单序列化为json对象
var formjson1 = $("#form1").serializeObject();json对象转为json字符串
JSON.stringify(formjson1);json对象赋值到表单,需要表单中控件的name值与json对象的key值匹配。
$('#form1').form('load', formjson1);
四、四种常见的 POST 提交数据方式(application/x-www-form-urlencoded,multipart/form-data,application/json,text/xml)
- HTTP/1.1 协议规定的 HTTP 请求方法有 OPTIONS、GET、HEAD、POST、PUT、DELETE、TRACE、CONNECT 这几种。其中 POST 一般用来向服务端提交数据,本文主要讨论 POST 提交数据的几种方式。
常见的 POST 数据提交的方式
application/x-www-form-urlencoded
-
-
- 浏览器的原生 form 表单,如果不设置 enctype 属性,那么最终就会以 application/x-www-form-urlencoded 方式提交数据。
- POST http: //www .example.com HTTP /1 .1
- 浏览器的原生 form 表单,如果不设置 enctype 属性,那么最终就会以 application/x-www-form-urlencoded 方式提交数据。
-
Content-Type: application /x-www-form-urlencoded ;charset=utf-8
title= test &sub%5B%5D=1&sub%5B%5D=2&sub%5B%5D=3
multipart/form-data
-
-
- 我们使用表单上传文件时,必须让 form 的 enctyped 等于这个值。直接来看一个请求示例:
- 我们使用表单上传文件时,必须让 form 的 enctyped 等于这个值。直接来看一个请求示例:
-
| POST http: //www .example.com HTTP /1 .1 Content-Type:multipart /form-data ; boundary=----WebKitFormBoundaryrGKCBY7qhFd3TrwA ------WebKitFormBoundaryrGKCBY7qhFd3TrwA Content-Disposition: form-data; name= "text" title ------WebKitFormBoundaryrGKCBY7qhFd3TrwA Content-Disposition: form-data; name= "file" ; filename= "chrome.png" Content-Type: image /png PNG ... content of chrome.png ... ------WebKitFormBoundaryrGKCBY7qhFd3TrwA-- |
-
-
-
- 上面提到的这两种 POST 数据的方式,都是浏览器原生支持的,而且现阶段原生 form 表单也只支持这两种方式。但是随着越来越多的 Web 站点,尤其是 WebApp,全部使用 Ajax 进行数据交互之后,我们完全可以定义新的数据提交方式,给开发带来更多便利。
-
application/json
-
-
- application/json 这个 Content-Type 作为响应头大家肯定不陌生。
- 现在越来越多的人把它作为请求头,用来告诉服务端消息主体是序列化后的 JSON 字符串。
- 服务端语言也都有处理 JSON 的函数
- JSON 格式支持比键值对复杂得多的结构化数据,这一点也很有用。
- url:"api/sipaccount"
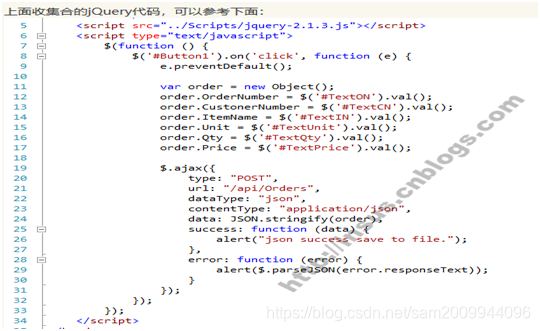
- Ajax 功能,默认就是提交 JSON 字符串。例如下面这段代码:
- var data = { 'title' : 'test' , 'sub' : [1,2,3]};
- application/json 这个 Content-Type 作为响应头大家肯定不陌生。
-
$http.post(url, data).success( function (result) {
...
});
-
-
-
- 最终发送的请求是
- POST http: //www .example.com HTTP /1 .1
- 最终发送的请求是
-
-
Content-Type: application /json ;charset=utf-8
{ "title" : "test" , "sub" :[1,2,3]}
text/xml
-
-
- 它是一种使用 HTTP 作为传输协议,XML 作为编码方式的远程调用规范。
- POST http: //www .example.com HTTP /1 .1
- 它是一种使用 HTTP 作为传输协议,XML 作为编码方式的远程调用规范。
-
Content-Type: text /xml
<?xml version= "1.0" ?>
<methodCall>
<methodName>examples.getStateName< /methodName >
<params>
<param>
<value><i4>41< /i4 >< /value >
< /param >
< /params >
< /methodCall >
<!DOCTYPE html>

<html>
<head>
<meta name="generator" content=
"HTML Tidy for HTML5 (experimental) for Windows https://github.com/w3c/tidy-html5/tree/c63cc39">
<meta http-equiv="Content-Type" content="text/html; charset=UTF-8">
<meta http-equiv="X-UA-Compatible" content="IE=9">
<title>Profile 1</title>

<link rel="stylesheet" href="./css/style.css">

</head>
<body>

<form   id="form1" action="/cgi-bin/file-up/download.cgi" enctype="multipart/form-data" method="post">

<div aria-hidden="true" style="display: none;"></div>


<div id="body" class="body-container">
<div id="page-layout">
<div class="layoutContainer">


<div id="main-container">
<div class="layoutRow">
<table style="padding: 0px;">
<tbody>
<tr>

<td style="width: 10px;"></td>
<td id="main-pad">
<div class="pad-Main">
<h1 id="gwt-uid-1362" class="first">General Settings</h1>
<div class="editable" id="gwt-uid-1371">
<div class="row editableRow">
<div class="cell padding"></div>
<div class="cell label">Profile Active</div>
<div class="cell contents"><span class="gwt-RadioButton first" id=
"gwt-uid-1368"><input type="radio" name="profileActive" value="0" id=
"gwt-uid-1367" tabindex="0"><label for=
"gwt-uid-1367">No</label></span><span class="gwt-RadioButton last"
id="gwt-uid-1370"><input type="radio" name="profileActive" value="1" id=
"gwt-uid-1369" tabindex="0" checked><label for=
"gwt-uid-1369">Yes</label></span></div>
</div>
</div>
<div class="editable" id="gwt-uid-1377">
<div class="row editableRow">
<div class="cell padding"></div>
<div class="cell label">Profile Name</div>
<div class="cell contents"><input type="text" class="gwt-TextBox"
name="profileName" id="gwt-uid-1376"></div>
</div>
</div>
<div class="editable" id="gwt-uid-1383">
<div class="row editableRow">
<div class="cell padding"></div>
<div class="cell label">SIP Server</div>
<div class="cell contents"><input type="text" class="gwt-TextBox"
name="sipServer" id="gwt-uid-1382"></div>
</div>
</div>
<div class="editable" id="gwt-uid-1389">
<div class="row editableRow">
<div class="cell padding"></div>
<div class="cell label">Failover SIP Server</div>
<div class="cell contents"><input type="text" class="gwt-TextBox"
name="failoverSipServer" id="gwt-uid-1388"></div>
</div>
</div>
<div class="editable" id="gwt-uid-1398">
<div class="row editableRow">
<div class="cell padding"></div>
<div class="cell label">Prefer Primary SIP Server</div>
<div class="cell contents"><span class="gwt-RadioButton first" id=
"gwt-uid-1395"><input type="radio" name="preferPrimarySipServer" value="0" id=
"gwt-uid-1394" tabindex="0" checked><label for=
"gwt-uid-1394">No</label></span><span class="gwt-RadioButton last"
id="gwt-uid-1397"><input type="radio" name="preferPrimarySipServer" value="1" id=
"gwt-uid-1396" tabindex="0"><label for=
"gwt-uid-1396">Yes</label></span></div>
</div>
</div>
<div class="editable" id="gwt-uid-1404">
<div class="row editableRow">
<div class="cell padding"></div>
<div class="cell label">Outbound Proxy</div>
<div class="cell contents"><input type="text" class="gwt-TextBox"
name="outboundProxy" id="gwt-uid-1403"></div>
</div>
</div>
<div class="editable" id="gwt-uid-1410">
<div class="row editableRow">
<div class="cell padding"></div>
<div class="cell label">Voice Mail Access Number</div>
<div class="cell contents"><input type="text" class=
"gwt-TextBox last" name="voiceMailAccessNumber" id="gwt-uid-1409"></div>
</div>
</div>


<div class="row-config last" id="gwt-uid-1414">


<!--

<button type="button" class="gwt-Button first" id="gwt-uid-1411">post</button>

<button type="button" class="gwt-Button" id="gwt-uid-1412">get</button>

<button type="button" class="gwt-Button last" id="gwt-uid-1413">Reset</button>

 -->


<button type="button"  id="gwt-uid-1411">save</button>

<button type="button"  id="gwt-uid-1412">save and apply</button>


<button type="button"  id="gwt-uid-1413">reset</button>


</div>


</div>
</td>
</tr>
</tbody>
</table>
</div>
</div>


</div>
</div>
</div>


 </form>


</body>


 <script src="./js/jquery-3.5.1.min.js"></script>
<script>

//jquery 自动表单赋值/jquery加载json对象数据自动表单赋值 和 表单转换json对象数据 https://blog.csdn.net/qq_36910987/article/details/88168425/

//参考:

                   // JQuery将 form里面内容转json,json填充form表单http://www.luofenming.com/show.aspx?id=ART2020032100001
				  //jquery 自动表单赋值 https://blog.csdn.net/qq_36910987/article/details/88168425
             		//jQuery自动给表单赋值 https://blog.csdn.net/liu22985342/article/details/27534501?utm_medium=distribute.pc_relevant.none-task-blog-baidujs_title-2&spm=1001.2101.3001.4242
		            //用Json给表单赋值 https://www.cnblogs.com/LearningC/p/8118639.html


   /**
	* 将form里面的内容序列化成json
	* 相同的checkbox用分号拼接起来
	* @param {obj} 需要拼接在后面的json对象
	* @method serializeJson      $("#form").serializeJson();
	* */
	$.fn.serializeJson = function (otherString) {
		var serializeObj = {},
			array = this.serializeArray();
		$(array).each(function () {
			if (this.name == "password") { //如果有密码,对密码值进行md5后在传输
			     //this.value = $.md5(this.value) //md5操作this.value的数字签名。 通过其不可逆的字符串变换算法,产生了这个唯一的MD5信息摘要。
				                                  //如果任何人对this.value做了任何改动,其MD5值也就是对应的“数字指纹”都会发生变化。
				                                 //MD5就可以为任何文件(不管其大小、格式、数量)产生一个同样独一无二的“数字指纹”,如果任何人对文件名做了任何改动,其MD5值也就是对应的“数字指纹”都会发生变化。

												 //我们假设密码的最大长度为8位字节(8 Bytes),同时密码只能是字母和数字,共26+26+10=62个字符,排列组合出的字典的项数则是P(62,1)+P(62,2)….+P(62,8),那也已经是一个很天文的数字了,存储这个字典就需要TB级的磁盘阵列,而且这种方法还有一个前提,就是能获得目标账户的密码MD5值的情况下才可以。这种加密技术被广泛的应用于UNIX系统中,这也是为什么UNIX系统比一般操作系统更为坚固一个重要原因。
			   this.value=this.value;
			}
			if (serializeObj[this.name]) {  // 相同的checkbox用分号拼接起来
				serializeObj[this.name] += ';' + this.value;
			} else {
				serializeObj[this.name] = this.value;
			}


		});

		if (otherString != undefined) {  // 除了本表单数据外,其他额外字符串otherString需要拼接在后面的json对象
			var otherArray = otherString.split(';');
			$(otherArray).each(function () {
				var otherSplitArray = this.split(':');
				serializeObj[otherSplitArray[0]] = otherSplitArray[1];
			});
		}
		return serializeObj;
	};


/*
   // err
			       var  formjson = {"profileActive":"1","profileName":"","sipServer":"","failoverSipServer":"","preferPrimarySipServer":"0","outboundProxy":"","voiceMailAccessNumber":""};
    //ok
    		      var  formjson = {"profileActive":1,"profileName":"profile1","sipServer":"192.168.1.25" ,"failoverSipServer":"192.168.1.25","preferPrimarySipServer":1,"outboundProxy":"192.168.1.25","voiceMailAccessNumber":"123" };
   $("form").setform(formjson);
 */


	/**
	 * 将josn对象赋值给form
	 * @param {obj} 需要给form赋值的json对象
	 * @method setForm        $("#form").setForm({ a: 'www.luofenming.com', b: '王五', c: '王五', d: '罗分明网络博客', e: 7, f: '8;10', i: '王' });
	 * */
	$.fn.setForm = function (jsonValue) {
		var obj = this;
		$.each(jsonValue, function (name, ival) {
			var $oinput = obj.find("input[name=" + name + "]");
			if ($oinput.attr("type") == "checkbox") {  // 是复选框,并且是数组
				if (ival !== null) {
					var checkboxObj = $("[name=" + name + "]");
					var checkArray = ival.split(";");
					for (var i = 0; i < checkboxObj.length; i++) {
						for (var j = 0; j < checkArray.length; j++) {
							if (checkboxObj[i].value == checkArray[j]) {
								checkboxObj[i].click();
							}
						}
					}
				}
			}
			else if ($oinput.attr("type") == "radio") {   // 是单选框
				$oinput.each(function () {
					var radioObj = $("[name=" + name + "]");
					for (var i = 0; i < radioObj.length; i++) {
						if (radioObj[i].value == ival) {
							radioObj[i].click();
						}
					}
				});
			}
			else if ($oinput.attr("type") == "textarea") {   //多行文本框
				obj.find("[name=" + name + "]").html(ival);
			}
			else {
				obj.find("[name=" + name + "]").val(ival);   //其他
			}
		})
	}


	// 调用方式: $("xxx").disform(yyy); 标签 disabled:true,yyy为disabled:false
	// $("标签x").setform(标签y); 除标签y以外,禁用标签x内全部文本只读,标签y可以为空
	//$("#disform").disform();
	//$("#disform").disform("#div");

	$.fn.disform =  function (jsonValue) {
		var obj = this;
		$("#"+obj[0].id+" input").each(function () {
			this.disabled=true
			this.style.backgroundColor = "#dcdcdc";
		})
		$("#"+obj[0].id+" textarea").each(function () {
			this.disabled=true
			this.style.backgroundColor = "#dcdcdc";
		})
		$("#"+obj[0].id+" select").each(function () {
			this.disabled=true
			this.style.backgroundColor = "#dcdcdc";
		})
		if(jsonValue!=''){
			$(jsonValue+" input").each(function () {
				this.disabled=false
				this.style.backgroundColor = "#ffffff";
			})
			$(jsonValue+" textarea").each(function () {
				this.disabled=false
				this.style.backgroundColor = "#ffffff";
			})
			$(jsonValue+" select").each(function () {
				this.disabled=false
				this.style.backgroundColor = "#ffffff";
			})
		}
	}


	//$("标签x").disformtrue(); 标签x内全部元素解除只读状态
	//$("#text_essas").disformtrue();
	$.fn.disformtrue =  function () {
		var obj = this;
		$("#"+obj[0].id+" input").each(function () {
			this.disabled=false
			this.style.backgroundColor = "#ffffff";
		})
		$("#"+obj[0].id+" textarea").each(function () {
			this.disabled=false
			this.style.backgroundColor = "#ffffff";
		})
		$("#"+obj[0].id+" select").each(function () {
			this.disabled=false
			this.style.backgroundColor = "#ffffff";
		})
	}

//jquery 自动表单赋值///jquery加载json对象数据自动表单赋值 和 表单转换json对象数据//


	/*
	/
	JSON字符串:
	var str1 = '{ "name": "cxh", "sex": "man" }';

	JSON对象:
	var str2 = { "name": "cxh", "sex": "man" };

	获取json对象里面的值的方式:
	方式1,var name=str2.name;

	方式2,var name=str2["name"];
	///

	$("#form").form('submit',{
	url:'服务器端处理的url地址',
	success:function (data) { // 在进行web开发,经常需要将服务器返回到客户端的json字符串转换为json对象
				//注意:此时的data只是一个普通的json字符串,需要手动转换JSON对象

		   //JSON字符串转换为JSON对象

			   //方法1.eval方法将jso字符串转换成标准json对象,data需要用括号拼接,不然会当作对象处理。

				   data = eval('('+data+')');

				 //方法2.ie8支持的原生json对象的parse方法将json字符串转换成JSON对象
				   data = JSON.parse(data);

				 //方法3.利用jQuery的parseJSON方法将json字符串转换为 标准的JSON对象
				 data = $.parseJSON(data);

	}
	});

	*/


 	/**
	 *使用JQuery将前端form表单数据转换为JSON字符串传递到后台cgi处理
	 * @param
	 * @method postFormSerializeJsonStr2Cgi
	 * */
function postFormSerializeJsonStr2Cgi(){

	var obj =  $("form").serializeJson(); //表单转换json对象数据
	//var jsonstr11 = JSON.stringify(obj);// json对象格式化成字符串
	//console.log(jsonstr11);
	// {"profileActive":"1","profileName":"","sipServer":"","failoverSipServer":"","preferPrimarySipServer":"0","outboundProxy":"","voiceMailAccessNumber":""}
	 $.ajax({
		type: "post",
		url: "/cgi-bin/cgitest.cgi", ///cgi-bin/cgitest.cgi"
		async: true,
		processData:false, //布尔值,规定通过请求发送的数据是否转换为查询字符串。默认是 true。
		contentType: 'application/json',   //传递的就是json字符串
		dataType:  'json', //返回数据格式
	  //data:$('#ff').serialize(),//这两种方式都不能直接将表单数据转换为json格式
	  //data:$('#ff').serializeArray(), //这两种方式都不能直接将表单数据转换为json格式
		data: JSON.stringify(obj),//将对象转为json字符串 jsonstr11  //这里是要传递的参数,格式为 data: "{paraName:paraValue}"
		success: function(result) {   //回调函数,result是json对象 如obj格式,返回值
			 console.log(result);


		   // console.log( " sipServer:"+ result.profileActive + " profileName:"+ result.profileName + " sipServer:"+ result.sipServer);
		}

	});

}


//jQuery通过ajax获得后台json数据给form表单赋值 https://blog.csdn.net/xiaosheng_papa/article/details/41676087?utm_medium=distribute.pc_relevant.none-task-blog-BlogCommendFromMachineLearnPai2-13.control&depth_1-utm_source=distribute.pc_relevant.none-task-blog-BlogCommendFromMachineLearnPai2-13.control

 	/**
	 *jQuery通过ajax获得后台cgi  json数据给form表单赋值
	 * @param
	 * @method getCgiJsonData2Form
	 * */
function getCgiJsonData2Form(){

	$.ajax({
		type:"get",
		url:"/cgi-bin/cgitest.cgi",
		async: true,  //布尔值,表示请求是否异步处理。默认是 true。
		processData:false, //布尔值,规定通过请求发送的数据是否转换为查询字符串。默认是 true。
		cache:true, //布尔值,表示浏览器是否缓存被请求页面。默认是 true。
		//username: ,//	规定在 HTTP 访问认证请求中使用的用户名。
		//password: ,//	规定在 HTTP 访问认证请求中使用的密码
		//contentType: "",  //发送数据到服务器时所使用的内容类型。默认是:"application/x-www-form-urlencoded"。
		//data: , //规定要发送到服务器的数据。
		timeout:2000  ,    //设置本地的请求超时时间(以毫秒计)

		dataType:"json", //	预期的服务器响应的数据类型。
		ifModified:false,  //布尔值,规定是否仅在最后一次请求以来响应发生改变时才请求成功。默认是 false。
		beforeSend: function(xhr){ //发送请求前运行的函数。  xhr用于创建 XMLHttpRequest 对象的函数。

		},
		success:function(result,status,xhr) //当请求成功时运行的函数。
		{

			console.log(result);
			//console.log( " sipServer:"+ result.profileActive + " profileName:"+ result.profileName + " sipServer:"+ result.sipServer);

			$("form").setForm(result);
		},
		error:function(xhr,status,error) //如果请求失败要运行的函数。
		{
			if(status == 'timeout'){ 处理超时的逻辑


			}else{  // //其他错误的逻辑


			}


		},
		complete:function(xhr,status) //请求完成时运行的函数(在请求成功或失败之后均调用,即在 success 和 error 函数之后)。
		{

		   if(status == 'success'){


			}else if(status == 'error'){


			}else if(status == 'timeout'){


			}

		}

	});

}


 $(function () {


			// err
			//     var  formjson = {"profileActive":"1","profileName":"","sipServer":"","failoverSipServer":"","preferPrimarySipServer":"0","outboundProxy":"","voiceMailAccessNumber":""};
			//ok
			//       $("#form").setForm({ a: 'www.luofenming.com', b: '王五', c: '王五', d: '罗分明网络博客', e: 7, f: '8;10', i: '王' });
			//var  formjson = {"profileActive":1,"profileName":"profile1","sipServer":"192.168.1.444" ,"failoverSipServer":"192.168.1.25","preferPrimarySipServer":1,"outboundProxy":"192.168.1.25","voiceMailAccessNumber":"123" };

			//$("form").setForm(formjson);


			getCgiJsonData2Form(); //jQuery通过ajax获得后台cgi  json数据给form表单赋值      get


            $("#gwt-uid-1411").click(function () {  //save              post


			      postFormSerializeJsonStr2Cgi();  //使用JQuery将前端form表单数据转换为JSON字符串传递到后台cgi处理

				  / profileActive=1&profileName=&sipServer=//
				 // var serializestr =	$('form').serialize();// 就是把表单的数据拼成这个格式的字符串!
				 // console.log(serializestr); //  profileActive=1&profileName=&sipServer=&failoverSipServer=&preferPrimarySipServer=0&outboundProxy=&voiceMailAccessNumber=
				  /// profileActive=1&profileName=&sipServer=
            });


		   $("#gwt-uid-1412").click(function () {   //save and apply      post


			});


			$("#gwt-uid-1413").click(function () {   //reset             get

			   getCgiJsonData2Form(); //jQuery通过ajax获得后台cgi  json数据给form表单赋值


			});


        })


//jQuery通过ajax获得后台json数据给form表单赋值


 //在jQuery中设置form表单中action的值的方法。
 //  $("#myFormId").attr("action", "userinfo.shtml");

 //Jquery表单取值赋值的一些基本操作https://blog.csdn.net/Cheung1021/article/details/7083358?utm_medium=distribute.pc_relevant.none-task-blog-BlogCommendFromMachineLearnPai2-2.control&depth_1-utm_source=distribute.pc_relevant.none-task-blog-BlogCommendFromMachineLearnPai2-2.control
/


 </script>
</html>
<form   id="form1" >


<script src="./js/jquery-3.5.1.min.js"></script>
<script src="./js/callManager.js"></script>
<script>

 $(function () {


	 $("#DectSipAccountSettingsBtn").click(function () {  //save              post
	        console.log("DectSipAccountSettingsBtn");
			var obj =  $("form").serializeJson(); //表单转换json对象数据
			//var jsonstr11 = JSON.stringify(obj);// json对象格式化成字符串
           // 使用JQuery将前端form表单数据转换为JSON字符串传递到后台cgi处理
			$.ajax({
				type: "post",
				url: "/cgi-bin/wdp.cgi?setDectSipAccountSettings",
				async: true,
				processData:false, //布尔值,规定通过请求发送的数据是否转换为查询字符串。默认是 true。
				contentType: 'application/json',   //传递的就是json字符串
				dataType:  'text', //返回数据格式
			  //data:$('#ff').serialize(),//这两种方式都不能直接将表单数据转换为json格式
			  //data:$('#ff').serializeArray(), //这两种方式都不能直接将表单数据转换为json格式
				data: JSON.stringify(obj),//将对象转为json字符串 jsonstr11  //这里是要传递的参数,格式为 data: "{paraName:paraValue}"
				success: function(result) {   //回调函数,result是json对象 如obj格式,返回值
					 console.log(result);

				}

			});

	});


 })
 </script>


#include <stdio.h>
#include "cgic.h"
#include <string.h>
#include <stdlib.h>


static int cgiStrEqNc(char *s1, char *s2) {
	while(1) {
		if (!(*s1)) {
			if (!(*s2)) {
				return 1;
			} else {
				return 0;
			}
		} else if (!(*s2)) {
			return 0;
		}
		if (isalpha(*s1)) {
			if (tolower(*s1) != tolower(*s2)) {
				return 0;
			}
		} else if ((*s1) != (*s2)) {
			return 0;
		}
		s1++;
		s2++;
	}
}


int cgiMain() {


   if (cgiStrEqNc(cgiRequestMethod, "post")) {
	   if (cgiStrEqNc(cgiContentType, "application/json")) {


			char *input;
			if (!cgiContentLength) {
				return 1;
			}
			input = (char *) malloc(cgiContentLength);
			if (!input) {
				return 2;
			}
			if (((int) fread(input, 1, cgiContentLength, cgiIn))
				!= cgiContentLength)
			{
				return 3;
			}

			printf("Content-Type:text/html\n\n");
			if (cgiStrEqNc(cgiQueryString, "setDectSipAccountSettings")) {

               printf(" cgi receive %s  %s\n\n",cgiQueryString,input);
					#if 0

					struct json_object *my_object = json_tokener_parse(input); //由str里的JSON字符串生成JSON对象
					/*遍历json对象集合*/

					json_object_object_foreach(my_object, key, val) {

					      printf("\t%s: %s\n", key, json_object_to_json_string(val));

					}

					printf("my_object.to_string()=%s\n", json_object_to_json_string(my_object));

					json_object_put(my_object); // 减少对象引用次数一次,当减少到0就释放(free)资源

					#endif


			}
			else if (cgiStrEqNc(cgiQueryString, "setProfilesGeneralSettings")) {

                     printf("cgi receive  %s  %s\n\n",cgiQueryString,input);

			}


		//   printf("Content-Type:application/json\n\n");
		//	printf("%s\n\n",input);  //input, cgiContentLength
			free(input);


	   }
   }

 	return 0;
}


#if  0 //json-c开发指南  https://www.cnblogs.com/qingergege/p/5997762.html
// JSON对象的生成
struct json_object * json_object_new_object();
说明: 创建个空的json_type_object类型JSON对象


struct json_object * json_tokener_parse(char *str);
说明:由str里的JSON字符串生成JSON对象,str是json_object_to_json_string() 生成的。
参数:str – json字符串


struct json_object * json_object_object_get(struct json_object * json,char *name);

说明:从json中按名字取一个对象。

参数:

    json – json对象

    name -  json域名字


struct json_object* json_object_new_boolean(Boolean b);

说明:创建个json_type_boolean值类型json对象


Boolean json_object_get_boolean(struct json_object *obj);
说明: 从json对象中boolean值类型得到boolean值


//JSON对象的释放

struct json_object * * json_object_get(struct json_object * this)
说明:增加对象引用计数。使用c库最关心的是内存谁来分配, 谁来释放. jsonc的内存管理方式, 是基于引用计数的内存树(链), 如果把一个struct json_object 对象a, add到另一个对象b上, 就不用显式的释放(json_object_put) a了, 相当于把a挂到了b的对象树上, 释放b的时候, 就会释放a. 当a既add到b上, 又add到对象c上时会导致a被释放两次(double free), 这时可以增加a的引用计数(调用函数json_object_get(a)), 这时如果先释放b, 后释放c, 当释放b时, 并不会真正的释放a, 而是减少a的引用计数为1, 然后释放c时, 才真正释放a.

参数:this – json对象


Void json_object_put(struct json_object * this)

说明:减少对象引用次数一次,当减少到0就释放(free)资源

参数:this – json对象


//JSON对象的操作

Int json_object_is_type(struct json_object * this, enum json_type type)

说明: 检查json_object是json的某个类型

参数: this: json_object 实例

       type: json_type_boolean,json_type_double, json_type_int, json_type_object, json_type_array, json_type_string


enum json_type json_object_get_type(struct json_object * this )

说明:得到json_object的类型。

参数: this – json对象


char * json_object_to_json_string(struct json_object * this)

说明:将json_object内容转换json格式字符串,其中可能含有转义符。

参数: this – json对象

返回值:Json格式字符串


void json_object_object_add(struct json_object* obj, char *key, struct json_object *val);

说明:添加个对象域到json对象中
参数:

       Obj – json对象

       key – 域名字

       val – json值对象


void json_object_object_del(struct json_object* obj, char *key);

说明:删除key值json对象

参数:

       ob j – json对象

       key – 域名字


int json_object_array_length(struct json_object *obj);

说明:得到json对象数组的长度。

参数: ob j – json数组值对象


extern int json_object_array_add(struct json_object *obj,

                             struct json_object *val);

说明:添加一元素在json对象数组末端

参数:

ob j – json数组值对象

val – json值对象


int json_object_array_put_idx(struct json_object *obj, int idx,

                                 struct json_object *val);

说明: 在指定的json对象数组下标插入或替换一个json对象元素。


参数:

obj – json数组值对象

val – json值对象

idx – 数组下标


struct json_object * json_object_array_get_idx(struct json_object * json_array,int i);

说明:从数组中,按下标取JSON值对象。

参数:

       json_array – json 数组类型对象

       i – 数组下标位置


定义宏 json_object_object_foreach(obj,key,val)

说明:遍历json对象的key和值 (key, val默认参数不变)


#endif
五、参考
谷歌浏览器调试技巧
https://blog.csdn.net/u010001477/article/details/76525970
Jquery判断表单是否修改
谷歌开发者工具调试CSS样式_谷歌应用
https://m.downzz.com/class361/36508.html
CSS 实例
https://www.runoob.com/css/css-examples.html
CSS 网页布局
添加JSON Data到已经存在的JSON文件中
https://www.cnblogs.com/insus/p/4344547.html
- 想法是先读取json文件的数据转换为数据集存放在内存中,新添加的数据再附加上去,然后再把内存的数据集序列化保存为json文件即可。
HTTP-REFERER:调用该CGI程序的网页的URL.
读取json文件原有数据—》添加新数据—》写入文件
json-c 的安装和使用(使用json-c读取文件中的json数据和保存json格式的数据至文件中)
https://blog.csdn.net/nurke/article/details/78041492
json-c的使用
json-c库函数使用起来较为简单:
申请json对象(以infor_object为例):
structjson_object *infor_object = NULL;
infor_object= json_object_new_object();
释放json对象:
json_object_put(infor_object);
#include <stdio.h>
#include <json/json.h>
#include <stdlib.h>
void test_jsonc()
{
struct json_object *infor_object = NULL;
infor_object = json_object_new_object();
if (NULL == infor_object)
{
printf("new json object failed.\n");
return;
}
struct json_object *para_object = NULL;
para_object = json_object_new_object();
if (NULL == para_object)
{
json_object_put(infor_object);//free
printf("new json object failed.\n");
return;
}
struct json_object *array_object = NULL;
array_object = json_object_new_array();
if (NULL == array_object)
{
json_object_put(infor_object);//free
json_object_put(para_object);//free
printf("new json object failed.\n");
return;
}
/*添加json值类型到数组中*/
json_object_array_add(array_object, json_object_new_int(256));
json_object_array_add(array_object, json_object_new_int(257));
json_object_array_add(array_object, json_object_new_int(258));
json_object_object_add(para_object, "DeviceId", json_object_new_string("sn_iso_9000"));
json_object_object_add(para_object, "MacAddr", json_object_new_string("AA:BB:CC:DD:EE:FF"));
json_object_object_add(para_object, "Visible", json_object_new_int(1));
/*添加json名称和值到json对象集合中*/
json_object_object_add(infor_object, "method", json_object_new_string("GetSystemInfo"));
json_object_object_add(infor_object, "param", para_object);
json_object_object_add(infor_object, "id", json_object_new_string("101"));
/*添加数组集合到json对象中*/
json_object_object_add(infor_object, "array", array_object);
json_object_to_file("1.json",infor_object); //将json格式转为文件
struct json_object *result_object = NULL;
result_object = json_object_object_get(infor_object, "method");
printf("-----------result_object method ---------------------------\n");
printf("%s\n", json_object_to_json_string(result_object));
printf("-----------result_object method---------------------------\n");
result_object = json_object_object_get(infor_object, "param");
printf("-----------result_object param ---------------------------\n");
printf("%s\n", json_object_to_json_string(result_object));
printf("-----------result_object param---------------------------\n");
result_object = json_object_object_get(infor_object, "array");
printf("-----------result_object array---------------------------\n");
printf("%s\n", json_object_to_json_string(result_object));
printf("-----------result_object array---------------------------\n");
int i;
for(i = 0; i < json_object_array_length(result_object); i++) {
struct json_object *obj = json_object_array_get_idx(result_object, i);
printf("\t[%d]=%s\n", i, json_object_to_json_string(obj));
}
struct json_object *file_object = NULL;
unsigned int filesize = 0;
FILE *fp;
fp = fopen("1.json", "r");
fseek(fp, 0L, SEEK_END);
filesize = ftell(fp); //获取了1.json的文件大小
printf("filesize is %d \n",filesize);
fclose(fp);
FILE *fp2;
char *file;
fp2 = fopen("1.json", "r");
file = (char *)malloc(filesize + 1);
fseek(fp2, SEEK_SET, 0);
fread(file,1,filesize,fp2);//读取1.json的数据
file_object = json_tokener_parse(file); //将读取1.json的数据转为json格式
fclose(fp2);
json_object_to_file("2.json",file_object); //将json格式转为文件.存至2.json文件中
printf("-----------json infor ---------------------------\n");
printf("%s\n", json_object_to_json_string(infor_object));
printf("-----------json infor ---------------------------\n");
json_object_put(infor_object);//free
json_object_put(file_object);//free
}
int main(int argc, char *argv[])
{
test_jsonc();
return 0;
}
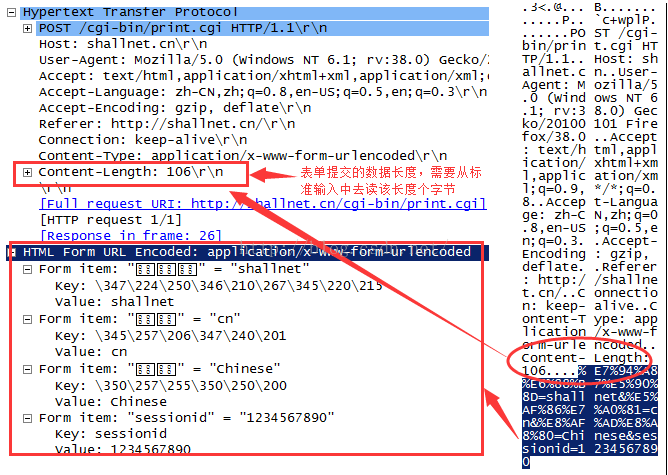
CGI允许Web服务器执行外部程序,并将它们的输出发送给浏览器。这样就提供了动态交互能力。
那么服务器是如何分开处理静态页面和动态CGI程序的呢?这主要是通过解析URL的方式。我们可以定义CGI程序的目录,如cgi-bin,那么如果URL包含”cgi-bin”字符串则这是动态程序,且将URL的参数给cgiargs。如果是静态页面,parse_uri返回1,反正返回0。所以我们可以通过返回值区别不同的服务类型。
POST方式的CGI规范实现原理:
由于POST方式不是通过URL传递参数,所以实现方式与GET方式不一样。
POST方式获取浏览器发送过来的参数长度设置为环境变量CONTENT-LENGTH。并将参数重定向到CGI的标准输入,这主要通过pipe管道实现的。CGI程序从标准输入读取CONTENT-LENGTH个字符就获取了浏览器传送的参数,并将处理结果输出到标准输出,同理标准输出已重定向到文件描述符,所以浏览器就能收到处理的响应。
C语言构建WEB管理系统(四):CGI程序解析POST数据
<body>
<p> 登录信息: </p>
<!--<form action="/cgi-bin/print.cgi">-->
<form action="/cgi-bin/print.cgi" method="post">
用户名:
<input type="text" name="用户名"/> <br />
密码:
<input type="password" name="密码" /> <br />
<input type="radio" name="语言" value="English"/> English <br />
<input type="radio" name="语言" value="Chinese"/> 简体中文
<input type="hidden" name="sessionid" value="1234567890"/> <br />
<input type="submit" value="登录"> <br />
</form>
</body>
int main(int argc, const char *argv[])
{
char *data = NULL, *data_len_str = NULL;
int data_len, read_len;
fprintf(stdout, "Content-Type: text/html\r\n\r\n");
data_len_str = getenv("CONTENT_LENGTH");
if (NULL == data_len_str) {
data_len_str = "";
}
data_len = atoi(data_len_str);
if (data_len < 0) {
return -1;
}
data = (char *)malloc(data_len);
if (NULL == data) {
return -1;
}
read_len = fread(data, 1, data_len, stdin);
if (read_len != data_len) {
return -1;
}
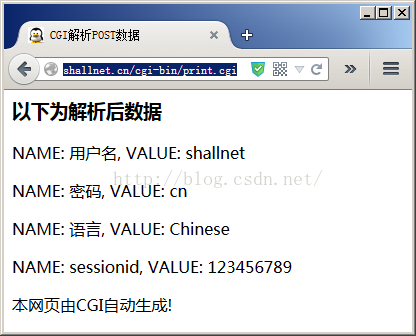
fprintf(stdout, "<HTML>\n");
fprintf(stdout, "<HEAD>\n");
fprintf(stdout, "<TITLE>CGI解析POST数据</TITLE>\n");
fprintf(stdout, "<HEAD>\n");
fprintf(stdout, "<BODY>\n");
fprintf(stdout, "<H3>以下为解析后数据</H3>\n");
// printf("input type=\"button\" value=\"Back CGI\" οnclick=\"javascript:window.location='../index.html'\">");
//printf("<a href=\"../first.html\" target=\"mainFrame\">%s</a>",name); //cgi中调用html:
//跳转到对应html或刷新
//form 载入json数据
sln_cgi_content_parse(data, data_len);
fprintf(stdout, "本网页由CGI自动生成!\n");
fprintf(stdout, "</BODY>");
fprintf(stdout, "</HTML>");
free(data);
return 0;
}
在做嵌入式web的时候我们一般要做的事情是要设计以一个登录的界面,来让客户验证自己的帐号和密码,这个帐号和密码既可以放在你的xml文件中也可以放在你的数据库中,但是最重要的是如何来通过CGI来调用和验证,其实最关键不是怎么接受数据,最关键的是怎么验证后跳转,我们在写cgi程序的时候,如果只是跳转的话,我们可以写一个空白的html然后在你的body的中间部分加上你的判断条件,如果你的判断条件成立的话,那么就就可以采用以下的办法来跳转:
printf(“<script>”);
printf(“window.loaction.herf=\”xm.html\”/n”);
printf(“</script>”);
在xm.html部分你可以选择的跳转到任何部分
嵌入式CGI 与HTML的数据交换https://blog.csdn.net/guiyuan_yelang/article/details/45251947
通过网页获取传感器信息和控制风扇,电机等器件。网页的制作,使用HTML和CGI,使用C语言编写CGI。
使用HTML中的表单form,提交表单到CGJ中,CGI接收数据,操作数据库,实现信息的传递。但是要将数据库中的数据实时的显示到HTML页面上,CGI库中却没有直接的方法来实现,,最后,使用比较麻烦的Cookie来传递数据。
嵌入式LINUX下CGI与HTML网页之间的通信
int (void)

{

               char *input;

               char *req_method;

               char name[32];

               char pass[32];


               req_method = getenv("REQUEST_METHOD");

               input = getcgidata(stdin, req_method);


               //sscanf(input, "%*[^=]=%*c%[^&]%*[^=]%*c%[^n]", name, pass);

               sscanf(input, "%*[^=]=%[^&]%*[^=]=%[^EOF]", name, pass);


               if (!strncmp(name,"root",4) && !strncmp(pass, "000", 3)){

                               /* Set Cookie. */

                               printf("Set-Cookie: %s=%s;  path=/rn","Result","login success");

                               printf("%s%c%cn","Content-Type:text/html;charset=utf-8",13,10);

                               printf("<meta http-equiv="refresh" content="0;url=../result.html">");

               } else {

                               printf("Set-Cookie: %s=%s&&%s;  path=/rn","Result", name, pass);

                               printf("%s%c%cn","Content-Type:text/html;charset=utf-8",13,10);

                               printf("<meta http-equiv="refresh" content="0;url=../result.html">");

               }


    return 0;

}
返回结果result.html:
<html>

<head>

<meta charset="UTF-8">

<script type="text/javascript" >

function getCookie(c_name)

{

               if (document.cookie.length>0)

               {

                               c_start=document.cookie.indexOf(c_name + "=")

                               if (c_start!=-1)

                               {

                                              c_start=c_start + c_name.length+1

                                              c_end=document.cookie.indexOf(";",c_start)

                                              if (c_end==-1) c_end=document.cookie.length

                                              return unescape(document.cookie.substring(c_start,c_end))

                               }

               }

               return ""

}

</script>

<title>Result</title>

</head>

<body>

<form>

               Login Result=

               <input name="lignt_now" type="text" id="result_text" />

</form>

<script type="text/javascript" >

               bang_text= document.getElementById('result_text');

               bang_text.value =getCookie('Result')

</script>

</body>

</html>
[精华]编写CGI的C语言代码(文件名是getdata.c)设置一个Cookie,打印一个HTML,跳转到showCookie.html页面。
嵌入式CGI 与HTML的数据交换
https://blog.csdn.net/guiyuan_yelang/article/details/45251947
#include <stdio.h>
#include "cgic.h"
#include <string.h>
#include <stdlib.h>
int cgiMain() {
fprintf(cgiOut,"Set-Cookie: %s=%s; path=/\r\n","Data","abcd");
//设置一个名为Data数据为"abcd"的Cookie
cgiHeaderContentType("text/html");
fprintf(cgiOut, "<HTML><HEAD>\n");
fprintf(cgiOut, "<meta http-equiv=Refresh content=1;URL=./showCookie.html\n");
//设置跳转到当前目录下的showCookie.html页面
fprintf(cgiOut, "<TITLE>Cookie</TITLE></HEAD>\n"
fprintf(cgiOut, "<BODY>");
fprintf(cgiOut, "</BODY>\n");
fprintf(cgiOut, "</HTML>\n");
return 0;
}
- 3.建一个html页面接收显示Cookie的数据:
建文件名为showCookie.html的HTML文件用来显示
HTML代码:
<html>
<head>
<script type="text/javascript" >
function getCookie(c_name)
{
if (document.cookie.length>0)
{
c_start=document.cookie.indexOf(c_name + "=")
if (c_start!=-1)
{
c_start=c_start + c_name.length+1
c_end=document.cookie.indexOf(";",c_start)
if (c_end==-1) c_end=document.cookie.length
return unescape(document.cookie.substring(c_start,c_end))
}
}
return ""
}
</script>
<title>显示Cookie数据</title>
</head>
<body>
<form >
显示Cookie中的数据: Data=
<input name="lignt_now" type="text" id="data_text" />
</form>
<script type="text/javascript" >
bang_text= document.getElementById('data_text');
bang_text.value =getCookie('Data') //调用载入json数据
</script>
</body>
</html>


 被折叠的 条评论
为什么被折叠?
被折叠的 条评论
为什么被折叠?
 到【灌水乐园】发言


