


1、首先组件的使用步骤:
使用nanoid生成独一无二的id比uuid更加轻量
1.创建组件.vue文件,组件名name(首字母大写)
2.引入组件:import Student from "./components/Student.vue" (script标签下)
3.注册组件:当前组件name属性与data平级,components注册局部组件{Student}
4.使用组件:在当前组件中使用<Student/>组件标签
const comp=Vue.extends({ 创建组件})
2、使用ref属性:被用来给元素或子组件注册引用信息(id的替代者)
应用在html标签上获取的是真实DOM元素,应用在组件标签上是组件实例对象(vc)
使用方式:
1. 打标识:```<h1 ref="xxx">.....</h1>``` 或 ```<School ref="xxx"></School>```
2. 获取:```this.$refs.xxx``` 获取实例,获取数据
3.父向子传值:使用自定义属性props传参
在子组件标签上自定义属性,子组件props:['xxx','sss'],或者props:{"xxx":{type:number,default:0}}
4.子向父传值:
1.通过父组件给子组件传递 函数类型(一个函数) 的props:(扩展)
	1.父组件通过属性传递一个函数给子组件

    //父组件中代码
	<School :getSchoolName="getSchoolName"/>
	methods: {
			getSchoolName(name){
				console.log('App收到了学校名:',name)
			}
		}

     //子组件中代码
		props:['getSchoolName'],
     //在某methods里面的函数里面调用该函数
	  this.getSchoolName(this.name)//传递一个子组件中的数据name
2.通过父组件给子组件绑定一个自定义事件实现:(第一种写法,使用@或v-on)
//父组件中代码  给子组件自定义atguigu事件
<Student @atguigu="getStudentName" />
//在methods中定义时间
	getStudentName(name,...params){
	console.log('App收到了学生名:',name,params)
	this.studentName = name
			},

//子组件中 通过this.$emit('atguigu',this.name)
	sendStudentlName(){
				//触发Student组件实例身上的atguigu事件
				this.$emit('atguigu',this.name,666,888,900)
				// this.$emit('demo')
				// this.$emit('click')
			},
3.通过父组件给子组件绑定一个自定义事件实现:(第二种写法,使用ref)
父组件中this.$refs.student.$on('自定义事件名',function)
//父组件给子组件 打上ref标识 定义自定义事件	this.$refs.student.$on('atguigu',function)
	<Student ref="student"/>
	mounted() {
			this.$refs.student.$on('atguigu',this.getStudentName) //绑定自定义事件
// this.$refs.student.$once('atguigu',this.getStudentName) //绑定自定义事件(一次性)
		},

        getStudentName(name,...params){
				console.log('App收到了学生名:',name,params)
				this.studentName = name
			},


//子组件中  去触发组件上的自定义事件this.$emit('atguigu',this.name)
解绑自定义事件:在子组件内部解绑this.$off('atguigu')
销毁当前组件实例:this.$destroy()
	unbind(){
    this.$off('atguigu') //解绑一个自定义事件
	// this.$off(['atguigu','demo']) //解绑多个自定义事件
	// this.$off() //解绑所有的自定义事件
			},
	death(){
	this.$destroy() //销毁了当前Student组件的实例,销毁后所有Student实例的自定义事件全都不奏效。
			}
5.sessionstorage/localStorage:只能存储字符串
localStorage.setItem('token',JSON.Stringfy()) JSON.parse(localStorage.getItem('token'))
6.全局事件总线传参(Vue.prototype.$bus=this或new Vue())//组件都能访问到$bus
***********************注意:使用的局限性***************************
总之,监听bus总线的事件,必须要函数中,但是该函数执行的时候,跟bus总线无关。
路由组件中:两个组件不在一个页面,bus总线即使改变了值,当点击另一个路由路径的时候,data函数又将值初始化了,
所以说,bus总线作用的两个组件应该在同一页面中。当然,可以用一个仓库来存储这个改变的值,比如:vuex、webStorage、数据库等等。
vue中兄弟组件之间的联动,兄弟组件之间的传值_叨唠的博客-CSDN博客_vue兄弟组件传值兄弟组件之间的传值,使得兄弟组件之间可以联动,相互操作方法1:借助父组件,让两个兄弟组件可以联动,子组件A将值传递给父组件,父组件再将值传递给子组件B第一步:子组件A传值给父组件通过$emit将e.target.innerText传递给父组件<template> <div class="initail"> <ul> &l... https://blog.csdn.net/zyz00000000/article/details/84824623
//安装全局事件总线
import Vue from "vue"
import App from "./App.vue"

Vue.config.productionTip=false

new Vue({
	el:'#app',
	render:h=>h(App),
	beforeCreate(){
		Vue.prototype.$bus=this//安装全局事件总线
	}
})

//发送数据方组件  this.$bus.$emit('aiguigu',this.name)

	methods:{
			sendStudentName(){
				this.$bus.$emit('hello',this.name)
			}
		}

//接收数据方组件  this.$bus.$on('hello',(data)=>{ 收到事件data//自定义事件回调})
	mounted() {
			// console.log('School',this)
			this.$bus.$on('hello',(data)=>{
				console.log('我是School组件,收到了数据',data)
			})
		},
//最好在销毁组件之前,解绑自定义事件
		beforeDestroy() {
			this.$bus.$off('hello')
		},
	}
7.消息的发布订阅pubsub-js
以下是详细用法
vue组件间的通信之pubsub-js - 显示账号 - 博客园本文介绍使用发布订阅的方式进行vue组件间的通信 我认为这种方式比较自由, 不存在组件间的关系问题 1. 首先安装pubsub-js npm install --save pubs https://www.cnblogs.com/z-qinfeng/p/12387268.html1.npm install --save pubsub-js
2.import pubsub form “pubsub-js”
3.订阅消息pubsub.subscribe('频道',(数据)=>{//回调}) (beforeDestroy中pubsub.unsubscribe(pubId))见下方示例
	mounted() {
			// console.log('School',this)
			/* this.$bus.$on('hello',(data)=>{
				console.log('我是School组件,收到了数据',data)
			}) */
			this.pubId = pubsub.subscribe('hello',(msgName,data)=>{
				console.log(this)
				// console.log('有人发布了hello消息,hello消息的回调执行了',msgName,data)
			})
		},
		beforeDestroy() {
			// this.$bus.$off('hello')
			pubsub.unsubscribe(this.pubId)
		},
4.发布消息pubsub.publish('频道',数据)
8.开启代理服务器Vue.config.js
配置参考 | Vue CLI![]() https://cli.vuejs.org/zh/config/#devserver-proxy
https://cli.vuejs.org/zh/config/#devserver-proxy
//开启代理服务器(方式一)
	/* devServer: {
    proxy: 'http://localhost:5000'
  }, */
	//开启代理服务器(方式二)
	devServer: {
    proxy: {
      '/atguigu': {
        target: 'http://localhost:5000',
				pathRewrite:{'^/atguigu':''},
        // ws: true, //用于支持websocket
        // changeOrigin: true //用于控制请求头中的host值
      },
      '/demo': {
        target: 'http://localhost:5001',
				pathRewrite:{'^/demo':''},
        // ws: true, //用于支持websocket
        // changeOrigin: true //用于控制请求头中的host值
      }
    }
  }
9.vue-resource发起请求(与axios作用相同)
10.插槽的使用
1.插槽:在组件中可以用<slot>标签占位,挖一个坑留着,在使用组件标签时,用双标签,往里面去填充内容,从而达到组件可以多样化的效果
2.具名插槽:
//组件中代码  有两个插槽  所以给name属性区别出插槽
<div class="category">
		<h3>{{title}}分类</h3>
		<!-- 定义一个插槽(挖个坑,等着组件的使用者进行填充) -->
		<slot name="center">我是一些默认值,当使用者没有传递具体结构时,我会出现1</slot>
		<slot name="footer">我是一些默认值,当使用者没有传递具体结构时,我会出现2</slot>
	</div>


//使用组件的位置   可以使用template标签—+  v-slot:footer
<Category title="电影">
<video slot="center" controls src="http://clips.vorwaerts-gmbh.de/big_buck_bunny.mp4"></video>
			<template v-slot:footer>
				<div class="foot">
					<a href="http://www.atguigu.com">经典</a>
					<a href="http://www.atguigu.com">热门</a>
					<a href="http://www.atguigu.com">推荐</a>
				</div>
				<h4>欢迎前来观影</h4>
			</template>
		</Category>

//或者   直接slot="footer"  直接等于对应的slot标签名
<Category title="游戏" >
			<ul slot="center">
				<li v-for="(g,index) in games" :key="index">{{g}}</li>
			</ul>
			<div class="foot" slot="footer">
				<a href="http://www.atguigu.com">单机游戏</a>
				<a href="http://www.atguigu.com">网络游戏</a>
			</div>
		</Category>
3.作用域插槽:数据也在组件中,不在使用者身上,当使用者需要拿到组件中的数据时,可以通过给<slot>标签添加自定义属性传值给使用者,在父组件中<template scope="{自定义属性}">通过解构赋值得到该数据
//子组件中slot标签自定义属性传值
<template>
	<div>
		<slot :games="games" msg="hello">我是一些默认内容</slot>
	</div>
</template>

<script>
export default {
	name:'Category',
	props:['title'],
	date(){
		return {
		games:['红色警戒','穿越火线','劲舞团','超级玛丽'],
		}
	}
}
</script>
//父组件中 template标签上  scope=“{games}”  或  slot-scope="{games}"

		<Category title="游戏">
			<template scope="atguigu">
				<ul>
					<li v-for="(g,index) in atguigu.games" :key="index">{{g}}</li>
				</ul>
			</template>
		</Category>

//slot-scope="{games}"
		<Category title="游戏">
			<template slot-scope="{games}">
				<h4 v-for="(g,index) in games" :key="index">{{g}}</h4>
			</template>
		</Category>
11.vuex:状态管理构架
VueX 是一个专门为 Vue.js 应用设计的状态管理构架,统一管理和维护各个vue组件的可变化状态(你可以理解成 vue 组件里的某些 data )。
Vuex有五个核心概念:
state, getters, mutations, actions, modules。
1. state:vuex的基本数据,用来存储变量 //this.$store.state.xxx 获取值
2. getter:从基本数据(state)派生的数据,相当于state的计算属性
3. mutation:提交更新数据的方法,必须是同步的(如果需要异步使用action)。每个 mutation 都有一个字符串的 事件类型 (type) 和 一个 回调函数 (handler)。this.$store.commit
回调函数就是我们实际进行状态更改的地方,并且它会接受 state 作为第一个参数,提交载荷作为第二个参数。
4. action:和mutation的功能大致相同,不同之处在于 ==》1. Action 提交的是 mutation,而不是直接变更状态。 2. Action 可以包含任意异步操作。this.$store.dispatch
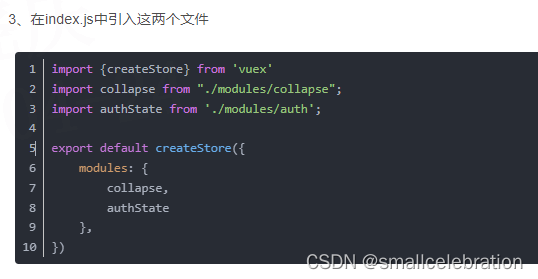
5. modules:模块化vuex,可以让每一个模块拥有自己的state、mutation、action、getters,使得结构非常清晰,方便管理。

模块化: 方法一使用mapState等
import {mapState,mapGetters,mapMutations,mapActions} from 'vuex'
	export default {
		name:'Count',
		data() {
			return {
				n:1, //用户选择的数字
			}
		},
		computed:{
			//借助mapState生成计算属性,从state中读取数据。(数组写法)
			...mapState('countAbout',['sum','school','subject']),
			...mapState('personAbout',['personList']),
			//借助mapGetters生成计算属性,从getters中读取数据。(数组写法)
			...mapGetters('countAbout',['bigSum'])
		},
		methods: {
			//借助mapMutations生成对应的方法,方法中会调用commit去联系mutations(对象写法)
			...mapMutations('countAbout',{increment:'JIA',decrement:'JIAN'}),
			//借助mapActions生成对应的方法,方法中会调用dispatch去联系actions(对象写法)
			...mapActions('countAbout',{incrementOdd:'jiaOdd',incrementWait:'jiaWait'})
		},
		mounted() {
			console.log(this.$store)
		},
模块化:方法二(使用this.$store)

12.路由按需加载:三种方法


 3040
3040


 被折叠的 条评论
为什么被折叠?
被折叠的 条评论
为什么被折叠?
 到【灌水乐园】发言


