


Most of your interactions with Yeoman will be through the command line. Run commands in the Terminal app if you’re on Mac, your shell in Linux, or cmder (preferably) / PowerShell / cmd.exe if you are on Windows.
Install prerequisites
Before installing Yeoman, you will need the following:
- Node.js v4 or higher
- npm (which comes bundled with Node)
- git
You can check if you have Node and npm installed by typing:
node --version && npm --versionIf you need to upgrade or install Node, the easiest way is to use an installer for your platform. Download the .msi for Windows or .pkg for Mac from the NodeJS website.
The npm package manager is bundled with Node, although you might need to update it. Some Node versions ship with rather old versions of npm. You can update npm using this command:
npm install --global npm@latestYou can check if you have Git installed by typing:
git --versionIf you don't have Git, grab the installers from the git website.
Install the Yeoman toolset
Once you’ve got Node installed, install the Yeoman toolset:
npm install --global yoErrors?
If you see permission or access errors, such as EPERM or EACCESS, do not use sudo as a work-around. You can consult this guide for a more robust solution.
Confirm installation
It is a good idea to check that everything is installed as expected by running commonly used Yeoman commands like yo with the --version flag as follows:
yo --version
In a traditional web development workflow, you would need to spend a lot of time setting up boilerplate code for your webapp, downloading dependencies, and manually creating your web folder structure. Yeoman generators to the rescue! Let's install a generator for FountainJS projects.
Install an generator
You can install Yeoman generators using the npm command and there are over 3500+ generators now available, many of which have been written by the open-source community.
Install generator-fountain-webapp using this command:
npm install --global generator-fountain-webappThis will start to install the Node packages required for the generator.
Errors?
If you see permission or access errors, such as EPERM or EACCESS, do not use sudo as a work-around. You can consult this guide for a more robust solution.
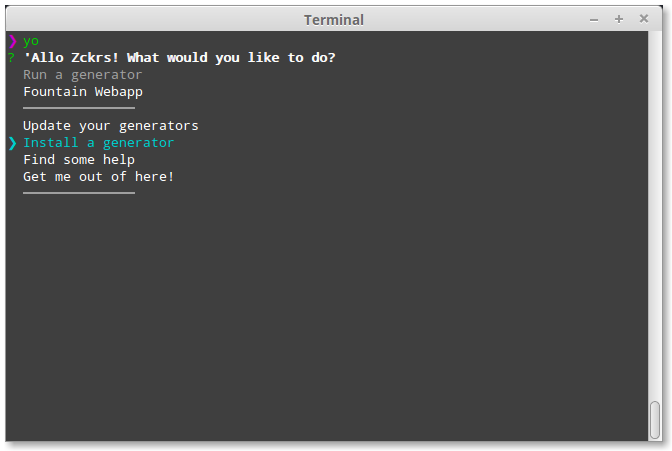
Along with using npm install directly, you can search for generators via the Yeoman interactive menu. Runyo and select Install a generator to search for published generators.
We've used the word "scaffold" a few times but you might not know what that means. Scaffolding, in the Yeoman sense of the word, means generating files for your web app based on your specific configuration requests. In this step, you'll see how Yeoman can generate files specifically for your favorite library or framework — with options for using other external libraries like Webpack, Babel and SASS — with minimal effort.
Create a project folder
Create a mytodo folder for all your codelab work:
mkdir mytodo && cd mytodoThis folder is where the generator will place your scaffolded project files.
Access generators via the Yeoman menu
Run yo again to see your generators:
yoIf you have a few generators installed, you'll be able to interactively choose from them. Highlight Fountain Webapp. Hit enter to run the generator.

Use generators directly
As you become more familiar with yo, you can run generators directly without the use of the interactive menu, like so:
yo fountain-webapp
Configure your generator
Some generators will also provide optional settings to customize your app with common developer libraries to speed up the initial setup of your development environment.
The FountainJS generator provides some choices to use your favorite:
- framework (React, Angular2 or Angular1)
- module management (Wepack, SystemJS or None with Bower)
- javascript preprocessor (Babel, TypeScript or none)
- css preprocessor (SASS, LESS or none)
- three sample app (a landing page, hello world, and TodoMVC)
For this codelab, we will use React, Wepack, Babel, SASS and the Redux TodoMVC sample.

Select successively these options with the arrows keys and the enter and watch the magic happen.

Yeoman will automatically scaffold out your app, grab your dependencies. After a few minutes we should be ready to go onto the next step.

Open up your mytodo directory to take a look at what was actually scaffolded. It'll look like this:

In mytodo, we have:
src: a parent directory for our web application
app: our React + Redux codeindex.html: the base html fileindex.js: the entry point for our TodoMVC app
conf: a parent directory for our configuration files for thrid-party tools (Browsersync, Webpack, Gulp, Karma)
gulp_tasks and gulpfile.js: our builder tasks
.babelrc, package.json, and node_modules: configuration and dependencies required
.gitattributes and .gitignore: configuration for git
Create the first commit
After generation and installation you should have a fresh git repository already initialzing.
You can safely add a commit to save the current state by these commands.
git add --all && git commit -m 'First commit'
Start the server
Run a npm script to create a local, Node-based http server on localhost:3000 (or 127.0.0.1:3000 for some configurations) by typing:
npm run serveOpen a new tab in your web browser on localhost:3000:

Stop the server
If you ever need to stop the server, use the Ctrl+C keyboard command to quit your current CLI process.
Note: You can't have more than one http server running on the same port (default 3000).
Watch your files
Open up your favorite text editor and start making changes. Each save will automatically force a browser refresh so you don’t have to do this yourself. This is called live reloading and it’s a nice way of getting a real-time view of your application state.
Live reloading is made available to your application through a set of Gulp tasks configured ingulpfile.js and Browsersync configured in gulp_tasks/browsersync.js; it watches for changes to your files and automatically reloads them if it detects a change.
Below, we edited Header.js in the src/app/components directory. Thanks to live reload we go from this:

To this instantly:

Don't forgot the test!
You have a TodoMVC app tested and you change the title header. You should edit test in `mytodo/src/app/components/Header.spec.js` **or** revert the change for demonstrate livereloading
For those unfamiliar with Karma, it is a JavaScript test runner that is test framework agnostic. The fountainjs generator has included test framework Jasmine. When we ran yo fountain-webapp earlier in this codelab the generator scaffolded files with pattern *.spec.js in the source folder of themytodo folder, created a conf/karma.conf.js file, and pulled in the Node modules for Karma. We’ll be editing a Jasmine script to describe our tests soon but let’s see how we can run tests first.
Run unit tests
Let’s go back to the command line and kill our local server using Ctrl+C. There is already a npm script scaffolded out in our package.json for running tests. It can be run as follows:
npm test
Every tests should pass.
Update unit tests
You’ll find unit tests scaffolded in the src folder, so open up src/app/reducers/todos.spec.js. This is the unit test for your Todos reducer. For example we get focus on the first test who verify the initial state.
it('should handle initial state', () => {
  expect(todos(undefined, {})).toEqual([
    {
      text: 'Use Redux',
      completed: false,
      id: 0
    }
  ]);
});
And replace that test with the following:
it('should handle initial state', () => {
  expect(todos(undefined, {})).toEqual([
    {
      text: 'Use Yeoman', // <=== HERE
      completed: false,
      id: 0
    }
  ]);
});
Re-running our tests with npm test should see our tests now failing.
If you want run test automatically on change you can use npm run test:auto instead.
Open src/app/reducers/todos.js.
Replace the initial state by:
const initialState = [
  {
    text: 'Use Yeoman',
    completed: false,
    id: 0
  }
];
Fantastic you have fixed the test:

Writing unit tests make it easier to catch bugs as your app gets bigger and when more developers join your team. The scaffolding feature of Yeoman makes writing unit tests easier so no excuse for not writing your own tests! ;)
Install npm package
To easily achieve this we can use another Redux module called "redux-localstorage" that will allow us to quickly implement local storage.
Run the following command:
npm install --save redux-localstorage@rc 
Use redux-localstorage
The Redux store should be configured (src/app/store/configureStore.js) to use storage:
import {compose, createStore} from 'redux';
import rootReducer from '../reducers';

import persistState, {mergePersistedState} from 'redux-localstorage';
import adapter from 'redux-localstorage/lib/adapters/localStorage';

export default function configureStore(initialState) {
  const reducer = compose(
    mergePersistedState()
  )(rootReducer, initialState);

  const storage = adapter(window.localStorage);

  const createPersistentStore = compose(
    persistState(storage, 'state')
  )(createStore);

  const store = createPersistentStore(reducer);
  if (module.hot) {
    // Enable Webpack hot module replacement for reducers
    module.hot.accept('../reducers', () => {
      const nextReducer = require('../reducers').default;
      store.replaceReducer(nextReducer);
    });
  }

  return store;
}
If you look at your app in the browser now you’ll see that there are one item "Use Yeoman" in the todo list. The app is initialising the todos store if local storage is empty and we haven’t given it any todo items yet.

Go ahead and add a few items to the list:

Now when we refresh our browser the items persist. Hooray!
We can confirm whether our data is being persisted to local storage by checking the Resources panel in Chrome DevTools and selecting Local Storage from the lefthand side:

Write unit tests
For an extra challenge, revisit unit testing in Step 6 and consider how you might update your tests now that the code is using local storage.
Ready to show your beautiful todo app to the world? Let’s try to build a production-ready version of it which we can ship.
Optimize files for production
To create a production version of our application, we’ll want to:
- lint our code,
- concatenate and minify our scripts and styles to save on those network requests,
- compile the output of any preprocessors we’re using, and
- generally make our application really lean.
Phew! Amazingly we can achieve all of this just by running:
npm run build Your lean, production-ready application is now available in a dist folder in the root of your mytodoproject. These are the files that you can put on your server using FTP or any other deployment service.
Build and preview the production-ready app
Want to preview your production app locally? That’s just another simple npm script:
npm run serve:distIt will build your project and launch a local web server. Yo Hero!


 989
989

 被折叠的 条评论
为什么被折叠?
被折叠的 条评论
为什么被折叠?
 到【灌水乐园】发言


