


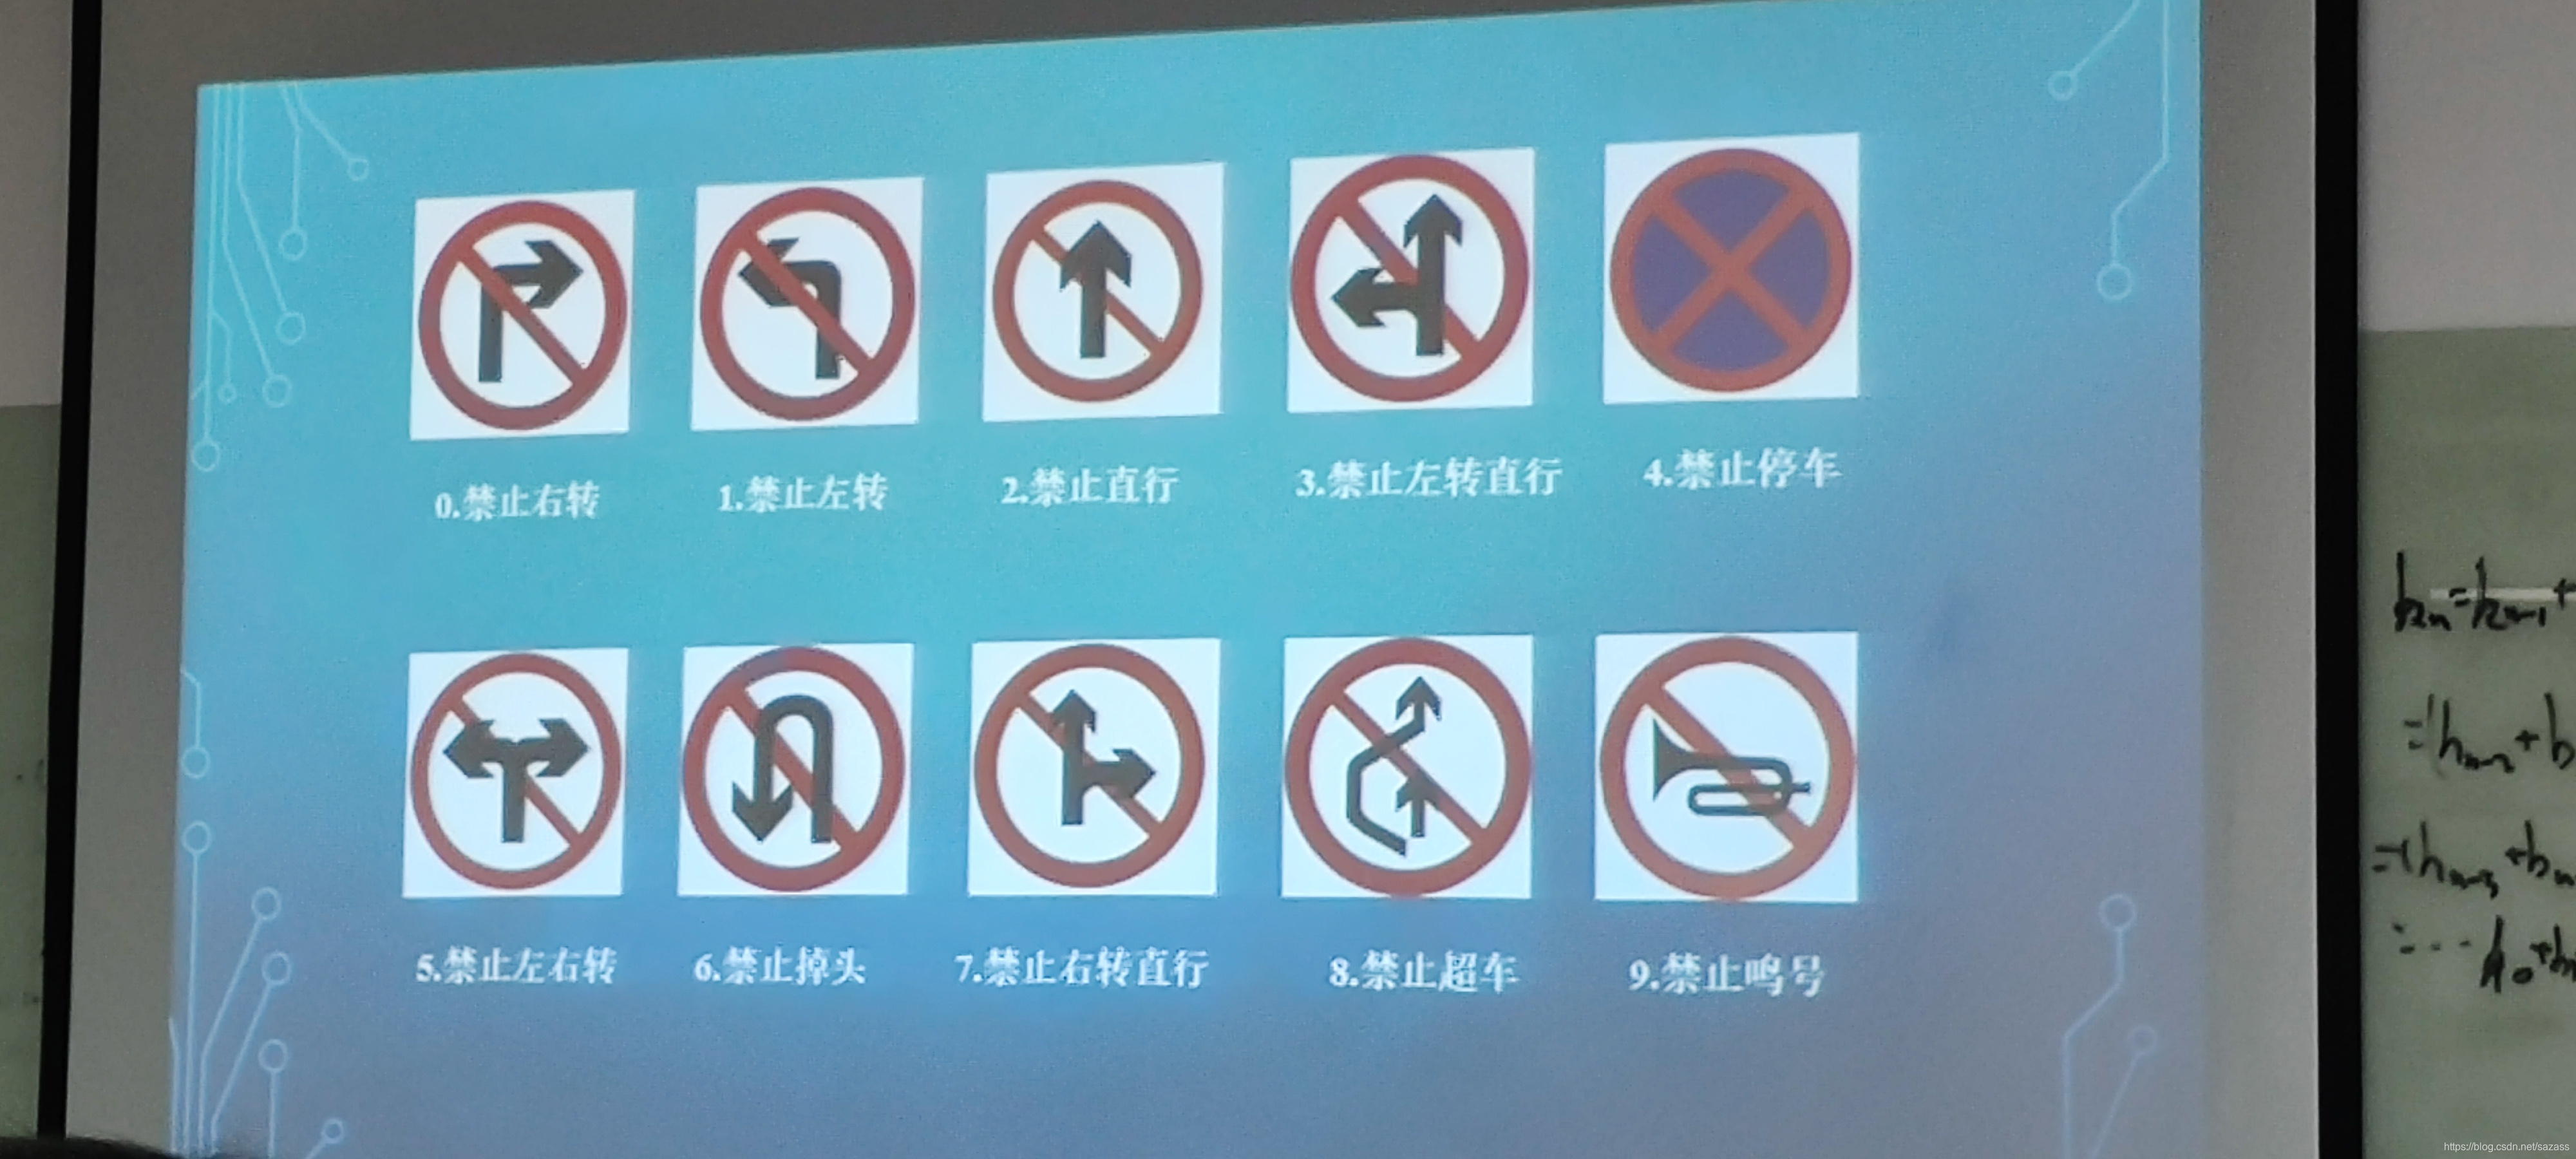
前言:
这是数字图像课程的大作业,老师要求不可以采用深度学习的方法检测和识别特定的路标,只能采用传统的图像算法提取特征从而检测出特定的车牌.
参考文章:
https://blog.csdn.net/majichen95/article/details/80380668
!!!!
路标的检测和识别算法改进,改进后的算法代码与讲解链接:
[opencv完整项目详解] 传统图像算法解决路标的检测和识别(改进升级版)
目录
完整代码:
#include <iostream>
#include <opencv2/opencv.hpp>
#include <math.h>

using namespace std;
using namespace cv;

#define PI 3.1415926

struct BGR	// 定义BGR结构体
{
	uchar b;
	uchar g;
	uchar r;
};

struct HSV // 定义HSV结构体
{
	int h;
	double s;
	double v;
};

bool IsEquals(double val1, double val2)
{
	return fabs(val1 - val2) < 0.001;
}

// 将RGB格式转换为HSV格式
void BGR2HSV(BGR &bgr, HSV &hsv)
{
	double b, g, r;
	double h, s, v;
	double min, max;
	double delta;

	b = bgr.b / 255.0;
	g = bgr.g / 255.0;
	r = bgr.r / 255.0;

	if (r > g)
	{
		max = MAX(r, b);
		min = MIN(g, b);
	}
	else
	{
		max = MAX(g, b);
		min = MIN(r, b);
	}

	v = max;
	delta = max - min;

	if (IsEquals(max, 0))
	{
		s = 0.0;
	}
	else
	{
		s = delta / max;
	}

	if (max == min)
	{
		h = 0.0;
	}
	else
	{
		if (IsEquals(r, max) && g >= b)
		{
			h = 60 * (g - b) / delta + 0;
		}
		else if (IsEquals(r, max) && g < b)
		{
			h = 60 * (g - b) / delta + 360;
		}
		else if (IsEquals(g, max))
		{
			h = 60 * (b - r) / delta + 120;
		}
		else if (IsEquals(b, max))
		{
			h = 60 * (r - g) / delta + 240;
		}
	}

	hsv.h = (int)(h + 0.5);
	hsv.h = (hsv.h > 359) ? (hsv.h - 360) : hsv.h;
	hsv.h = (hsv.h < 0) ? (hsv.h + 360) : hsv.h;
	hsv.s = s;
	hsv.v = v;
}

// 填充算法(漫水天填充)
void fillHole(const Mat srcBw, Mat &dstBw)
{
	Size m_Size = srcBw.size();
	Mat Temp = Mat::zeros(m_Size.height + 2, m_Size.width + 2, srcBw.type());
	srcBw.copyTo(Temp(Range(1, m_Size.height + 1), Range(1, m_Size.width + 1)));

	cv::floodFill(Temp, Point(0, 0), Scalar(255));

	Mat cutImg;
	Temp(Range(1, m_Size.height + 1), Range(1, m_Size.width + 1)).copyTo(cutImg);

	dstBw = srcBw | (~cutImg);

}

//判断rect1与rect2是否有交集
bool isInside(Rect rect1, Rect rect2)
{
	Rect t = rect1&rect2;
	if (rect1.area() > rect2.area())
	{
		return false;
	}
	else
	{
		if (t.area() != 0)
			return true;
	}
}

int main()
{
	// 载入检测图片
	Mat srcImg = imread("./src/3.jpg");
	if (srcImg.empty())
	{
		cout << "找不到相关图像,检查路径" << endl;
		return 0;
	}

	// 限定图像长宽
	int width = srcImg.cols;//图像宽度
	int height = srcImg.rows;//图像高度
	if (width > 1920 || height >1080)
	{
		float factor = min((float)1920 / width, (float)1080 / height);
		resize(srcImg, srcImg, Size(factor*width, factor*height));
		width *= factor;
		height *= factor;
	}
	//cout << "width=" << width << ",height=" << height << endl;
	//imshow("srcImg", srcImg);
	//waitKey(0);

	// 第一步:分割红色颜色色块
	Mat matRgb = Mat::zeros(srcImg.size(), CV_8UC1);
	int x, y; //循环
	for (y = 0; y < height; y++)
		for (x = 0; x < width; x++)
		{
			// 获取BGR值
			BGR bgr;
			bgr.b = srcImg.at<Vec3b>(y, x)[0];
			bgr.g = srcImg.at<Vec3b>(y, x)[1];
			bgr.r = srcImg.at<Vec3b>(y, x)[2];

			HSV hsv;
			BGR2HSV(bgr, hsv); // bgr转hsv
			//红色范围
			if ((hsv.h >= 135 * 2 && hsv.h <= 180 * 2 || hsv.h >= 0 && hsv.h <= 10 * 2) && hsv.s * 255 >= 16
				&& hsv.s * 255 <= 255 && hsv.v * 255 >= 46 && hsv.v * 255 <= 255)
			{
				matRgb.at<uchar>(y, x) = 255;
			}// if
		}// for

	// 第二步:去噪相关处理
	medianBlur(matRgb, matRgb, 3);// 中值滤波
	medianBlur(matRgb, matRgb, 5);// 中值滤波
	Mat element = getStructuringElement(MORPH_ELLIPSE, Size(2 * 1 + 1, 2 * 1 + 1), Point(1, 1));
	Mat element1 = getStructuringElement(MORPH_ELLIPSE, Size(2 * 3 + 1, 2 * 3 + 1), Point(3, 3));
	erode(matRgb, matRgb, element);//腐蚀
	dilate(matRgb, matRgb, element1);//膨胀

	// 第三步:填充
	fillHole(matRgb, matRgb);//填充
	//imshow("fillHole", matRgb);
	//waitKey(0);

	// 第四步:找轮廓
	vector<vector<Point>>contours; //轮廓
	vector<Vec4i> hierarchy;//分层
	findContours(matRgb, contours, hierarchy, CV_RETR_EXTERNAL, CV_CHAIN_APPROX_SIMPLE, Point(0, 0));//寻找轮廓
	vector<vector<Point>> contours_poly(contours.size());  //近似后的轮廓点集
	vector<Rect> boundRect(contours.size());  //包围点集的最小矩形vector

	// 第五步:找轮廓的最小外接矩形
	for (int i = 0; i < contours.size(); i++)
	{
		approxPolyDP(Mat(contours[i]), contours_poly[i], 3, true); //对多边形曲线做适当近似,contours_poly[i]是输出的近似点集
		boundRect[i] = boundingRect(Mat(contours_poly[i])); //计算并返回包围轮廓点集的最小矩形
	}

	// 第六步:对提取出的轮廓进行去噪,筛选出交通标志
	Mat drawing = Mat::zeros(matRgb.size(), CV_8UC3);
	Mat imageContours1 = Mat::zeros(matRgb.size(), CV_8UC1); //最小外结圆画布
	vector<Mat> vec_roi;	// 存储筛选出的交通标志的图像信息
	vector<Rect> vec_rect;	// 存储交通标志相对于原图的roi区域
	for (int i = 0; i < contours.size(); i++)
	{
		Rect rect = boundRect[i];

		//1. 若轮廓矩形内部还包含着矩形,则将被包含的小矩形取消
		bool inside = false;
		for (int j = 0; j < contours.size(); j++)
		{
			Rect t = boundRect[j];
			if (rect == t)
				continue;
			else if (isInside(rect, t))
			{
				inside = true;
				break;
			}
		}// for
		if (inside)
			continue;

		//2.轮廓面积筛选
		float Area = (float)rect.width * (float)rect.height;
		float dConArea = (float)contourArea(contours[i]);
		float dConLen = (float)arcLength(contours[i], 1);
		if (dConArea < 300)
			continue;

		//3.高宽比筛选
		float ratio = (float)rect.width / (float)rect.height;
		if (ratio > 1.3 || ratio < 0.4)
			continue;

		// 筛选完成,进行存储
		Mat roi = srcImg(Rect(boundRect[i].tl(), boundRect[i].br()));
		vec_roi.push_back(roi);
		vec_rect.push_back(Rect(boundRect[i].tl(), boundRect[i].br()));

	}

	// 第七步:载入模板的交通标志
	Mat template_srcimg = imread("./template/template.jpg");
	cvtColor(template_srcimg, template_srcimg, COLOR_BGR2GRAY); //图像灰度化

	//第八步:遍历所有交通标志,进行相似度匹配
	Mat gray_template, gray_roi;
	for (int i = 0; i < vec_roi.size(); i++)
	{
		// 创建一个模板副本
		template_srcimg.copyTo(gray_template);
		Mat tmp_roi = vec_roi[i].clone();
		//1. tmp_roi图像 resize为方形
				tmp_roi.resize(min(tmp_roi.rows, tmp_roi.cols), min(tmp_roi.rows, tmp_roi.cols));
		//2. tmp_roi图像灰度化
		cvtColor(tmp_roi, gray_roi, COLOR_BGR2GRAY);
		//3. 与模板图像统一尺寸
		int w = gray_template.cols, h = gray_template.rows;
		resize(gray_roi, gray_roi, cv::Size(w, h));
		//4. 标记最大内接圆
		vector<vector<bool>> enclosingcircle_flag;
		Point center(0.5*w, 0.5*h);
		for (int col = 0; col < w; col++)
		{
			vector<bool> col_flag;
			for (int row = 0; row < h; row++)
			{
				bool flag;
				if (((col - center.x)*(col - center.x) + (row - center.y)*(row - center.y)) < center.x*center.x) // 内接圆内
					flag = true;
				else
					flag = false;
				col_flag.push_back(flag);
			}
			enclosingcircle_flag.push_back(col_flag);
		}
		//5.高斯滤波
		cv::GaussianBlur(gray_roi, gray_roi, cv::Size(7, 7), 3, 3);
		cv::GaussianBlur(gray_roi, gray_roi, cv::Size(5, 5), 3, 3);
		cv::GaussianBlur(gray_template, gray_template, cv::Size(7, 7), 3, 3);
		cv::GaussianBlur(gray_template, gray_template, cv::Size(5, 5), 3, 3);
		//6.二值化
		// 与图像的灰度值均值作为二值化的阈值
		int gray_mean1 = 0, gray_mean2 = 0;
		for (int x = 0; x < w; x++)
			for (int y = 0; y < h; y++) {
				gray_mean1 += gray_roi.at<uchar>(y, x);
				gray_mean2 += gray_template.at<uchar>(y, x);
			}
		gray_mean1 /= (w*h);
		gray_mean2 /= (w*h);
		threshold(gray_roi, gray_roi, gray_mean1, 255, cv::THRESH_BINARY_INV);
		threshold(gray_template, gray_template, gray_mean2, 255, cv::THRESH_BINARY_INV);
		//imshow("gray_roi.jpg", gray_roi);
		//imshow("gray_template.jpg", gray_template);
		//7. 相似度计算
		// 比较两个图255像素点的交集与并集的比值
		float jiaoji = 0, bingji = 0;
		for (int x = 0; x < w; x++)
			for (int y = 0; y < h; y++)
			{
				if (enclosingcircle_flag[x][y] == false)
					continue; // 不处于内接圆,跳过
				if (gray_roi.at<uchar>(y, x) == 255 && gray_template.at<uchar>(y, x) == 255)	//交集
					jiaoji++;
				if (gray_roi.at<uchar>(y, x) == 255 || gray_template.at<uchar>(y, x) == 255)	//并集
					bingji++;
			}
		float score = jiaoji / bingji;
		std::stringstream buf;
		buf.precision(3);//覆盖默认精度
		buf.setf(std::ios::fixed);//保留小数位
		buf << score;
		std::string str;
		str = buf.str();
		putText(srcImg, str, Point(vec_rect[i].x, vec_rect[i].y), FONT_HERSHEY_PLAIN, 2, Scalar(255, 255, 0), 2);
		//8. 相似度判断
		if (score > 0.7) // 判定通过
		{
			rectangle(srcImg, vec_rect[i], Scalar(255, 0, 0), 4, 8, 0); //相似度通过,画蓝框
		}
		else
		{
			rectangle(srcImg, vec_rect[i], Scalar(0, 0, 255), 4, 8, 0); //相似度不通过,画红框
		}
	}

	imshow("result.jpg", srcImg);//显示最终效果图
	waitKey(0);
	return 0;
}
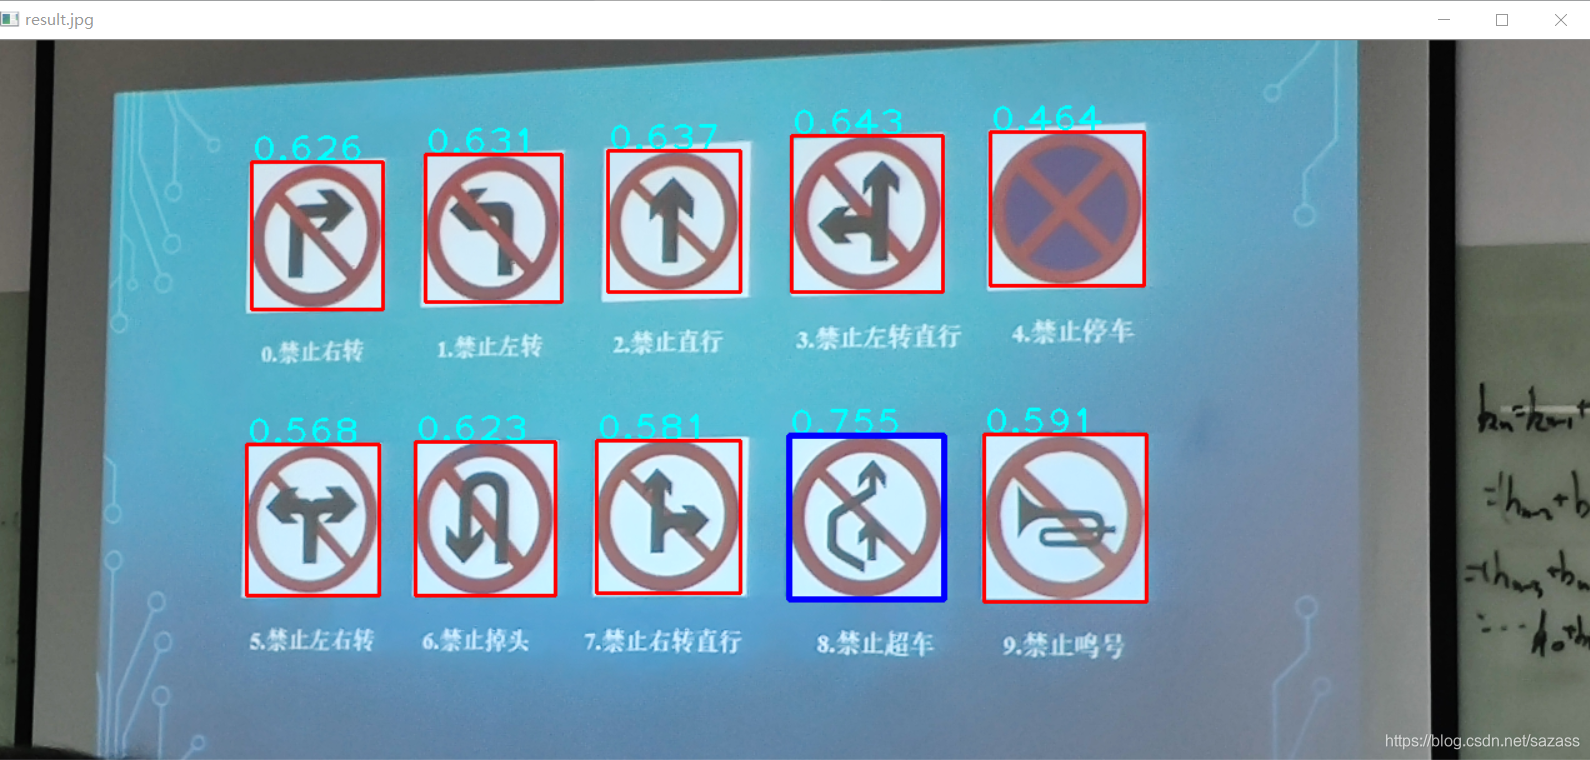
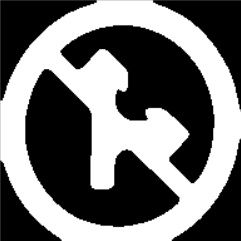
srcImg 就是我们的待检测图像,效果如下:
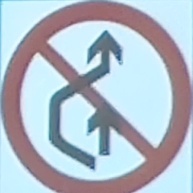
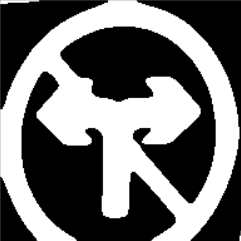
template_srcimg 就是我们需要检测的目标路标,效果如下:
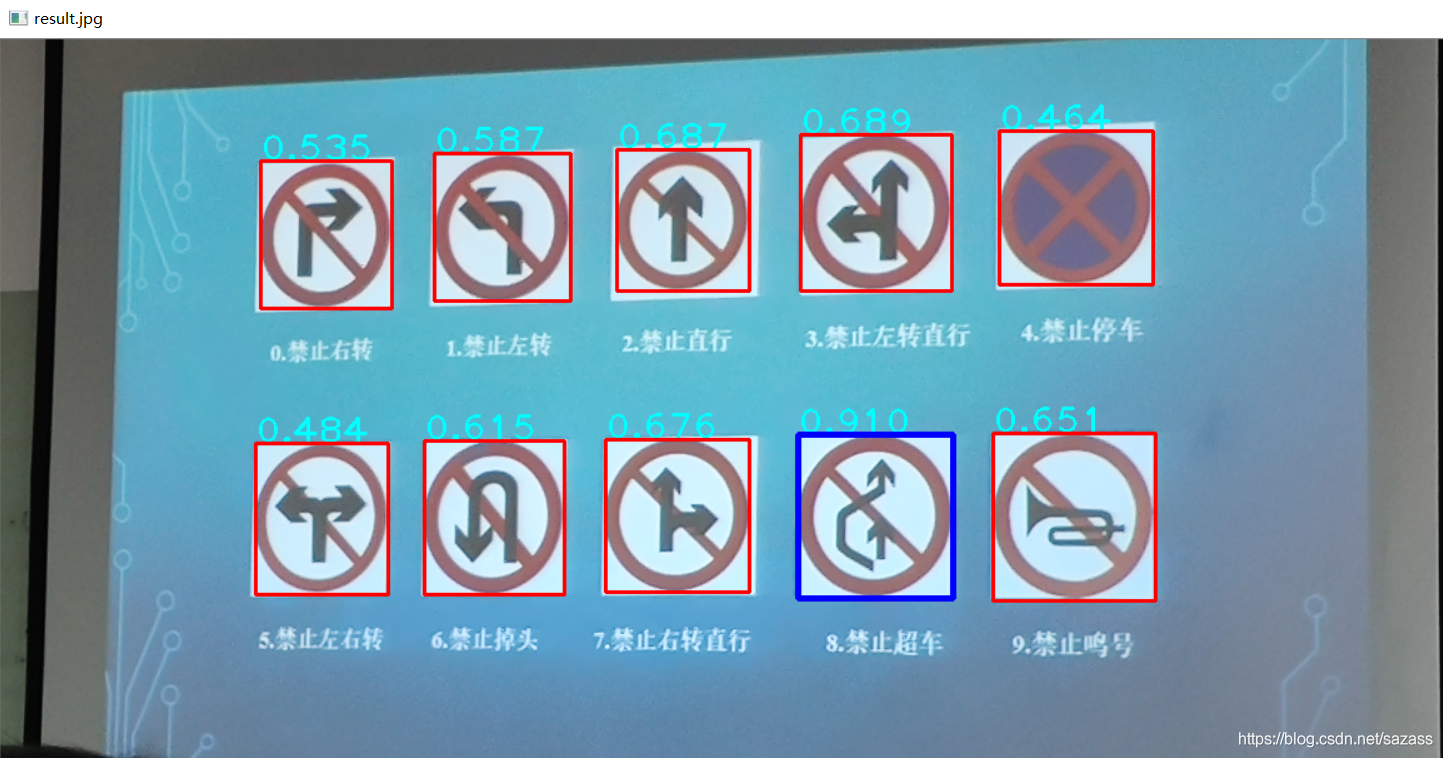
最终效果:

算法思路:
我们从整体上将这个算法分为检测和匹配两个阶段。检测阶段就是对整个图进行搜索,找出所有类似于路标的候选框;匹配阶段就是对之前从图像中获取的候选框进行一一的匹配,根据特定的匹配评估公式得出相似度,然后根据我们自己设定的阈值判断相似度是否达标,相似度达标则认定为为”禁止超车”标记,相似度不达标则认定为是干扰框。
检测阶段: 在这一阶段我们需要标记所有类似于路标的ROI区域,不能采用机器学习的方法,我们只能直接来寻找并且设定检测目标的特征。经过仔细观察后发现,这些路标的共同点特征就是路标的边缘一圈都是红色的圈。
因此,我们获取到两个主要特征:1.红色2.圆圈。并且我们根据这两个主要特征以及一些筛选就可以完成第一阶段的检测工作。
匹配阶段: 此时我们以获取候选的目标,并且我们的程序里存有一张搜索目标路标的模板。我们的工作就是判断我们找到的候选目标与我们模板的相似度,相似度高则可认为是匹配到了我们需要搜索的路牌,相似度低则认为这不是我们的需要搜索的路牌
代码讲解
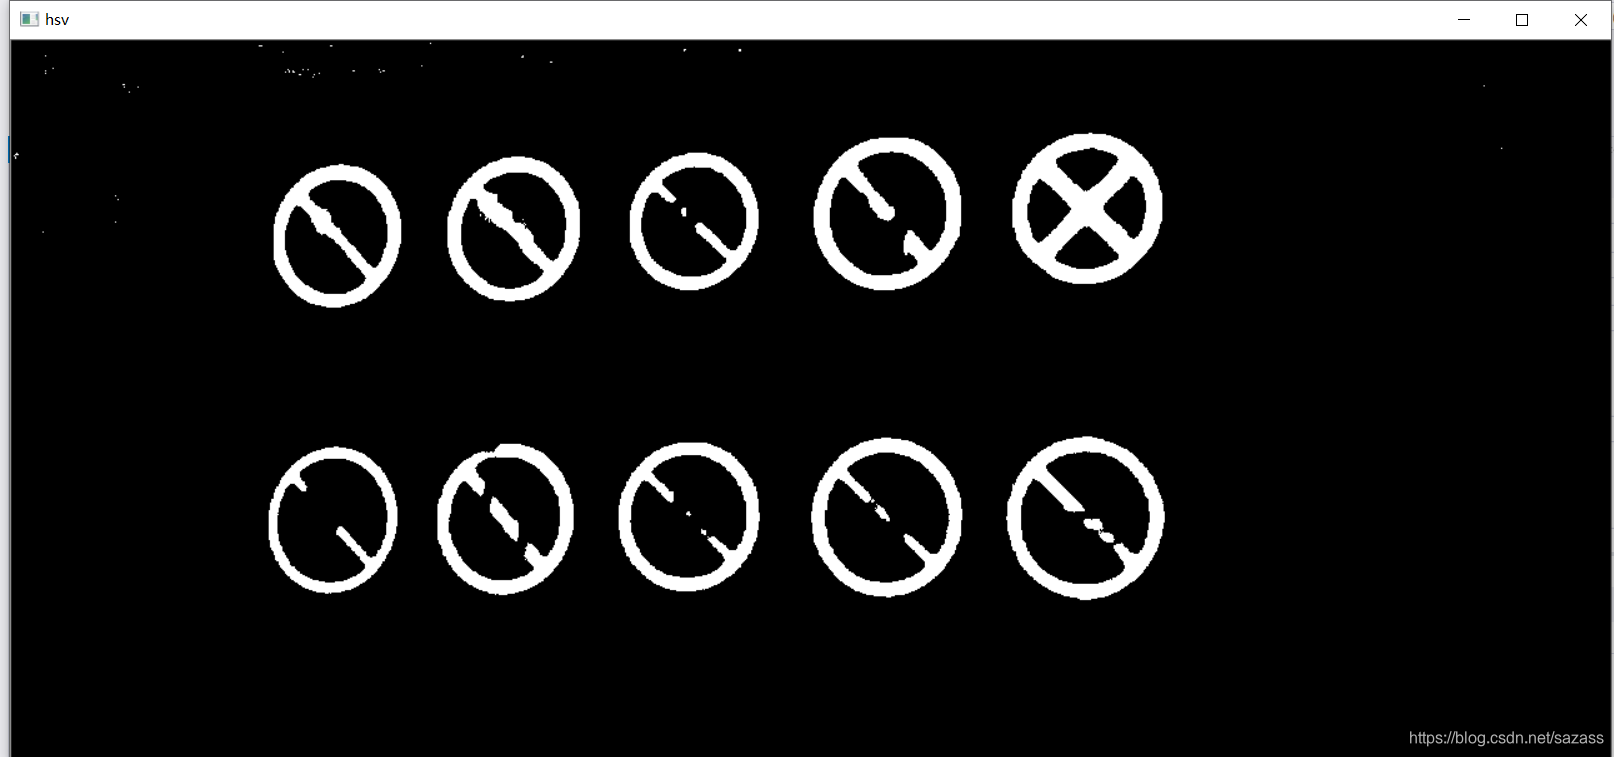
第一步:颜色分割
首先进行颜色提取,这需要我们先进行RGB转HSV,然后再筛选出红色范围内的区域.
颜色范围(该图H取值范围[0,180],S取值范围[0,255], V取值范围[0,255])
而我们代码中的范围:H取值范围[0,360],S取值范围[0,1],V取值范围[0,1]。
RGB转HSV的代码:
struct BGR	// 定义BGR结构体
{
	uchar b;
	uchar g;
	uchar r;
};

struct HSV // 定义HSV结构体
{
	int h;
	double s;
	double v;
};

bool IsEquals(double val1, double val2)
{
	return fabs(val1 - val2) < 0.001;
}

// 将RGB格式转换为HSV格式
void BGR2HSV(BGR &bgr, HSV &hsv)
{
	double b, g, r;
	double h, s, v;
	double min, max;
	double delta;

	b = bgr.b / 255.0;
	g = bgr.g / 255.0;
	r = bgr.r / 255.0;

	if (r > g)
	{
		max = MAX(r, b);
		min = MIN(g, b);
	}
	else
	{
		max = MAX(g, b);
		min = MIN(r, b);
	}

	v = max;
	delta = max - min;

	if (IsEquals(max, 0))
	{
		s = 0.0;
	}
	else
	{
		s = delta / max;
	}

	if (max == min)
	{
		h = 0.0;
	}
	else
	{
		if (IsEquals(r, max) && g >= b)
		{
			h = 60 * (g - b) / delta + 0;
		}
		else if (IsEquals(r, max) && g < b)
		{
			h = 60 * (g - b) / delta + 360;
		}
		else if (IsEquals(g, max))
		{
			h = 60 * (b - r) / delta + 120;
		}
		else if (IsEquals(b, max))
		{
			h = 60 * (r - g) / delta + 240;
		}
	}

	hsv.h = (int)(h + 0.5);
	hsv.h = (hsv.h > 359) ? (hsv.h - 360) : hsv.h;
	hsv.h = (hsv.h < 0) ? (hsv.h + 360) : hsv.h;
	hsv.s = s;
	hsv.v = v;
}
调用代码:
注,由于HSV取值范围的不同,映射对照表时,需要进行数值转换.
比如 H需要除以2,S需要乘以255,V需要乘以255.
int x, y; //循环
for (y = 0; y < height; y++)
	for (x = 0; x < width; x++)
	{
		// 获取BGR值
		BGR bgr;
		bgr.b = srcImg.at<Vec3b>(y, x)[0];
		bgr.g = srcImg.at<Vec3b>(y, x)[1];
		bgr.r = srcImg.at<Vec3b>(y, x)[2];

		HSV hsv;
		BGR2HSV(bgr, hsv); // bgr转hsv
		//红色范围
		if ((hsv.h >= 135 * 2 && hsv.h <= 180 * 2 || hsv.h >= 0 && hsv.h <= 10 * 2) && hsv.s * 255 >= 16
			&& hsv.s * 255 <= 255 && hsv.v * 255 >= 46 && hsv.v * 255 <= 255)
		{
			matRgb.at<uchar>(y, x) = 255;
		}// if
	}// for
imshow("hsv", matRgb);
waitKey(0);
效果:
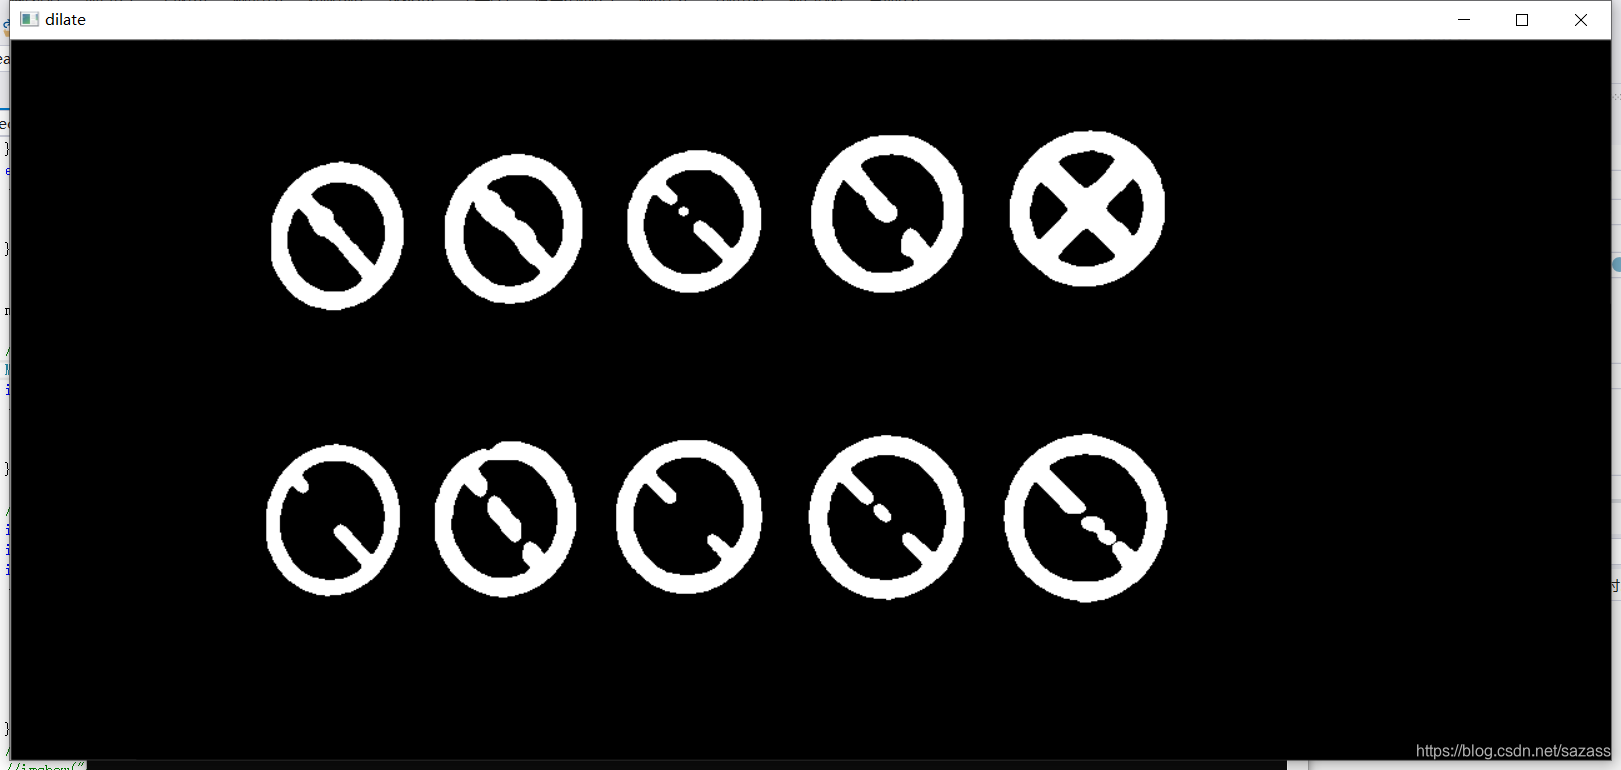
第二步:去噪
先进行两次中值滤波,再进行一个开运算.
medianBlur(matRgb, matRgb, 3);// 中值滤波
medianBlur(matRgb, matRgb, 5);// 中值滤波
Mat element = getStructuringElement(MORPH_ELLIPSE, Size(2 * 1 + 1, 2 * 1 + 1), Point(1, 1));
Mat element1 = getStructuringElement(MORPH_ELLIPSE, Size(2 * 3 + 1, 2 * 3 + 1), Point(3, 3));
erode(matRgb, matRgb, element);//腐蚀
dilate(matRgb, matRgb, element1);//膨胀
imshow("dilate", matRgb);
waitKey(0);
效果:
第三步:填充
// 填充算法(漫水天填充)
void fillHole(const Mat srcBw, Mat &dstBw)
{
	Size m_Size = srcBw.size();
	Mat Temp = Mat::zeros(m_Size.height + 2, m_Size.width + 2, srcBw.type());
	srcBw.copyTo(Temp(Range(1, m_Size.height + 1), Range(1, m_Size.width + 1)));
	cv::floodFill(Temp, Point(0, 0), Scalar(255));
	Mat cutImg;
	Temp(Range(1, m_Size.height + 1), Range(1, m_Size.width + 1)).copyTo(cutImg);
	dstBw = srcBw | (~cutImg);
}
调用:
fillHole(matRgb, matRgb);//填充
imshow("fillHole", matRgb);
waitKey(0);
效果:
第四步:找轮廓
findContours常规操作
// 第四步:找轮廓
vector<vector<Point>>contours; //轮廓
vector<Vec4i> hierarchy;//分层
findContours(matRgb, contours, hierarchy, CV_RETR_EXTERNAL, CV_CHAIN_APPROX_SIMPLE, Point(0, 0));//寻找轮廓
vector<vector<Point>> contours_poly(contours.size());  //近似后的轮廓点集
vector<Rect> boundRect(contours.size());  //包围点集的最小矩形vector
第五步:找轮廓的最小外接矩形
// 第五步:找轮廓的最小外接矩形
for (int i = 0; i < contours.size(); i++)
{
	approxPolyDP(Mat(contours[i]), contours_poly[i], 3, true); //对多边形曲线做适当近似,contours_poly[i]是输出的近似点集
	boundRect[i] = boundingRect(Mat(contours_poly[i])); //计算并返回包围轮廓点集的最小矩形
}
第六步:筛选轮廓
筛选轮廓,主要排除面积过小的,交叉的
// 第六步:对提取出的轮廓进行去噪,筛选出交通标志
Mat drawing = Mat::zeros(matRgb.size(), CV_8UC3);
Mat imageContours1 = Mat::zeros(matRgb.size(), CV_8UC1); //最小外结圆画布
vector<Mat> vec_roi;	// 存储筛选出的交通标志的图像信息
vector<Rect> vec_rect;	// 存储交通标志相对于原图的roi区域
for (int i = 0; i < contours.size(); i++)
{
	Rect rect = boundRect[i];

	//1. 若轮廓矩形内部还包含着矩形,则将被包含的小矩形取消
	bool inside = false;
	for (int j = 0; j < contours.size(); j++)
	{
		Rect t = boundRect[j];
		if (rect == t)
			continue;
		else if (isInside(rect, t))
		{
			inside = true;
			break;
		}
	}// for
	if (inside)
		continue;

	//2.轮廓面积筛选
	float Area = (float)rect.width * (float)rect.height;
	float dConArea = (float)contourArea(contours[i]);
	float dConLen = (float)arcLength(contours[i], 1);
	if (dConArea < 500)
		continue;

	//3.高宽比筛选
	float ratio = (float)rect.width / (float)rect.height;
	if (ratio > 1.3 || ratio < 0.4)
		continue;

	// 筛选完成,进行存储
	Mat roi = srcImg(Rect(boundRect[i].tl(), boundRect[i].br()));
	vec_roi.push_back(roi);
	vec_rect.push_back(Rect(boundRect[i].tl(), boundRect[i].br()));

}
第七步:载入模板
载入模板图,并设置为单通道
// 第七步:载入模板的交通标志
Mat template_srcimg = imread("./template/template.jpg");
cvtColor(template_srcimg, template_srcimg, COLOR_BGR2GRAY); //图像灰度化
第八步:相似度匹配
我们需要遍历所有的轮廓vec_roi.
Mat gray_template, gray_roi;
for (int i = 0; i < vec_roi.size(); i++)
{
''''''
}
以下,是一次迭代中的操作步骤:
8.1 轮廓与模板统一尺寸
先将该轮廓tmp_roiresize为方形,然后再resize与模板尺寸一致.
注:这其中发现一个不知原因的现象,使用resize时:
tmp_roi.resize(min(tmp_roi.rows, tmp_roi.cols), min(tmp_roi.rows, tmp_roi.cols));
最后结果准确率能达到0.9

而另一种resize方式,准确率只能达到0.7+,很迷.仅仅只是这一步的差异.
resize(tmp_roi, tmp_roi, cv::Size(min(tmp_roi.rows, tmp_roi.cols), min(tmp_roi.rows, tmp_roi.cols)));
(大家可以下载这边的图片,然后替换一个resize用法,在代码里测试,确实能准确复现到这个现象,目前不知道原因,不过当然采用了准确率更高的resize)
// 创建一个模板副本
template_srcimg.copyTo(gray_template);
Mat tmp_roi = vec_roi[i].clone();
//1. tmp_roi图像 resize为方形
tmp_roi.resize(min(tmp_roi.rows, tmp_roi.cols), min(tmp_roi.rows, tmp_roi.cols));
//2. tmp_roi图像灰度化
cvtColor(tmp_roi, gray_roi, COLOR_BGR2GRAY);
//3. 与模板图像统一尺寸
int w = gray_template.cols, h = gray_template.rows;
resize(gray_roi, gray_roi, cv::Size(w, h));
8.2 标记最大内接圆
这一步的意思就是相似度匹配只对最大内接圆内的像素点进行判断,不对最大内接圆之外的像素点进行判断,因为我们认定的路标都是圆形的.
我当时想不起来怎么再抠成一个圆形的ROI,就想到这个很好理解看起来又很蠢的方法,设置一个和图像尺寸一致的bool二维数组,分别标志对应的像素点是否是最大内接圆内.
//4. 标记最大内接圆
vector<vector<bool>> enclosingcircle_flag;
Point center(0.5*w, 0.5*h);
for (int col = 0; col < w; col++)
{
	vector<bool> col_flag;
	for (int row = 0; row < h; row++)
	{
		bool flag;
		if (((col - center.x)*(col - center.x) + (row - center.y)*(row - center.y)) < center.x*center.x) // 内接圆内
			flag = true;
		else
			flag = false;
		col_flag.push_back(flag);
	}
	enclosingcircle_flag.push_back(col_flag);
}
8.3 高斯滤波优化
同时对模板和目标的roi图进行高斯滤波,当时的想法就是进行一定的模糊,然后能够淡化一下细节上的差异.最终的实验也证明,进行高斯滤波后,得分提高了(在其他外景图中,得分会有较大提升).
想想,这就是论文中的消融实验吧.
未采用高斯滤波优化的结果
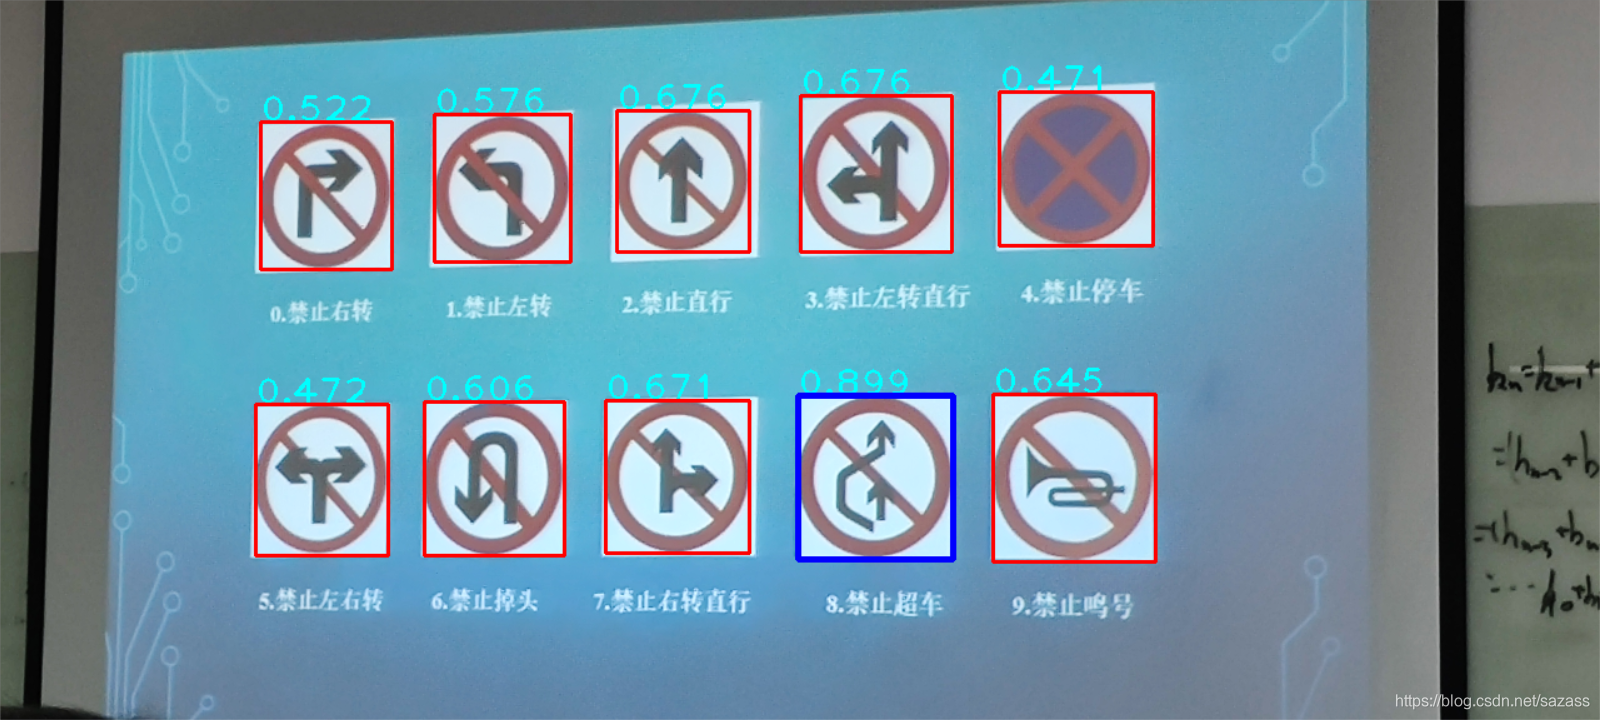
cv::GaussianBlur(gray_roi, gray_roi, cv::Size(7, 7), 3, 3);
cv::GaussianBlur(gray_roi, gray_roi, cv::Size(5, 5), 3, 3);
cv::GaussianBlur(gray_template, gray_template, cv::Size(7, 7), 3, 3);
cv::GaussianBlur(gray_template, gray_template, cv::Size(5, 5), 3, 3);
8.4 对两个图同时进行二值化
由于阈值不好确定,目前将灰度值的均值作为二值化的阈值.
注:在外景很容易失效,二值化这个操作比较适合于光照,背景都比较稳定的,比如机器视觉,黑盒子搞个工业光源,流水线产品检测,效果不错.
其实这个二值化对算法的泛性影响不好,测试其他算法出问题多半就是这个二值化的阈值选的不够好.
//6.二值化
// 与图像的灰度值均值作为二值化的阈值
int gray_mean1 = 0, gray_mean2 = 0;
for (int x = 0; x < w; x++)
	for (int y = 0; y < h; y++) {
		gray_mean1 += gray_roi.at<uchar>(y, x);
		gray_mean2 += gray_template.at<uchar>(y, x);
	}
gray_mean1 /= (w*h);
gray_mean2 /= (w*h);
threshold(gray_roi, gray_roi, gray_mean1, 255, cv::THRESH_BINARY_INV);
threshold(gray_template, gray_template, gray_mean2, 255, cv::THRESH_BINARY_INV);
//imshow("gray_roi.jpg", gray_roi);
//imshow("gray_template.jpg", gray_template);


8.5 相似度计算,相似度判断
简单介绍两种:
第一种,对最大内接圆内所有的像素点进行一一匹配,算法像素点相同的比例多少.
float sum = 0,similar=0;
float jiaoji = 0, bingji = 0;
for (int x = 0; x < w; x++)
	for (int y = 0; y < h; y++)
	{
		sum++;
		if (enclosingcircle_flag[x][y] == false)
			continue; // 不处于内接圆,跳过
		if (gray_roi.at<uchar>(y, x) == gray_template.at<uchar>(y, x))
			similar++; //内接圆内该像素点一致
	}

float score = similar / sum;
std::stringstream buf;
buf.precision(3);//覆盖默认精度
buf.setf(std::ios::fixed);//保留小数位
buf << score;
std::string str;
str = buf.str();
putText(srcImg, str, Point(vec_rect[i].x, vec_rect[i].y), FONT_HERSHEY_PLAIN, 2, Scalar(255, 255, 0), 2);
if (score > 0.7) // 判定通过
{
	rectangle(srcImg, vec_rect[i], Scalar(255, 0, 0), 4, 8, 0); //blue
}
else
{
	rectangle(srcImg, vec_rect[i], Scalar(0, 0, 255), 2, 8, 0); //red
}
效果:个人认为效果极差,可见相似度的计算方式也是非常重要的.
大家有兴趣可以复现

第二种,我们关心的其实就是路标中的白色标记是否一致,因此计算的方式就是两个图在最大内接圆内,值为255的像素点的交集占值为255的像素点的并集的比例.
// 比较两个图255像素点的交集与并集的比值
float jiaoji = 0, bingji = 0;
for (int x = 0; x < w; x++)
	for (int y = 0; y < h; y++)
	{
		if (enclosingcircle_flag[x][y] == false)
			continue; // 不处于内接圆,跳过
		if (gray_roi.at<uchar>(y, x) == 255 && gray_template.at<uchar>(y, x) == 255)	//交集
			jiaoji++;
		if (gray_roi.at<uchar>(y, x) == 255 || gray_template.at<uchar>(y, x) == 255)	//并集
			bingji++;
	}
float score = jiaoji / bingji;
std::stringstream buf;
buf.precision(3);//覆盖默认精度
buf.setf(std::ios::fixed);//保留小数位
buf << score;
std::string str;
str = buf.str();
putText(srcImg, str, Point(vec_rect[i].x, vec_rect[i].y), FONT_HERSHEY_PLAIN, 2, Scalar(255, 255, 0), 2);
//8. 相似度判断
if (score > 0.7) // 判定通过
{
	rectangle(srcImg, vec_rect[i], Scalar(255, 0, 0), 4, 8, 0); //相似度通过,画蓝框
}
else
{
	rectangle(srcImg, vec_rect[i], Scalar(0, 0, 255), 4, 8, 0); //相似度不通过,画红框
}
效果:个人感觉也就勉强及格
我对相似度计算方法是非常不满的.因为有一点点偏移就很有可能破坏相似度的得分.
我的想法就是滑动窗口机制,每次进行一定的偏移再进行匹配操作,最后取一个最优值.
后面也没什么兴趣搞了,听说只需要交个pdf报告就好了,也不需要进行什么测试,这种算法也没啥使用价值,随便一个深度学习模型就能甩几条街,就没有继续优化了.
最后总结:
问题其实是非常多的,主要体现在泛性上.
1.红色提取在外景非常容易与背景色混起来,颜色提取可能会有很多干扰,鲁棒性差.
2.圆形提取也有问题.外景存在透视效果,路标也不一定是圆形的啊,不固定视角,透视变换也没法确定.
3.二值化的阈值问题,真的头疼,传统视觉算法解决问题很容易遇到这个问题,一个图一种阈值.
4.相似度优化的问题二值化的图,随机的相似度就能达到0.5,匹配的图需要达到一个较高的得分,才可以与其他图进行区分.本文的相似度匹配算法,其实扩展到其他图也并不理想,可能需要更专业的相似度匹配算法才行.
其实深度学习解决检测和分类问题把传统算法具有很多巨大的优势.计算机自己寻找特征.本人找到两个特征本质上都有问题,都不好.但掌握一定的视觉算法基础也是很有必要的.适宜的视觉算法的预处理再加上深度学习的训练,能使效果更好.
这个算法感觉没啥实用价值,恩,留给后来人写大作业用吧.
收获:
有一种写论文的赶脚,加了一个高斯滤波,哎,发现数据变好了,哈哈,这要是论文代码感觉可以水论文了.
希望在复现论文的时候也有这样的灵感.
要是真的把论文水出来就好了,目前感觉SOTA算法真的是高不可攀…
!!!!
路标的检测和识别算法改进,改进后的算法代码与讲解链接:
[opencv完整项目详解] 传统图像算法解决路标的检测和识别(改进升级版)


 1234
1234

 被折叠的 条评论
为什么被折叠?
被折叠的 条评论
为什么被折叠?
 到【灌水乐园】发言


