


Spring IoC
一、IoC 概述
1、概述
IoC 全称为 Inversion of Control,即 控制反转,是一种设计思想,而不是一个具体的技术实现。
控制:控制对象的创建和销毁反转:将对象的控制权(创建和销毁)交给IoC容器(主动new对象 -> 到IoC容器中取)
2、IoC的原理
IoC(Inversion of Control)的原理基于两个重要的概念:依赖注入(Dependency Injection)和控制反转(Inversion of Control)。
-
依赖注入(Dependency Injection):
依赖注入是 IoC 的一个重要实现方式,它通过外部传递依赖对象的方式来实现组件之间的依赖关系。
简单来说,就是将一个对象所依赖的其他对象,通过构造函数、属性或者方法参数的方式注入到该对象中。这样,对象不需要自己创建和管理依赖对象,而是由外部容器负责注入依赖,从而实现了依赖关系的解耦。
-
控制反转(Inversion of Control):
控制反转是 IoC 的核心概念,它将程序的控制权从应用程序代码中反转到容器或者框架中。
传统的程序设计中,应用程序代码通常负责管理对象的创建、依赖关系的维护等,而在 IoC 中,这些控制权被转移到了外部容器或者框架中,由它们负责创建和管理对象,管理对象之间的依赖关系,并在需要时将对象注入到需要依赖的组件中。
3、IoC的作用
IoC(Inversion of Control)即控制反转,是一种软件设计思想,它将控制权从应用程序代码中转移至框架或容器,使得框架或容器负责控制程序的流程和对象的创建、销毁等行为。IoC 的作用主要体现在以下几个方面:
-
降低耦合性(Decoupling):
将组件之间的依赖关系从代码中解耦,通过将依赖关系交由容器管理,组件不再直接依赖于特定的实现类,而是依赖于抽象接口或者规范。这样,当需要替换某个实现类时,只需要修改配置文件或者注解,而不需要修改代码,从而降低了组件之间的耦合性。
-
简化代码(Simplifying Code):
通过 IoC 容器管理对象的生命周期和依赖关系,可以减少开发人员编写大量的样板代码,例如对象的创建、初始化、销毁等操作,使得代码更加简洁、清晰,并且易于维护。
-
集中管理(Centralized Management):
IoC 容器可以集中管理应用程序中的所有组件,包括对象的创建、依赖关系的管理、配置信息的管理等,从而提高了系统的可管理性和可维护性。
-
提高灵活性(Improving Flexibility):
由于依赖关系和配置信息被集中管理,可以通过修改配置文件或者注解来实现不同的配置,从而使得系统更加灵活,能够快速适应不同的需求和变化。
-
提高可测试性(Improving Testability):
由于依赖关系被注入到组件中,可以更方便地进行单元测试和集成测试,通过替换模拟对象或者配置不同的依赖关系,可以轻松地对组件进行测试,提高了系统的可测试性。
总的来说,IoC 通过将控制权从应用程序代码中转移至框架或容器,降低了组件之间的耦合性,简化了代码,集中了管理,提高了灵活性和可测试性,是一种强大的软件设计思想,被广泛应用于各种软件开发项目中。
4、Spring Bean
简单来说,Spring Bean 就是那些被 IoC 容器所管理的对象。(下文的 Bean 统一指 Spring Bean)
二、Bean 的声明
1、组件类
1)组件类声明
@Component:被该注解标注的类,会作为组件类。通过组件扫描,为组件类创建Bean。
@Target(ElementType.TYPE)
@Retention(RetentionPolicy.RUNTIME)
@Documented
@Indexed
public @interface Component {

	/**
	 * beanName
	 */
	String value() default "";

}
Spring容器中的所有的Bean都有一个name,默认是 将类名的第一个字母变为小写。
@Component("pc")
public class Computer {}
@Repository、@Service、@Controller这三个注解上都加了@Component,可以起到一样的效果。
@Repository:对应 持久层,主要用于数据库相关操作。@Service:对应 服务层,主要涉及一些复杂的逻辑,需要用到 持久层。@Controller:对应 控制层,主要用于 接受用户请求 并 调用 服务层 返回数据给前端页面。
2)组件类扫描
@ComponentScan:开启组件扫描。Spring会扫描指定位置下的组件类,并为组件类创建bean。
默认扫描 @ComponentScan 标注的配置类所在的包及这个包下的所有子包。
也可以手动指定扫描的包:
/**
 * 指定扫描的基础包(单个)
 */
@Configuration
@ComponentScan("package")
public class BeanConfig {}
/**
 * 指定扫描的基础包(多个)
 */
@Configuration
@ComponentScan(basePackages = {"package1","package2"})
public class BeanConfig {}
如果觉得指定包是类型不安全(not type-safe)的,也可以指定包中所包含的具体的类或接口:
/**
 * 这些类或接口所在的包,将会作为组件扫描的基础包
 */
@Configuration
@ComponentScan(basePackageClasses = {ClassA.class, ClassB.class, InterfaceA.class})
public class BeanConfig {}
2、@Bean
@Bean 配合 @Configuration
@Configuration
public class Config {
    @Bean
    public User user() {
        return new User();
    }
}
三、FactoryBean
1、FactoryBean
如果一个类 A 实现了 FactoryBean 接口,那么 类A 就变成了 “A工厂”。
getBean("a") 获得的实际上是调用 类A 的 getObject() 方法返回的对象,而不是对象 A。
/**
 * 实现FactoryBean后,会生成2个bean对象
 * 1、beanName = myFactoryBean   ------  getObject()返回的类 FactoryBeanObject
 * 2、beanName = &myFactoryBean  ------  FactoryBean的实现类 MyFactoryBean
 */
@Component
public class MyFactoryBean implements FactoryBean<FactoryBeanObject> {

    /**
     * 在`getBean`的时候才会调用(懒加载)
     */
    @Override
    public FactoryBeanObject getObject() {
        System.out.println("MyFactoryBean getObject execute");
        return new FactoryBeanObject();
    }

    @Override
    public Class<?> getObjectType() {
        return FactoryBeanObject.class;
    }

}

2、SmartFactoryBean
SmartFactoryBean 和 FactoryBean 类似,区别在于:
FactoryBean的getObject()不是在Spring启动时调用的,是在getBean的时候调用的,有点类似于懒加载。SmartFactoryBean可以设置是否在Spring容器启动时就调用getObject()方法。
@Component
public class MySmartFactoryBean implements SmartFactoryBean<SmartFactoryBeanObject> {

    @Override
    public SmartFactoryBeanObject getObject() {
        System.out.println("MySmartFactoryBean getObject execute");
        return new SmartFactoryBeanObject();
    }

    @Override
    public Class<?> getObjectType() {
        return SmartFactoryBeanObject.class;
    }

    /**
     * 是否在Spring容器启动时就调用getObject()方法
     */
    @Override
    public boolean isEagerInit() {
        return true;
    }

}
四、Bean 的作用域
1、bean的作用域
Spring官方文档中给出的bean的scope有五种
| value取值 | value描述 |
|---|---|
singleton | 单例,Spring容器只会创建该bean的唯一实例【默认】 |
prototype | 多例,每个请求都会创建一个新的实例 |
request | 每个 http request 都会创建一个新的实例【仅在 WebApplicationContext 中有效】 |
session | 每个 http session 都会创建一个新的实例【仅在 WebApplicationContext 中有效】 |
application | 全局的 http session 中,容器只会创建该bean的唯一实例【仅在 WebApplicationContext 中有效】 |
在BeanDefinition中只有两种scope,就是singleton和prototype
public interface BeanDefinition extends AttributeAccessor, BeanMetadataElement {
    String SCOPE_SINGLETON = ConfigurableBeanFactory.SCOPE_SINGLETON;	// singleton
    String SCOPE_PROTOTYPE = ConfigurableBeanFactory.SCOPE_PROTOTYPE;	// prototype
}
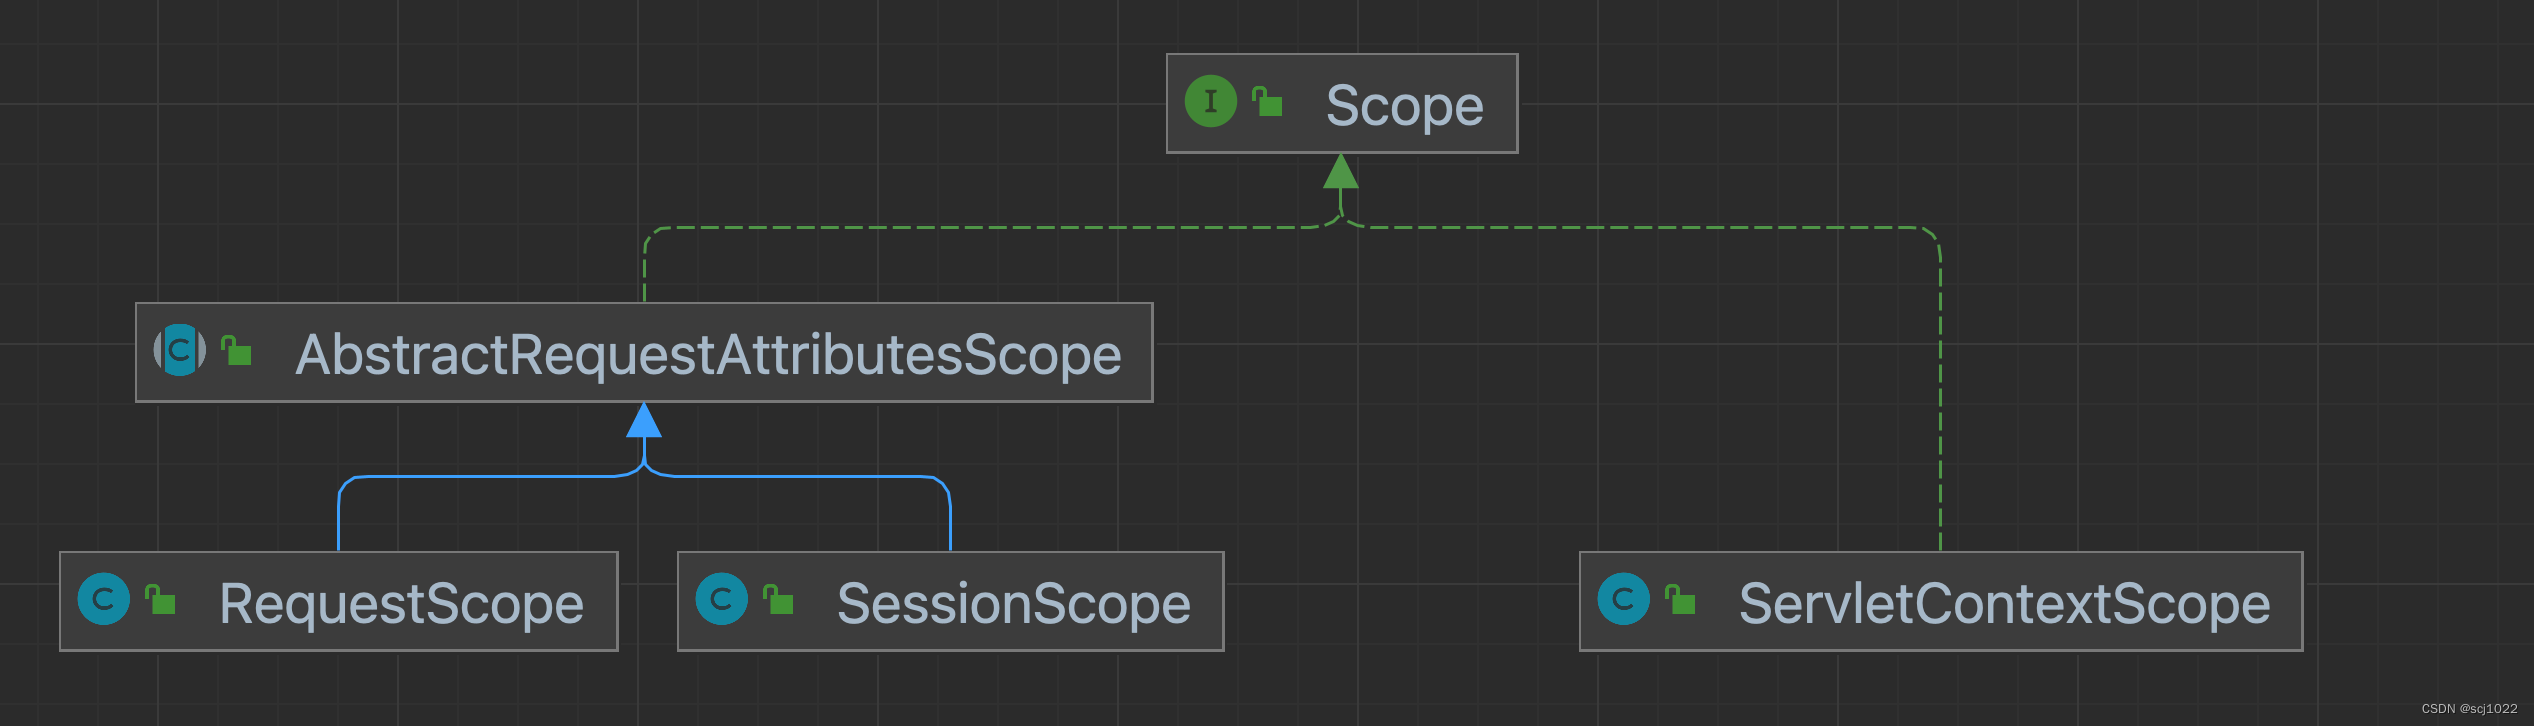
其余三种scope,都在WebApplicationContext中
package org.springframework.web.context;

public interface WebApplicationContext extends ApplicationContext {
    String ROOT_WEB_APPLICATION_CONTEXT_ATTRIBUTE = WebApplicationContext.class.getName() + ".ROOT";
    String SCOPE_REQUEST = "request";
    String SCOPE_SESSION = "session";
    String SCOPE_APPLICATION = "application";
    String SERVLET_CONTEXT_BEAN_NAME = "servletContext";
    String CONTEXT_PARAMETERS_BEAN_NAME = "contextParameters";
    String CONTEXT_ATTRIBUTES_BEAN_NAME = "contextAttributes";

    @Nullable
    ServletContext getServletContext();
}
2、@Scope 注解
@Scope注解加在Bean上方,可以设置bean的作用域
@Configuration
public class ScopeConfig {

    /**
     * 默认情况是单例bean
     */
    @Bean("singletonBean")
    public SingletonBean singletonBean() {
        return new SingletonBean();
    }

    /**
     * 多例bean需要加上 @Scope("prototype")
     */
    @Bean("prototypeBean")
    @Scope("prototype")
    public PrototypeBean prototypeBean() {
        return new PrototypeBean();
    }

}
public class ScopeTest {
    public static void main(String[] args) {
        ApplicationContext context = new AnnotationConfigApplicationContext(ScopeConfig.class);
        System.out.println(context.getBean("singletonBean"));
        System.out.println(context.getBean("singletonBean"));
        System.out.println(context.getBean("prototypeBean"));
        System.out.println(context.getBean("prototypeBean"));
    }
}
com.dmeo.spring.ioc.scope.model.SingletonBean@1ffe63b9
com.dmeo.spring.ioc.scope.model.SingletonBean@1ffe63b9
com.dmeo.spring.ioc.scope.model.PrototypeBean@6ac13091
com.dmeo.spring.ioc.scope.model.PrototypeBean@5e316c74
3、扩展 @Scope 注解
可以自定义注解,加上@Scope("prototype"),也能实现多例bean。
@Target({ElementType.METHOD, ElementType.ANNOTATION_TYPE, ElementType.TYPE})
@Retention(RetentionPolicy.RUNTIME)
@Scope("prototype")
public @interface CustomPrototype {

}
@Configuration
public class ScopeConfig {

    /**
     * 使用自定义注解声明多例bean
     */
    @Bean("customPrototypeBean")
    @CustomPrototype
    public PrototypeBean customPrototypeBean() {
        return new PrototypeBean();
    }

}
public class ScopeTest {
    public static void main(String[] args) {
        ApplicationContext context = new AnnotationConfigApplicationContext(ScopeConfig.class);
        System.out.println(context.getBean("customPrototypeBean"));
        System.out.println(context.getBean("customPrototypeBean"));
    }
}
com.dmeo.spring.ioc.scope.model.PrototypeBean@1e802ef9
com.dmeo.spring.ioc.scope.model.PrototypeBean@2b6faea6
4、单例bean & 单例模式
单例bean 和 单例模式 是有区别的:
- 单例模式:一个类只有一个实例
- 单例bean:一个beanName只会获取到一个实例(但是同一个类可能会有多个实例)
5、单例池
单例池:一个存放单例bean的Map集合
/** Cache of singleton objects: bean name --> bean instance */
private final Map<String, Object> singletonObjects = new ConcurrentHashMap<String, Object>(256);
单例bean的获取:
- 根据 beanName,到
singletonObjects单例池 中获取 bean。- 如果获取到了,直接返回
- 如果获取不到
- 调用
singletonFactory的createBean方法,创建单例bean - 创建成功以后,存入
singletonObjects单例池,并将引用返回。
- 调用
五、Bean 的生命周期
1、生命周期
Bean在Spring容器中从创建到销毁经历了若干个阶段:

# 实例化

1. Spring对bean进行实例化
		Spring 基于 BeanDefinition 对 bean 进行实例化,
		实例化的Instance封装在 BeanWrapper 对象中。

# 属性填充

2. Spring将值和依赖的bean填充到bean对应的属性中
		根据 BeanDefinition 获取 PropertyValues,填充属性到 BeanWrapper 中的 Instance。

# 初始化

3. 如果 bean 实现了 BeanNameAware 接口
		-> Spring会调用 setBeanName(String beanName) 方法

4. 如果 bean 实现了 BeanClassLoaderAware 接口
		-> Spring会调用 setBeanClassLoader(ClassLoader classLoader) 方法

4. 如果 bean 实现了 BeanFactoryAware 接口
		-> Spring会调用 setBeanFactory(BeanFactory beanFactory) 方法

5. 如果 bean 实现了 ApplicationContextAware 接口
		-> Spring会调用 setApplicationContext(ApplicationContext applicationContext) 方法

6. 如果 bean 实现了 BeanPostProcessor 接口
		-> Spring会调用 postProcessBeforeInitialization(Object bean, String beanName) 方法

7. 如果 bean 实现了 InitializingBean 接口
		-> Spring会调用 afterPropertiesSet() 方法

8. 如果 bean 定义时声明了初始化方法 initMethod()
		-> Spring会执行 自定义的初始化方法 initMethod()

9. 如果 bean 实现了 BeanPostProcessor 接口
		-> Spring会调用 postProcessAfterInitialization(Object bean, String beanName) 方法

-------------- Bean现在已经完全可用 ------------

# 销毁

10. 如果 bean 实现了 DisposableBean 接口
		-> Spring会调用 destroy() 方法,进行bean的销毁。

11. 如果 bean 定义时声明了销毁方法 destroyMethod()
		-> Spring会执行 自定义的销毁方法 destroyMethod()
2、代码演示
@Configuration
public class CycleConfig {

    /**
     * 指定 自定义初始化 & 自定义销毁 方法
     */
    @Bean(initMethod = "customInit", destroyMethod = "customDestroy")
    public BeanCycle beanCycle() {
        return new BeanCycle();
    }

}
/**
 * Bean的生命周期
 */
public class BeanLifecycle implements BeanNameAware, BeanClassLoaderAware, BeanFactoryAware,
		ApplicationContextAware, BeanPostProcessor, InitializingBean, DisposableBean  {

    public BeanLifecycle() {
        System.out.println("执行 构造方法");
    }

    @Override
    public void setBeanName(String name) {
        System.out.println("执行 BeanNameAware 的 setBeanName 方法");
    }

    @Override
    public void setBeanClassLoader(ClassLoader classLoader) {
        System.out.println("执行 BeanClassLoaderAware 的 setBeanClassLoader 方法");
    }

    @Override
    public void setBeanFactory(BeanFactory beanFactory) throws BeansException {
        System.out.println("执行 BeanFactoryAware 的 setBeanFactory 方法");
    }

    @Override
    public void setApplicationContext(ApplicationContext applicationContext) throws BeansException {
        System.out.println("执行 ApplicationContextAware 的 setApplicationContext 方法");
    }

    @PostConstruct
    void postConstruct() {
        System.out.println("执行 @PostConstruct 标记的方法");
    }

    @Override
    public Object postProcessBeforeInitialization(Object bean, String beanName) throws BeansException {
        // System.out.println("执行 BeanPostProcessor 的 postProcessBeforeInitialization 方法");
        return bean;
    }

    @Override
    public void afterPropertiesSet() {
        System.out.println("执行 InitializingBean 的 afterPropertiesSet 方法");
    }

    public void customInit() {
        System.out.println("执行 自定义的初始化方法 customInit");
    }

    @Override
    public Object postProcessAfterInitialization(Object bean, String beanName) throws BeansException {
        // System.out.println("执行 BeanPostProcessor 的 postProcessAfterInitialization 方法");
        return bean;
    }

    @PreDestroy
    void preDestroy() {
        System.out.println("执行 @PreDestroy 标记的方法");
    }

    @Override
    public void destroy() {
        System.out.println("执行 DisposableBean 的 destroy 方法");
    }

    public void customDestroy() {
        System.out.println("执行 自定义的销毁方法 customDestroy");
    }

}
/******* 启动服务 *******/

执行 构造方法

执行 BeanNameAware 的 setBeanName 方法
执行 BeanClassLoaderAware 的 setBeanClassLoader 方法
执行 BeanFactoryAware 的 setBeanFactory 方法
执行 ApplicationContextAware 的 setApplicationContext 方法
执行 @PostConstruct 标记的方法
执行 InitializingBean 的 afterPropertiesSet 方法
执行 自定义的初始化方法 customInit

/******* 关闭服务 *******/

执行 @PreDestroy 标记的方法
执行 DisposableBean 的 destroy 方法
执行 自定义的销毁方法 customDestroy
六、依赖注入
1、@Resource
@Resource 注解不是Spring提供的,是由JDK提供的(javax.annotation.Resource),但是解析是由Spring负责的。
@Component
public class InjectByResource {
    /**
     * 指定name(根据name)
     *   1)根据name有一个 -> 直接注入
     *   2)根据name没找到 -> 项目启动就会报错 NoSuchBeanDefinitionException
     *   3)根据name有多个 -> 项目启动就会报错 ConflictingBeanDefinitionException
     */
    @Resource(name = "red")
    private Color blue;

    /**
     * 指定type(先根据type,再根据name)
     *    1)根据type有一个 -> 直接注入
     *    2)根据type没找到 -> 抛错
     *    3)根据type有多个 -> 再根据name找
     */
    @Resource(type = Color.class)
    private Color white;

    /**
     * 都不指定(先根据name,再根据type)
     *    1)根据name有一个 -> 直接注入
     *    2)根据name没找到 -> 再根据type找
     *					  -> 根据type有一个 -> 直接注入
     *					  -> 根据type有多个 -> 抛错 NoUniqueBeanDefinitionException
     *    3)根据name有多个 -> 项目启动就会报错 ConflictingBeanDefinitionException
     */
    @Resource
	private Color green;
}
指定name:根据name找,找不到就报错。指定type:先根据type找,找不到就报错,找到多个再根据name筛选。都不指定:先根据name找,找到多个就报错,找不到再根据type找。
2、@Autowired
1)Field变量注入
@Component
public class InjectByAutowired {
    /**
     * 先byType
     *     1)根据type有一个 -> 直接注入
     *     2)根据type有多个 -> 再根据name筛选
     *
     * 再byName
     *     1)根据name有一个 -> 直接注入
     *     2)根据name没找到 -> 项目启动就会报错 NoUniqueBeanDefinitionException(type有多个,name不存在)
     *     3)根据name有多个 -> 项目启动就会报错 ConflictingBeanDefinitionException
     */
    @Autowired
    private Color blue;

    /**
     * 如果根据type找到多个,需要根据name进一步筛选,@Qualifier 可以指定筛选的name
     * 例如:根据 Color 找到多个
     * 	   1)不加 @Qualifier -> 根据 green 进一步筛选(变量名)
     * 	   2)加了 @Qualifier -> 根据 red 进一步筛选(@Qualifier指定的name)
     */
    @Autowired
    @Qualifier("red")
    private Color green;

    /**
     * required属性(默认为true)
     *     1)required=false -> 找不到bean时,注入null
     *     2)required=true  -> 找不到bean时,报错
     */
    @Autowired(required = false)
    private NotExistBeanObj notExistBeanObj;

}
2)Setter方法注入
@Component
public class OrderService {
    // 待注入的属性
    private DependencyA dependencyA;
    private DependencyB dependencyB;
    private DependencyC dependencyC;

    // 参数是 要注入的对象
    @Autowired
    public void setDependencyA(DependencyA dependencyA) {
        this.dependencyA = dependencyA;
    }

    @Autowired
    public void setDependencyB(DependencyB dependencyB) {
        this.dependencyB = dependencyB;
    }

    @Autowired
    public void setDependencyC(DependencyC dependencyC) {
        this.dependencyC = dependencyC;
    }
}
3)构造器注入(推荐)
@Component
public class OrderService {
    // 待注入的属性
    private DependencyA dependencyA;
    private DependencyB dependencyB;
    private DependencyC dependencyC;

    // 参数是 要注入的对象
    @Autowired
    public OrderService(DependencyA dependencyA, DependencyB dependencyB, DependencyC dependencyC) {
        this.dependencyA = dependencyA;
        this.dependencyB = dependencyB;
        this.dependencyC = dependencyC;
    }
}
在 Spring4.3 之后,如果我们的类中只有单个构造函数,那么Spring就会实现一个隐式的自动注入(可省略@Autowired)
@Component
public class OrderService {
    // 待注入的属性
    private DependencyA dependencyA;
    private DependencyB dependencyB;
    private DependencyC dependencyC;

    // 参数是 要注入的对象
    public OrderService(DependencyA dependencyA, DependencyB dependencyB, DependencyC dependencyC) {
        this.dependencyA = dependencyA;
        this.dependencyB = dependencyB;
        this.dependencyC = dependencyC;
    }
}
3、@RequiredArgsConstructor
@RequiredArgsConstructor 是 Lombok 提供的一个注解,作用是:
- 当一个类中包含
final或@NonNull注解修饰的字段时,这个注解会为该类自动生成一个包含这些字段的构造函数。
1)基本功能
@RequiredArgsConstructor
public class Person {
    @NonNull
    private String name;
    private final Integer age;
    private String address;
}
上面的代码使用 @RequiredArgsConstructor 注解后,Lombok 会自动生成以下代码:
public class Person {
    private @NonNull String name;
    private final Integer age;
    private String address;

    public Person(final @NonNull String name, final Integer age) {
        if (name == null) {
            throw new NullPointerException("name is marked non-null but is null");
        } else {
            this.name = name;
            this.age = age;
        }
    }
}
2)注入功能
在 Spring4.3 之后,如果我们的类中只有单个构造函数,那么Spring就会实现一个隐式的自动注入(可省略@Autowired)
因此,@RequiredArgsConstructor 可以实现构造器注入,而且可以避免冗余的构造方法。
@RequiredArgsConstructor
@Component
public class OrderService {
    // 待注入的属性
    private final DependencyA dependencyA;
    private final DependencyB dependencyB;
    private final DependencyC dependencyC;
}
注意,使用@RequiredArgsConstructor 注入时,最好别再写其他构造方法,避免造成影响(参考「构造器注入 案例分析」)
4、@Bean + @Configuration
可以看到,@Bean的autowire属性已经被打上了@Deprecated,这里主要看一下 default Autowire.NO。
@Target({ElementType.METHOD, ElementType.ANNOTATION_TYPE})
@Retention(RetentionPolicy.RUNTIME)
@Documented
public @interface Bean {
    // ...

    @Deprecated
	Autowire autowire() default Autowire.NO;

    // ...
}
1)同一配置类
同一配置类中,可以直接引用依赖对象的@Bean方法进行注入(必须在同一配置类中)
@Configuration
public class Config {

    /**
     * orderService()方法上添加了@Bean注解,Spring将会拦截所有对它的调用,
     * 确保直接返回该方法所创建的bean,而不是每次都对其进行实际的调用。
     */
    @Bean
    public OrderService orderService() {
        return new OrderService();
    }

    @Bean
    public UserService userService() {
        return new UserService(orderService());
    }

}
注意:看起来 UserService 对应的bean 是通过调用 orderService() 得到的,但情况并非完全如此。
默认情况下,@Configuration 标记的 Config 是代理对象,因此调用的 orderService() 是代理类调用的
- 如果 OrderService 对应的bean不存在,会创建对应的bean
- 如果 OrderService 对应的bean已存在,会直接返回已存在的bean
也就是说,每次调用 orderService() 方法,得到的都是同一个bean
2)不同配置类
不同配置类中,可以通过@Bean修饰方法的参数进行注入(不需要在统一配置类也可以)
@Configuration
public class Config1 {
    @Bean
    public OrderService orderService() {
        return new OrderService();
    }
}
@Configuration
public class Config2 {
    // 创建UserService的bean时,会自动装配一个OrderService
    @Bean
    public UserService userService(OrderService orderService) {
        return new UserService(orderService);
    }
}
这样在构建UserService的bean时,Spring会找到OrderService的bean,并传入@Bean方法构建UserService的bean。
5、构造器注入 案例分析
1)单个构造
在 Spring4.3 之后,如果我们的类中只有单个构造函数,那么Spring就会实现一个隐式的自动注入(可省略@Autowired)
/**
 * 使用空参构造实例化
 */
@Component
public class UserService {

    private User user;

    public UserService() {
    }

}
/**
 * 使用有参构造实例化
 */
@Component
public class UserService {

    private User user;

    public UserService(User user) {
        this.user = user;
    }

}
2)空参构造 + 有参构造
/**
 * 空参构造 + 有参构造
 * ① 没有@Autowired --> 默认使用空参构造(不会注入InjectService)
 * ② 一个@Autowired --> 使用@Autowired标记的构造方法
 * ③ 多个@Autowired --> 报错:Invalid autowire-marked constructor ...
 *							 Found constructor with 'required' Autowired annotation already
 */
@Component
public class ManyConstruction1 {

    public InjectService injectService;

    public ManyConstruction1() {
    }

    @Autowired
    public ManyConstruction1(InjectService injectService) {
        this.injectService = injectService;
    }

}
3)多个有参构造
/**
 * 多个有参构造
 * ① 没有@Autowired --> 报错:No default constructor found;
 *							 nested exception is java.lang.NoSuchMethodException:
 *							 com.demo.spring.ioc.inject.construct.ManyConstruction2.<init>()
 * ② 一个@Autowired --> 使用@Autowired标记的构造方法
 * ③ 多个@Autowired --> 报错:Invalid autowire-marked constructor ...
 *							 Found constructor with 'required' Autowired annotation already
 */
@Component
public class ManyConstruction2 {

    public InjectService injectService;
    public InjectService2 injectService2;

    @Autowired
    public ManyConstruction2(InjectService injectService) {
        this.injectService = injectService;
    }

    public ManyConstruction2(InjectService injectService1, InjectService2 injectService2) {
        this.injectService = injectService1;
        this.injectService2 = injectService2;
    }

}
4)多个 @Autowired(false)
/**
 * 如果多个@Autowired都声明了required = false,不会报错
 * ① 优先使用「参数最多」的构造方法
 * ② 如果参数多的构造方法的参数bean不存在/找不到 --> 使用「参数第二多」的构造方法(以此类推)
 * ③ 如果存在参数一样多的构造方法 --> 使用「声明在上面」的构造方法
 */
@Component
public class ManyConstruction3 {

    public InjectService injectService;
    public InjectService2 injectService2;
    public NoBeanObject noBeanObject;

    public ManyConstruction3() {
    }

    @Autowired(required = false)
    public ManyConstruction3(InjectService injectService) {
        System.out.println("使用了1个参数的构造方法1");
        this.injectService = injectService;
    }

    @Autowired(required = false)
    public ManyConstruction3(InjectService2 injectService2) {
        System.out.println("使用了1个参数的构造方法2");
        this.injectService2 = injectService2;
    }

    @Autowired(required = false)
    public ManyConstruction3(InjectService injectService, InjectService2 injectService2) {
        System.out.println("使用了2个参数的构造方法");
        this.injectService = injectService;
        this.injectService2 = injectService2;
    }

    @Autowired(required = false)
    public ManyConstruction3(InjectService injectService, InjectService2 injectService2, NoBeanObject noBeanObject) {
        System.out.println("使用了3个参数的构造方法");
        this.injectService = injectService;
        this.injectService2 = injectService2;
        this.noBeanObject = noBeanObject;
    }

}
6、特殊案例
父类中 @Autowired 修饰的属性:会被注入
public class BaseService {

    // 是否会被注入??
    @Autowired
    public UserService userService;

}

@Component
public class OrderService extends BaseService {

    private void test() {
        System.out.println(userService); // 会被注入!
    }

}
static修饰的属性:不会被注入
@Component
public class OrderService {

    // 是否会被注入??
    @Autowired
    private static UserService userService;

    private void test() {
        System.out.println(userService); // null 不会被注入
    }

}


 1万+
1万+

 被折叠的 条评论
为什么被折叠?
被折叠的 条评论
为什么被折叠?
 到【灌水乐园】发言


