


背景
目前已经搭建好了mysql主从架构,参考这篇博文:Mysql主从架构搭建保姆级教程-CSDN博客,需要再业务层面使用ShardingJDBC作为中间件来实现读写分离,提高数据查询效率。
这篇文章使用 ShardingSphere 中的JDBC方式,并通过JAVA SDK形式引入spring cloud工程,实现轻量级的读写分离功能。
Sharding Sphere介绍
Apache ShardingSphere 是一款分布式的数据库生态系统, 可以将任意数据库转换为分布式数据库,并通过数据分片、弹性伸缩、加密等能力对原有数据库进行增强。
Apache ShardingSphere 设计哲学为 Database Plus,旨在构建异构数据库上层的标准和生态。 它关注如何充分合理地利用数据库的计算和存储能力,而并非实现一个全新的数据库。 它站在数据库的上层视角,关注它们之间的协作多于数据库自身。
思路
maven中引入依赖,通过bean配置数据源然后在yml中配置主从数据源、负载策略等即可。
下面直接贴代码
代码
1 pom.xml
pom依赖如下,网络上有很多pom依赖但是经常出现yml不生效的问题。这篇文章采用javabean的形式管理,配置自己参考官网文档选用需要的进行自定义即可。
<dependency>
    <groupId>com.alibaba</groupId>
    <artifactId>druid-spring-boot-starter</artifactId>
</dependency>

<dependency>
    <groupId>org.springframework.boot</groupId>
    <artifactId>spring-boot-starter-jdbc</artifactId>
</dependency>

<dependency>
    <groupId>com.mysql</groupId>
    <artifactId>mysql-connector-j</artifactId>
    <version>${mysql.connector.version}</version>
</dependency>

<!-- ShardingJDBC 依赖 -->
<dependency>
    <groupId>org.apache.shardingsphere</groupId>
    <artifactId>shardingsphere-jdbc-core</artifactId>
    <version>${sharding.jdbc.version}</version>
</dependency>
2 yml配置
spring:
  # 读写分离主从配置
  shardingsphere:
    datasource:
      master:
        name: ds_master
        type: com.alibaba.druid.pool.DruidDataSource
        driver-class-name: com.mysql.cj.jdbc.Driver
        url: jdbc:mysql://172.16.10.113:16030/bdcp_api_service?useSSL=false&useUnicode=true&characterEncoding=utf-8&zeroDateTimeBehavior=convertToNull&transformedBitIsBoolean=true&tinyInt1isBit=false&allowMultiQueries=true&serverTimezone=GMT%2B8
        username: root
        password: DQx!wBdV#7
      slave1:
        name: ds_slave_1
        type: com.alibaba.druid.pool.DruidDataSource
        driver-class-name: com.mysql.cj.jdbc.Driver
        url: jdbc:mysql://172.16.10.112:16030/bdcp_api_service?useSSL=false&useUnicode=true&characterEncoding=utf-8&zeroDateTimeBehavior=convertToNull&transformedBitIsBoolean=true&tinyInt1isBit=false&allowMultiQueries=true&serverTimezone=GMT%2B8
        username: root
        password: DQx!wBdV#7
      slave2:
        name: ds_slave_2
        type: com.alibaba.druid.pool.DruidDataSource
        driver-class-name: com.mysql.cj.jdbc.Driver
        url: jdbc:mysql://172.16.10.114:16030/bdcp_api_service?useSSL=false&useUnicode=true&characterEncoding=utf-8&zeroDateTimeBehavior=convertToNull&transformedBitIsBoolean=true&tinyInt1isBit=false&allowMultiQueries=true&serverTimezone=GMT%2B8
        username: root
        password: DQx!wBdV#7
3 代码配置
3.1 自定义配置文件
@Data
@NoArgsConstructor
@AllArgsConstructor
public class ApiDsProperties {

    private String name;
    private String type;
    private String driverClassName;
    private String url;
    private String username;
    private String password;

}
@Data
@RefreshScope
@Component
@ConfigurationProperties(prefix = "spring.shardingsphere.datasource")
public class ShardingSphereProperties {


    private ApiDsProperties master;

    private ApiDsProperties slave1;

    private ApiDsProperties slave2;


}
3.2 主从数据源配置
根据上述文件格式配置即可
import com.alibaba.druid.pool.DruidDataSource;
import com.dsj.prod.apiservice.biz.properties.ApiDsProperties;
import com.dsj.prod.apiservice.biz.properties.ShardingSphereProperties;
import org.apache.shardingsphere.driver.api.ShardingSphereDataSourceFactory;
import org.apache.shardingsphere.readwritesplitting.api.ReadwriteSplittingRuleConfiguration;
import org.apache.shardingsphere.readwritesplitting.api.rule.ReadwriteSplittingDataSourceRuleConfiguration;
import org.springframework.context.annotation.Bean;
import org.springframework.context.annotation.Configuration;
import org.springframework.jdbc.core.JdbcTemplate;

import javax.annotation.Resource;
import javax.sql.DataSource;
import java.sql.SQLException;
import java.util.*;

@Configuration
public class DataSourceConfig {


    public static final String RANDOM = "random";

    @Resource
    private ShardingSphereProperties shardingSphereProperties;

    @Bean
    public DataSource dataSource() throws SQLException {
        Map<String, DataSource> dataSourceMap = createDataSource();
        // 配置读写分离规则
        ReadwriteSplittingDataSourceRuleConfiguration dataSourceRuleConfig = new ReadwriteSplittingDataSourceRuleConfiguration(
                RANDOM,
                null,//禁用自动感知主库
                shardingSphereProperties.getMaster().getName(),
                Arrays.asList(shardingSphereProperties.getSlave1().getName(), shardingSphereProperties.getSlave2().getName()),
                "ROUND_ROBIN"
        );
        Properties props = new Properties();
        // 打印sql
        props.setProperty("sql-show", Boolean.TRUE.toString());

        ReadwriteSplittingRuleConfiguration ruleConfig = new ReadwriteSplittingRuleConfiguration(Collections.singleton(dataSourceRuleConfig), Collections.emptyMap());
        return ShardingSphereDataSourceFactory.createDataSource( dataSourceMap, Collections.singleton(ruleConfig), props);
    }


    /**
     * @return {@link Map< String, DataSource>}
     * @description: 创建数据源
     * @version v1.0.0
     * @since 12:59 PM 2023/12/5
     **/
    private Map<String, DataSource> createDataSource() {
        Map<String, DataSource> dataSourceMap = new HashMap<>();
        // 一主两从
        ApiDsProperties master = shardingSphereProperties.getMaster();
        ApiDsProperties slave1 = shardingSphereProperties.getSlave1();
        ApiDsProperties slave2 = shardingSphereProperties.getSlave2();

        DruidDataSource masterDataSource = new DruidDataSource();
        masterDataSource.setUsername(master.getUsername());
        masterDataSource.setPassword(master.getPassword());
        masterDataSource.setDriverClassName(master.getDriverClassName());
        masterDataSource.setUrl(master.getUrl());
        dataSourceMap.put(master.getName(), masterDataSource);

        DruidDataSource slave1DataSource = new DruidDataSource();
        slave1DataSource.setUsername(slave1.getUsername());
        slave1DataSource.setPassword(slave1.getPassword());
        slave1DataSource.setDriverClassName(slave1.getDriverClassName());
        slave1DataSource.setUrl(slave1.getUrl());
        dataSourceMap.put(slave1.getName(), slave1DataSource);

        DruidDataSource slave2DataSource = new DruidDataSource();
        slave2DataSource.setUsername(slave2.getUsername());
        slave2DataSource.setPassword(slave2.getPassword());
        slave2DataSource.setDriverClassName(slave2.getDriverClassName());
        slave2DataSource.setUrl(slave2.getUrl());
        dataSourceMap.put(slave2.getName(), slave2DataSource);
        return dataSourceMap;
    }


    @Bean
    public JdbcTemplate jdbcTemplate(DataSource dataSource) {
        return new JdbcTemplate(dataSource);
    }
}
测试
这里使用jdbctemplate进行读取测试。测试的环境如下:
ds_master 主库
ds_slave_1 从库1
ds_slave_1 从库2
测试表 test_table
测试库 使用自己新建的
-- 创建测试库
CREATE DATABASE bdcp_api_service;

-- 创建测试表
CREATE TABLE `test_table` (
  `id` int NOT NULL AUTO_INCREMENT,
  `name` varchar(100) COLLATE utf8mb4_general_ci DEFAULT NULL,
  `created_at` timestamp NULL DEFAULT CURRENT_TIMESTAMP,
  PRIMARY KEY (`id`)
) ENGINE=InnoDB AUTO_INCREMENT=28 DEFAULT CHARSET=utf8mb4 COLLATE=utf8mb4_general_ci;

-- 模拟插入几条数据
insert into test_table (name) values ('data1');
insert into test_table (name) values ('data2');
insert into test_table (name) values ('data3');
测试端点代码:
/**
 * 读写分离测试控制器
 *
 * @title 读写分离测试控制器
 * @package com.dsj.prod.apiService.controller
 */
@Api(value = "读写分离测试控制器", tags = "读写分离测试控制器")
@Slf4j
@RestController
@RequestMapping("/test-read-write-separation")
public class TestReadWriteSeparationController {

    @Resource
    private JdbcTemplate jdbcTemplate;

    @GetMapping("/read-data")
    public R<Object> readData() throws SQLException {
        String sql = "select * from test_table";
        List<Map<String, Object>> resultList = jdbcTemplate.queryForList(sql);
        log.info("读数据成功: {}", resultList);

        return R.ok(resultList);
    }

    @PostMapping("/write-data")
    public R<Object> writeData(String name) throws SQLException {
        // 需要预编译
        String sql = "insert into test_table (name) values (?)";
        jdbcTemplate.update(sql, name);
        log.info("写数据成功");

        return R.ok("写数据成功");
    }

}
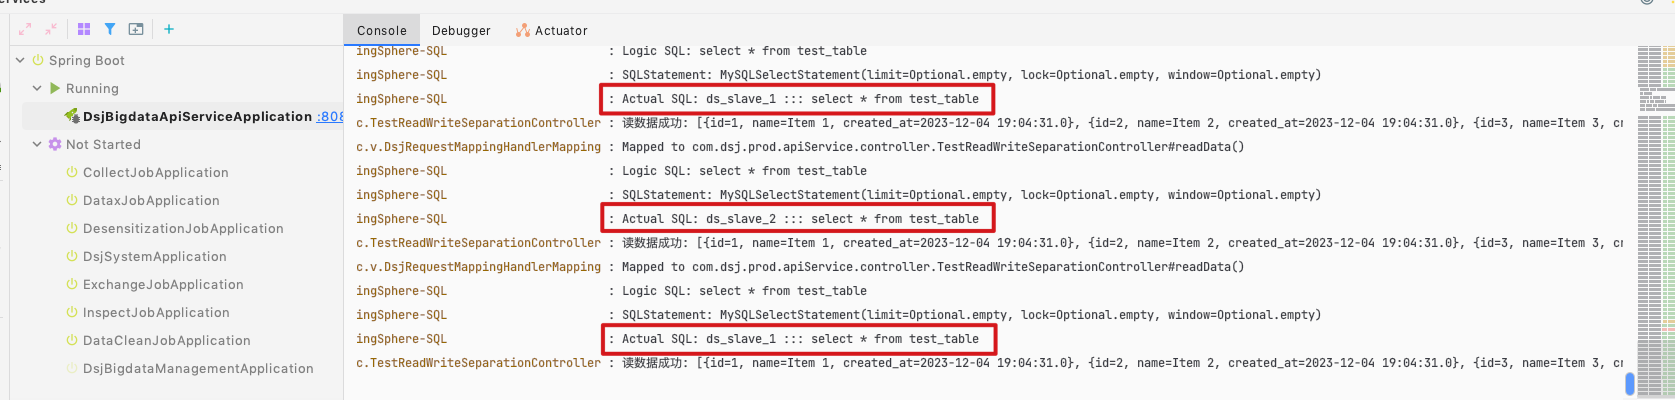
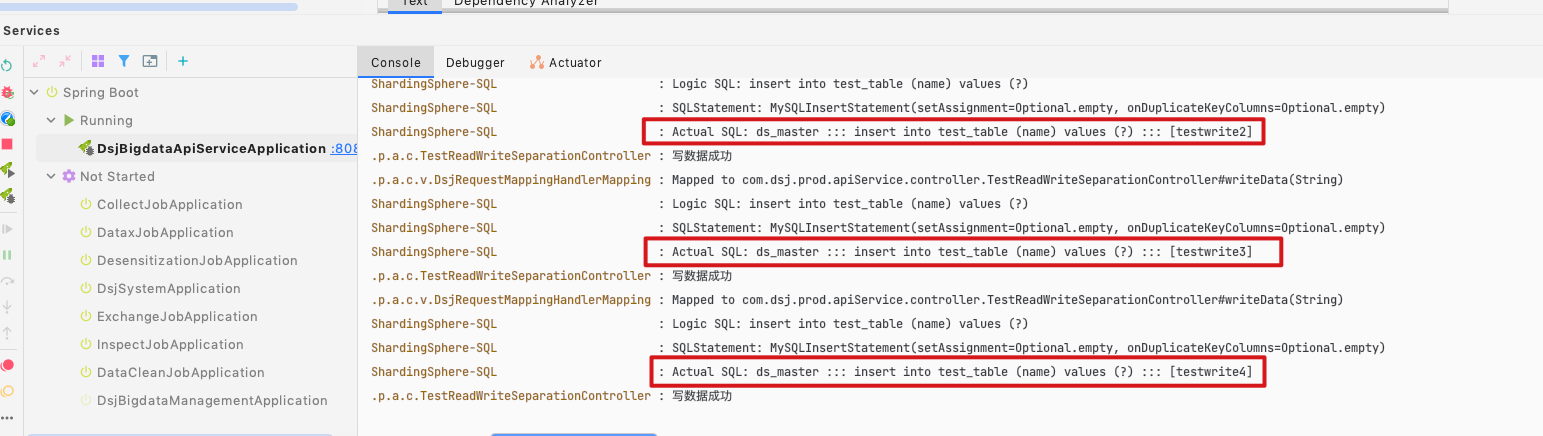
可以看到打印的日志,读取走从库,轮询。写入走主库。
当然可以进行更加多样的配置,比如双主双从,或者配置读取的其他策略的比如权重、随机等。推荐参考官方文档查看后续更多的内容。
官网文档:


 5993
5993


 被折叠的 条评论
为什么被折叠?
被折叠的 条评论
为什么被折叠?
 到【灌水乐园】发言


