


当我们在一个Activity中(或通过Context对象),调用startActivity()方法来启动另一个Activity的过程中发生了什么呢?这就是本文想跟大家分享的内容,我们一起通过源码的方式来看下Activity的启动过程。(本文是基于Android Q的源码)
Activity的启动流程大体分为两步:找到要启动的Activity;然后启动它。(虽说有点像如何把大象装进冰箱,但也确实是那么回事,只不过每个步骤有更多细节)
找到Activity
要想启动一个Activity,系统先要找到这个Activity的信息。我们以从一个Activity中启动另一个Activity为起点来分析Activity的启动过程,在这个过程种会涉及到系统查找要启动的Activity的过程,下面我们以时序图来分析Activity的启动过程:

这只是Activity启动过程种的一小部分,Activity的启动的服务端是由ActivityTaskManagerService实现的,在ActivityTaskManagerService中Activity的启动又是由ActivityStarter来实现。对于系统如何找到要启动的Activity,大体分为两步:
- 得到ResolveInfo对象,实现方式是通过ActivityStackSuperVisor.resolveIntent()方法(最终是调用了PackageManagerService.resolveIntent()方法)解析而来;
- 得到ActivityInfo对象,在得到ResolveInfo对象后,加上一些逻辑判断得到ActivityInfo对象;至此系统就找到了需要启动的Activity;
而这两步都是在ActivityStarter.startActivityMayWait()方法中完成。
//ActivityStarter.java
private int startActivityMayWait(IApplicationThread caller, int callingUid,
        String callingPackage, int requestRealCallingPid, int requestRealCallingUid,
        Intent intent, String resolvedType, IVoiceInteractionSession voiceSession,
        IVoiceInteractor voiceInteractor, IBinder resultTo, String resultWho, int requestCode,
        int startFlags, ProfilerInfo profilerInfo, WaitResult outResult,
        Configuration globalConfig, SafeActivityOptions options, boolean ignoreTargetSecurity,
        int userId, TaskRecord inTask, String reason,
        boolean allowPendingRemoteAnimationRegistryLookup,
        PendingIntentRecord originatingPendingIntent, boolean allowBackgroundActivityStart) {

    // Refuse possible leaked file descriptors
    // 省略部分代码....

    // Save a copy in case ephemeral needs it
    final Intent ephemeralIntent = new Intent(intent);
    // Don't modify the client's object!
    intent = new Intent(intent);
    if (componentSpecified
            && !(Intent.ACTION_VIEW.equals(intent.getAction()) && intent.getData() == null)
            && !Intent.ACTION_INSTALL_INSTANT_APP_PACKAGE.equals(intent.getAction())
            && !Intent.ACTION_RESOLVE_INSTANT_APP_PACKAGE.equals(intent.getAction())
            && mService.getPackageManagerInternalLocked()
                    .isInstantAppInstallerComponent(intent.getComponent())) {

        intent.setComponent(null /*component*/);
        componentSpecified = false;
    }
    // 通过ActivitySuperVisor.resolveIntent()方法解析得到ResolveInfo对象;
    ResolveInfo rInfo = mSupervisor.resolveIntent(intent, resolvedType, userId,
            0 /* matchFlags */,
                    computeResolveFilterUid(
                            callingUid, realCallingUid, mRequest.filterCallingUid));
    if (rInfo == null) {

        UserInfo userInfo = mSupervisor.getUserInfo(userId);
        if (userInfo != null && userInfo.isManagedProfile()) {

            UserManager userManager = UserManager.get(mService.mContext);
            boolean profileLockedAndParentUnlockingOrUnlocked = false;
            long token = Binder.clearCallingIdentity();
            try {

                UserInfo parent = userManager.getProfileParent(userId);
                profileLockedAndParentUnlockingOrUnlocked = (parent != null)
                        && userManager.isUserUnlockingOrUnlocked(parent.id)
                        && !userManager.isUserUnlockingOrUnlocked(userId);
            } finally {

                Binder.restoreCallingIdentity(token);
            }
            if (profileLockedAndParentUnlockingOrUnlocked) {

                rInfo = mSupervisor.resolveIntent(intent, resolvedType, userId,
                        PackageManager.MATCH_DIRECT_BOOT_AWARE
                                | PackageManager.MATCH_DIRECT_BOOT_UNAWARE,
                        computeResolveFilterUid(
                                callingUid, realCallingUid, mRequest.filterCallingUid));
            }
        }
    }
    //得到ActivityInfo对象
    ActivityInfo aInfo = mSupervisor.resolveActivity(intent, rInfo, startFlags, profilerInfo);

    synchronized (mService.mGlobalLock) {

        final ActivityStack stack = mRootActivityContainer.getTopDisplayFocusedStack();
        stack.mConfigWillChange = globalConfig != null
                && mService.getGlobalConfiguration().diff(globalConfig) != 0;
        if (DEBUG_CONFIGURATION) Slog.v(TAG_CONFIGURATION,
                "Starting activity when config will change = " + stack.mConfigWillChange);

        final long origId = Binder.clearCallingIdentity();

        if (aInfo != null &&
                (aInfo.applicationInfo.privateFlags
                        & ApplicationInfo.PRIVATE_FLAG_CANT_SAVE_STATE) != 0 &&
                mService.mHasHeavyWeightFeature) {

            // This may be a heavy-weight process!  Check to see if we already
            // have another, different heavy-weight process running.
            if (aInfo.processName.equals(aInfo.applicationInfo.packageName)) {

                final WindowProcessController heavy = mService.mHeavyWeightProcess;
                if (heavy != null && (heavy.mInfo.uid != aInfo.applicationInfo.uid
                        || !heavy.mName.equals(aInfo.processName))) {

                    int appCallingUid = callingUid;
                    if (caller != null) {

                        WindowProcessController callerApp =
                                mService.getProcessController(caller);
                        if (callerApp != null) {

                            appCallingUid = callerApp.mInfo.uid;
                        } else {

                            Slog.w(TAG, "Unable to find app for caller " + caller
                                    + " (pid=" + callingPid + ") when starting: "
                                    + intent.toString());
                            SafeActivityOptions.abort(options);
                            return ActivityManager.START_PERMISSION_DENIED;
                        }
                    }

                    IIntentSender target = mService.getIntentSenderLocked(
                            ActivityManager.INTENT_SENDER_ACTIVITY, "android",
                            appCallingUid, userId, null, null, 0, new Intent[] {
    intent },
                            new String[] {
    resolvedType }, PendingIntent.FLAG_CANCEL_CURRENT
                                    | PendingIntent.FLAG_ONE_SHOT, null);

                    Intent newIntent = new Intent();
                    if (requestCode >= 0) {

                        // Caller is requesting a result.
                        newIntent.putExtra(HeavyWeightSwitcherActivity.KEY_HAS_RESULT, true);
                    }
                    newIntent.putExtra(HeavyWeightSwitcherActivity.KEY_INTENT,
                            new IntentSender(target));
                    heavy.updateIntentForHeavyWeightActivity(newIntent);
                    newIntent.putExtra(HeavyWeightSwitcherActivity.KEY_NEW_APP,
                            aInfo.packageName);
                    newIntent.setFlags(intent.getFlags());
                    newIntent.setClassName("android",
                            HeavyWeightSwitcherActivity.class.getName());
                    intent = newIntent;
                    resolvedType = null;
                    caller = null;
                    callingUid = Binder.getCallingUid();
                    callingPid = Binder.getCallingPid();
                    componentSpecified = true;
                    rInfo = mSupervisor.resolveIntent(intent, null /*resolvedType*/, userId,
                            0 /* matchFlags */, computeResolveFilterUid(
                                    callingUid, realCallingUid, mRequest.filterCallingUid));
                    aInfo = rInfo != null ? rInfo.activityInfo : null;
                    if (aInfo != null) {

                        aInfo = mService.mAmInternal.getActivityInfoForUser(aInfo, userId);
                    }
                }
            }
        }

        final ActivityRecord[] outRecord = new ActivityRecord[1];
        int res = startActivity(caller, intent, ephemeralIntent, resolvedType, aInfo, rInfo,
                voiceSession, voiceInteractor, resultTo, resultWho, requestCode, callingPid,
                callingUid, callingPackage, realCallingPid, realCallingUid, startFlags, options,
                ignoreTargetSecurity, componentSpecified, outRecord, inTask, reason,
                allowPendingRemoteAnimationRegistryLookup, originatingPendingIntent,
                allowBackgroundActivityStart);

        Binder.restoreCallingIdentity(origId);
        //省略部分代码

        return res;
    }
}
启动Activity
在了解系统怎么找到要启动的Activity后,我们现在就来看下启动Activity的过程。在了解Activity启动过程前,我们先了解下Activity 栈结构模型
Activity结构模型
下面这幅图就是Activity(对应图中的ActivityRecord)在历史任务中的结构。
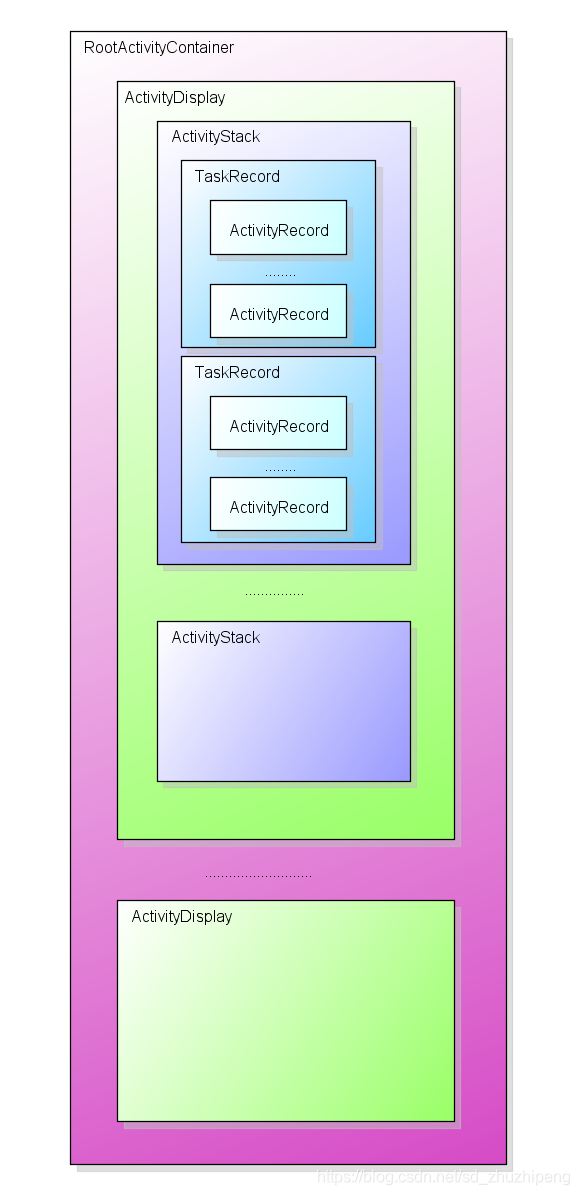
数据结构描述
- RootActivityContainer : Activity 容器的根节点
- ActivityDisplay:每个实例代表系统中的一个显示屏幕,也就是说如果你的Android设备是多屏的,那么将会有多个ActivityDisplay实例。
- ActivityStack: Activity栈,用于表示管理栈中的Activity。
- TaskRecord:ActivityRecord列表的封装类,在ActivityStack中用于记录历史运行的Activity。
- ActivityRecord:ActivityRecord表示历史运行的Activity对象。
- 通过
dumpsys activity a命令可查看当前设备的activity栈结构。
启动过程分析
对于上面的数据结构图,要有个基本掌握,这有助于我们理解Activity启动过程中的逻辑。我们先从ActivityStarter.startActivity()方法分析
//ActivityStarter.java
private int startActivity(IApplicationThread caller, Intent intent, Intent ephemeralIntent,
        String resolvedType, ActivityInfo aInfo, ResolveInfo rInfo,
        IVoiceInteractionSession voiceSession, IVoiceInteractor voiceInteractor,
        IBinder resultTo, String resultWho, int requestCode, int callingPid, int callingUid,
        String callingPackage, int realCallingPid, int realCallingUid, int startFlags,
        SafeActivityOptions options,
        boolean ignoreTargetSecurity, boolean componentSpecified, ActivityRecord[] outActivity,
        TaskRecord inTask, boolean allowPendingRemoteAnimationRegistryLookup,
        PendingIntentRecord originatingPendingIntent, boolean allowBackgroundActivityStart) {

    mSupervisor.getActivityMetricsLogger().notifyActivityLaunching(intent);
    int err = ActivityManager.START_SUCCESS;
    // Pull the optional Ephemeral Installer-only bundle out of the options early.
    final Bundle verificationBundle
            = options != null ? options.popAppVerificationBundle() : null;

    WindowProcessController callerApp = null;
    if (caller != null) {

        callerApp = mService.getProcessController(caller);
        if (callerApp != null) {

            callingPid = callerApp.getPid();
            callingUid = callerApp.mInfo.uid;
        } else {

            Slog.w(TAG, "Unable to find app for caller " + caller
                    + " (pid=" + callingPid + ") when starting: "
                    + intent.to
最低0.47元/天 解锁文章


 860
860


 被折叠的 条评论
为什么被折叠?
被折叠的 条评论
为什么被折叠?
 到【灌水乐园】发言


