


Openlayers简介
Openlayers是一个基于Javacript开发,免费、开源的前端地图开发库,使用它,可以很容易的开发出WebGIS系统。目前Openlayers支持地图瓦片、矢量数据等众多地图数据格式,支持比较完整的地图交互操作。
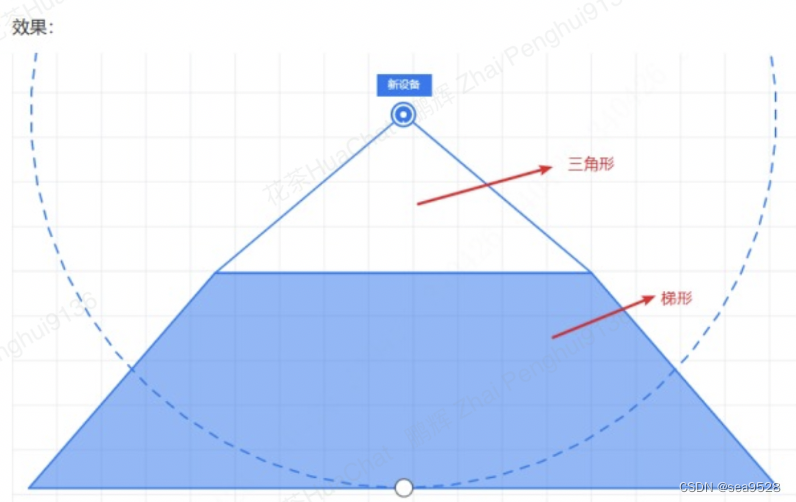
三角形、矩形
三角形、矩形都是使用polygon生成,只需要传入点位的时候做好处理,注意首尾相连(开始点位和结束点位为同一个)
实现代码
/*
 * @description: 根据传的点位生成多边形要素
 * @param(object] coord 点位数据
 * @param(object] center_ 相机中心点
 * @param(object] config 配置数据
 * @return (object] 生成图形要素的feature
 */
_createPolygonFeature(coord, center_, config) {
    const {
        lenscolor,
        horizontalRotationAngle,
        deviceId,
        lensIndex,
        camera,
        lensNum,
        param
    } = config
    // 处理图形点位,转化坐标
    var polygons = [
        [120.1719, 30.1838],
        [120.1719, 30.1834],
        [120.1722, 30.1835],
        [120.1719, 30.1838]
    ]
    //根据传入的点位生成图形,并旋转图形
    var polygon = new Polygon([polygons])
    // 旋转图形响应角度
    polygon.rotate(transformAngle(Number(horizontalRotationAngle)), center_)
    //生成图形要素
    var feature = new Feature({
        geometry: polygon,
        // 自定义feature放入一些属性
        deviceId: deviceId,
        lensIndex: lensIndex,
        figureshape: "polygon",
        addoperatePoint: true,
        camera: config,
        cameraNum: camera.cameraNum,
        lensNum: lensNum,
        lenscolor
    })
    //设置要素样式
    const style = new style({
        fill: new Fill({
            color: colorToRGB(lensColor, this.fillopacity)
        }),
        stroke: new Stroke({
            color: colorToRGB(lensColor, this.strokeopacity),
            width: 2
        })
    })
    // 设置要素层级为负值, 且图形越大层级越低, 这样小的图形被覆盖可以点击
    const index = param.config.installationDistance
    style.setZIndex(-index)
    // 设置要素样式
    feature.setstyle(style)
    // 设置要素id
    feature.setId('camera_ polygon_' + deviceId + '- .' + lensIndex)
    return feature
}
效果
圆形、圆环、半圆、虚线圆
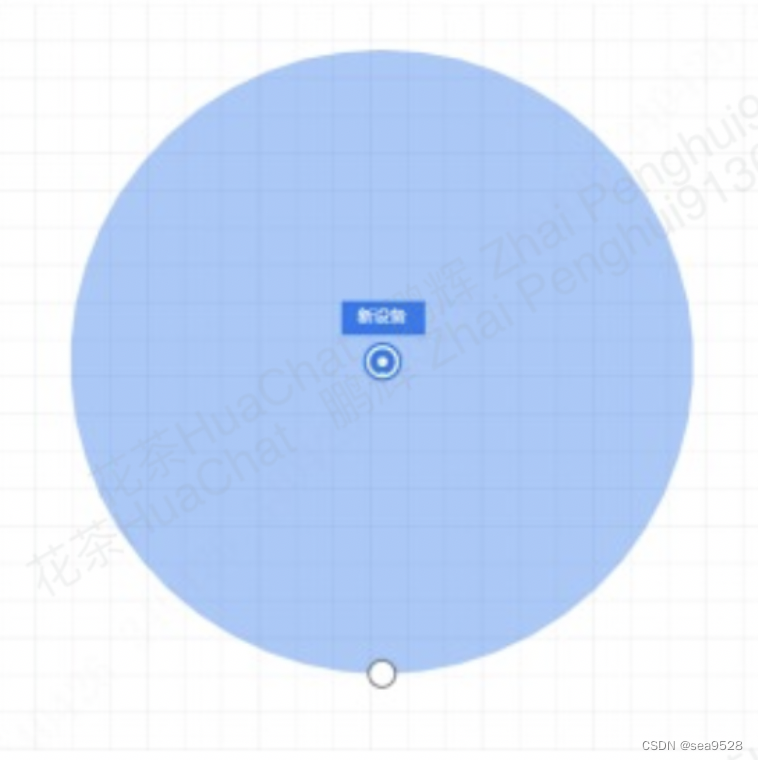
圆形
/*
 * @description: 绘制圆形
 * @param(object] origin 圆形中心点
 * @param(number] radius 圆的半径 单位pixel
 * @param(object] config 配置数据
 * @param(boolean] addoperatePoint 是否给图形添加操作点
 * @param(boolean] isRotate 是否旋转图形
 * @return (object] 生成图形要素的feature
 */

draw(origin, radius, config, addoperatePoint=false, isRotate=true) {
    const {
        lensColor,
        horizontalRotationAngle,
        deviceId,
        lensIndex,
        camera,
        lensNum,
        installationDistance,
        param
    } = config
    const points = []
    //圆环边数,默认100, 越多显示的越平滑
    const sides = this.fishEyeSides
    //弧度,图形要显示的角度,默认360*,即圆环
    const rotation = 360
    //获取圆心的pixel 坐标
    const originPixel = this.map.getPixelFromCoordinate(origin)
    // 计算初始角度
    const angle = ((180 - rotation) / 360) * Math.PI
    var rotatedAngle, x, y
    //循环sides + 1次才是完整图形, 要不然图形会缺少一点,对不齐
    for (vari = 0; i < sides + 1; ++i) {
        //让点分布在120°的范围里
        const an = i * (rotation / 360)
        rotatedAngle = angle + (an * 2 * Math.PI) / sides
        let coordinate = []
        // 偏移后的x,y坐标,为pixel
        x = originPixel[0] + radius * Math.cos(rotatedAngle)
        y = originPixel[1] + radius * Math.sin(rotatedAngle)
        const pixelCoordinate = [x, y]
        // 把pixel坐标转换为3857坐标系
        coordinate = this.map.getCoordinateFromPixel(pixelCoordinate)
        points.push(coordinate)
    }
    // 添加点位给polygon
    const poy = new Polygon([points])
    //根据后台返回的角度旋转图形
    if (isRotate) poy.rotate(transformAngle(Number(horizontalRotationAngle)), origin)
    // 创建feature要素
    const feature = new Feature({
        geometry: poy,
        // geometry 必填,下方这些都是自己添加的属性
        radius: this.map.pixelToMeter(radius),
        figureShape: 'fishEyeCircle',
        addoperatePoint: addoperatePoint,
        deviceId: deviceId,
        lensIndex: lensIndex,
        camera: config,
        cameraNum: camera.cameraNum,
        lensNum: lensNum,
        lenscolor
    })
    //设置要素样式
    const style = new style({
        fill: new Fill({
            color: colorToRGB(lensColor, this.fillopacity)
        }),
        stroke: new Stroke({
            color: colorToRGB(lensColor, this.strokeopacity),
            width: 2
        })
    })
    // 设置要素层级为负值, 且图形越大层级越低, 这样小的图形被覆盖可以点击
    const index = param.config.installationDistance
    style.setZIndex(-index)
    // 设置要素样式
    feature.setstyle(style)
    return feature
}
效果:
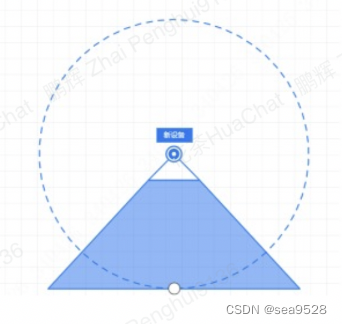
虚线圆
虚线圆只需要使用上放画圆形方法画出圆,然后设置样式的使用,给style样式 中stroke (边框)设置属性lineDash: [10, 10] 即可,lineDash详情查看官方文档
this.style = new style({
    //填充样式
    fill: new Fill({
        color: colorToRGB(lenscolor, 0)
    }),
    //边界样式
    stroke: new Stroke({
        color: colorToRGB(lenscolor, strokeOpacity),
        width: 2,
        lineDash: [10, 10] //设置边界为虚线,并且虚线间隔为10
    })
})
效果:
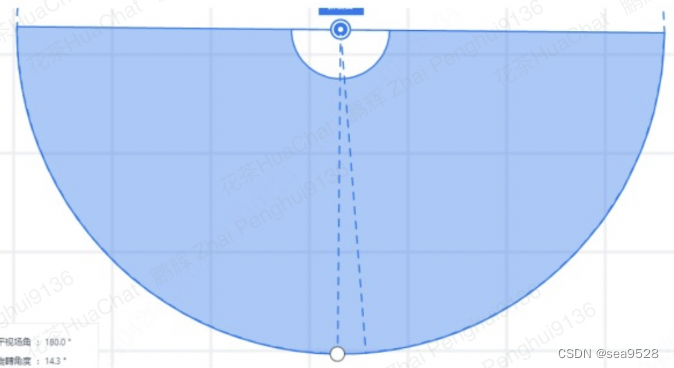
圆环
Polygon 可以传多个数组
1.数组的第一个线性环定义了多边形的外部边界或表面。每个后续的线性环在多边形曲面上定义一个孔。
2.定义多个数组,既可在图形上挖洞
//添加外圆点位和内圆点位,在外圆里面挖洞内圆,实现圆环效果
const poy = new Polygon([points ,innerPoints])
效果:


 675
675


 被折叠的 条评论
为什么被折叠?
被折叠的 条评论
为什么被折叠?
 到【灌水乐园】发言


