Introduction to Android Espresso
Espresso is a testing framework that exposes a simple API to perform UI testing of android apps. With the latest 2.0 release, Espresso is now part of the Android Support Repository which makes it more easier to add automated testing support for your project.
But before jumping into Espresso API, lets consider what puts it apart from the other testing frameworks.
- One of the first things you’ll notice about Espresso, is that its code looks a lot like English, which makes it predictable and easy to learn.
- The API is relatively small, and yet open for customization.
- Espresso tests run optimally fast (no waits, sleeps)
- Gradle + Android Studio support
Adding Espresso to your project
1. First of all make sure you have Android Support Repository installed
2. Add the following dependencies to your application build.gradle file
|
1
2
3
4
|
dependencies {
androidTestCompile 'com.android.support.test:testing-support-lib:0.1'
androidTestCompile 'com.android.support.test.espresso:espresso-core:2.0'
}
|
3. Finally, specify the test instrumentation runner in default config
|
1
2
3
4
5
6
7
|
android {
defaultConfig {
// ....
testInstrumentationRunner "android.support.test.runner.AndroidJUnitRunner"
}
}
|
And that is basically what it takes “to invite your project to a cup of Espresso”!
The main components of Espresso
Espresso is built up from 3 major components.
These components are:
- ViewMatchers – allows you to locate a view in the current view hierarchy
- ViewActions – allows you to interact with views
- ViewAssertions – allows you to assert the state of a view.
For simplicity, you may use these shortcuts to refer to them:
- ViewMatchers – “find something“
- ViewActions – “do something“
- ViewAssertions – “check something“
And, for example when you will need to check something (like, is some text displayed on the screen?), you’ll know you’ll need a ViewAssertion for that.
Below is an example of a test in Espresso, and where the main components find their place.
A simple test using onView()
Suppose we have an app where the user is asked to enter his name.
After he enters the name, he taps on the “Next” button and is redirected to another activity where a greeting message is displayed.
If we would write a test for this scenario, then it might look something like this:
|
1
2
3
4
5
6
7
8
|
// locate the view with id "user_name" and type the text "John"
onView(withId(R.id.user_name)).perform(typeText(
"John"
));
// locate the view with id "next" and click on it
onView(withId(R.id.next)).perform(click());
// locate the view with id "greeting_message" and check its text is equal with "Hello John!"
onView(withId(R.id.greeting_message)).check(matches(withText(
"Hello John!"
)));
|
Notice that we don’t specify explicitly what kind of view we are interacting with (eg.: EditText, Button), we simply say that we are looking for a view with a specific id.
Also, when clicking on the “Next” button and later checking the text, we don’t have to write some special code to tell Espresso that we have navigated to another activity.
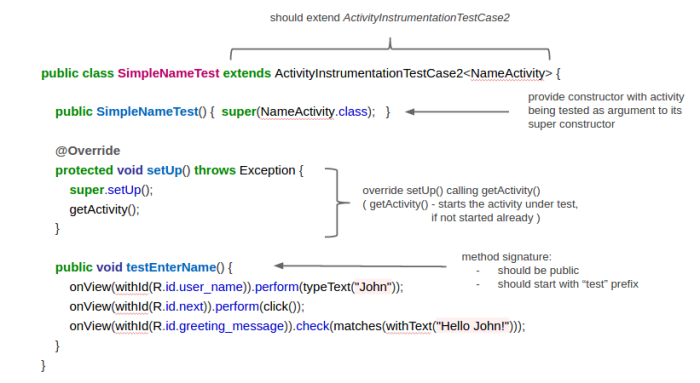
Now, if we want to actually run this test, then it should be put in a class. In Gradle, the location where tests are stored is: yourApp/src/androidTest/java.
This is an example of a test class, and its main characteristics:
A simple test using onData()
Whenever you have a ListView, GridView, Spinner, and other Adapter based views, you’ll have to use onData() in order to interact with an item from that list.
onData() is targeting directly the data provided by your adapter. What does this mean, we will see in a moment.
In a hypothetical application we are asked to select a country from a Spinner, once selected, the country is displayed next to the Spinner.
A test to check that the displayed country is equal with what was selected, might look like this:
|
1
2
3
4
5
6
7
8
|
// locate the view with id "country_spinner" and click on it
onView(withId(R.id.country_spinner)).perform(click());
// match an item that is a String and is equal with whatever value the COUNTRY constant is initialized, then click on it.
onData(allOf(is(instanceOf(String.
class
)), is(COUNTRY))).perform(click());
// locate the view with id "selected_country" and check its text is equal with COUNTRY
onView(withId(R.id.selected_country)).check(matches(withText(
"selected: "
+ COUNTRY)));
|
The Spinner you saw in the example above is backed by a simple array of strings, and because of this, we specify that we are looking for an item of type String. If, instead of a String, it were some custom object, then we would specify that instead.
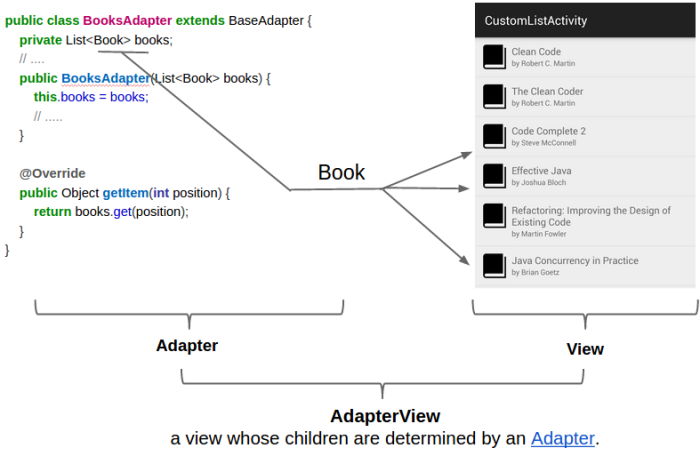
To illustrate, consider the following example where a list of books is displayed:
Since the items in the adapter are of type Book, so will look the query:
|
1
|
onData(allOf(is(instanceOf(Book.
class
)), withBookTitle(BOOK_TITLE))).perform(click());
|
DataInteractions
Espresso has a few useful methods that can be used to interact with data.
atPosition() – Might be useful when the element to interact with is not relevant, or when the items always appear in a specific order, so you know every item on what position sits.
|
1
|
onData(...).atPosition(
2
).perform(click());
|
inRoot() – Use inRoot() to target non-default windows. One scenario where this can be used is when testing autocomplete. The list that appears in the autocomplete view belongs to a window that is drawn on top of application window.
In this case you have to specify that the data you are looking for, is not in the main window.
|
1
2
3
|
onView(withText(
"AutoCompleteText"
))
.inRoot(withDecorView(not(is(getActivity().getWindow().getDecorView()))))
.check(matches(isDisplayed()));
|
onChildView() – This DataInteraction allows to further refine the query by letting you interact with a specific view from a list row.
Let say that you have a list of items and every item has a delete button. You want to click on Delete button of a specific item:
|
1
2
|
onData(withBookTitle(
"My Book"
))
.onChildView(withId(R.id.book_delete)).perform(click());
|
inAdapterView() – This allows to select a particular adapter view to operate on, by default Espresso operates on any adapter view.
You may find this useful when dealing with ViewPagers and Fragments, and you want to interact with the AdapterView that is currently displayed, or when you have more than one adapter view in your activity.
|
1
2
3
|
onData(withBookTitle(
"My Book"
))
.inAdapterView(allOf(isAssignableFrom(AdapterView.
class
), isDisplayed()))
.perform(click());
|
Espresso and RecyclerView
RecyclerView is an UI component designed to render a collection of data just like ListView and GridView, actually, it is intended to be a replacement of these two. What interests us from a testing point of view, is that a RecyclerView is no longer an AdapterView. This means that you can not use onData() to interact with list items.
Fortunately, there is a class called RecyclerViewActions that exposes a small API to operate on a RecyclerView. RecyclerViewActions is part of a separate lib called espresso-contrib, that also should be added to build.gradle:
|
1
2
3
4
5
|
dependencies {
// ...
androidTestCompile('com.android.support.test.espresso:espresso-contrib:2.0');
}
|
Since your project already includes a dependency to recyclerview, and might as well include support libs, some dependencies conflicts might appear. In this case exclude
them from espresso-contrib like this:
|
1
2
3
4
5
6
7
8
9
|
dependencies {
// ...
androidTestCompile('com.android.support.test.espresso:espresso-contrib:2.0') {
exclude group: 'com.android.support', module: 'appcompat'
exclude group: 'com.android.support', module: 'support-v4'
exclude module: 'recyclerview-v7'
}
}
|
Here is how to click on an item from the list by position:
|
1
2
|
onView(withId(R.id.recyclerView))
.perform(RecyclerViewActions.actionOnItemAtPosition(
0
, click()));
|
Or how to perform a click on a View from an item:
|
1
2
3
|
onView(withId(R.id.recyclerView))
.perform(RecyclerViewActions.actionOnItem(
hasDescendant(withText(BOOK_TITLE)), click()));
|
More Espresso Examples on Github:
https://github.com/vgrec/EspressoExamples
原文地址:https://androidresearch.wordpress.com/2015/04/04/an-introduction-to-espresso/


 本文介绍Espresso测试框架,一种用于Android应用UI测试的强大工具。Espresso具备易读且易于定制的API,能够快速执行测试而无需等待或休眠。文章详细讲解了如何将Espresso集成到项目中,并通过实例演示了主要组件ViewMatchers、ViewActions及ViewAssertions的应用。


 3302
3302

 被折叠的 条评论
为什么被折叠?


