


1.3.elasticsearch 6.x
ES下载:https://www.elastic.co/cn/downloads/past-releases#elasticsearch
Kibana下载: https://www.elastic.co/cn/downloads/past-releases#kibana
Logstat下载: https://www.elastic.co/cn/downloads/past-releases#logstash
Apm-server: https://www.elastic.co/cn/downloads/past-releases#apm-server
Beats: https://www.elastic.co/cn/downloads/beats
agent下载地址:https://search.maven.org/search?q=a:elastic-apm-agent
1.3.1.windows安装elasticsearch
安装es
1、下载es
http://www.elastic.co/cn/products/elasticsearch
jdk下载:
https://www.oracle.com/technetwork/java/javase/downloads/jdk8-downloads-2133151.html
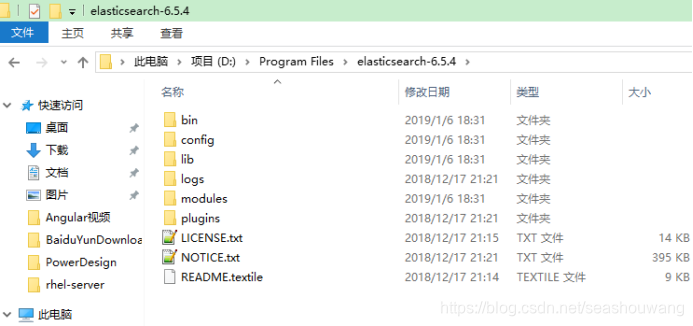
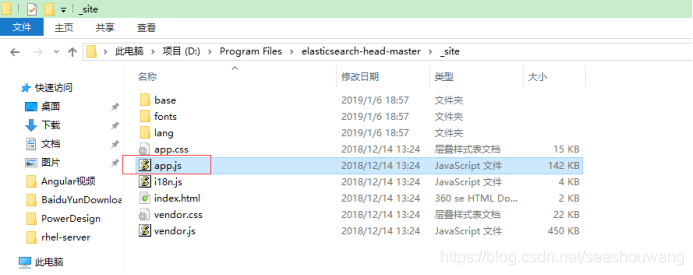
2、解压缩下载的zip文件
bin 存放elasticSearch 运行命令
config 存放配置文件
lib 存放elasticSearch运行依赖jar包
modules 存放elasticSearch 模块
plugins 存放插件
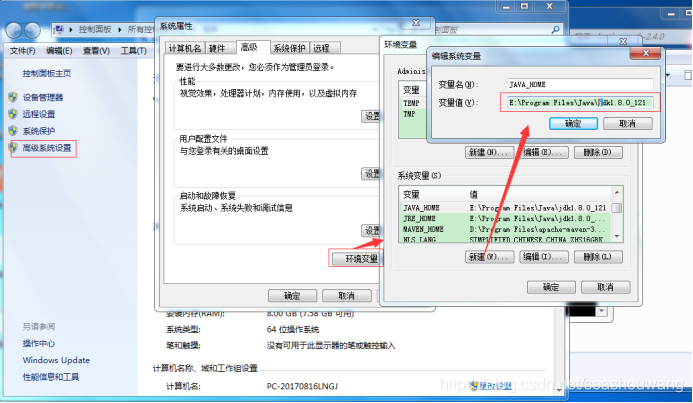
3、es运行是需要java支持,配置java环境变量
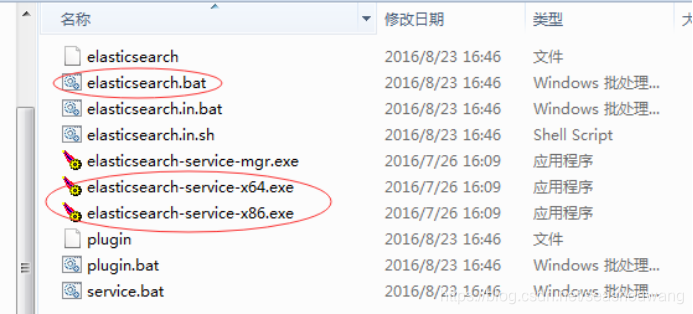
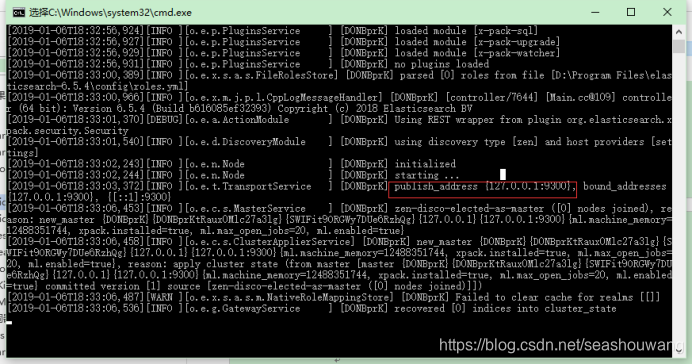
4、运行es
进入到解析缩目录中的bin目录,点击elasticsearh.bat或者elastic*.exe文件都可以。
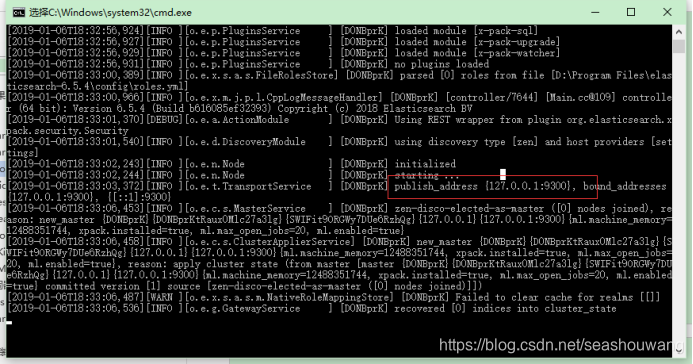
启动后如下
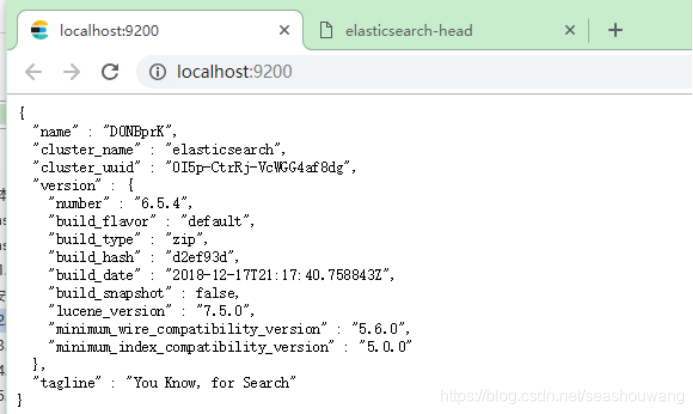
5、es访问路径:
启动后,通过 http://localhost:9200访问
1.3.2.ElasticSearch-6.x安装head插件
head下载:
https://github.com/mobz/elasticsearch-head
由于es安装依赖node.js/grunt,所以,需要先安装node.js/grnut
安装node.js
node.js下载地址:https://nodejs.org/en/
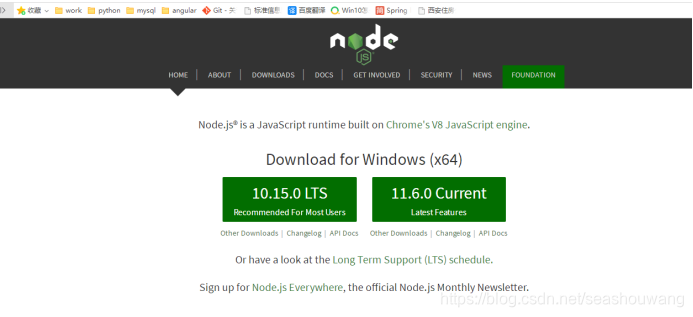
直接下载安装即可(node.js傻瓜式安装),安装完成需要配置到环境变量path中。
安装grunt
grunt是一个很方便的构建工具,可以进行打包压缩、测试、执行等等的工作,5.0里的head插件就是通过grunt启动的。因此需要安装grunt:
npm install -g grunt-cli

安装head插件
下载地址:
https://github.com/mobz/elasticsearch-head
git下载:
git clone git://github.com/mobz/elasticsearch-head.git
修改head源码
由于head的代码还是2.6版本的,直接执行有很多限制,比如无法跨机器访问。因此需要用户修改两个地方:
目录:head/Gruntfile.js:
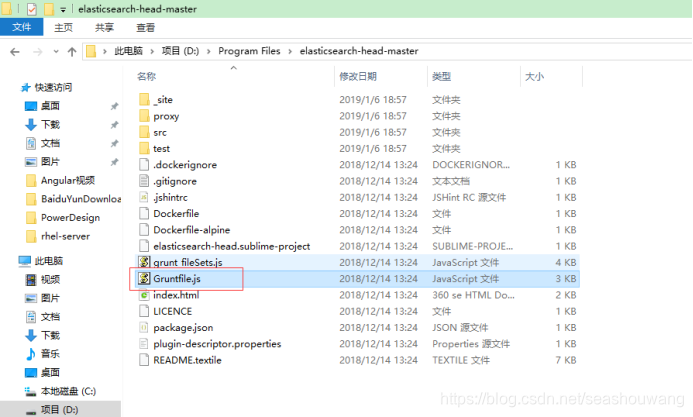
在connet中增加hostname属性,设置为*,允许所有机器访问。
connect: {
server: {
options: {
port: 9100,
base: ‘.’,
keepalive: true,
hostname: ‘*’
}
}
}
修改连接地址:
目录:head/_site/app.js
修改head的连接地址:
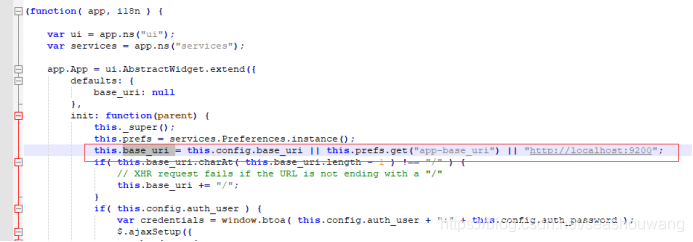
修改head的连接地址:
this.base_uri = this.config.base_uri || this.prefs.get(“app-base_uri”) || “http://localhost:9200”;
把localhost修改成你es的服务器地址,如:
this.base_uri = this.config.base_uri || this.prefs.get(“app-base_uri”) || “http://10.10.10.10:9200”;
修改es配置文件
修改es使用的参数。编辑config/elasticsearch.yml:
#换个集群的名字,免得跟别人的集群混在一起
cluster.name: es-5.0-test
#换个节点名字
node.name: node-101
#修改一下ES的监听地址,设成0.0.0.0让任何人都可以访问,线上服务不要这样设置。
network.host: 0.0.0.0
#默认的就好
http.port: 9200
#增加新的参数,这样head插件可以访问es,解决elasticsearch-head 集群健康值: 未连接问题
http.cors.enabled: true
http.cors.allow-origin: “*”
注意,设置参数的时候:后面要有空格!
启动 elasticsearch
双击运行elasticsearch.ba即可,启动后如下:
浏览器访问 http://localhost:9200/
安装dead
然后在head源码目录中,执行npm install 下载的包:
npm install

安装提示phantomjs未按照,通过命令行安装:npm install phantomjs
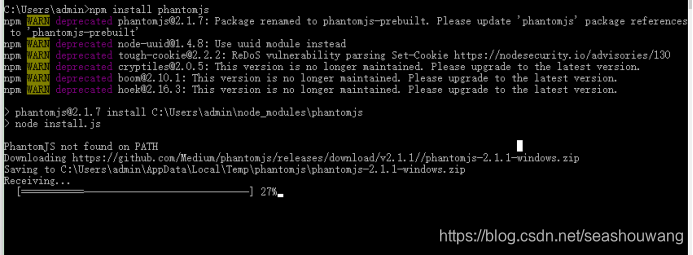
(我在安装的时候,需要下载一个phantomjs-2.1.1-windows.zip,要下载一个这个特别慢,所以我自己手动下载一个,然后再次执行
npm install)
初次运行安装可能会报警告或错误。可以重新运行一次npm install。
最后,在head源代码目录下启动nodejs:
grunt server
效果如图:

测试head插件
浏览器访问http://localhost:9100

以上链接正常显示绿色,表示head插件安装成功。
1.3.3.ElasticSearch6.x集群
Kibana 的下载地址:https://www.elastic.co/downloads/
问题排查论坛:https://discuss.elastic.co/c
准备环境:
Jdk_1.8+
elasticsearch-6.5.4.tar.gz
hedhat7.2
注意:elasticsearch-6.x需要jdk 1.8, linux内核在3.x以上
下载elasticsearch,解压缩
下载,执行tar -zxvf elasticsearch-6.5.4.tar.gz解压
[root@server90 opt]#
[root@server90 opt]# tar -zxf elasticsearch-6.5.4.tar.gz
[root@server90 opt]# ls
elasticsearch-6.5.4 elasticsearch-6.5.4.tar.gz rh
[root@server90 opt]#
[root@server90 elasticsearch-6.5.4]#
[root@server90 elasticsearch-6.5.4]# vim /etc/profile
#Current threshold for system reserved uid/gids is 200
#You could check uidgid reservation validity in
#/usr/share/doc/setup-*/uidgid file
if [ $UID -gt 199 ] && [ "`id -gn`" = "`id -un`" ]; then
    umask 002
else
    umask 022
fi

for i in /etc/profile.d/*.sh ; do
    if [ -r "$i" ]; then
        if [ "${-#*i}" != "$-" ]; then
            . "$i"
        else
            . "$i" >/dev/null
        fi
    fi
done

unset i
unset -f pathmunge

JAVA_HOME=/usr/local/jdk1.8.0_192
JRE_HOME=$JAVA_HOME/jre
PATH=$JAVA_HOME:$JAVA_HOME/bin:$JRE_HOME:$JRE_HOME/bin:$PATH
"/etc/profile" 80L, 1870C                                                          80,1         底端
#Current threshold for system reserved uid/gids is 200
#You could check uidgid reservation validity in
#/usr/share/doc/setup-*/uidgid file
if [ $UID -gt 199 ] && [ "`id -gn`" = "`id -un`" ]; then
    umask 002
else
    umask 022
fi

for i in /etc/profile.d/*.sh ; do
    if [ -r "$i" ]; then
        if [ "${-#*i}" != "$-" ]; then
            . "$i"
        else
            . "$i" >/dev/null
        fi
    fi
done

unset i
unset -f pathmunge

JAVA_HOME=/usr/local/jdk1.8.0_192
JRE_HOME=$JAVA_HOME/jre
PATH=$JAVA_HOME:$JAVA_HOME/bin:$JRE_HOME:$JRE_HOME/bin:$PATH

ES_HOME=/opt/elasticsearch-6.5.4
PATH=$ES_HOOME:$ES_HOME/bin:$PATH
“/etc/profile” 88L, 1943C 已写入
[root@server90 elasticsearch-6.5.4]#
修改elasticsearch.yml配置文件
修改配置文件config/elasticsearch.yml
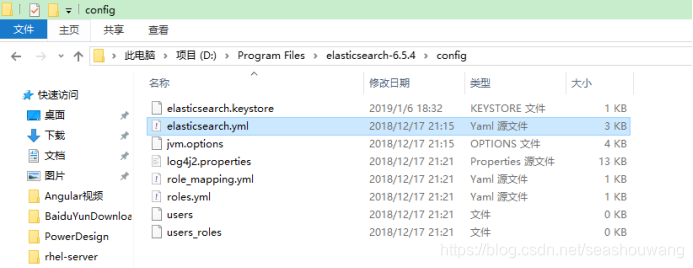
[root@server90 elasticsearch-6.5.4]# cd config/
[root@server90 config]# ls
elasticsearch.keystore jvm.options role_mapping.yml users
elasticsearch.yml log4j2.properties roles.yml users_roles
[root@server90 config]# vim elasticsearch.yml
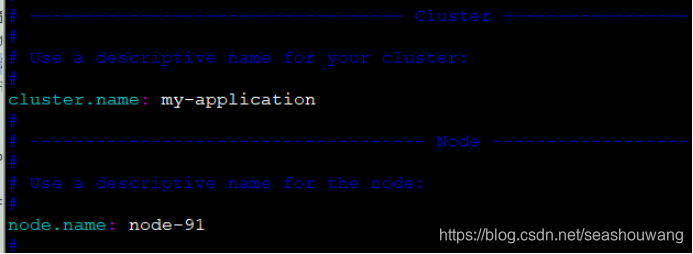
添加一下内容:
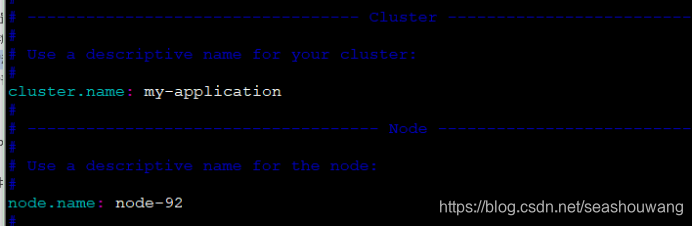
#Use a descriptive name for your cluster:
#
cluster.name: my-application
#
#------------------------------------ Node ------------------------------------
#
#Use a descriptive name for the node:
#
node.name: node-1
#
#Add custom attributes to the node:
#
#node.rack: r1
#Set the bind address to a specific IP (IPv4 or IPv6):
#允许所用用户访问
network.host: 0.0.0.0
#
#Set a custom port for HTTP:
#
http.port: 9200
#添加防脑裂配置
discovery.zen.ping.multicast.enabled: false
discovery.zen.ping_timeout: 120s
client.transport.ping_timeout: 60s
discovery.zen.ping.unicast.hosts: ["192.168.1.63","192.168.1.64", "192.168.1.65"]
[root@server90 config]#
[root@server90 config]#
注意:1、如果要配置集群,则elasticsearch配置的cluster.name都要相同,都启动可以自动组成集群,这里如果不改cluster.name则默认是cluster.name=elasticsearch,nodename随意取但是集群内的各节点不能相同,同时启动可以组成集群。
elasticsearch配置文件详解
elasticsearch的config文件夹里面有两个配置文件:elasticsearch.yml和logging.yml,第一个是es的基本配置文件,第二个是日志配置文件,es也是使用log4j来记录日志的,所以logging.yml里的设置按普通log4j配置文件来设置就行了。下面主要讲解下elasticsearch.yml这个文件中可配置的东西。
cluster.name:elasticsearch配置es的集群名称,默认是elasticsearch,es会自动发现在同一网段下的es,如果在同一网段下有多个集群,就可以用这个属性来区分不同的集群。
ode.name:"FranzKafka"节点名,默认随机指定一个name列表中名字,该列表在es的jar包中config文件夹里name.txt文件中,其中有很多作者添加的有趣名字。
ode.master:true指定该节点是否有资格被选举成为node,默认是true,es是默认集群中的第一台机器为master,如果这台机挂了就会重新选举master。
ode.data:true指定该节点是否存储索引数据,默认为true。
index.number_of_shards:5设置默认索引分片个数,默认为5片。
index.number_of_replicas:1设置默认索引副本个数,默认为1个副本。
ath.conf:/path/to/conf设置配置文件的存储路径,默认是es根目录下的config文件夹。
ath.data:/path/to/data设置索引数据的存储路径,默认是es根目录下的data文件夹,可以设置多个存储路径,用逗号隔开,例:path.data:/path/to/data1,/path/to/data2
ath.work:/path/to/work设置临时文件的存储路径,默认是es根目录下的work文件夹。
ath.logs:/path/to/logs设置日志文件的存储路径,默认是es根目录下的logs文件夹
ath.plugins:/path/to/plugins设置插件的存放路径,默认是es根目录下的plugins文件夹
ootstrap.mlockall:true设置为true来锁住内存。因为当jvm开始swapping时es的效率会降低,所以要保证它不swap,可以把ES_MIN_MEM和ES_MAX_MEM两个环境变量设置成同一个值,并且保证机器有足够的内存分配给es。同时也要允许elasticsearch的进程可以锁住内存,Linux下可以通过ulimit-l unlimited命令。
etwork.bind_host:192.168.0.1设置绑定的ip地址,可以是ipv4或ipv6的,默认为0.0.0.0。
etwork.publish_host:192.168.0.1设置其它节点和该节点交互的ip地址,如果不设置它会自动判断,值必须是个真实的ip地址。
etwork.host:192.168.0.1这个参数是用来同时设置bind_host和publish_host上面两个参数。
transport.tcp.port:9300设置节点间交互的tcp端口,默认是9300。
transport.tcp.compress:true设置是否压缩tcp传输时的数据,默认为false,不压缩。
http.port:9200设置对外服务的http端口,默认为9200。
http.max_content_length:100mb设置内容的最大容量,默认100m
http.enabled:false是否使用http协议对外提供服务,默认为true,开启。
gateway.type:localgateway的类型,默认为local即为本地文件系统,可以设置为本地文件系统,分布式文件系统,Hadoop的HDFS,和amazon的s3服务器,其它文件系统的设置方法下次再详细说。
gateway.recover_after_nodes:1设置集群中N个节点启动时进行数据恢复,默认为1。
gateway.recover_after_time:5m设置初始化数据恢复进程的超时时间,默认是5分钟。
gateway.expected_nodes:2设置这个集群中节点的数量,默认为2,一旦这N个节点启动,就会立即进行数据恢复。
cluster.routing.allocation.node_initial_primaries_recoveries:4初始化数据恢复时,并发恢复线程的个数,默认为4。
cluster.routing.allocation.node_concurrent_recoveries:2添加删除节点或负载均衡时并发恢复线程的个数,默认为4。
indices.recovery.max_size_per_sec:0设置数据恢复时限制的带宽,如入100mb,默认为0,即无限制。
indices.recovery.concurrent_streams:5设置这个参数来限制从其它分片恢复数据时最大同时打开并发流的个数,默认为5。
discovery.zen.minimum_master_nodes:1设置这个参数来保证集群中的节点可以知道其它N个有master资格的节点。默认为1,对于大的集群来说,可以设置大一点的值(2-4)
discovery.zen.ping.timeout:3s设置集群中自动发现其它节点时ping连接超时时间,默认为3秒,对于比较差的网络环境可以高点的值来防止自动发现时出错。
discovery.zen.ping.multicast.enabled:false设置是否打开多播发现节点,默认是true。
discovery.zen.ping.unicast.hosts:[“host1”, “host2:port”,“host3[portX-portY]”]设置集群中master节点的初始列表,可以通过这些节点来自动发现新加入集群的节点
将elasticsearch拷贝到启动机器
[root@server90 opt]#
[root@server90 opt]# scp -r elasticsearch-6.5.4 root@192.168.1.91:/opt/
[root@server90 opt]#
[root@server90 opt]# scp -r elasticsearch-6.5.4 root@192.168.1.92:/opt/
[root@server90 opt]#
[root@server90 opt]#
拷贝环境变量:
[root@server90 opt]#
[root@server90 opt]# scp -r /usr/local/jdk1.8.0_192 root@192.168.1.91:/usr/local/
[root@server90 opt]#
[root@server90 opt]# scp -r /usr/local/jdk1.8.0_192 root@192.168.1.92:/usr/local/
[root@server90 opt]#
[root@server90 opt]#
[root@server90 opt]# scp /etc/profile root@192.168.1.91:/etc/
root@192.168.1.91’s password:
profile 100% 1943 1.9KB/s 00:00
[root@server90 opt]#
[root@server90 opt]# scp /etc/profile root@192.168.1.92:/etc/
root@192.168.1.92’s password:
profile 100% 1943 1.9KB/s 00:00
[root@server90 opt]#
[root@server91 opt]#
[root@server91 opt]# source /etc/profile
[root@server91 opt]#
[root@server92 ~]#
[root@server92 ~]# source /etc/profile
[root@server92 ~]#
注意:
在拷贝到其他机器上时,需要将network.host地址修改为各自服务器ip地址,node.name修改为其他名称,同时需要给elasticsearch目录授权为普通用户
server91配置:
server92配置:
配置文件读取最大字节数
修改/etc/security/limits.conf文件,添加或修改如下行:
-
hard nofile 65536 -
soft nofile 65536

2.max virtual memory areas vm.max…
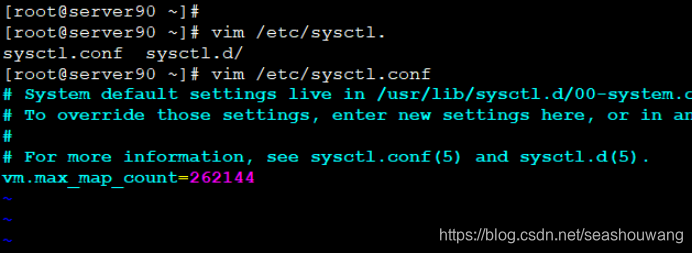
修改 /etc/sysctl.conf 文件,添加如下行:
vm.max_map_count=262144
修改好了以后,调用sysctl -a查看,发现参数并没有变动,要重启才可以。
重启以后,再启动es即可,就可以通过主机ip访问。
[root@server90 ~]#
[root@server90 ~]# scp /etc/security/limits.conf root@192.168.1.91:/etc/security/
root@192.168.1.91’s password:
limits.conf 100% 2516 2.5KB/s 00:00
[root@server90 ~]# scp /etc/sysctl.conf root@192.168.1.91:/etc/
[root@server90 ~]#
[root@server90 ~]# scp /etc/security/limits.conf root@192.168.1.92:/etc/security/
root@192.168.1.92’s password:
limits.conf 100% 2516 2.5KB/s 00:00
[root@server90 ~]# scp /etc/sysctl.conf root@192.168.1.92:/etc/
[root@server90 ~]#
授权elasticsearch目录为普通用户权限
由于es在运行时必须使用普通用户才可以启动,所以这里要将es权限修改为普通用户。
先创建一个用户 useradd es ,然后在授权。
创建用户:
每个机器上都创建一个用户。
[root@server63 local]# useradd es
授权:
server90授权为普通用户:
[root@server91 opt]#
[root@server91 opt]# chown -R es:es elasticsearch-6.5.4
[root@server91 opt]#
server91授权为普通用户:
[root@server91 opt]#
[root@server91 opt]# chown -R es:es elasticsearch-6.5.4
server92授权为普通用户:
[root@server92 opt]#
[root@server92 opt]# chown -R es:es elasticsearch-6.5.4
启动/关闭服务
注意:es启动的时候不能用root用户,需要一个普通用户才能启动。
启动服务切换到普通用户:
[wangsh@server90 elasticsearch-6.5.4]$
[wangsh@server90 elasticsearch-6.5.4]$ rm -rf logs/*
[wangsh@server90 elasticsearch-6.5.4]$ ls
bin config data lib LICENSE.txt logs modules NOTICE.txt plugins README.textile
[wangsh@server90 elasticsearch-6.5.4]$
[wangsh@server90 elasticsearch-6.5.4]$
[wangsh@server90 elasticsearch-6.5.4]$
[wangsh@server90 elasticsearch-6.5.4]$ ls
bin config data lib LICENSE.txt logs modules NOTICE.txt plugins README.textile
[wangsh@server90 elasticsearch-6.5.4]$
[wangsh@server90 elasticsearch-6.5.4]$
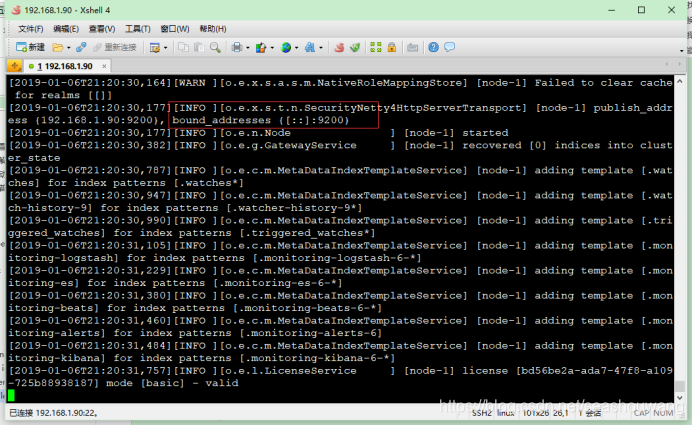
[wangsh@server90 elasticsearch-6.5.4]$ ./bin/elasticsearch
[2019-01-06T21:20:07,971][INFO ][o.e.e.NodeEnvironment ] [node-1] using 1 data paths, mounts [[/ (rootfs)]], net usable_space [43.7gb], net total_space [47.7gb], types [rootfs]
[2019-01-06T21:20:07,973][INFO ][o.e.e.NodeEnvironment ] [node-1] heap size [1015.6mb], compressed ordinary object pointers [true]
[2019-01-06T21:20:07,974][INFO ][o.e.n.Node ] [node-1] node name [node-1], node ID [tLj6n_xUQcaaTGzmZ2dS-A]
[2019-01-06T21:20:07,975][INFO ][o.e.n.Node ] [node-1] version[6.5.4], pid[2740], build[default/tar/d2ef93d/2018-12-17T21:17:40.758843Z], OS[Linux/3.10.0-327.el7.x86_64/amd64], JVM[Oracle Corporation/OpenJDK 64-Bit Server VM/1.8.0_65/25.65-b01]
[2019-01-06T21:20:07,975][INFO ][o.e.n.Node ] [node-1] JVM arguments [-Xms1g, -Xmx1g, -XX:+UseConcMarkSweepGC, -XX:CMSInitiatingOccupancyFraction=75, -XX:+UseCMSInitiatingOccupancyOnly, -XX:+AlwaysPreTouch, -Xss1m, -Djava.awt.headless=true, -。。。。。。。
[2019-01-06T21:20:31,484][INFO ][o.e.c.m.MetaDataIndexTemplateService] [node-1] adding template [.monitoring-kibana] for index patterns [.monitoring-kibana-6-*]
[2019-01-06T21:20:31,757][INFO ][o.e.l.LicenseService ] [node-1] license [bd56be2a-ada7-47f8-a109-725b88938187] mode [basic] - valid
注意:启动时,其他服务器上也都启动elasticsearch服务才能组成一个集群。
浏览器测试
浏览器输入:http://192.168.1.90:9200/
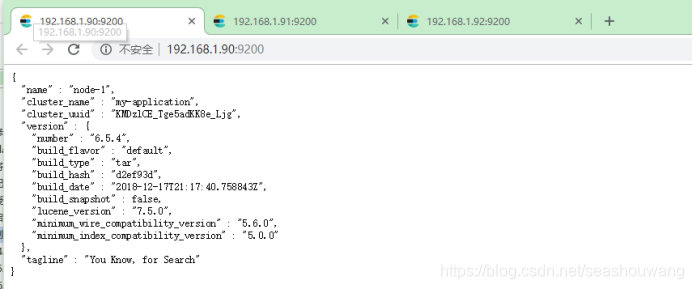
以上表示服务启动成功!
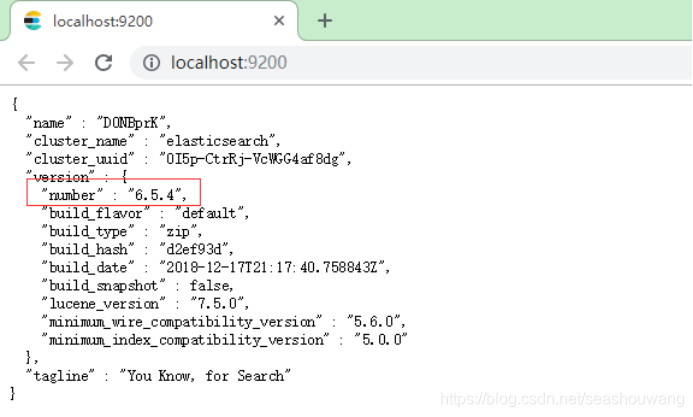
结果解析:
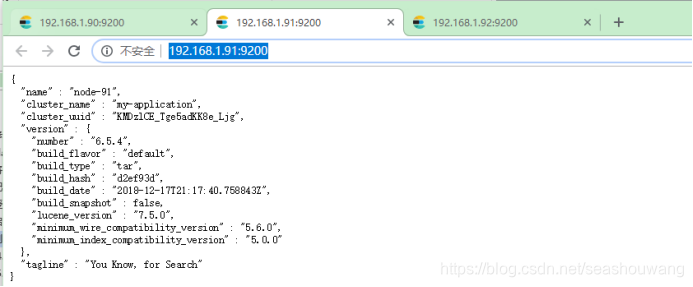
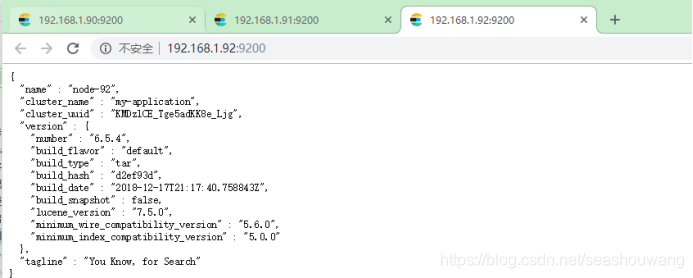
·name———Elasticsearch实例的名字,默认情况下它将从名字列表中随机选择一个,其设置是在config/elasticsearch.yml文件中;
·version———版本号,以json格式表示了一组信息,其中:
number字段代表了当前运行Elasticserch的版本号;
build_snashot字段代表了当前版本是否是从源代码构建而来;
lucene_version表示Elasticsearch所基于的Lucene的版本;
·tagline———包含了Elasticsearch的第一个tagline:“You Know, for Search”。
浏览器输入:http://192.168.1.91:9200/
浏览器输入:http://192.168.1.92:9200/
es安装脚本:
创建es安装脚本文件,vim elasticsearch-intall.sh
#!/bin/bash
#配置elasticsearch的安装目录 修改的地方1 脚本可以自己创建
currentTime=$(date '+%Y-%m-%d %H:%M:%S')
echo -e "请输入es的安装目录,不存在脚本自动创建,例如 /opt/es"
read installpath

#创建安装的目录
if [ ! -d $installpath ]; then
   mkdir -p $installpath
fi
if [ ! -d $installpath ]; then
  echo "创建目录$installpath失败!请检查目录是否有权限"
  exit
fi


#检查文件是否存在
install_home=`find $installpath -name  'elasticsearch-*' -type d | awk  '{print $1}' | head -n 1`
if [ $? -eq 0 ]; then
   echo "该文件已存在该目录:$install_home,安装后将覆盖原文件"
fi

#进入到该目录
#cd $installpath

#创建用户
groupadd es
echo "创建用户组:es"
useradd -g es es
echo "创建用户:es"
passwd es


#解压tar包
currentdir=$(cd $(dirname $0); pwd)
echo "当前目录:$currentdir"
#wget https://artifacts.elastic.co/downloads/elasticsearch/elasticsearch-6.5.4.tar.gz

ls | grep 'elasticsearch-.*[gz]$'
if [ $? -ne 0 ]; then
   #当前目录没有es的压缩包
   echo "在$currentdir下没有发现elasticsearch-*.tar.gz,请自行上传!"
   exit
else
   #解压
   echo "解压缩进行中............."
   tar -xf $currentdir/$(ls | grep 'elasticsearch-.*[gz]$') -C $installpath
   echo "解压缩完成,文件目录:$installpath"
fi

#安装目录
#install_home=`ls $installpath | grep 'elasticsearch-.*'`
install_home=`find $installpath -name  'elasticsearch-*' -type d | awk  '{print $1}' | head -n 1`
echo "安装文件目录:$install_home"

#授权
chown -R es:es $install_home

data_path=$install_home/data
#if [ ! -d ${path} ];then
if [ -d ${data_path} ];then
    echo dir ${data_path} exist!
else
    mkdir $data_path
    chmod 777 -R $data_path
fi

logs_path=$install_home/logs
#if [ ! -d ${path} ];then
if [ -d ${logs_path} ];then
    echo dir ${logs_path} exist!
else
    mkdir $logs_path
    chmod 777 -R $logs_path
fi

#配置目录
#conf_path=$installpath/$install_home/config
conf_path=$install_home/config
echo "配置文件目录:$conf_path"

#修改配置文件
echo -e "请输入您的主机ip:例如 192.168.8.21"
read serverip
echo "network.host: ${serverip}">>$conf_path/elasticsearch.yml

echo -e "请输入访问端口:例如9200"
read port
echo "http.port: ${port}">>$conf_path/elasticsearch.yml

echo "cluster.name: elasticsearch">>$conf_path/elasticsearch.yml
echo "node.name: node-es">>$conf_path/elasticsearch.yml

echo "path.data: ${data_path}">>$conf_path/elasticsearch.yml
echo "path.logs: ${logs_path}">>$conf_path/elasticsearch.yml

echo "bootstrap.memory_lock: false">>$conf_path/elasticsearch.yml
echo "bootstrap.system_call_filter: false">>$conf_path/elasticsearch.yml
es启动脚本
创建启动脚本 /etc/init.d/elasticsearch.sh,添加到开机自启。
#!/bin/sh
#chkconfig: 2345 80 05
#description: es_server

#找到本机安装目录
PATH=/usr/local/bin:/sbin:/usr/bin:/bin

ES_HOME=/home/daison/elasticsearch/elasticsearch-6.5.4/bin/

nohup $ES_HOME/bin/elasticsearch > $ES_HOME/logs/elasticsearch.log 2>&1 &
chkconfig --add elasticsearch
1.3.8.安装Kibana-6.5插件
Kibana 是一个为 Logstash 和 ElasticSearch 提供的日志分析的 Web 接口。可使用它对日志进行高效的搜索、可视化、分析等各种操作。
Kibana是一个开源的分析与可视化平台,设计出来用于和Elasticsearch一起使用的。你可以用kibana搜索、查看、交互存放在Elasticsearch索引里的数据,使用各种不同的图表、表格、地图等kibana能够很轻易地展示高级数据分析与可视化。
Kibana让我们理解大量数据变得很容易。它简单、基于浏览器的接口使你能快速创建和分享实时展现Elasticsearch查询变化的动态仪表盘。安装Kibana非常快,你可以在几分钟之内安装和开始探索你的Elasticsearch索引数据不需要写任何代码,没有其他基础软件依赖。
下载kibana插件
下载地址:https://www.elastic.co/downloads/
历史版本下载地址:https://www.elastic.co/cn/downloads/past-releases#kibana
本次下载kibana-6.5.4-linux-x86_64.tar.gz
解压安装
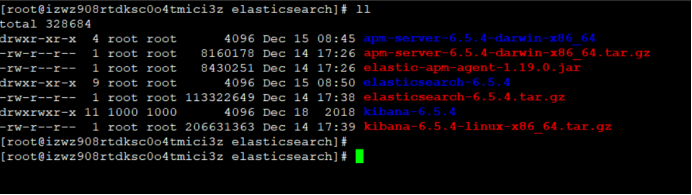
[root@izwz908rtdksc0o4tmici3z elasticsearch]#
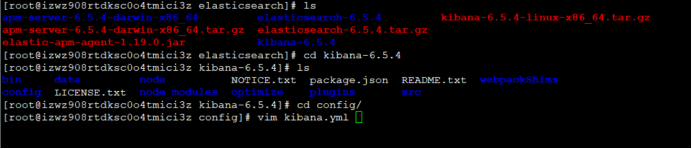
[root@izwz908rtdksc0o4tmici3z elasticsearch]# tar -xf kibana-6.5.4-linux-x86_64.tar.gz
修改配置文件config/kibana.yml
修改配置文件vi config/kibana.yml的elasticsearch.url属性即可
添加elasticsearch.url: http://192.168.1.63:9200 #es安装服务地址,
[root@izwz908rtdksc0o4tmici3z config]# vim kibana.yml
添加以下内容:
#Kibana is served by a back end server. This controls which port to use.
#server.port: 5601

#The host to bind the server to.
#server.host: "0.0.0.0"
server.host: "localhost"

#The Elasticsearch instance to use for all your queries.
elasticsearch.url: "http://localhost:9200"

#Kibana uses an index in Elasticsearch to store saved searches, visualizations
#and dashboards. It will create a new index if it doesn't already exist.
kibana.index: ".kibana"
#The default application to load.
#kibana.defaultAppId: "discover"
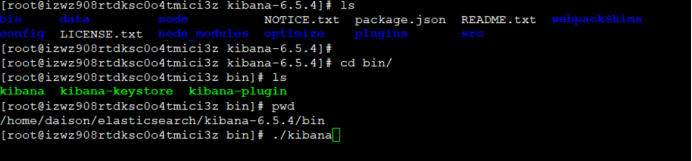
运行kibana
Run bin/kibana (or bin\kibana.bat on Windows)
通过 ./bin/kibana启动服务,默认占用5601端口,可通过http://[ip]:5601在浏览器访问
[root@izwz908rtdksc0o4tmici3z bin]# ./kibana
kibana一键安装脚本
#!/bin/bash
#配置Kibana的安装目录 修改的地方1 脚本可以自己创建
currentTime=$(date '+%Y-%m-%d %H:%M:%S')
echo -e "请输入kibana的安装目录,不存在脚本自动创建,例如 /home/install"
read installpath

#创建Kibana安装的目录
if [ ! -d $installpath ]; then
   mkdir -p $installpath
fi
if [ ! -d $installpath ]; then
  echo "创建目录$installpath失败!请检查目录是否有权限"
  exit
fi

#检查文件是否存在
install_home=`find $installpath -name  'kibana-*' -type d | awk  '{print $1}' | head -n 1`
if [ $? -eq 0 ]; then
   echo "该文件已存在该目录:$install_home,安装后将覆盖原文件"
fi


#解压tar包
currentdir=$(cd $(dirname $0); pwd)
echo "当前目录:$currentdir"
#wget https://artifacts.elastic.co/downloads/kibana/kibana-6.5.4-linux-x86_64.tar.gz

ls | grep 'kibana-.*[gz]$'
if [ $? -ne 0 ]; then
   #当前目录没有es的压缩包
   echo "在$currentdir下没有发现kibana-*.tar.gz,请自行上传!"
   exit
else
   #解压
   echo "解压缩文进行中..........."
   tar -xf $currentdir/$(ls | grep 'kibana-.*[gz]$') -C $installpath

   echo "解压缩完成,文件目录:$installpath"
fi

#安装目录
#kibanabanben=`ls $installpath| grep 'kibana-.*'`
install_home=`find $installpath -name  'kibana-*' -type d | awk  '{print $1}' | head -n 1`
echo "安装文件目录:$install_home"

#配置文件目录
confpath=$install_home/config
echo "配置文件目录:$confpath"

#修改配置文件
echo -e "请输入您的主机ip:例如 192.168.8.21"
read serverip
echo "elasticsearch.url: \"http://${serverip}:9200\"" >>$confpath/kibana.yml

echo -e "请输入kibana的访问端口:例如 5601"
read kibanaport
echo "server.port: ${kibanaport}">>$confpath/kibana.yml

echo 'server.host: "0.0.0.0"'>>$confpath/kibana.yml
echo 'kibana.index: ".kibana"'>>$confpath/kibana.yml
kibana开机启动脚本
创建vimi /etc/init.d/kibana-server开机启动脚本,内容如下:
#!/bin/sh
#chkconfig: 2345 80 05
#description: kibana-server

export NODE_PATH=/usr/local/node-v10.23
export PATH=$PATH:$NODE_PATH/bin

KIBANA_HOME=/home/daison/elasticsearch/kibana-6.5.4

nohup $KIBANA_HOME/bin/kibana > $KIBANA_HOME/logs/kiban.log 2>&1 &
将该脚本添加到开机启动即可
chkconfig --add kibana-server
kibana一键启动脚本
#!/bin/sh
# chkconfig: 2345 10 90
# description: Start and Stop kibana

#找到本机安装目录
PATH=/usr/local/bin:/sbin:/usr/bin:/bin

#node 安装目录
export NODE_PATH=/usr/local/node-v10.23
export PATH=$PATH:$NODE_PATH/bin

#kibana的默认端口,kibana.conf文件中
PORT=5601

#kibana目录
KIBANA_HOME=/home/daison/kibana-6.5.4-linux-x86_64

#kibana服务端的命令
EXEC=$KIBANA_HOME/bin/kibana &
case "$1" in
	start)
		param=`fuser -n tcp 5601`
		if [ "$param"="0" ]; then
		   echo "kibana is running ............."
		else
		   echo "starting kibana server..........."
		   $EXEC
		fi
		;;
	stop)
		param=`fuser -n tcp 5601`
		kill -9 $param
		echo "kibana stop ..........."
		;;
	restart|force-reload)
		${0} stop
		${0} start
		;;
	*)
		echo "usage: /etc/init.d/kibana {start|stop|restart|force-reload} >&2"
esac
登陆测试
浏览器输入:http://192.168.1.63:5601/
1.3.9.apm-server6.5安装
下载地址:
https://www.elastic.co/cn/downloads/
历史版本下载:
https://www.elastic.co/cn/downloads/past-releases#apm-server
Apm-server6.5:
https://artifacts.elastic.co/downloads/apm-server/apm-server-6.5-windows-x86_64.zip
https://artifacts.elastic.co/downloads/apm-server/apm-server-6.5.4-darwin-x86_64.tar.gz
配置文档:
https://www.elastic.co/guide/en/apm/server/current/elasticsearch-output.html
安装
1、首页需要安装Elasticsearch and Kibana,并启动es和kibana.
2、下载apm-server
3、修改apm-server.yml配置文件
配置Elasticsearch输出编辑apm-server.yml
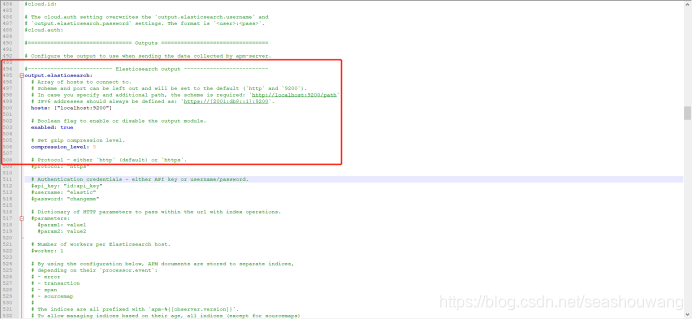
Elasticsearch输出使用Elasticsearch HTTP API将事件直接发送到Elasticsearch。
配置示例:
output.elasticsearch:
hosts: [“https://myEShost:9200”]
要启用SSL,请添加https到hosts下定义的所有URL。
通过elasticsearch 输出将数据发送到安全群集时,APM Server可以使用以下任何一种身份验证方法:
基本身份验证凭据(用户名和密码)。
基于令牌的(API密钥)身份验证。
公钥基础结构(PKI)证书。
基本身份验证:
output.elasticsearch:
  hosts: ["https://myEShost:9200"]
  username: "apm_writer"
  password: "YOUR_PASSWORD"
API密钥验证:
output.elasticsearch:
  hosts: ["https://myEShost:9200"]
  api_key: "KnR6yE41RrSowb0kQ0HWoA"
PKI证书认证:
output.elasticsearch:
  hosts: ["https://myEShost:9200"]
  ssl.certificate: "/etc/pki/client/cert.pem"
  ssl.key: "/etc/pki/client/cert.key"
4、启动apm-server服务-
./apm-server -e
amp-server启动默认端口是8200。
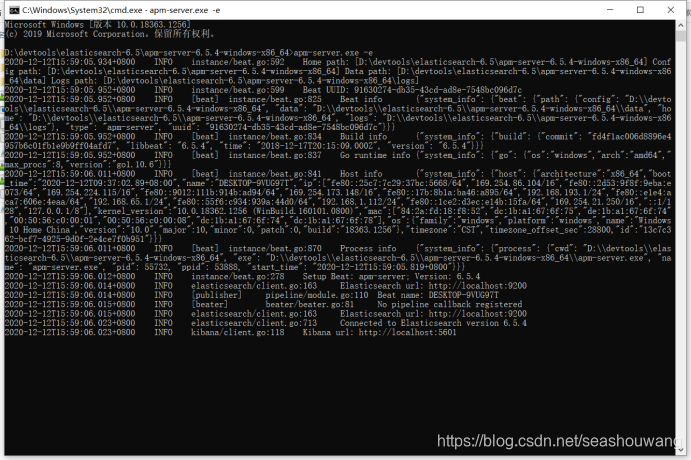
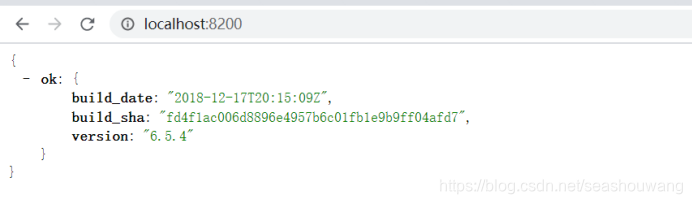
登陆页面查看http://localhost:8200/
yum安装
YUMedit
To add the apm-server repository for YUM:
Download and install the public signing key:
sudo rpm --import https://packages.elastic.co/GPG-KEY-elasticsearch
Create a file with a .repo extension (for example, elastic.repo) in your /etc/yum.repos.d/ directory and add the following lines:
[elastic-7.x]
name=Elastic repository for 7.x packages
baseurl=https://artifacts.elastic.co/packages/7.x/yum
gpgcheck=1
gpgkey=https://artifacts.elastic.co/GPG-KEY-elasticsearch
enabled=1
autorefresh=1
type=rpm-md
The package is free to use under the Elastic license. An alternative package which contains only features that are available under the Apache 2.0 license is also available. To install it, use the following baseurl in your .repo file:
baseurl=https://artifacts.elastic.co/packages/oss-7.x/yum
Your repository is ready to use. For example, you can install APM Server by running:
sudo yum install apm-server
To configure APM Server to start automatically during boot, run:
sudo systemctl enable apm-server
If your system does not use systemd then run:
sudo chkconfig --add apm-server
1.3.10.Agent1.19代理配置
Agent官网:
https://www.elastic.co/guide/en/apm/agent/java/current/index.html
agent配置:
https://www.elastic.co/guide/en/apm/agent/java/current/setup-javaagent.html
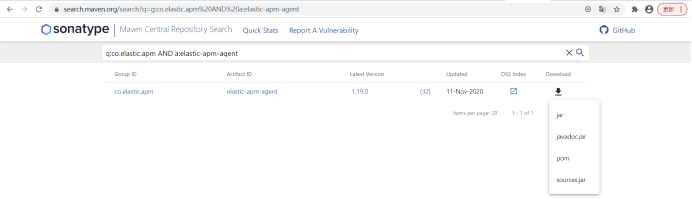
下载地址:https://search.maven.org/search?q=a:elastic-apm-agent
1、下载APM代理
从Maven Central下载代理jar 。不要不加剂作为依赖于你的应用程序。
elastic-apm-agent下载:https://search.maven.org/search?q=a:elastic-apm-agent
2、使用javaagent标志启动您的应用程序
添加-javaagent标志并为代理配置系统属性。
设置所需的服务名称(允许的字符:az,AZ,0-9,-,_和空格)
设置自定义APM服务器URL(默认:http:// localhost:8200)
设置您的应用程序的基本软件包
复制代码段
java -javaagent:/path/to/elastic-apm-agent-<version>.jar \
     -Delastic.apm.service_name=my-application \
     -Delastic.apm.server_url=http://localhost:8200 \
     -Delastic.apm.application_packages=org.example \
     -jar my-application.jar
参数说明:
-javaagent: 代理包路径
Service_name: 服务名称,自定义,最好英文
Server_url: 服务请求地址,及apm-server服务地址
application_packages:应用程序包路径
-jar:应用程序jar包
有关配置选项和高级用法,请参阅文档
https://www.elastic.co/guide/en/apm/agent/java/current/setup.html
示例:
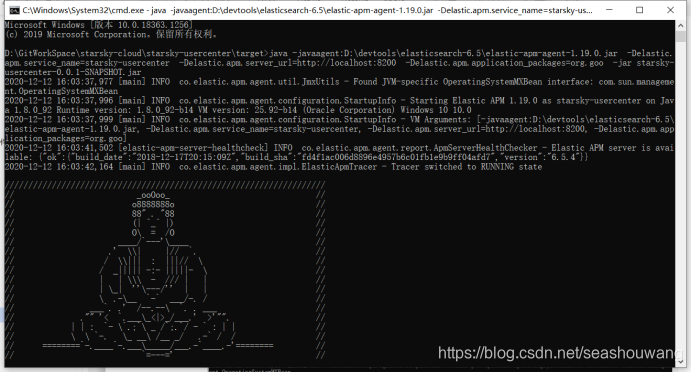
例如我们在命令行启动一个应用服务starsky-usercenter-0.0.1-SNAPSHOT.jar,则执行如下命令
java -javaagent:D:\devtools\elasticsearch-6.5\elastic-apm-agent-1.19.0.jar \
     -Delastic.apm.service_name=starsky-usercenter \
     -Delastic.apm.server_url=http://localhost:8200 \
     -Delastic.apm.application_packages=org.goo \
     -jar starsky-usercenter-0.0.1-SNAPSHOT.jar
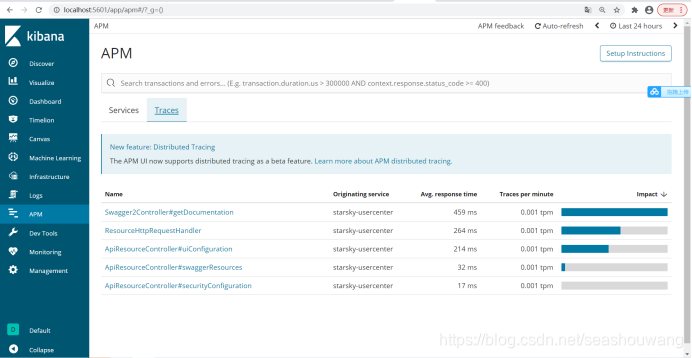
访问服务http://localhost:9999/sys/swagger-ui.html接口,登陆kibana页面查看服务如下:
http://localhost:5601/
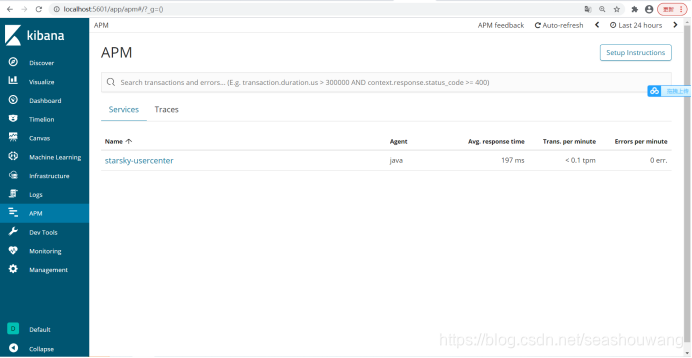
收集数据:
日志信息:
1.3.11.Filebeat安装
1、安装Elasticsearch GeoIP和用户代理插件
该模块需要两个默认未安装的Elasticsearch插件,在Elasticsearch安装文件夹中,运行:
bin/elasticsearch-plugin install ingest-geoip
bin/elasticsearch-plugin install ingest-user-agent
2、下载并安装Filebeat
第一次使用Filebeat?请参阅《入门指南》
https://www.elastic.co/guide/en/beats/filebeat/6.5/filebeat-getting-started.html
curl -L -O https://artifacts.elastic.co/downloads/beats/filebeat/filebeat-6.5.4-darwin-x86_64.tar.gz
tar xzvf filebeat-6.5.4-darwin-x86_64.tar.gz cd filebeat-6.5.4-darwin-x86_64/
3、编辑配置
修改filebeat.yml以设置连接信息:
output.elasticsearch:
  hosts: ["<es_url>"]
  username: "elastic"
  password: "<password>"
setup.kibana:
  host: "<kibana_url>"
用户密码在哪里,Elasticsearch的URL是,Kibana的URL。elastic<es_url><kibana_url>
4、启用并配置apache2模块
在安装目录中,运行:
./filebeat modules enable apache2
修改modules.d/apache2.yml文件中的设置。
5、启动Filebeat
该setup命令将加载Kibana仪表板。如果已经设置了仪表板,请忽略此命令。
./filebeat setup
./filebeat -e
1.4.安装ik分词器
下载elasticsearch中文分词器:
https://github.com/medcl/elasticsearch-analysis-ik
https://github.com/medcl/elasticsearch-analysis-ik/tree/2.x
这里默认的是master的,但是master的项目需要用gradle编译,这里选择2.x版本。
1、下载开源项目
2、打包ik分词器
下载后的压缩包解压后进去发现是pom工程, 这里是用maven对此工程进行编译,前提要安装maven.
分别执行如下命令:
mvn clean
mvn compile
mvn package
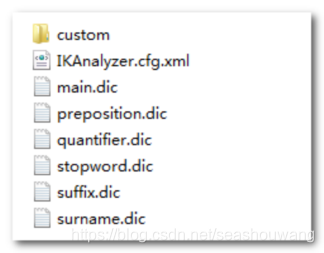
3、打包完成后,进入target/release目录,将下列文件,拷贝到es安装目录中/plugins/analysis-ik目录下
4、进入target/release/config 目录,将所有配置文件,复制%es%/config 目录下。
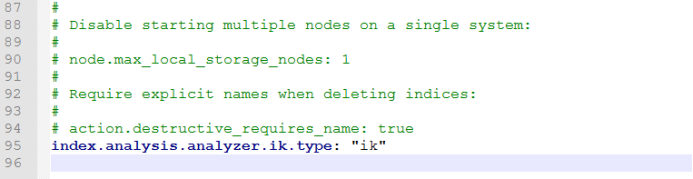
5、配置elasticsearch.yml
添加index.analysis.analyzer.ik.type: "ik"配置给ik解析器添加一个标示
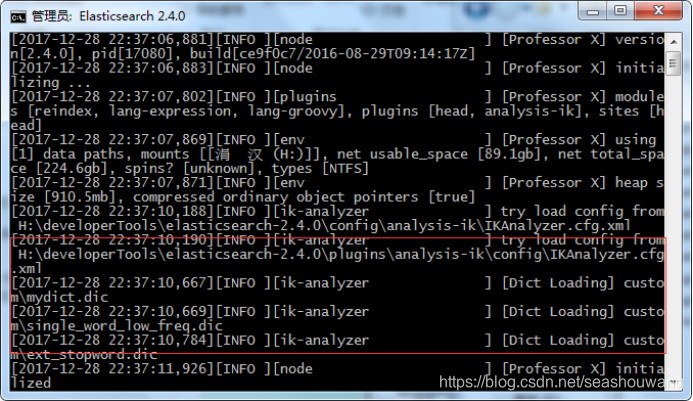
6、重启es
通过日志可以查询到,ik分词器已经启动。
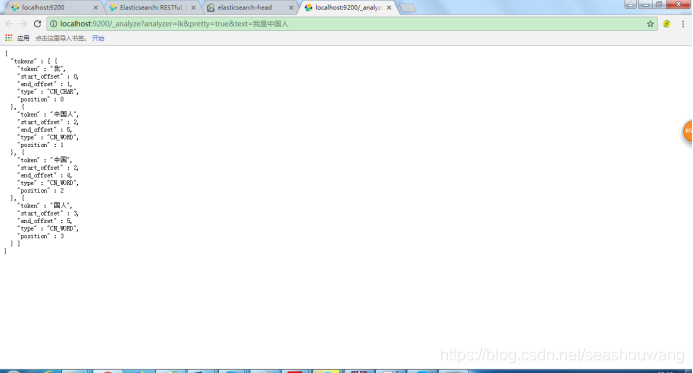
7、访问测试:
http://localhost:9200/_analyze?analyzer=ik&pretty=true&text=我是中国人
1.7.elasticsearch问题
1.7.1.Elasticsearch is still initializing the kibana index.
kibana启动后,登陆页面提示错误: Elasticsearch is still initializing the kibana index
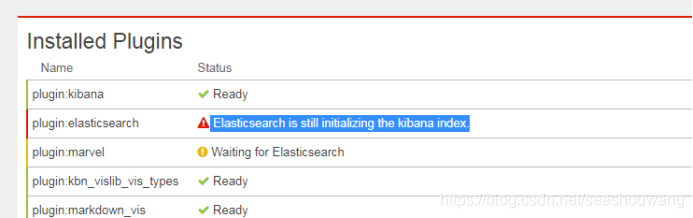
解决办法
- /_plugin/gui/ 使用gui删除.kibana的索引
- curl -XDELETE http://localhost:9200/.kibana
 这就说明logstash没有把日志写入到elasticsearch。
检查logstash与elasticsearch之间的通讯是否有问题,一般问题就在这。
解决的方法:
将配置文件kibana.yml中下面一项的配置放开(#注释符去掉)即可:
kibana.index: “.kibana”
1.7.2.Marvel version 2.4.6 is not supported with Kibana 4.4.1. Kibana version 4.6.x is expected.
Marvel version 2.4.6 不支持Kibana 4.4.1.,必须是4.6.x 以上才可以,替换更高版本即可。
1.7.3.java.nio.file.AccessDeniedException: /opt/elasticsearch-6.5.4/config/jvm.options
当前启动用户的权限不足,赋予权限,使用root用户给普通用户授权。
chown -R 用户名:用户名 文件(目录)名
chmod 755 文件(目录)名
1.7.4.bootstrap checks failed
[2019-01-06T21:07:18,741][DEBUG][o.e.a.ActionModule ] [node-1] Using REST wrapper from plugin o
rg.elasticsearch.xpack.security.Security
[2019-01-06T21:07:19,151][INFO ][o.e.d.DiscoveryModule ] [node-1] using discovery type [zen] and h
ost providers [settings]
[2019-01-06T21:07:20,831][INFO ][o.e.n.Node ] [node-1] initialized
[2019-01-06T21:07:20,832][INFO ][o.e.n.Node ] [node-1] starting …
[2019-01-06T21:07:21,617][INFO ][o.e.t.TransportService ] [node-1] publish_address {192.168.1.90:93
00}, bound_addresses {[::]:9300}
[2019-01-06T21:07:21,657][INFO ][o.e.b.BootstrapChecks ] [node-1] bound or publishing to a non-loo
pback address, enforcing bootstrap checks
[2019-01-06T21:07:21,665][ERROR][o.e.b.Bootstrap ] [node-1] node validation exception
2 bootstrap checks failed
1: max file descriptors [4096] for elasticsearch process is too low, increase to at least [65536]
2: max virtual memory areas vm.max_map_count [65530] is too low, increase to at least [262144]
[2019-01-06T21:07:21,681][INFO ][o.e.n.Node ] [node-1] stopping …
[2019-01-06T21:07:21,753][INFO ][o.e.n.Node ] [node-1] stopped
[2019-01-06T21:07:21,753][INFO ][o.e.n.Node ] [node-1] closing …
[2019-01-06T21:07:21,771][INFO ][o.e.n.Node ] [node-1] closed
翻译内容:
解决方法 前两个在/etc/security/limits.conf文件中追加配置,centos是当前启动es用户
centos hard nofile 65536
centos hard nproc 5000
centos soft nofile 65536
centos soft nproc 5000
后面一个在sysctl.conf文件中添加配置
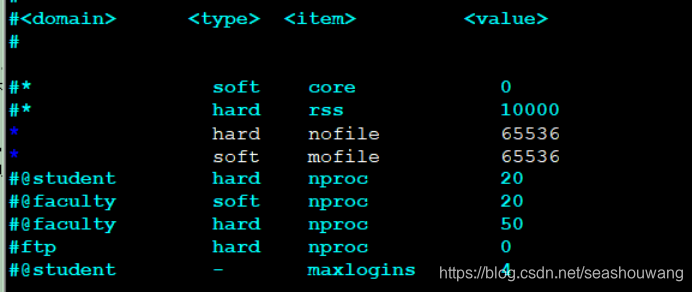
vm.max_map_count=655360
然后执行
sysctl -p
重启es
原文:https://blog.csdn.net/DanKanHu/article/details/82756408
解决办法:
修改/etc/security/limits.conf文件,添加或修改如下行:
-
hard nofile 65536 -
soft nofile 65536
2.max virtual memory areas vm.max…
修改 /etc/sysctl.conf 文件,添加如下行:
vm.max_map_count=262144
修改好了以后,调用sysctl -a查看,发现参数并没有变动,要重启才可以。
重启以后,再启动es即可,就可以通过主机ip访问。

Cannot open file logs/gc.log due to Permission denied
Java HotSpot™ 64-Bit Server VM warning: Cannot open file logs/gc.log due to Permission denied
Exception in thread “main” org.elasticsearch.bootstrap.BootstrapException: java.nio.file.AccessDeniedException: /home/es/elasticsearch-6.4.2/config/elasticsearch.keystore
Likely root cause: java.nio.file.AccessDeniedException: /home/es/elasticsearch-6.4.2/config/elasticsearch.keystore
解决方法:
因为第一次启动不小心用了root启动,导致用root生成了对应的文件。切换es账号之后,没有对应文件的权限导致,删除相关的东西即可。


 547
547


 被折叠的 条评论
为什么被折叠?
被折叠的 条评论
为什么被折叠?
 到【灌水乐园】发言


