


springboot启动一个项目代码例子如下
SpringApplication.run(xxxx.class, args);
跟踪进去如下
public static ConfigurableApplicationContext run(Class<?> primarySource,
		String... args) {
	return run(new Class<?>[] { primarySource }, args);
}

public static ConfigurableApplicationContext run(Class<?>[] primarySources,
		String[] args) {
	return new SpringApplication(primarySources).run(args);
}
上面是创建了一个SpringApplication对象,然后调用其run方法
SpringApplication构造方法:
public SpringApplication(Class<?>... primarySources) {
	this(null, primarySources);
}

public SpringApplication(ResourceLoader resourceLoader, Class<?>... primarySources) {
	//上面传null
	this.resourceLoader = resourceLoader;
	Assert.notNull(primarySources, "PrimarySources must not be null");
	//上面传运行的主方法的类
	this.primarySources = new LinkedHashSet<>(Arrays.asList(primarySources));
	//三种类型:REACTIVE|NONE|SERVLET;REACTIVE对应spring5新增的webflux;SERVLET是传统servlet
	this.webApplicationType = deduceWebApplicationType();
	//从META-INF/spring.factories文件获取ApplicationContextInitializer类型的类
	setInitializers((Collection) getSpringFactoriesInstances(
			ApplicationContextInitializer.class));
	//从META-INF/spring.factories文件获取ApplicationListener类型的类
	setListeners((Collection) getSpringFactoriesInstances(ApplicationListener.class));
	//获取运行的主方法的类
	this.mainApplicationClass = deduceMainApplicationClass();
}
创建了SpringApplication对象后,接着执行它的run方法
public ConfigurableApplicationContext run(String... args) {
	StopWatch stopWatch = new StopWatch();
	stopWatch.start();//性能监控
	//Spring容器类
	ConfigurableApplicationContext context = null;
	//SpringBootExceptionReporter类
	Collection<SpringBootExceptionReporter> exceptionReporters = new ArrayList<>();
	configureHeadlessProperty();//设置系统的“java.awt.headless”属性
	//从META-INF/spring.factories中获得SpringApplicationRunListener类型的类,放进SpringApplicationRunListeners
	SpringApplicationRunListeners listeners = getRunListeners(args);
	listeners.starting();//开始事件
	try {
		//命令行启动的参数封装到DefaultApplicationArguments
		ApplicationArguments applicationArguments = new DefaultApplicationArguments(
				args);
		//【标记1】实例或配置好environment
		ConfigurableEnvironment environment = prepareEnvironment(listeners,
				applicationArguments);
		//对系统中的“spring.beaninfo.ignore”属性进行处理
		configureIgnoreBeanInfo(environment);
		//打印招牌
		Banner printedBanner = printBanner(environment);
		//【标记2】创建容器,三种类型
		context = createApplicationContext();
		//从META-INF/spring.factories中获取SpringBootExceptionReporter类型的类
		exceptionReporters = getSpringFactoriesInstances(
				SpringBootExceptionReporter.class,
				new Class[] { ConfigurableApplicationContext.class }, context);
		//【标记3】准备容器
		prepareContext(context, environment, listeners, applicationArguments,
				printedBanner);
		//刷新容器
		refreshContext(context);
		//留给子类实现
		afterRefresh(context, applicationArguments);
		//性能监控停止
		stopWatch.stop();
		//打印信息,主要关于启动时间
		if (this.logStartupInfo) {
			new StartupInfoLogger(this.mainApplicationClass)
					.logStarted(getApplicationLog(), stopWatch);
		}
		//监听器回调started
		listeners.started(context);
		//执行实现了ApplicationRunner、CommandLineRunner接口的bean的run方法
		callRunners(context, applicationArguments);
	}
	catch (Throwable ex) {
		//会回调listener的failed方法
		handleRunFailure(context, ex, exceptionReporters, listeners);
		throw new IllegalStateException(ex);
	}

	try {
		//监听器回调running方法
		listeners.running(context);
	}
	catch (Throwable ex) {
		handleRunFailure(context, ex, exceptionReporters, null);
		throw new IllegalStateException(ex);
	}
	return context;
}
上面的springboot的启动流程一目了然了,准备好环境environment,准备好容器context,然后加载好各种资源到容器中,接着启动。
【标记1】实例或配置好environment
private ConfigurableEnvironment prepareEnvironment(
		SpringApplicationRunListeners listeners,
		ApplicationArguments applicationArguments) {
	// 创建Environment类型对象,三种:StandardServletEnvironment|StandardReactiveWebEnvironment|StandardEnvironment
	ConfigurableEnvironment environment = getOrCreateEnvironment();
	//配置Environment的一些属性
	configureEnvironment(environment, applicationArguments.getSourceArgs());
	//监听器回调environmentPrepared方法
	listeners.environmentPrepared(environment);
	//绑定environment(其实还没看懂干嘛)
	bindToSpringApplication(environment);
	if (!this.isCustomEnvironment) {
		//这里再次检测是否需要把environment转为对应类型的environment,上面getOrCreateEnvironment里不是判断过了吗??
		environment = new EnvironmentConverter(getClassLoader())
				.convertEnvironmentIfNecessary(environment, deduceEnvironmentClass());
	}
	//这里把environment中的propertySources成员中的configurationProperties键对应的值替换为SpringConfigurationPropertySources
	ConfigurationPropertySources.attach(environment);
	return environment;
}
【标记2】创建容器,三种类型
protected ConfigurableApplicationContext createApplicationContext() {
	Class<?> contextClass = this.applicationContextClass;
	if (contextClass == null) {
		try {
			switch (this.webApplicationType) {
			case SERVLET:
				contextClass = Class.forName(DEFAULT_WEB_CONTEXT_CLASS);
				break;
			case REACTIVE:
				contextClass = Class.forName(DEFAULT_REACTIVE_WEB_CONTEXT_CLASS);
				break;
			default:
				contextClass = Class.forName(DEFAULT_CONTEXT_CLASS);
			}
		}
		catch...
	}
	return (ConfigurableApplicationContext) BeanUtils.instantiateClass(contextClass);
}
【标记3】准备容器
private void prepareContext(ConfigurableApplicationContext context,
		ConfigurableEnvironment environment, SpringApplicationRunListeners listeners,
		ApplicationArguments applicationArguments, Banner printedBanner) {
	//设置environment
	context.setEnvironment(environment);
	//设置bean名字生成器、resourceloader、classloader、ApplicationConversionService
	postProcessApplicationContext(context);
	//执行从META-INF/spring.factories中获取的ApplicationContextInitializer类型的initialize方法
	applyInitializers(context);
	//监听器回调contextPrepared方法,容器已经准备好
	listeners.contextPrepared(context);
	//打印信息:主要关于active profile的
	if (this.logStartupInfo) {
		logStartupInfo(context.getParent() == null);
		logStartupProfileInfo(context);
	}
	// Add boot specific singleton beans
	ConfigurableListableBeanFactory beanFactory = context.getBeanFactory();
	//向beanFactory注册了bean
	beanFactory.registerSingleton("springApplicationArguments", applicationArguments);
	if (printedBanner != null) {
		beanFactory.registerSingleton("springBootBanner", printedBanner);
	}
	if (beanFactory instanceof DefaultListableBeanFactory) {
		//设置是否允许覆盖bean
		((DefaultListableBeanFactory) beanFactory)
				.setAllowBeanDefinitionOverriding(this.allowBeanDefinitionOverriding);
	}
	// Load the sources
	Set<Object> sources = getAllSources();
	Assert.notEmpty(sources, "Sources must not be empty");
	//开始加载资源
	load(context, sources.toArray(new Object[0]));
	//监听器回调contextLoaded,容器已经加载完
	listeners.contextLoaded(context);
}
prepareContext方法中会执行ApplicationContextInitializer的initialize方法,执行完的时候,当prepareContext方法执行完容器已加载好了资源
总结一下SpringApplicationRunListener的回调顺序
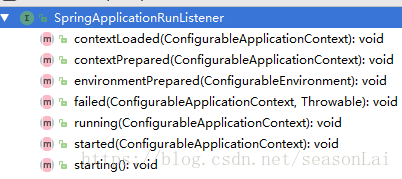
SpringApplicationRunListener共7个方法,回调顺序为:
starting -> environmentPrepared -> contextPrepared -> contextLoaded -> started -> running
failed方法在running前执行有错误发现才回调
对应事件为:
ApplicationStartingEvent -> ApplicationEnvironmentPreparedEvent -> ApplicationContextInitializedEvent -> ApplicationPreparedEvent -> ApplicationStartedEvent -> ApplicationReadyEvent
----------------------------- 分割线 -----------------------------
SpringBoot是使用内嵌的服务容器运行起来的,上面没提及到哪里启动了服务容器,如servlet、reactive。其实是在refreshContext(context)刷新容器的时候启动的。
	private void refreshContext(ConfigurableApplicationContext context) {
		refresh(context);//刷新容器
		if (this.registerShutdownHook) {
			try {
				context.registerShutdownHook();//注册钩子方法
			}
			catch (AccessControlException ex) {
				// Not allowed in some environments.
			}
		}
	}

	protected void refresh(ApplicationContext applicationContext) {
		Assert.isInstanceOf(AbstractApplicationContext.class, applicationContext);
		((AbstractApplicationContext) applicationContext).refresh();
	}

	public void refresh() throws BeansException, IllegalStateException {
        ...
        synchronized(this.startupShutdownMonitor) {
            ...

            try {
                ...
                this.onRefresh();
                ...
                this.finishRefresh();
            } catch ...

        }
    }
上面有提到applicationContext会在三种类型中选一种,其中ServletWebServerApplicationContext和ReactiveWebServerApplicationContext都重写了onRefresh()、finishRefresh()方法。
以ServletWebServerApplicationContext为例
	protected void onRefresh() {
		super.onRefresh();
		try {
			createWebServer();
		}
		catch (Throwable ex) {
			throw new ApplicationContextException("Unable to start web server", ex);
		}
	}

	protected void finishRefresh() {
		super.finishRefresh();
		WebServer webServer = startWebServer();
		if (webServer != null) {
			publishEvent(new ServletWebServerInitializedEvent(webServer, this));
		}
	}
可以看到在onRefresh()创建服务容器,在finishRefresh()启动容器。
	private void createWebServer() {
		WebServer webServer = this.webServer;
		ServletContext servletContext = getServletContext();
		if (webServer == null && servletContext == null) {
			//去spring容器中找ServletWebServerFactory类型的bean
			//springboot默认注入TomcatServletWebServerFactory
			ServletWebServerFactory factory = getWebServerFactory();
			this.webServer = factory.getWebServer(getSelfInitializer());
		}
		else if (servletContext != null) {
			try {
				getSelfInitializer().onStartup(servletContext);
			}
			catch (ServletException ex) {
				throw new ApplicationContextException("Cannot initialize servlet context",
						ex);
			}
		}
		initPropertySources();//向servletContext存入相关配置属性
	}
上面通过工厂模式抽象出ServletWebServerFactory 类,用户可以随意切换servlet容器,如tomcat、jetty等。接下来就是具体工厂根据不同的servlet容器,编程式地创建相关的对象。如tomcat的话就创建Tomcat对象,并配置好service,host、connector等属性。这方面知识需要深入了解相关容器。


 959
959


 被折叠的 条评论
为什么被折叠?
被折叠的 条评论
为什么被折叠?
 到【灌水乐园】发言


