


主启动类
@SpringBootApplication
@MapperScan("com.example.mapper")
public class StableBootApplication {
    public static void main(String[] args) {
        SpringApplication.run(StableBootApplication.class,args);
    }
}
SpringApplication类中有个静态run()方法,最终执行如下:
public static ConfigurableApplicationContext run(Class<?>[] primarySources, String[] args) {
        return (new SpringApplication(primarySources)).run(args);
    }
显然 分为两部分
- 实例化(new) SpringApplication。
- 执行run()方法。
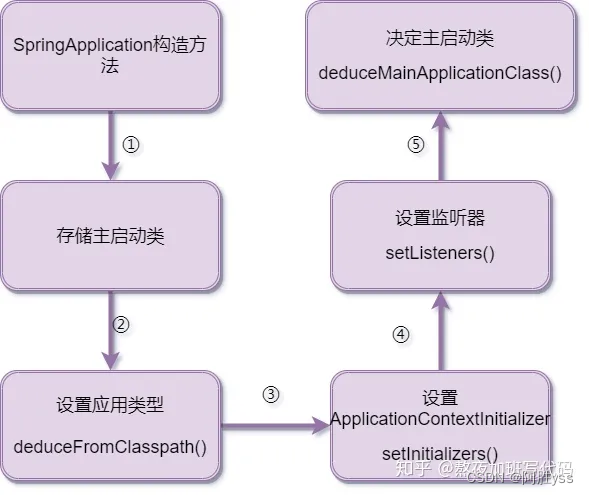
阅读 SpringApplication类的构造函数
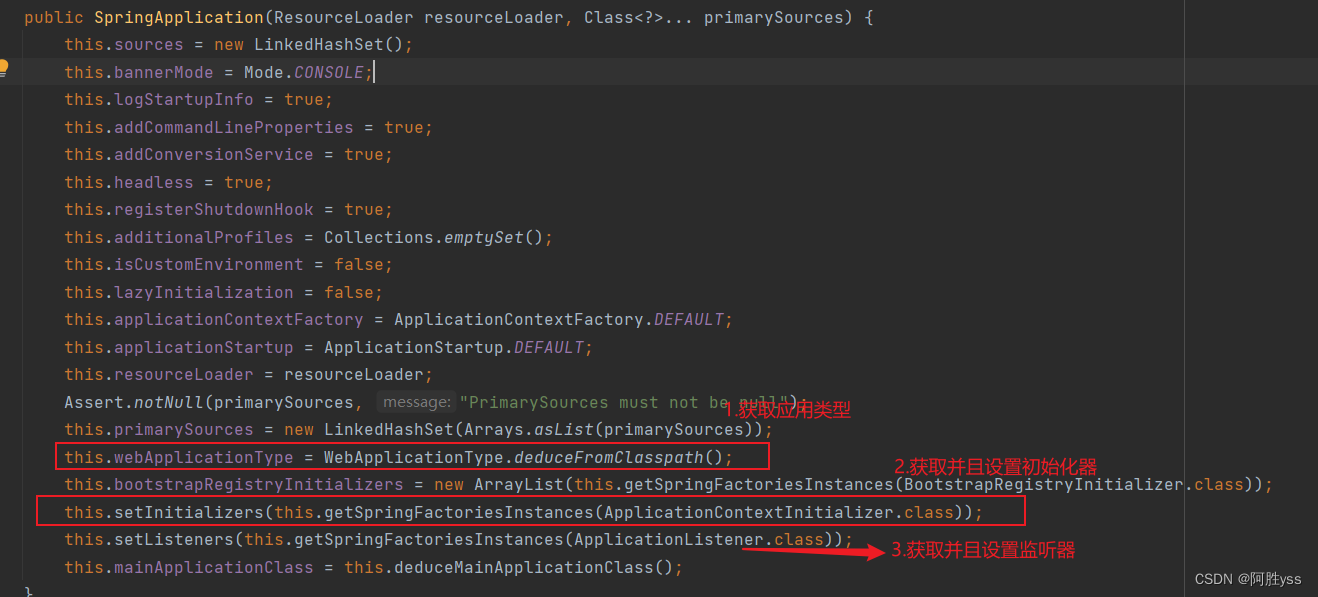
实例化 SpringApplication
获取并且设置应用类型(重要)
应用类型有三种:
- NONE:顾名思义,什么都没有,正常流程走,不额外的启动web容器,比如Tomcat。
- SERVLET:基于servlet的web程序,需要启动内嵌的servletweb容器,比如Tomcat。(常用)
- REACTIVE:基于reactive的web程序,需要启动内嵌reactiveweb容器,作者不是很了解,不便多说
引入 spring-boot-starter-web 则是SERVLET, 基于servlet的web程序
源码如下:
static WebApplicationType deduceFromClasspath() {
    if (ClassUtils.isPresent("org.springframework.web.reactive.DispatcherHandler", (ClassLoader)null) && !ClassUtils.isPresent("org.springframework.web.servlet.DispatcherServlet", (ClassLoader)null) && !ClassUtils.isPresent("org.glassfish.jersey.servlet.ServletContainer", (ClassLoader)null)) {
        return REACTIVE;
    } else {
        String[] var0 = SERVLET_INDICATOR_CLASSES;
        int var1 = var0.length;

        for(int var2 = 0; var2 < var1; ++var2) {
            String className = var0[var2];
            if (!ClassUtils.isPresent(className, (ClassLoader)null)) {
                return NONE;
            }
        }

        return SERVLET;
    }
}
获取并且设置初始化器以及监听器
初始化器以及监听器 调用的方法都是 getSpringFactoriesInstances(类型Type)。
最终逻辑是 从 从类路径META-INF/spring.factories中 加载 初始化器以及监听器 。
初始化器(ApplicationContextInitializer): 初始化某些 IOC容器刷新之前的组件。
监听器(ApplicationListener): 监听特定的事件 比如IOC容器刷新、容器关闭等。
getSpringFactoriesInstances() 方法根据指定的Class类型从META-INF/spring.factories 中获取相应的自动配置类。
private <T> Collection<T> getSpringFactoriesInstances(Class<T> type, Class<?>[] parameterTypes, Object... args) {
    ClassLoader classLoader = this.getClassLoader();
    // 从 META-INF/spring.factories 中获取  (loadFactoryNames方法)
    Set<String> names = new LinkedHashSet(SpringFactoriesLoader.loadFactoryNames(type, classLoader));
    // 根据名称实例化
    List<T> instances = this.createSpringFactoriesInstances(type, parameterTypes, classLoader, args, names);
    AnnotationAwareOrderComparator.sort(instances);
    return instances;
}
小结
SpringApplication的构建都是为了run()方法启动做铺垫,最重要的部分就是设置应用类型、设置初始化器、设置监听器。
注意: 初始化器和这里的监听器都要放置在spring.factories文件中才能在这一步骤加载,否则不会生效。因为此时IOC容器还未创建,所以即使将其注入到IOC容器中也是不会生效的。
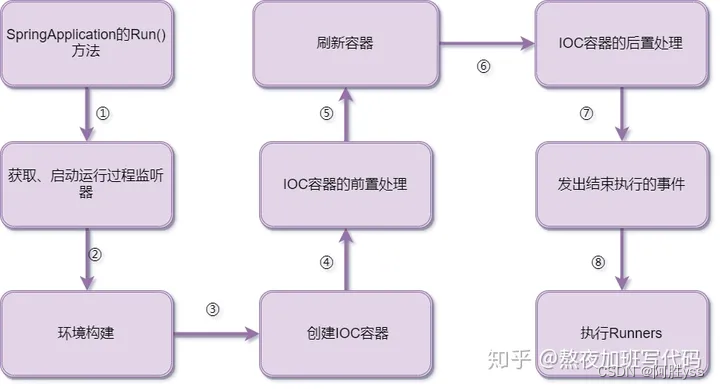
执行run() 方法
上面分析了SpringApplication的构建过程,一切都做好了铺垫,现在到了启动的过程了。
获取并且启动运行过程监听器
监听器(SpringApplicationRunListeners): 监听应用程序启动过程。
同样是调用的 getSpringFactoriesInstances() 方法 ,从spring.factories文件中获取相应的自动配置类:
org.springframework.boot.SpringApplicationRunListener=
org.springframework.boot.context.event.EventPublishingRunListener
SpringApplicationRunListeners类详解 (有利于熟悉Springboot整个启动过程)
starting() 方法 启动springboot 应用 监听器
environmentPrepared() 环境准备完成
contextPrepared() 刷新IOC容器前的准备完成
contextLoaded() IOC容器加载完成(注意这一步IOC容器还未开始刷新)
started() springboot 应用启动完成
ready() springboot应用准备了接收请求了
环境构建
加载系统配置以及用户的自定义配置(application.properties)
ConfigurableEnvironment environment =
this.prepareEnvironment(listeners, bootstrapContext, applicationArguments);
创建IOC容器
context = this.createApplicationContext();

很显然 我这里是 SERVLET 故创建的是 AnnotationConfigServletWebServerApplicationContext()。
这一步仅仅是创建了IOC容器,未有其他操作
刷新IOC容器的前置处理(重要)
this.prepareContext(bootstrapContext, context, environment, listeners,
applicationArguments, printedBanner);
调用初始化器
从spring.factories取值的
将自定义的ApplicationContextInitializer放在META-INF/spring.factories中,在此时也是会被调用。
加载启动类,注入容器
两次广播事件
listeners.contextPrepared(context);
load(context, sources.toArray(new Object[0]));
刷新IOC容器(重要)
刷新容器完全是Spring的功能了,比如初始化资源,初始化上下文广播器等
tomcat内置应用服务器在此时启动
刷新IOC容器的后置处理
this.afterRefresh(context, applicationArguments);
默认为空,如果有自定义需求可以重写,比如打印一些启动结束日志等。
发出结束执行的事件
执行Runners
小结
未完待续…


 6488
6488

 被折叠的 条评论
为什么被折叠?
被折叠的 条评论
为什么被折叠?
 到【灌水乐园】发言


