


一、Gateway
Gateway整合Nacos的服务治理功能实现路由负载,整合Nacos配置中心功能实现路由动态配置,整合Sentinel实现网关限流
1.1 搭建网关服务
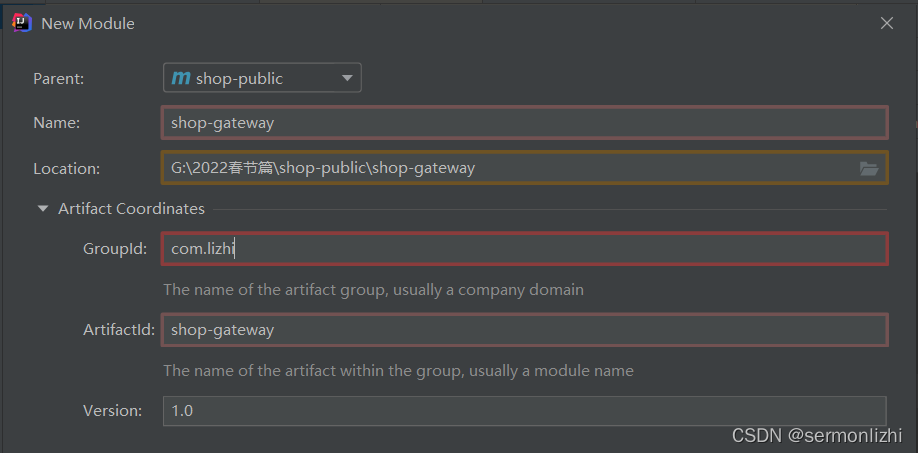
在shop-gateway的pom文件中添加下面的依赖
<?xml version="1.0" encoding="UTF-8"?>
<project xmlns="http://maven.apache.org/POM/4.0.0"
         xmlns:xsi="http://www.w3.org/2001/XMLSchema-instance"
         xsi:schemaLocation="http://maven.apache.org/POM/4.0.0 http://maven.apache.org/xsd/maven-4.0.0.xsd">
    <parent>
        <artifactId>shop-public</artifactId>
        <groupId>com.lizhi</groupId>
        <version>1.0</version>
    </parent>
    <modelVersion>4.0.0</modelVersion>

    <artifactId>shop-gateway</artifactId>

    <properties>
        <maven.compiler.source>11</maven.compiler.source>
        <maven.compiler.target>11</maven.compiler.target>
    </properties>

    <dependencies>
        <dependency>
            <groupId>com.lizhi</groupId>
            <artifactId>shop-common</artifactId>
            <version>${project.version}</version>
        </dependency>
        <dependency>
            <groupId>org.springframework.boot</groupId>
            <artifactId>spring-boot-starter</artifactId>
        </dependency>
        <dependency>
            <groupId>com.alibaba.cloud</groupId>
            <artifactId>spring-cloud-starter-alibaba-nacos-discovery</artifactId>
        </dependency>
        <dependency>
            <groupId>com.alibaba.cloud</groupId>
            <artifactId>spring-cloud-starter-alibaba-nacos-config</artifactId>
        </dependency>
        <dependency>
            <groupId>org.springframework.cloud</groupId>
            <artifactId>spring-cloud-starter-gateway</artifactId>
        </dependency>
        <!--  Sentinel限流  -->
        <dependency>
            <groupId>com.alibaba.cloud</groupId>
            <artifactId>spring-cloud-starter-alibaba-sentinel</artifactId>
        </dependency>
        <!-- Sentinel整合Gateway -->
        <dependency>
            <groupId>com.alibaba.cloud</groupId>
            <artifactId>spring-cloud-alibaba-sentinel-gateway</artifactId>
        </dependency>

        <dependency>
            <groupId>com.alibaba.csp</groupId>
            <artifactId>sentinel-datasource-nacos</artifactId>
        </dependency>
    </dependencies>

    <build>
        <plugins>
            <!--spring boot打包插件 生成可独立运行的jar文件-->
            <plugin>
                <groupId>org.springframework.boot</groupId>
                <artifactId>spring-boot-maven-plugin</artifactId>
                <version>${spring.boot.version}</version>
                <executions>
                    <execution>
                        <goals>
                            <goal>repackage</goal>
                        </goals>
                    </execution>
                </executions>
            </plugin>
        </plugins>
    </build>

</project>
spring-cloud-starter-gateway依赖就可以实现网关路由的功能,但它的路由需要指定IP和端口,通过整合Nacos后,可以实现通过服务名来路由;同时spring-cloud-alibaba-sentinel-gateway整合了Sentinel和Gateway,开箱即用,引入spring-cloud-starter-alibaba-sentinel和sentinel-datasource-nacos之后,可以通过配置文件来配置限流规则以及限流数据源
1.2 配置网关限流以及路由
在application.yml中配置nacos、sentinel以及gateway
server:
  port: 9529
spring:
  application:
    name: shop-gateway
  cloud:
    nacos:
      discovery:
        server-addr: 127.0.0.1:8848
        namespace: 24712b7c-05ad-4b79-af97-1d202431f521
        group: LZ_GROUP_MASTER
    sentinel:
      transport:
        port: 9013
        dashboard: 127.0.0.1:9010
      eager: true
      filter:
        enabled: false
      datasource:
        ds:
          nacos:
            server-addr: 127.0.0.1:8848
            namespace: 24712b7c-05ad-4b79-af97-1d202431f521
            dataId: shop-gateway-sentinel.json
            groupId: LZ_GROUP_MASTER
            rule-type: flow
            data-type: json
    gateway:
      discovery:
        locator:
          enabled: true # 让gateway可以发现nacos中的服务
      # 配置跨域
      globalcors:
        cors-configurations:
          '[/**]':
            allowedOrigins: "*"
            allowedMethods:
              - GET
              - POST
注意:
- Sentinel 网关流控默认的粒度是 route 维度以及自定义 API 分组维度,默认不支持 URL 粒度。若通过 Spring Cloud Alibaba 接入,请将 spring.cloud.sentinel.filter.enabled 配置项置为 false(若在网关流控控制台上看到了 URL 资源,就是此配置项没有置为 false)。
- 若使用 Spring Cloud Alibaba Sentinel 数据源模块,需要注意网关流控规则数据源类型是 gw-flow,若将网关流控规则数据源指定为 flow 则不生效。
在bootstrap.yml中配置网关路由的动态配置文件
spring:
  profiles:
    active: dev
  application:
    name: shop-gateway
  cloud:
    nacos:
      config:
        server-addr: 127.0.0.1:8848
        namespace: 24712b7c-05ad-4b79-af97-1d202431f521
        group: LZ_GROUP_MASTER
        file-extension: yml
        extension-configs:
          dataId: shop-gateway-router.yml
          group: LZ_GROUP_MASTER
          refresh: true
Sentinel 1.6.3 引入了网关流控控制台的支持,用户可以直接在 Sentinel 控制台上查看 API Gateway 实时的 route 和自定义 API 分组监控,管理网关规则和 API 分组配置。
在 API Gateway (网关服务)端,用户只需要在原有启动参数的基础上添加如下启动参数即可标记应用为 API Gateway 类型:
# 注:通过 Spring Cloud Alibaba Sentinel 自动接入的 API Gateway 整合则无需此参数
-Dcsp.sentinel.app.type=1
启动之后就可以看到Sentinel控制台网关的API管理,以及创建网关流控规则
注:通过 Spring Cloud Alibaba Sentinel 自动接入的 API Gateway 整合则无需此参数这句话没看懂是什么意思
1.3 添加网关限流配置文件
在上面网关配置中,为网关创建了一个dataId为shop-gateway-sentinel.json的流控配置文件,网关流控与普通服务有所区别,Sentinel 1.6.0 引入了 Sentinel API Gateway Adapter Common 模块,此模块中包含网关限流的规则和自定义 API 的实体和管理逻辑:
GatewayFlowRule:网关限流规则,针对 API Gateway 的场景定制的限流规则,可以针对不同 route 或自定义的 API 分组进行限流,支持针对请求中的参数、Header、来源 IP 等进行定制化的限流。ApiDefinition:用户自定义的 API 定义分组,可以看做是一些 URL 匹配的组合。比如我们可以定义一个 API 叫my_api,请求 path 模式为/foo/**和/baz/**的都归到my_api这个 API 分组下面。限流的时候可以针对这个自定义的 API 分组维度进行限流。
其中网关限流规则 GatewayFlowRule 的字段解释如下:
resource:资源名称,可以是网关中的 route 名称或者用户自定义的 API 分组名称。resourceMode:规则是针对 API Gateway 的 route(RESOURCE_MODE_ROUTE_ID)还是用户在 Sentinel 中定义的 API 分组(RESOURCE_MODE_CUSTOM_API_NAME),默认是 route。【0-路由模式,1-自定义API模式】grade:限流指标维度,同限流规则的grade字段。count:限流阈值intervalSec:统计时间窗口,单位是秒,默认是 1 秒。controlBehavior:流量整形的控制效果,同限流规则的controlBehavior字段,目前支持快速失败和匀速排队两种模式,默认是快速失败。burst:应对突发请求时额外允许的请求数目。maxQueueingTimeoutMs:匀速排队模式下的最长排队时间,单位是毫秒,仅在匀速排队模式下生效。- paramItem:参数限流配置。若不提供,则代表不针对参数进行限流,该网关规则将会被转换成普通流控规则;否则会转换成热点规则。其中的字段:
parseStrategy:从请求中提取参数的策略,目前支持提取来源 IP(PARAM_PARSE_STRATEGY_CLIENT_IP)、Host(PARAM_PARSE_STRATEGY_HOST)、任意 Header(PARAM_PARSE_STRATEGY_HEADER)和任意 URL 参数(PARAM_PARSE_STRATEGY_URL_PARAM)四种模式。fieldName:若提取策略选择 Header 模式或 URL 参数模式,则需要指定对应的 header 名称或 URL 参数名称。pattern:参数值的匹配模式,只有匹配该模式的请求属性值会纳入统计和流控;若为空则统计该请求属性的所有值。(1.6.2 版本开始支持)matchStrategy:参数值的匹配策略,目前支持精确匹配(PARAM_MATCH_STRATEGY_EXACT)、子串匹配(PARAM_MATCH_STRATEGY_CONTAINS)和正则匹配(PARAM_MATCH_STRATEGY_REGEX)。(1.6.2 版本开始支持)
创建网关流控规则:
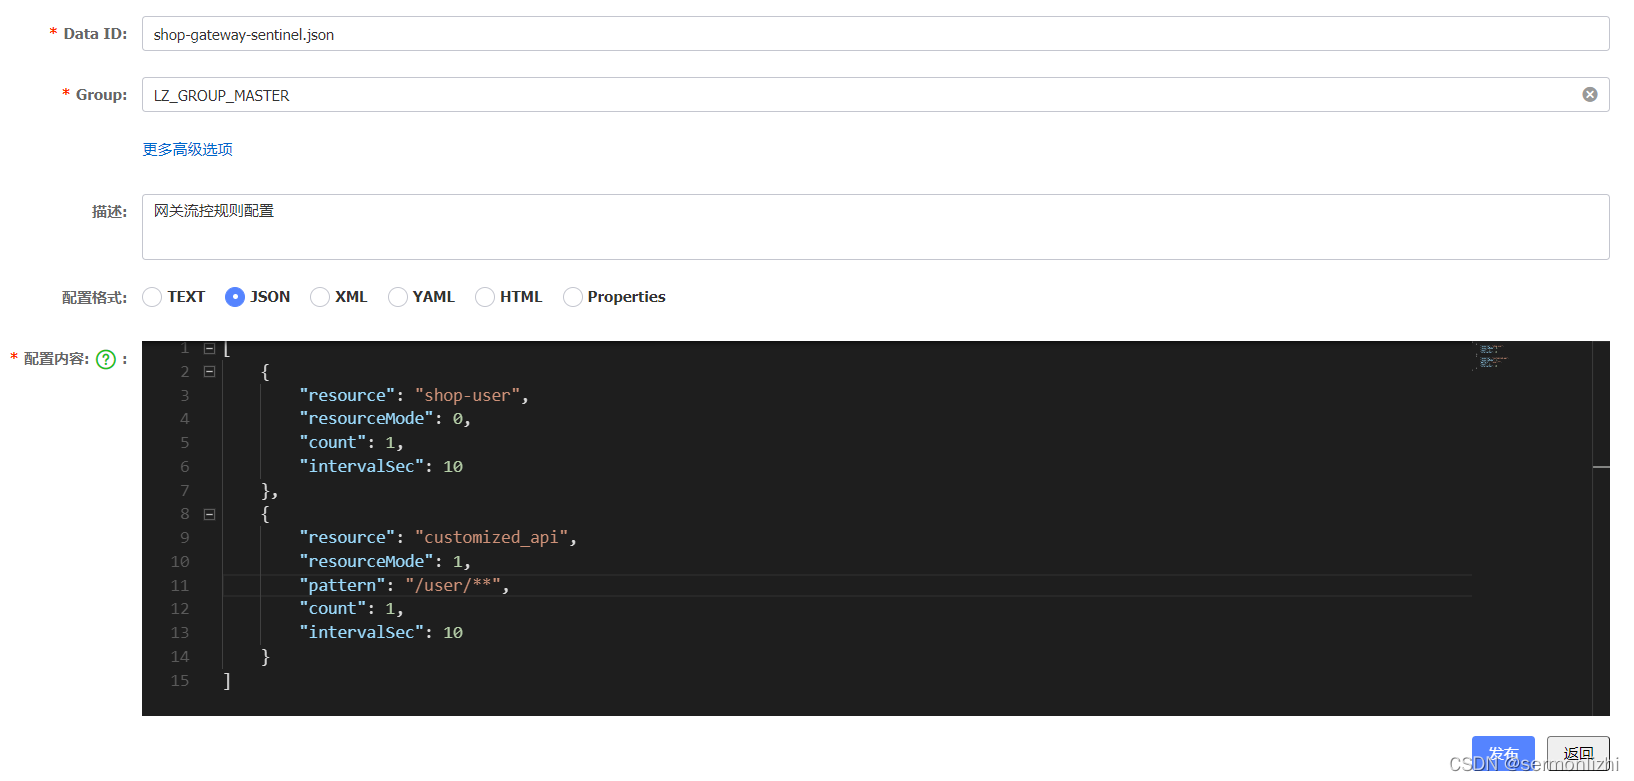
发布之后,就可以在Sentinel控制台的流控规则看到相应的配置信息

1.4 添加网关路由配置文件
同样在上面的bootstrap.yml配置文件中已经配置了网关路由的配置文件,其dataId为shop-gateway-router.yml,可以通过Nacos控制台的配置文件来配置路由规则

注:在配置的时候一定要注意层级关系
上面这种配置路由的方式显得不直观,我们可以自定义Json格式的路由配置文件,基于Nacos实现定制化的动态代理
路由配置如下:
[{
    "id": "shop-user",
    "order": 0,
    "predicates": [{
        "args": {
            "pattern": "/user/**"
        },
        "name": "Path"
    }],
    "uri": "lb://shop-user"
}]
动态更新路由配置代码如下:
package com.lizhi.listener;

import com.alibaba.fastjson.JSON;
import com.alibaba.fastjson.JSONObject;
import com.alibaba.nacos.api.NacosFactory;
import com.alibaba.nacos.api.config.ConfigService;
import com.alibaba.nacos.api.config.listener.Listener;
import com.alibaba.nacos.api.exception.NacosException;
import lombok.extern.slf4j.Slf4j;
import org.springframework.beans.factory.annotation.Value;
import org.springframework.cloud.gateway.event.RefreshRoutesEvent;
import org.springframework.cloud.gateway.route.RouteDefinition;
import org.springframework.cloud.gateway.route.RouteDefinitionWriter;
import org.springframework.context.ApplicationEventPublisher;
import org.springframework.context.ApplicationEventPublisherAware;
import org.springframework.stereotype.Component;
import reactor.core.publisher.Mono;

import javax.annotation.PostConstruct;
import javax.annotation.Resource;
import java.util.ArrayList;
import java.util.List;
import java.util.Properties;
import java.util.concurrent.Executor;

/**
 * @author 李志
 * @apiNote Nacos动态路由监听配置
 */
@Component
@Slf4j
public class NacosDynamicRouteService implements ApplicationEventPublisherAware {

    /**
     * @param serverAddr nacos服务地址
     * @param nameSpace 命名空间id,有dev/test等环境隔离,注意区分
     * @param routeConfigDataId 网关路由文件id
     * @param group 组别
     */
    @Value("${nacos.server.address}")
    private String serverAddr;

    @Value("${nacos.namespace}")
    private String nameSpace;

    @Value("${gateway.route.config.dataId}")
    private String routeConfigDataId;

    @Value("${nacos.group}")
    private String group;

    @Resource
    private RouteDefinitionWriter routeDefinitionWriter;

    private ApplicationEventPublisher applicationEventPublisher;

    private static final List<String> ROUTE_LIST = new ArrayList<>();

    @PostConstruct
    public void dynamicRouteByNacosListener() {
        try {
            Properties properties = new Properties();
            properties.put("serverAddr", serverAddr);
            properties.put("namespace", nameSpace);
            ConfigService configService = NacosFactory.createConfigService(properties);

            // 程序首次启动, 并加载初始化路由配置
            String initConfigInfo = configService.getConfig(routeConfigDataId, group, 5000);
            addAndPublishBatchRoute(initConfigInfo);

            configService.addListener(routeConfigDataId, group, new Listener() {
                @Override
                public void receiveConfigInfo(String configInfo) {
                    addAndPublishBatchRoute(configInfo);
                }

                @Override
                public Executor getExecutor() {
                    return null;
                }
            });
        } catch (NacosException e) {
            e.printStackTrace();
        }
    }

    private void clearRoute() {
        for (String id : ROUTE_LIST) {
            this.routeDefinitionWriter.delete(Mono.just(id)).subscribe();
        }
        ROUTE_LIST.clear();
    }

    private void addRoute(RouteDefinition definition) {
        try {
            routeDefinitionWriter.save(Mono.just(definition)).subscribe();
            ROUTE_LIST.add(definition.getId());
        } catch (Exception e) {
            e.printStackTrace();
        }
    }

    /**
     * 批量 添加及发布 路由
     *
     * @param configInfo 配置文件字符串, 必须为json array格式
     */
    private void addAndPublishBatchRoute(String configInfo) {
        try {
            clearRoute();
            List<RouteDefinition> gatewayRouteDefinitions = JSONObject.parseArray(configInfo, RouteDefinition.class);
            for (RouteDefinition routeDefinition : gatewayRouteDefinitions) {
                addRoute(routeDefinition);
            }
            publish();
            log.info("Dynamic config gateway route finished. {}", JSON.toJSONString(gatewayRouteDefinitions));
        } catch (Exception e) {
            e.printStackTrace();
        }
    }

    private void publish() {
        this.applicationEventPublisher.publishEvent(new RefreshRoutesEvent(this.routeDefinitionWriter));
    }

    @Override
    public void setApplicationEventPublisher(ApplicationEventPublisher applicationEventPublisher) {
        this.applicationEventPublisher = applicationEventPublisher;
    }
}
1.5 配置限流异常信息
我们可以通过配置文件和编码的方式来自定义限流异常信息,通过编码的方式显得比较笨重,这里直接使用配置文件的方式
spring:
  cloud:
    sentinel:
      scg:
        fallback:
          mode: response
          response-status: 200
          response-body: '{"code": 502,"message": "服务器睡着了...请稍后再试!"}'
spring:
  cloud:
    sentinel:
      scg:
        fallback:
          mode: redirect
          redirect: http://www.google.com
通过配置文件的方式,提供了两种模式,response和redircet模式,response返回文字提示信息,redirect重定向跳转,同时需要配置redirect属性值即跳转地址
1.6 调用接口测试
调用接口如下:
http://localhost:9529/user/test
其中前面地址为网关服务的访问地址,后面的/user/test则是shop-user服务提供的接口,根据配置的路由规则,会把请求转发到shop-user服务
返回结果
[
    {
        "oid": 1,
        "uid": 1,
        "userName": "lizhi",
        "pid": 1,
        "productPrice": 88.80,
        "num": 3
    }
]


 1538
1538


 被折叠的 条评论
为什么被折叠?
被折叠的 条评论
为什么被折叠?
 到【灌水乐园】发言


