


需求
一个应用通过接口,调用另一个应用的接口。使用OpenFeign来实现接口调用。
说明
通过OpenFeign(本文接下来简称Feign)调用远程接口,需要Eureka注册中心的支持。
OpenFeign调用接口的逻辑如下:
- 提供接口的应用(A),将自身注册到Eureka服务器(注册中心);应用A需要给自己起一个应用名称;
- 调用接口的应用(B),从Eureka读取所有已注册服务的信息;
- B应用的Feign客户端,通过服务的应用名称,从已注册服务的信息中,找到应用A(对应的IP地址和端口号),从而调用A的接口。
本文主要内容
本文主要讲述,如何配置一个注册中心(Eureka),Feign的配置,以及使用Feign来调用接口。
主要包含三个部分:
- 配置Eureka注册中心(单体,非集群);
- 配置提供接口的应用,注册到Eureka:提供被调用的接口;
- 配置调用接口的应用,从Eureka获取到被调用方地址:调用接口。
Eureka服务器
1. 依赖
<dependency>
	<groupId>org.springframework.cloud</groupId>
	<artifactId>spring-cloud-starter-netflix-eureka-server</artifactId>
</dependency>
2. 配置(application.properties)
此配置为单体服务器配置,非集群配置。
server.port=8761

# 主机名,不配置的时候将根据操作系统的主机名获取。
eureka.instance.hostname=localhost

# 不将自身注册到注册中心。是否将自己注册到注册中心,默认为true。单个Eureka服务器,不需要注册自身,配置为false;如果是Eureka集群,则需要注册自身,即配置为true。
eureka.client.registerWithEureka=false
# 是否从注册中心获取服务注册信息,默认为true。
eureka.client.fetchRegistry=false
# 注册中心对外暴露的注册地址
eureka.client.serviceUrl.defaultZone=http://${eureka.instance.hostname}:${server.port}/eureka/
3. 开启Eureka服务器
在 Application 启动类上,添加注解 @EnableEurekaServer.
示例代码:
import org.springframework.boot.SpringApplication;
import org.springframework.boot.autoconfigure.SpringBootApplication;
import org.springframework.cloud.netflix.eureka.server.EnableEurekaServer;

@EnableEurekaServer
@SpringBootApplication
public class EurekaServerDemoApplication {

	public static void main(String[] args) {
		SpringApplication.run(EurekaServerDemoApplication.class, args);
	}

}
FeignServer
提供接口的应用,可以通过Feign来调用接口。
1. 依赖
- Eureka Discovery Client
<dependency>
	<groupId>org.springframework.cloud</groupId>
	<artifactId>spring-cloud-starter-netflix-eureka-client</artifactId>
</dependency>
2. 配置(application.properties)
server.port=8081

# 应用名称
spring.application.name=feign-server
# 使用 ip地址:端口号 注册
eureka.instance.prefer-ip-address=true
eureka.instance.instance-id=${spring.cloud.client.ip-address}:${server.port}
# 注册中心地址
eureka.client.service-url.defaultZone=http://localhost:8761/eureka/
3. 提供接口
package com.example.feign.server.controller;

import org.springframework.web.bind.annotation.GetMapping;
import org.springframework.web.bind.annotation.RequestMapping;
import org.springframework.web.bind.annotation.RestController;

@RestController
@RequestMapping("feign_server_path")
public class DataController {

	@GetMapping("hello")
	public String hello() {
		return "hello feign server!";
	}

	@GetMapping("data")
	public String getData() {
		return "来自FeignServer的数据!";
	}

	@GetMapping("result")
	public String getData(String account) {
		return "从FeignServer查询的数据!入参为:" + account;
	}

	@GetMapping("two_params")
	public String getDataByTwoParam(String account, String name) {
		return "从FeignServer查询的数据!account=" + account + ",name=" + name;
	}

}
Feign客户端
通过Feign,调用FeignServer应用的接口。
1. 依赖
需要引入两个依赖:
- Eureka Discovery Client
- OpenFeign
<dependency>
	<groupId>org.springframework.cloud</groupId>
	<artifactId>spring-cloud-starter-netflix-eureka-client</artifactId>
</dependency>
<dependency>
	<groupId>org.springframework.cloud</groupId>
	<artifactId>spring-cloud-starter-openfeign</artifactId>
</dependency>
注意:需要通过 <dependencyManagement> 和 <properties>,管理 spring cloud 版本。如果项目中已经添加,则无需再额外修改。
<dependencyManagement>
	<dependencies>
		<dependency>
			<groupId>org.springframework.cloud</groupId>
			<artifactId>spring-cloud-dependencies</artifactId>
			<version>${spring-cloud.version}</version>
			<type>pom</type>
			<scope>import</scope>
		</dependency>
	</dependencies>
</dependencyManagement>
<properties>
	<spring-cloud.version>2021.0.8</spring-cloud.version>
</properties>
2. 配置(application.properties)
server.port=8082

# 不将自身注册到Eureka注册中心。本配置为是否将自己注册到注册中心,默认为true。
eureka.client.registerWithEureka=false
# 注册中心地址
eureka.client.service-url.defaultZone=http://localhost:8761/eureka/
3. 开启Feign客户端
在 Application 启动类上,添加注解 @EnableFeignClients.
示例代码:
import org.springframework.boot.SpringApplication;
import org.springframework.boot.autoconfigure.SpringBootApplication;
import org.springframework.cloud.openfeign.EnableFeignClients;

@EnableFeignClients
@SpringBootApplication
public class FeignClientDemoApplication {

	public static void main(String[] args) {
		SpringApplication.run(FeignClientDemoApplication.class, args);
	}

}
4. 定义接口(与FeignServer对应)
注解 @FeignClient:表示Feign接口。
name:Feign所调用的应用的应用名称。
path:FeignClient中所有接口的公共路径。一般对应到Feign所调用的应用的Controller的接口公共路径,即 Controller 上 @RequestMapping 中的接口路径。
注意:FeignClient 中,name 和 value,互为别名。官网示例中使用的是 name,本示例中也采用了name字段。但是经过测试,value字段的效果与name完全一样。
package com.example.feign.client.feign;

import org.springframework.cloud.openfeign.FeignClient;
import org.springframework.web.bind.annotation.GetMapping;
import org.springframework.web.bind.annotation.RequestParam;

@FeignClient(name = "feign-server", path = "feign_server_path")
public interface DataClient {

	@GetMapping("data")
	String getData();

	@GetMapping("result")
	String getDataByOneParam(@RequestParam("account") String account);

	@GetMapping("two_params")
	public String getDataByTwoParam(@RequestParam("account") String account, @RequestParam("name") String name);

}
5. 调用Feign接口
像调用本地方法一样,调用Feign接口。
package com.example.feign.client.controller;

import org.springframework.beans.factory.annotation.Autowired;
import org.springframework.web.bind.annotation.GetMapping;
import org.springframework.web.bind.annotation.RequestMapping;
import org.springframework.web.bind.annotation.RestController;

import com.example.feign.client.feign.DataClient;

@RestController
@RequestMapping("feign_client")
public class FeignClientDataController {

	@GetMapping("hello")
	public String hello() {
		return "hello feign client!";
	}

	@Autowired
	private DataClient client;

	@GetMapping("data")
	public String getData() {
		return "通过FeignClient调用:" + client.getData();
	}

	@GetMapping("one_param")
	public String getDataByOneParam(String account) {
		return "通过FeignClient调用:" + client.getDataByOneParam(account);
	}

	@GetMapping("two_params")
	public String getDataByTwoParam(String account, String name) {
		return "通过FeignClient调用:" + client.getDataByTwoParam(account, name);
	}

}
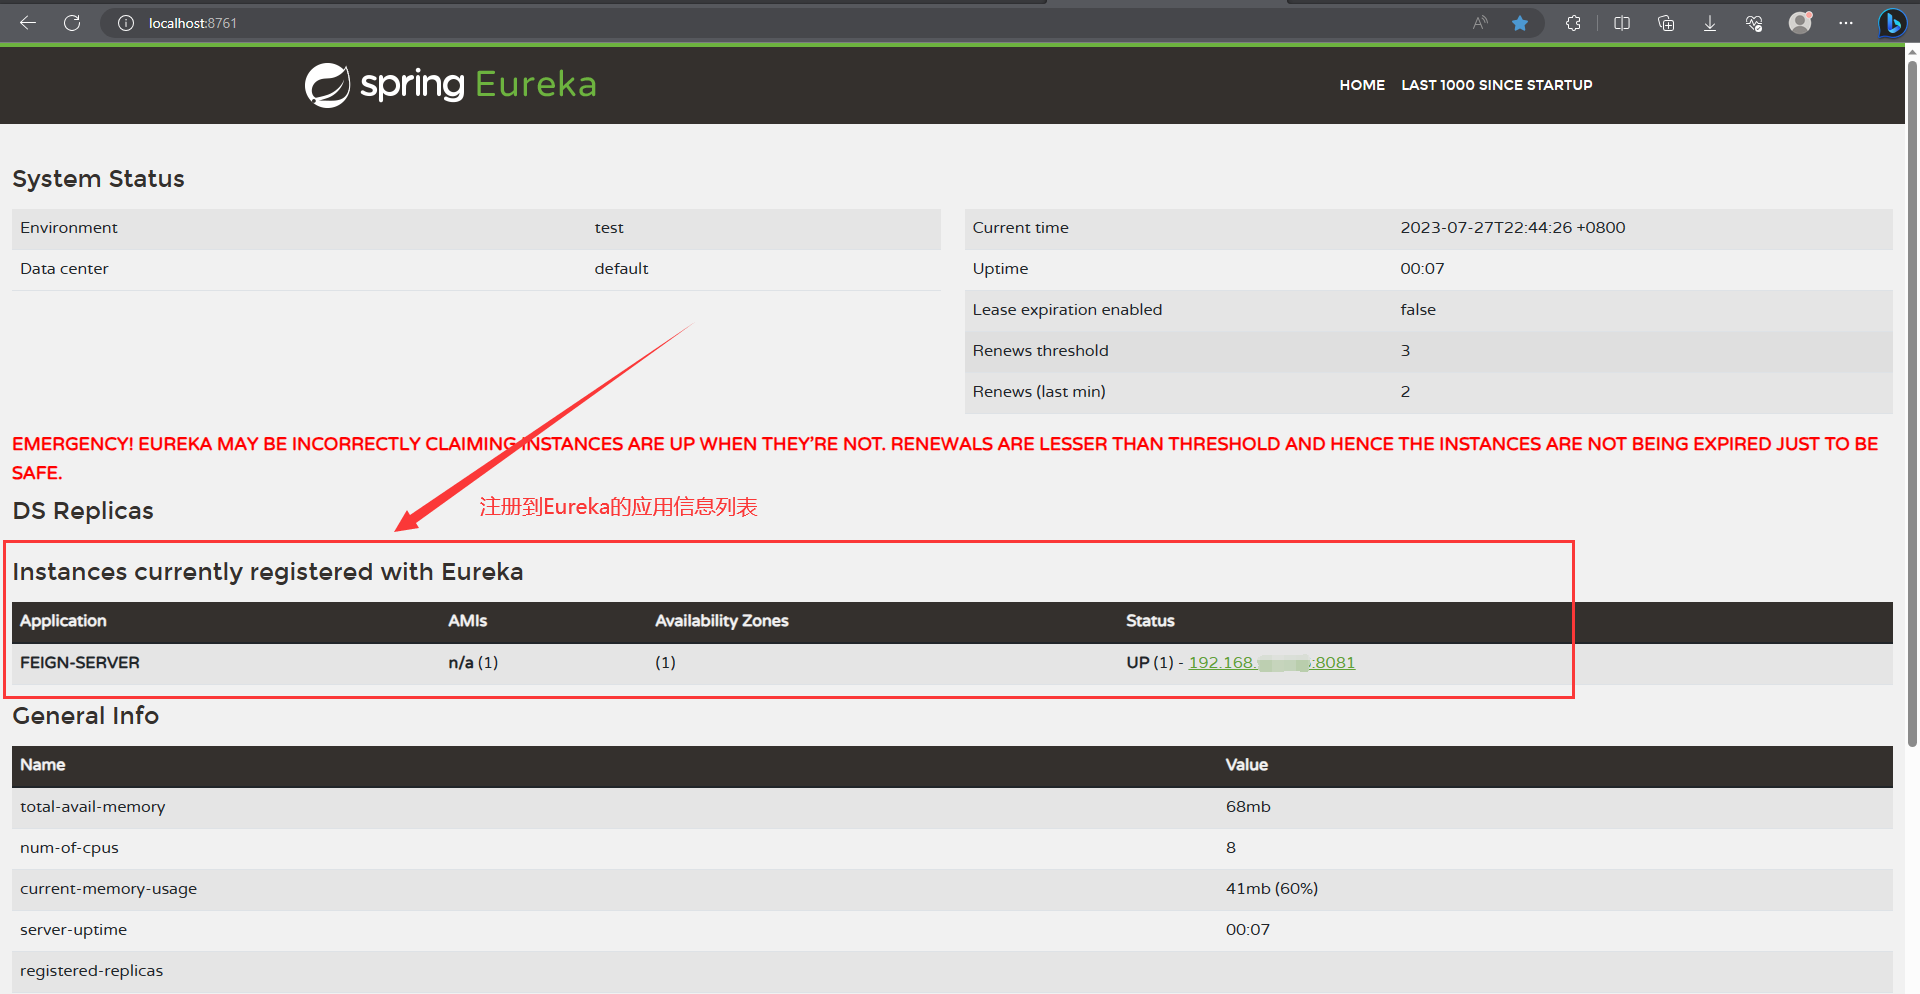
调用示例
Eureka
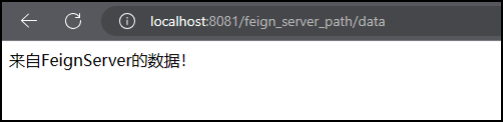
FeignServer的接口直接调用
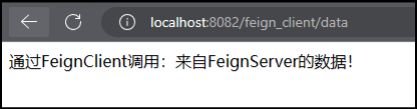
FeignClient通过Feign,调用FeignServer的接口
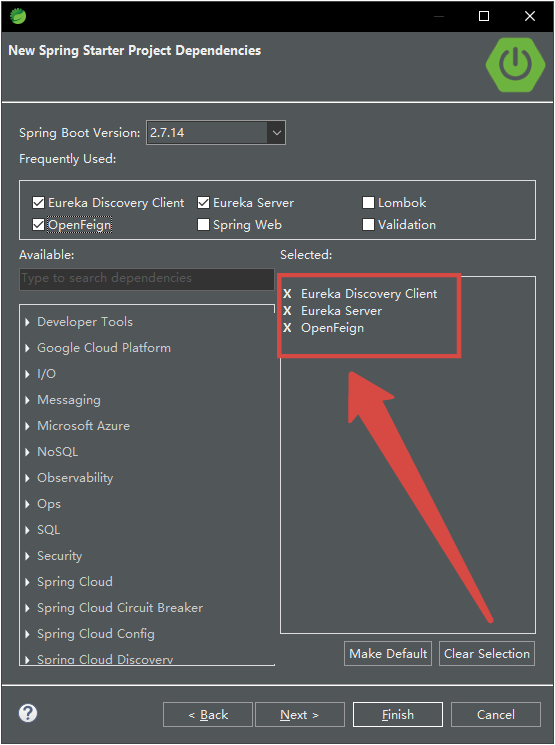
创建项目时添加Eureka和Feign依赖
在新创建SpringBoot项目时,可以通过SpringBoot创建器,添加依赖。此时,在左下侧的依赖搜索框内,可以直接搜索到Eureka和OpenFeign的相关依赖。勾选需要的依赖,则创建时对应依赖直接添加到项目中。
Eureka和OpenFeign的三个依赖,以及对应的含义如下:
Eureka Server :Eureka服务器;
Eureka Discovery Client :Eureka客户端;
OpenFeign :Feign客户端;
application中配置被调用方的应用名
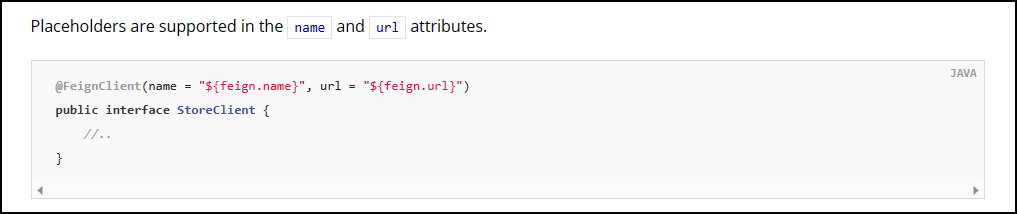
Feign客户端使用配置(占位符),设置被调用方的应用名。
Feign中,name 和 url 属性支持占位符。
官网示例
代码实例
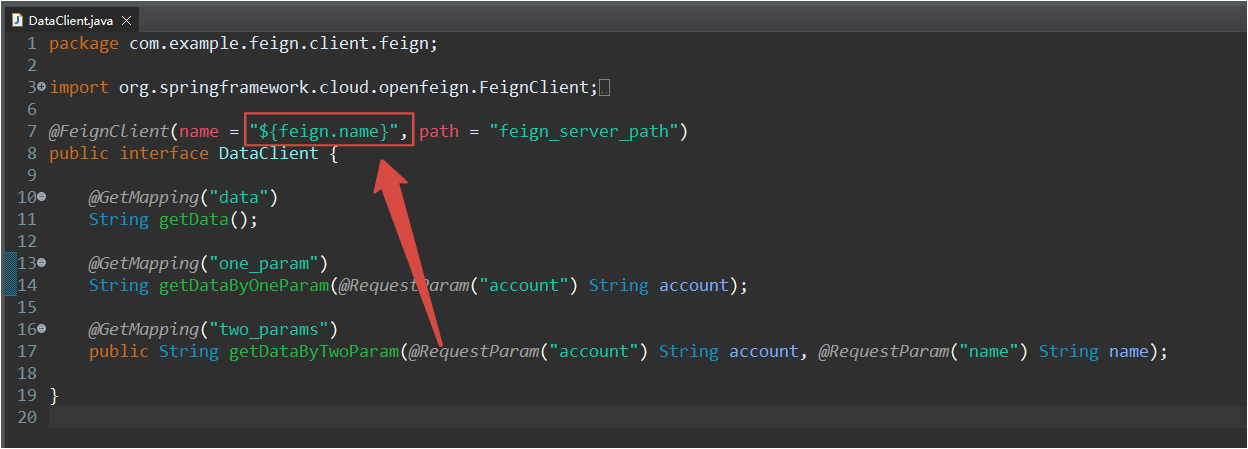
FeignClient配置
package com.example.feign.client.feign;

import org.springframework.cloud.openfeign.FeignClient;
import org.springframework.web.bind.annotation.GetMapping;
import org.springframework.web.bind.annotation.RequestParam;

@FeignClient(name = "${feign.name}", path = "feign_server_path")
public interface DataClient {

	@GetMapping("data")
	String getData();

	@GetMapping("one_param")
	String getDataByOneParam(@RequestParam("account") String account);

	@GetMapping("two_params")
	public String getDataByTwoParam(@RequestParam("account") String account, @RequestParam("name") String name);

}
application配置
# 被调用的Feign服务的应用名
feign.name=feign-server
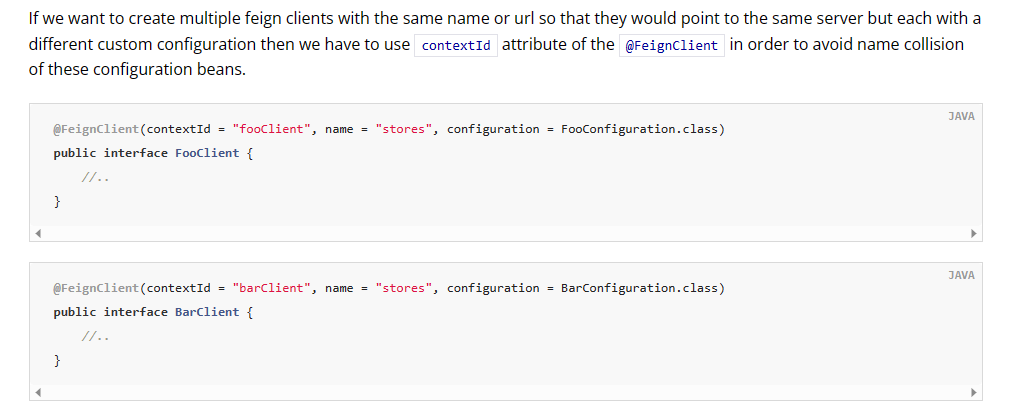
contextId:区分同一个应用对应多个FeignClient
被调用的应用所提供的接口,根据业务逻辑,可能会划分为多个不同的模块。在Feign客户端中,每一个模块,对应一个独立的FeignClient。
因为调用是同一个应用,所以多个FeignClient的应用名(name字段)是相同的。需要通过contextId字段,对不同的FeignClient进行处分;否则会出现冲突导致报错。
核心代码
两个FeignClient,分别使用不同的contextId。
package com.example.feign.client.feign;

import org.springframework.cloud.openfeign.FeignClient;
import org.springframework.web.bind.annotation.GetMapping;
import org.springframework.web.bind.annotation.RequestParam;

@FeignClient(name = "${feign.name}", path = "feign_server_path", contextId = "DataClient")
public interface DataClient {
	// 接口定义代码,省略...
}
package com.example.feign.client.feign;

import org.springframework.cloud.openfeign.FeignClient;
import org.springframework.web.bind.annotation.GetMapping;

@FeignClient(name = "${feign.name}", path = "files", contextId = "FileClient")
public interface FileClient {
	// 接口定义代码,省略...
}
不加contextId的报错
Error starting ApplicationContext. To display the conditions report re-run your application with 'debug' enabled.
[2m2023-08-06 23:27:20.184[0;39m [31mERROR[0;39m [35m14592[0;39m [2m---[0;39m [2m[           main][0;39m [36mo.s.b.d.LoggingFailureAnalysisReporter  [0;39m [2m:[0;39m

***************************
APPLICATION FAILED TO START
***************************

Description:

The bean '${feign.name}.FeignClientSpecification' could not be registered. A bean with that name has already been defined and overriding is disabled.

Action:

Consider renaming one of the beans or enabling overriding by setting spring.main.allow-bean-definition-overriding=true
参考
-
官方文档
@RequestParam:Get方法参数注解
Feign的Get方法,请求参数需要加 @RequestParam 注解。
如果不加注解,根据参数的个数,会报如下两种错误。
两种报错
Body parameter 0 was null
Feign客户端,调用Get方法时,接口包含一个参数,报错:
java.lang.IllegalArgumentException: Body parameter 0 was null
Method has too many Body parameters
Feign客户端,调用Get方法时,接口包含多个参数,报错:
Method has too many Body parameters
报错接口的原始代码
Body parameter 0 was null
- Feign服务器端接口
	@GetMapping("one_param")
	public String getData(String account) {
		return "从FeignServer查询的数据!入参为:" + account;
	}
- Feign客户端
	@GetMapping("one_param")
	String getData(String account);
Method has too many Body parameters
- Feign服务器端接口
	@GetMapping("two_params")
	public String getDataByTwoParam(String account, String name) {
		return "从FeignServer查询的数据!account=" + account + ",name=" + name;
	}
- Feign客户端
	@GetMapping("two_params")
	public String getDataByTwoParam(String account, String name);
解决方法:@RequestParam
Feign接口参数添加@RequestParam注解。
Feign客户端,修改后的代码如下:
import org.springframework.web.bind.annotation.RequestParam;
	@GetMapping("result")
	String getData(@RequestParam("account") String account);

	@GetMapping("two_params")
	public String getDataByTwoParam(@RequestParam("account") String account, @RequestParam("name") String name);
完整的Feign客户端代码示例
package com.example.feign.client.feign;

import org.springframework.cloud.openfeign.FeignClient;
import org.springframework.web.bind.annotation.GetMapping;
import org.springframework.web.bind.annotation.RequestParam;

@FeignClient(value = "feign-server", path = "feign_server_path")
public interface FeignInvocationService {

	@GetMapping("data")
	String getFeignServerData();

	@GetMapping("result")
	String getData(@RequestParam("account") String account);

	@GetMapping("two_params")
	public String getDataByTwoParam(@RequestParam("account") String account, @RequestParam("name") String name);

}
成功调用的接口示例


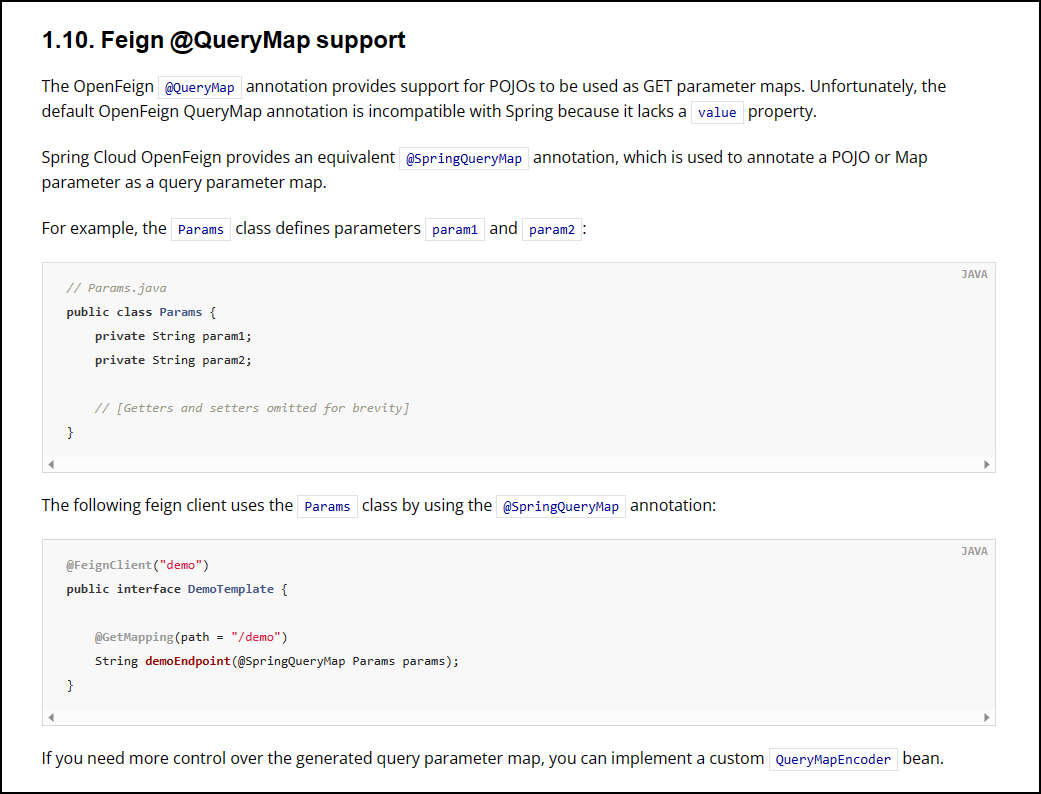
@SpringQueryMap
Feign 的 GET接口,数据类(即:POJO)作为参数,使用 @SpringQueryMap 注解标注参数。
不在参数前加上 @SpringQueryMap 注解,Feign会报错。
代码示例
import org.springframework.cloud.openfeign.FeignClient;
import org.springframework.cloud.openfeign.SpringQueryMap;
import org.springframework.web.bind.annotation.GetMapping;

import com.example.feign.client.feign.query.InputQuery;

@FeignClient(name = "${feign.name}", path = "feign_server_path", contextId = "DataClient")
public interface DataClient {

	// 其他接口...

	@GetMapping("query_object")
	public String getDataByQueryObject(@SpringQueryMap InputQuery query);

}
报错
2023-08-07 23:06:25.570[0;39m [31mERROR[0;39m [35m9368[0;39m [2m---[0;39m [2m[nio-8082-exec-3][0;39m [36mo.a.c.c.C.[.[.[/].[dispatcherServlet]   [0;39m [2m:[0;39m Servlet.service() for servlet [dispatcherServlet] in context with path [] threw exception [Request processing failed; nested exception is feign.FeignException$MethodNotAllowed: [405] during [GET] to [http://feign-server/feign_server_path/query_object] [DataClient#getDataByQueryObject(InputQuery)]: [{"timestamp":"2023-08-07T15:06:25.532+00:00","status":405,"error":"Method Not Allowed","path":"/feign_server_path/query_object"}]] with root cause

feign.FeignException$MethodNotAllowed: [405] during [GET] to [http://feign-server/feign_server_path/query_object] [DataClient#getDataByQueryObject(InputQuery)]: [{"timestamp":"2023-08-07T15:06:25.532+00:00","status":405,"error":"Method Not Allowed","path":"/feign_server_path/query_object"}]
        at feign.FeignException.clientErrorStatus(FeignException.java:221) ~[feign-core-11.10.jar:na]
        at feign.FeignException.errorStatus(FeignException.java:194) ~[feign-core-11.10.jar:na]
        at feign.FeignException.errorStatus(FeignException.java:185) ~[feign-core-11.10.jar:na]
官方文档
@SpringQueryMap 参数丢失
使用 @SpringQueryMap 的接口,只能含有一个参数对象。
如果接口有两个参数对象,并且都用 @SpringQueryMap 注解,则第二个参数对象会被丢弃,根本不会解析到接口请求的参数里。
打印Feign日志
Feign发送请求的日志信息
配置文件
# 打印Feign接口调用日志(仅开发测试环境使用)
logging.level.com.kiiik.web=debug
feign.client.config.default.loggerLevel=FULL
参考文章:
打印Feign日志
url:通过IP地址和端口号访问被调用应用
@FeignClient 可以通过 url 字段,指定房屋服务器的IP地址和端口号。当被调用的应用,没有注册到Eureka注册中心时,直接通过 url 配置实际地址就好了。
代码示例
FeignClient:url字段
package com.example.feign.client.feign;

import org.springframework.cloud.openfeign.FeignClient;

@FeignClient(name = "${feign.name}", url = "${feign.url}", path = "feign_server_path", contextId = "DataClient")
public interface DataClient {
    // 接口,省略...
}
配置
# 被调用的Feign服务的IP地址和端口号(用于调用没有注册到Eureka的服务)
feign.url=http://localhost:8081
官网文档

通过Feign调用接口下载文件
实现方法
需要通过Feign调用接口下载文件,直接让Feign接口返回值为 Response,全称 feign.Response;然后通过Response获取到输入流。之后就可以对输入流进行处理,放入输出流中,保存到本地或传递文件给用户。
代码示例
package com.example.feign.client.feign;

import org.springframework.cloud.openfeign.FeignClient;
import org.springframework.web.bind.annotation.GetMapping;
import org.springframework.web.bind.annotation.PathVariable;

import feign.Response;

@FeignClient(name = "${feign.name}", url = "${feign.url}", path = "files", contextId = "FileClient")
public interface FileClient {

	@GetMapping("download")
	Response download();

	@GetMapping("/download/{filename}")
	Response download(@PathVariable("filename") String filename);

}
package com.example.feign.client.controller;

import java.io.IOException;
import java.io.InputStream;
import java.net.URLEncoder;

import javax.servlet.ServletOutputStream;
import javax.servlet.http.HttpServletResponse;

import org.apache.tomcat.util.http.fileupload.IOUtils;
import org.springframework.beans.factory.annotation.Autowired;
import org.springframework.web.bind.annotation.GetMapping;
import org.springframework.web.bind.annotation.PathVariable;
import org.springframework.web.bind.annotation.RequestMapping;
import org.springframework.web.bind.annotation.RestController;

import com.example.feign.client.feign.FileClient;

@RestController
@RequestMapping("files")
public class FileController {

	@Autowired
	private FileClient client;

	@GetMapping("download")
	public void download(HttpServletResponse response) throws IOException {
		InputStream inputStream = client.download().body().asInputStream();

		String fileName = URLEncoder.encode("测试文件.txt", "UTF-8");
		response.setHeader("content-disposition", "attachment;fileName=" + fileName);
		ServletOutputStream outputStream = response.getOutputStream();

		IOUtils.copy(inputStream, outputStream);
		IOUtils.closeQuietly(inputStream);
		IOUtils.closeQuietly(outputStream);
	}

	@GetMapping("/download/{filename}")
	public void downloadByPathname(@PathVariable("filename") String filename, HttpServletResponse response)
			throws IOException {
		InputStream inputStream = client.download(filename).body().asInputStream();

		String fileName = URLEncoder.encode(filename, "UTF-8");
		response.setHeader("content-disposition", "attachment;fileName=" + fileName);
		ServletOutputStream outputStream = response.getOutputStream();

		IOUtils.copy(inputStream, outputStream);
		IOUtils.closeQuietly(inputStream);
		IOUtils.closeQuietly(outputStream);
	}

}


 128
128


 被折叠的 条评论
为什么被折叠?
被折叠的 条评论
为什么被折叠?
 到【灌水乐园】发言


