


Eureka
一、不引入Eureka时
1.引入公共模块依赖
<!-- 引入公共模块依赖 -->
<dependency>
    <groupId>niit</groupId>
    <artifactId>springcloud-api</artifactId>
</dependency>
引入后会发现Maven视图报错,此处需要在父工程(hnuspringcloud的pom.xml)中引入依赖,并指定版本,如下:
<!-- 子模块依赖引用 -->
<dependency>
    <groupId>niit</groupId>
    <artifactId>springcloud-api</artifactId>
    <version>1.0.0</version>
</dependency>
2.提供方的配置文件application.yml
#server.port=8001
server:
  port: 8001

#配置数据源
spring:
  application:
    name: provider-article
  datasource:
    driver-class-name: com.mysql.jdbc.Driver
    url: jdbc:mysql://127.0.0.1:3306/hnu_springcloud?useUnicode=true&characterEncoding=utf-8&useSSL=false
    username: root
    password: root
    type: com.alibaba.druid.pool.DruidDataSource

#配置mybatis
mybatis:
  #配置springboot扫描mapper.xml文件目录
  mapper-locations: classpath:mappers/*Mapper.xml
  #配置springboot扫描实体类所在的包(配置以后不需要在xml文件里写路径名)
  type-aliases-package: com.niit.model
3.消费方创建Controller类和注入RestTemplate
@Configuration
public class RestConfig {

    @Bean
    public RestTemplate restTemplate(){
        return new RestTemplate();
    }
}
@RestController
@RequestMapping("/consumer/article")
public class ConsumerArticleController {

    /** 服务提供方访问地址 */
    public static final String ARTICLE_URL = "http://localhost:8001/article";

    @Autowired
    private RestTemplate restTemplate;

    @GetMapping("/{id}")
    public Object getArticle(@PathVariable("id") Long id){
        Article article = restTemplate.getForObject(ARTICLE_URL + "/" + id, Article.class);
        System.out.println("服务消费端:由服务端查询文章信息返回结果:" + article);
        return article;
    }

    @PostMapping("/article")
    public String add(@RequestBody Article article){
        String result = restTemplate.postForObject(ARTICLE_URL, article, String.class);
        System.out.println("服务消费端:由服务端保存文章信息返回结果: --> " + result);
        return result;
    }

    @GetMapping("article")
    public List<Article> list(Article article){
        List<Article> list = restTemplate.getForObject(ARTICLE_URL,List.class);
        System.out.println("服务消费端:由服务端查询文章列表返回结果:" + list);
        return list;
    }


}
二、Eureka服务注册与发现
1.Eureka服务模块
(1)启动Eureka
spring-cloud-starter-netflix-eureka-server
<!-- eureka-server 依赖 -->
    <dependency>
        <groupId>org.springframework.cloud</groupId>
        <artifactId>spring-cloud-starter-netflix-eureka-server</artifactId>
    </dependency>
application.yml
server:
  port: 7001

eureka:
  instance: # Eureka实例定义
    hostname: localhost #定义 Eureka 实例所在的主机名称
  client:
  	register-with-eureka: false #是否要注册到eureka中
  	fetch-registry: false #是否要从eureka中获取注册信息;
(2)配置Eureka保护模式
修改application.xml文件
server:
  eviction-interval-timer-in-ms: 1000   #设置清理的间隔时间,而后这个时间使用的是毫秒单位(默认是60秒)
  enable-self-preservation: false #设置为false表示关闭保护模式
  lease-renewal-interval-in-seconds: 2 # 设置心跳的时间间隔(默认是30秒)
  lease-expiration-duration-in-seconds: 5  # 如果现在超过了5秒的间隔(默认是90秒)
开始测试,重启Eureka服务、重启服务提供方
第1步:查看eureka页面列表,正常显示服务提供方的列表;
第2步:停止服务提供方的服务;
第3步:等待几秒钟,发现服务列表中已不再显示服务提供方列表;
Eureka中的保护机制一般不建议关闭以及调整心跳及剔除清洗时间。
默认情况下,如果Eureka Server在一定时间内(默认90秒)没有接收到某个微服务实例的心跳,Eureka Server将会移除该实例。但是当网络分区故障发生时,微服务与Eureka Server之间无法正常通信,而微服务本身是正常运行的,此时不应该移除这个微服务,所以引入了自我保护机制。
自我保护模式正是一种针对网络异常波动的安全保护措施,使用自我保护模式能使Eureka集群更加的健壮、稳定的运行。
自我保护机制的工作机制是:如果在15分钟内超过85%的客户端节点都没有正常的心跳,那么Eureka就认为客户端与注册中心出现了网络故障,Eureka Server自动进入自我保护机制
2.服务提供方
(1)注册到Eureka服务
eureka:
  client:
    service-url:
      defaultZone: http://localhost:7001/eureka
修改启动类 添加@EnableEurekaClient注解
设置服务名、服务中的每个模块名
spring:
  application:
    name: provider-article #每一个微服务在Eureka中都有1个唯一的名字,默认为 UNKNOWN,所以为服务提供方单独取个名字,

eureka:
  client:
    service-url:
      defaultZone: http://localhost:7001/eureka
  instance:
    instance-id: hnuspringcloud-provider-article #Status中的域名
(2)部署监控服务
修改pom.xml文件,增加依赖:
<!-- springboot 监控服务 -->
<dependency>
    <groupId>org.springframework.boot</groupId>
    <artifactId>spring-boot-starter-actuator</artifactId>
</dependency>
<!-- 发现$project.artifactId$、$project.modelVersion$ 等修饰符未解析-->
<plugin>
  	<groupId>org.apache.maven.plugins</groupId>
    <artifactId>maven-compiler-plugin</artifactId>
   	<configuration>
    	<source>${jdk.version}</source><!-- 源代码使用的开发版本 -->
    	<target>${jdk.version}</target><!-- 需要生成的目标class文件的编译版本 -->
    </configuration>
</plugin>
http://192.168.203.1:8001/actuator/info
查看当前应用的健康状况,修改配置文件application.yml
#需要鉴权的功能
management:
  endpoints:
    web:
      exposure:
        include: "*"   #使用 ‘*‘,开启所有的端点
http://192.168.203.1:8001/actuator/health
3.服务的发现
目的是让我们的服务暴漏给消费者,供消费者访问调用
(1)启动类;
增加注解*@EnableDiscoveryClient*,不同于@EnableEurekaClient
(2)在的Controller层增加成员变量,并增加打印服务信息方法;
//    import com.netflix.discovery.DiscoveryClient;注意不同包下的区别;导入该包,启动,测试,发现启动报错
    import org.springframework.cloud.client.discovery.DiscoveryClient;
    @Resource
    private DiscoveryClient client ; // 进行Eureka的发现服务

	/** 直接返回客户端服务信息 */
    @GetMapping("/discover")
    public Object discovery(){
        List<String> list = client.getServices();
        System.out.println("ArticleController --> discovery list:" + list);
        List<ServiceInstance> siList = client.getInstances("provider-article");  //ServiceInstance
        for(ServiceInstance service : siList){
            System.out.println(service.getServiceId() + "\t" + service.getHost() + "\t" + service.getPort() + "\t" + service.getUri());
        }
        return this.client;
    }
4.Eureka注册中心的高可用
(1)创建多个Eureka服务注册中心
拷贝eureka服务新建2个,更改拷贝后的pom文件、yml文件(端口、instance.hostname、defaultZone需要配置3个eureka的URL连接)、启动类名称;
在eureka.client节点下增加:
service-url:
  defaultZone: http://eureka2:7002/eureka,http://eureka3:7003/eureka
(2)修改父工程pom文件,增加新建工程的模块
(3)修改提供方application.yml文件中的defaultZone
增加另外2个eureka服务地址,使其同时注册到3个服务当中;
Ribbon
1.概念
Ribbon 是基于Netflix Ribbon 实现的一套客户端 负载均衡的工具。
Ribbon是Netflix发布的云中间层服务开源项目,其主要功能是提供客户端实现负载均衡算法。
Ribbon 客户端组件提供一系列完善的配置项如连接超时,重试等。
简单的说,Ribbon是一个客户端负载均衡器,我们可以在配置文件中列出Load Balancer后面的所有机器,Ribbon会自动的帮助你基于某种规则(如 简单轮询,随机连接等)去连接这些机器,我们也很容易使用Ribbon实现自定义的负载均衡算法。
2.为服务消费者整合Ribbon
目标:实现消费端通过微服务名称从Eureka上找到并访问。
(1)配置依赖
在消费者微服务的pom文件中增加依赖:
<dependency>
	<groupId>org.springframework.cloud</groupId>
	<artifactId>spring-cloud-starter-netflix-eureka-client</artifactId>
</dependency>
说明:因为eureka依赖中已经包含了ribbon的依赖,所以不需要单独引入
(3)配置@LoadBalanced
在RestConfig配置类的restTemplate方法上注入@LoadBalanced,使消费者自带负载均衡,如下所示:
@Bean
@LoadBalanced //此行为新添加的内容
	public RestTemplate restTemplate(){
	return new RestTemplate();
}
问题:当restTemplate上增加注解@LoadBalanced后,还能否通过localhost:8001访问微服务吗?
答案:不能,所以使用@LoadBalanced注解后,请求地址一定要配合服务名称进行访问。
(4)配置@EnableEurekaClient
@EnableEurekaClient和@EnableDiscoveryClient在作用上相似,适用范围不同
在服务消费端主启动类上加注解EnableEurekaClient,告诉springboot容器该服务是一个eureka客户端。
(5)修改请求地址为在EurekaServer中注册的服务名
// public static final String ARTICLE_URL =
"http://localhost:8001/article"; //此行需注释
public static final String ARTICLE_URL = "http://PROVIDERARTICLE/article"; //此行为新增
(7)服务提供方集群化
需要新增数据库,在数据库中tb_article表中增加database_name列,修改Java相关代码(bean,mapper)
复制提供方模块,修改pom文件,修改applimcation.yml文件 复制原工程springboot配置文件,修改以下内容 server.port srping.datasource.url eureka.instance.instance-id info.app.name
(8)总结
Ribbon其实就是一个软负载均衡的客户端组件,Ribbon和Eureka整合后Consumer可以直接调用服务 而不用再关心地址和端口号。
3.Ribbon核心组件IRule
根据特定算法从服务列表中选取一个要访问的服务。
(1)路由策略实现的 2 中方式:
1)全局策略;
需要在RestConfig中配置路由规则:
/**
* 配置消费端在调用服务提供方时采用统一的访问策略;
* @return
*/
@Bean
public IRule ribbonRule(){
	return new com.netflix.loadbalancer.RandomRule();
}
2)单个客户端策略;
场景:
①我们有多个服务(文章服务、搜索服务、用户服务、订单服务和会员中心服务);
②文章服务有 3 个微服务,其中 1 个微服务所在的服务器配置较低,我们需要对文章服务单独制定负
实现步骤:
①新增Ribbon配置类
在com.niit.config包下新增ArticleRibbonConfig配置类,并配置负载均衡策略为随机策略(RandomRule),如下图所示:
/**
* 配置消费端在调用服务提供方时采用统一的访问策略;* @return
*/
@Bean
public IRule ribbonRule(){
	return new com.netflix.loadbalancer.RandomRule();
}
②针对哪个服务进行单独配置负载均衡策略
使用RibbonClient 为特定 name 的Ribbon Client 自定义配置
/**
启动类
*/
@RibbonClient(name="PROVIDER-ARTICLE", configuration =ArticleRibbonConfig.class)
③重启消费端进行测试
发现会报错,报错原因: The FooConfiguration has to be @Configuration but take care that it is not in a @ComponentScan for the main application context, otherwise it will be shared by all the @RibbonClients . If you use @ComponentScan (or @SpringBootApplication ) you need to take steps to avoid it being included (for instance put it in a separate, non-overlapping package, or specify the packages to scan explicitly in the @ComponentScan ). 来源Customizing the Ribbon Client
解决方案二:将ArticleRibbonConfig放在除主启动类所在包以外的包下
将ArticleRibbonConfig配置类移动至非主启动类所在包下,例如主启动类所在包名:com.niit,那必须将ArticleRibbonConfig移动至除com.niit以外的包下,例如:com.hnu。
3)在消费方获取调用的服务提供方信息
在ConsumerArticleController类中操作
①注入LoadBalancerClient
@Resource
private LoadBalancerClient loadBalancerClient;
②获取服务信息并输出
public ServiceInstance printlnServiceInstance(){
    ServiceInstance serviceInstance = loadBalancerClient.choose("PROVIDERARTICLE");
    String host = serviceInstance.getHost();
    String port = serviceInstance.getPort() + "";
    String serviceId = serviceInstance.getServiceId();
    String uri = serviceInstance.getUri().toString();
    System.out.println("【ServiceInstance】host = " + host + "、port = " +
    port + "、serviceId = " + serviceId + "、uri = " + uri);
}
③在[根据id获取文章信息详情]接口中调用上一步所写的方法printlnServiceInstance,新增后的代码如下:
@GetMapping("/{id}")
    public Object getArticle(@PathVariable("id") Long id){
    Article article = restTemplate.getForObject(ARTICLE_URL + "/" + id,
    Article.class);
    System.out.println("服务消费端:由服务端查询文章信息返回结果:" + article);
    printlnServiceInstance(); /** 为本次增加 */
    return article;
}
4.脱离Eureka使用Ribbon
前边我们是将Ribbon与Eureka配合使用,但现实中可能不具备这样的条件,例如一些遗留的微服务, 他们可能并没有注册到Eureka Server上,甚至根本不是使用SpringCloud开发的,此时想要使用 Ribbon实现负载均衡,要怎么办呢?
所以产生问题:ribbon是否可以脱离eureka客户端实现服务调用 的负载均衡?
答案:是可以的。
实现流程:
(1)复制consumer工程新建consumer-ribbon
(2)修改pom文件
修改artifactId;
将eureka-client的依赖注释; 增加ribbon依赖:
<!-- ribbon依赖 -->
<dependency>
<groupId>org.springframework.cloud</groupId>
<artifactId>spring-cloud-starter-netflix-ribbon</artifactId>
</dependency>
(3)在父工程pom文件中增加该模块;
(4)修改application.yml文件
删除eureka节点(禁用eureka); 增加:
ribbon:
  eureka:
    enabled: false #禁用eureka
#服务名称,可以随意定义,这里与eureka里注册的名称一样。
PROVIDER-ARTICLE:
  ribbon:
#用于为名为 PROVIDER-ARTICLE 的Ribbon客户端设置请求地址列表
    listOfServers:
 http://localhost:8001,http://localhost:8002,http://localhost:8003
(5)删除@LoadBalanced注解
(6)修改controller中调用的地址
在接口中增加获取调用服务实例的接口,并重新封装URL,修改后如下内容:
ServiceInstance serviceInstance = printlnServiceInstance(); //为本次增加
@GetMapping("/{id}")
public Object getArticle(@PathVariable("id") Long id){
    ServiceInstance serviceInstance = printlnServiceInstance(); //为本次增加
    Article article =
    restTemplate.getForObject(serviceInstance.getUri().toString() + "/article/" +
    id, Article.class);
    //System.out.println("服务消费端:由服务端查询文章信息返回结果:" + article);
    return article;
}
5.Ribbon自定义规则
路由规则: 1)当访问次数>3时访问下一个微服务。 2)访问次数可以动态配置,通过new 创建对象时进行传参。
实现思路: 创建自定义策略类,必须继承AbstractLoadBalancerRule 抽象类(参考使用RandomRule);
Feign
Feign 是一个声明式的Web服务客户端,使得编写Web服务客户端变得非常容易, 只需要创建一个接口,然后上边添加注解即可。
1.Feign 能干什么?
Feign 旨在使编写Java Http 客户端变得更容易。
前面我们在使用Ribbon + RestTemplate 时利用RestTemplate 对 Http 请求的封装处理,形成了一套模板化的调用方法。但是在实际开发中,由于对服务依赖的调用不止一处, 往往一个接口会被多处调用,所以通常都会针对每个微服务自行封装一些客户端类来包装这些依赖服务的调用。 所以,Feign 在此基础上做了进一步封装,由它来帮助我们定义和实现依赖服务接口的定义。在Feign的实现下, 我们只需要创建一个接口并使用注解的方式来配置它(以前是Dao接口上标注Mapper注解,现在是一个微服务接口上面标注一个FeignClient(即:声明式)注解即可) ,即可完成对服务提供方的接口绑定,简化了使用Ribbon时自动封装服务调用客户端的开发量。
2.Feign使用步骤
(1)引入依赖
<!-- feign依赖 -->
<dependency>
<groupId>org.springframework.cloud</groupId>
<artifactId>spring-cloud-starter-openfeign</artifactId>
</dependency>
(2)配置启动类
1)删除Ribbon相关配置,他会被默认引用,如要修改负载策略只需在配置文件添加相应配置
2)增加注解@EnableFeignClients 开启Feign
3)需要将com.niit.config.ArticleRibbonConfig 配置类中的 **@Configuration 注解注释掉**。
(3)新建接口类
在niit下新建一个feign包,在feign包下新建名为“IArticleClientService”的接口类,如下图所示:
package com.niit.feign;
import com.niit.config.FeignLogConfiguration;
import com.niit.model.Article;
import org.springframework.cloud.openfeign.FeignClient;
import org.springframework.web.bind.annotation.*;
import java.util.List;
@FeignClient(name="PROVIDER-ARTICLE"/*, configuration =FeignLogConfiguration.class*/)
public interface IArticleClientService {
    @GetMapping(path="/article/{id}"/*,method=RequestMethod.GET*/)
    public Article getById(@PathVariable("id") Long id);

    @PostMapping("/article")
    public String add(@RequestBody Article article);

    @GetMapping("article")
    public List<Article> list(Article article);

    @DeleteMapping("/article/{id}")
    public String deleteById(@PathVariable("id") Long id);
}
name=“PROVIDER-ARTICLE”:需要保证请求地址、方法以及参数与服务提供方暴露的接口信息一致。
(4)修改controller
将接口类注入到controller中,直接通过接口对象调用接口函数;
(5)测试发现可以正常访问服务,而且自带负载均衡;
修改ribbon 负载均衡的配置再进行测试验证。默认为轮询
3.其他功能
Feign还提供了对压缩的支持、和提供方授权认证,和Feign日志。这里只介绍日志
在很多场景下,需要了解Feign处理请求的具体细节,那么如何满足需求呢?
Feign对日志的处理非常灵活,可以为每个Feign客户端指定日志记录策略,每个客户端都会创建一个 logger。
默认情况下,logger的名称是Feign接口的完整类名。需要注意的是,Feign的日志打印只会对 DEBUG级别做出响应。
Logger.Level共有以下四种级别:
NONE: 不记录任何日志(默认)
BASIC: 仅记录请求方法、URL、响应状态代码以及执行时间
HEADERS: 记录BASIC级别的基础上,记录请求和响应的header。
FULL: 记录请求和响应的header、body和元数据。
(1)步骤
1)在application.yml配置文件中增加:
logging:
level:
#将Feign接口的日志级别设置成DEBUG, 因为 Feign 的Logger.Level 只对DEBUG做出响应
com.niit.feign.IArticleClientService: DEBUG
2)设置日志级别(两种方式,类似于修改负载策略)
①编码方式设置日志级别:创建配置类FeignLogConfiguration
@Bean
Logger.Level feignLoggerLevel(){
	return Logger.Level.BASIC;
}
②使用属性配置日期级别:在application.yml配置文件中增加:
feign:
  client:
    config:
      PROVIDER-ARTICLE:
        loggerLevel: basic
logging:
  level:
     com.niit.feign.IArticleClientService: DEBUG
4.总结
Feign 通过接口的方法调用Rest服务(之前是Ribbon + RestTemplate);
Feign = restemplate + httpheader + ribbon + eureka
所以 Feign 也支持负载均衡。
Hystrix
1.概述
Hystrix是一个用于处理分布式系统的延迟和容错的开源库,在分布式系统里,许多依赖不可避免的会调用失败,比如超时、异常等,Hystrix能够保证在一个依赖出问题的情况下,不会导致整体服务失败,避免级联故障,以提高分布式系统的弹性。
“断路器”本身是一种开关装置,当某个服务单元发生故障之后,通过断路器的故障监控(类似熔断保险丝),向调用方返回一个符合预期的、可处理的备选响应(FallBack),而不是长时间的等待或者抛出调用方无法处理的异常,这样就保证了服务调用方的线程不会被长时间、不必要地占用,从而避免了故障在分布式系统中的蔓延,乃至雪崩。
主要功能:服务降级、服务熔断、服务限流、接近实时的监控
2.服务熔断(服务提供端提供设置的)
(1)概述:
熔断机制是应对雪崩效应的一种微服务链路保护机制。
当扇出链路的某个微服务不可用或者响应时间太长时,会进行服务的降级,进而熔断该节点微服务的调用,快速返回"错误"的响应信息。当检测到该节点微服务调用响应正常后恢复调用链路。
在SpringCloud框架里熔断机制通过Hystrix实现。Hystrix会监控微服务间调用的状况,当失败的调用到一定阈值,默认是 5 秒内 20 次调用失败就会启动熔断机制。熔断机制的注解是**@HystrixCommand**。
(2)实现步骤(在提供方controller类实现)
上面已经说过的步骤已省略:
1)增加hystrix依赖:
<!-- 增加 Hystrix 依赖 -->
<dependency>
<groupId>org.springframework.cloud</groupId>
<artifactId>spring-cloud-starter-netflix-hystrix</artifactId>
</dependency>
2)修改主启动类,增加注解**@EnableHystrix** 开启Hystrix服务
3)模拟运行时异常,修改getById方法,修改后内容如下:
Article article = articleService.selectById(id);
if(null == article){
throw new RuntimeException("服务发生异常,未查询到文章信息!");
}
return article;
4)测试查看异常;
5)在getById方法上增加注解,具体内容如下:
@HystrixCommand(fallbackMethod="fallbackForGetById")
6)创建名为“fallbackForGetById”的方法,具体内容如下:
//该方法实现对异常的处理
public Article fallbackForGetById(Long id){
    System.out.println("fallbackForGetById --> " + id);
    Article article = new Article();
    article.setTitle("服务提供方:Id 为 " + id + " 的记录不存在!");
    return article;
}
7)测试
①在浏览器中先后输入正确的请求地址【http://localhost/consumer/article/2】,查看返回是否正常。
②在浏览器中先后输入错误的请求地址【http://localhost/consumer/article/99】,查看返回是否异常。
3.服务降级
(1)概述
服务降级处理是在客户端实现完成的,与服务端没有关系
(2)实现服务降级(在服务消费端):
1)修改pom.xml文件
引入依赖:
<!-- 增加 Hystrix 依赖 -->
<dependency>
<groupId>org.springframework.cloud</groupId>
<artifactId>spring-cloud-starter-netflix-hystrix</artifactId>
</dependency>
2)修改启动类:在启动类上增加注解:@EnableHystrix,开启Hystrix
3)修改controller
①在方法getArticle上增加注解:@HystrixCommand(fallbackMethod = “fallbackGetArtice”)
②创建名为fallbackGetArtice的方法,方法返回类型,参数与getArticle一致,具体内容如下:
public Article fallbackForGetById(Long id){
    Article article = new Article();
    article.setId(-1L);
    article.setTitle("服务消费方:Id 为 " + id + " 的文章服务不可用,服务暂时被
    降级处理!");
    return article;
}
4)测试
① 分别启动eureka、provider-article、consumer-feign微服务;
② 浏览器中分别测试正确、异常的地址;
③ 停止 provier-article服务 再次测试异常服务;
小结:当服务提供方被停止服务后,直接返回服务消费方的备选响应;
存在问题: 当我们控制器中的接口方法非常多的时候,便会存在方法膨胀的现象,因为每个业务逻辑方法都需要新建一个返回值、参数一样的备选方法。
如何优化?
(3)优化服务降级
1)撤销第 3步增加的内容;
2)在feign包下增加fallback包; com.niit.feign.fallback
3)实现FallbackFactory
在fallback包下创建名为:IArticleClientServiceFallbackFactory 的类,并实现FallbackFactory接口,具体内容如下:
package com.niit.feign.fallback;

import com.niit.feign.IArticleClientService;
import com.niit.model.Article;
import feign.hystrix.FallbackFactory;
import org.springframework.stereotype.Component;
import java.util.List;

@Component /** 注意:这里必须增加,否则启动会报异常 */
public class IArticleClientServiceFallbackFactory implements FallbackFactory<IArticleClientService> {
    @Override
    public IArticleClientService create(Throwable throwable) {
    	return new IArticleClientService(){
            @Override
            public Article getById(Long id) {
                Article article = new Article();
                article.setTitle("IArticleClientServiceFallbackFactory.IArticleClientServi
                ce ID为【" +id+ "】的文章服务已不可用,服务暂时被降级处理!");
                return article;
            }
            //其他方法已省略
        };
    }
}
4)修改 IArticleClientService 接口类
在类注解@FeignClient中增加 fallbackFactory 属性,具体内容如下:
@FeignClient(name="PROVIDER-ARTICLE"/*, configuration =
FeignLogConfiguration.class*/,fallbackFactory =IArticleClientServiceFallbackFactory.class)
5)测试
按第 4 步步骤进行测试,发现结果一样,但我们将备选响应方法与业务接口成功解耦。
(4)总结:
此时服务端provider-article已经停止服务,但是我们做了服务降级处理,让客户端在服务端不可用时也会获得提示信息,而不会挂起耗死服务器。
4.HystrixDashboard(仪表盘)
(1)概述
除了隔离依赖服务的调用以外,Hystrix还提供了准实时的调用监控(Hystrix Dashboard),Hystrix会持续地记录所有通过Hystrix发起的请求的执行信息,并以统计报表和图形的形式展示给用户,包括每秒 执行多少请求多少成功,多少失败等。Netflix通过hystrix-metrics-event-stream(事件流)项目实现了对以上指标的监控。Spring Cloud也提供了Hystrix Dashboard的整合,对监控内容转化成可视化界面。
(2)实现步骤
1)新建微服务
2)在启动类添加注解@EnableHystrixDashboard,(不需要@EnableHystrix )
3)检查服务提供方是否引入健康检查模块
<!-- springboot 监控服务 -->
<dependency>
<groupId>org.springframework.boot</groupId>
<artifactId>spring-boot-starter-actuator</artifactId>
</dependency>
4)检查服务提供方application.yml文件是否配置监控信息
management:
    endpoints:
        web:
          exposure:
            include: "*" # 使用 ‘*‘,开启所有的端点
5)重启服务提供方,进行测试
首先访问:http://localhost:8001/actuator/hystrix.stream
访问:http://localhost:9001/hystrix,验证是否正常
说明:
第一个输入框:监控地址
dashboard有三种监控模式:
默认的集群监控: http://turbine-hostname:port/turbine.stream
指定的集群监控: http://turbine-hostname:port/turbine.stream?cluster=[clusterName]
单体应用的监控: http://hystrix-app:port/actuator/hystrix.stream
Delay:该参数用来控制服务器上轮询监控信息的时间间隔,默认为 2000 毫秒,可以通过配置该属性
来降低客户端的网络和CPU消耗。
Title:该参数对应了头部标题Hystrix Stream之后的内容,默认会使用具体监控实例的URL。
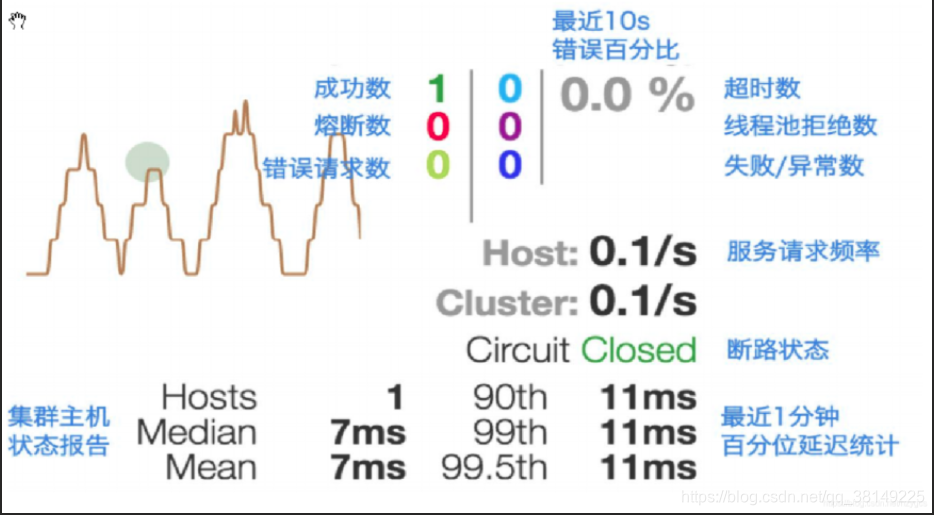
1 圈(实心圆):共有两种含义。
颜色:它通过颜色的变化代表了实例的健康状况,他的健康度从 绿色<黄色<橙色<红色递减。
大小:它的大小也会根据实例的请求流量发生变化,流量越大,实心圆就越大。
所以通过实心圆的展示,就可以在大量的实例中快速的发现故障实例和高流量实例。
1 线(曲线):用来记录 2 分钟内流量的相对变化,可以通过它来观察流量的上升和下降趋势。
(3)测试断路器状态
使用错误请求地址:http://localhost/consumer/article/31 频繁访问服务器,通过一段时间后发现服务
断路器状态已打开,再次访问正常地址后,断路器状态又恢复为关闭状态。
5.使用 Turbine 聚合(群)监控数据
(1)概述
hystrix dashboard 一次只能监控一个服务实例,使用 turbine 可以汇集监控信息,将聚合后的信息提供给hystrix dashboard来集中展示和监控
Turbine是hystrix监控数据的聚合。
Turbine可以聚合多台服务器的监控数据,聚合后交给仪表盘进行展现,同时监控多台服务器。
(2)实现流程
1)新建模块
2)添加turbine(涡轮)依赖
<properties>
<project.build.sourceEncoding>UTF-8</project.build.sourceEncoding>
</properties>
<dependencies>
    <dependency>
    <groupId>org.springframework.cloud</groupId>
    <artifactId>spring-cloud-starter-netflix-turbine</artifactId>
    </dependency>
</dependencies>
3)配置文件 application.yml
server:
  port: 9101
eureka:
  client:
    register-with-eureka: false
  	service-url:
      defaultZone:
http://eureka:7001/eureka,http://eureka2:7002/eureka,http://eureka3:7003/eureka

turbine:
  app-config: PROVIDER-ARTICLE
  cluster-name-expression: new String("default")
app-config指定要聚合的服务,order-service, service2,service3
cluster-name-expression给聚合后的数据起一个集群名,一般用 default
4)主程序添加注解 @EnableTurbine
5)测试
启动 eureka
启动 hnuspringcloud-provider-article-hystrix
启动 hnuspringcloud-consumer-feign
启动hnuspringcloud-consumer-turbine
启动 hnuspringcloud-consumer-hystrix-dashboard
访问:http://localhost/consumer/article/1 测试服务提供方、消费方是否正常
访问:http://localhost:9101/turbine.stream 是否正常
访问:http://localhost:9001/hystrix 测试监控是否启动
访问:在Hystrx DashBoard 里访问 http://localhost:9101/turbine.strea
Zuul路由
1.概述
(1)背景
如果直接让客户端与各个微服务通信,会存在以下问题:
1 )客户端会多次请求不同的微服务,增加了客户端的复杂性;
2 )存在跨域请求,在一定场景下处理相对复杂;
3 )认证复杂,每个服务都需要独立认证;
4 )难以重构,随着项目的迭代,可能需要重新划分微服务。例如:可能将多个服务合并成一个或者一个服务拆分成多个。如果客户端直接与微服务进行通信,那么重构将很难实施。
5 )某些微服务可能使用了对防火墙/浏览器不友好的协议,直接访问时会有一定的困难。
(2)微服务网关的特点:
1 )封装了应用程序的内部结构,客户端只用跟网关交互,而无需直接调用特定微服务的接口。
2 )易于监控:可以在微服务网关收集监控数据并将其推送到外部系统进行分析;
3 )易于认证:可以在微服务网关上进行认证,然后再将请求转发到后端的微服务,而无需在每个微服务中进行认证。
4 )减少了客户端与各微服务之间的交互次数。
(3)Zuul简介
Zuul包含了对请求的路由和过滤两个最主要的功能:
其中路由功能负责将外部请求转发到具体的微服务实例上,是实现外部访问统一入口的基础。而过滤器功能则负责对请求的处理过程进行干预,是实现请求校验、服务聚合等功能的基础。
Zuul和Eureka进行整合,将Zuul自身注册为Eureka服务治理下的应用,同时从Eureka中获得其他微服务的消息,也即以后访问的微服务都是通过Zuul跳转后获得。
注意:Zuul服务最终还是会注册进Eureka
主要功能:
1)身份认证与安全:识别每个资源的验证要求,并拒绝那些与要求不符的请求。
2)审查与监控:在边缘位置追踪有意义的数据和统计结果,从而为我们带来精确的生产视图。
3)动态路由:动态地将请求路由到不同的后端集群;
4)压力测试:逐渐增加指向集群的流量,以了解性能;
5)负载分配:为每一种负载类型分配对应容量,并弃用超出限定值的请求;
6)静态响应处理:在边缘位置直接建立部分响应,从而避免其转发到内部集群。
2.创建实例
(1)新建hnuspringcloud-zull-gateway 微服务
(2)修改 pom.xml 文件
<dependencies>
<!-- Eureka Zuul服务 -->
<dependency>
<groupId>org.springframework.cloud</groupId>
<artifactId>spring-cloud-starter-netflix-zuul</artifactId>
</dependency>

<!-- Eureka Client服务 -->
<dependency>
<groupId>org.springframework.cloud</groupId>
<artifactId>spring-cloud-starter-netflix-eurekaclient</artifactId>
</dependency>

<!-- springboot 监控服务 -->
<dependency>
<groupId>org.springframework.boot</groupId>
<artifactId>spring-boot-starter-actuator</artifactId>
</dependency>
</dependencies>
(3)新建application.yml文件
server:
  port: 9501

spring:
  application:
    name: hnuspringcloud-zuul-gateway

eureka:
  client: # 客户端进行Eureka注册的配置
    service-url:
      defaultZone:
http://eureka:7001/eureka,http://eureka2:7002/eureka,http://eureka3:7003/eureka
  instance:
    hostname: zuul #定义 zuul 微服务的主机名称,需要修改hosts
    instance-id: myzuulgateway
    prefer-ip-address: true
info:
  app.name: hnuspringcloud-zool-gateway
  company.name: NIIT
  build.artifactId: $project.artifactId$
  build.modelVersion: $project.modelVersion$
  build.jdkVersion: 1.8

management:
  endpoints:
    web:
      exposure:
        include: "*"
(4)修改hosts文件(可选)
在hosts文件中增加域名配置,配置内容如下:
172.0.0.1 zuul
其中zuul需要与 yml 配置文件中的 eureka.instance.hostname信息配置一致。
(5)创建启动类@EnableZuulProxy
import org.springframework.boot.SpringApplication;
import org.springframework.boot.autoconfigure.SpringBootApplication;
import org.springframework.cloud.netflix.eureka.EnableEurekaClient;
import org.springframework.cloud.netflix.zuul.EnableZuulProxy;

@SpringBootApplication
@EnableEurekaClient
@EnableZuulProxy
public class MyZuulApplication {
    public static void main(String[] args) {
    	SpringApplication.run(MyZuulApplication.class,args);
    }
}
(6)测试
1)启动 eureka 服务( 1 个即可)
2)启动 1 个服务提供方 provider-article
3)启动 1 个 zuul 服务
只访问服务提供方的接口地址:http://localhost:8001/article/
通过路由进行访问:http://localhost:9501/provider-article/article/
说明:在默认情况下,Zuul会自动代理所有注册到EurekaServer的微服务,并且 Zuul 的路由规则如下:
http://[zuul_host]:zuul_port/serviceId/**
(7)测试负载均衡
1)启动 eureka 服务( 1 个即可)
2)启动多个服务提供方 provider-article
3)启动一个 zuul 服务
多次访问:http://localhost:9501/provider-article/article/
经过多次访问,会发现 3 个article服务都会被访问到,说明 Zuul 可以使用 Ribbon 达到负载均衡的效果。
3.断点管理
当@EnableZuulProxy与Spring Boot Actuator配合使用,Zuul会暴露:routes和filters网络端点。借助这些
端点,可方便、直观地查看及管理Zuul。
(1)routes端点
routes端点简介:
1 )使用GET方法访问该端点,即可返回Zuul当前映射的路由列表;
2 )使用POST方法访问该端点就会强制刷新Zuul当前映射的路由列表(尽管路由会自动刷新,SpringCloud依然提供了强制立即刷新的方式)。
3 )Spring Cloud Edgware对/routes端点进行进一步增强,我们可以使用/routes/details查看更多与路由相关的详情设置。
由于spring-cloud-starter-zuul已经包含了spring-boot-starter-actuator,因此之前编写的microservice-gateway-zuul已具备路由管理的能力。
测试
访问:http://localhost:9501/actuator/routes,返回以下内容:
{"/provider-article/**":"provider-article"}
说明: /provider-article/* * ”会转发到/cloud-register-user微服务的/* * 。
访问:http://localhost:9501/actuator/routes/details,返回以下内容
{
    "/provider-article/**":{
        "id":"provider-article",
        "fullPath":"/provider-article/**",
        "location":"provider-article",
        "path":"/**",
        "prefix":"/provider-article",
        "retryable":false, //是否重试
        "customSensitiveHeaders":false,
        "prefixStripped":true
    }
}
(2)filters端点
filters端点简介
在Spring Cloud Edgware版本中,新增了/filters 端点。访问该端点即可返回Zuul中当前所有过滤器的详情,并按照类型分类。
结果展示
如下是 /filters 端点的展示结果,从中,我们可以了解当前Zuul中, error、post 、pre 、route 四种类型的过滤器分别有哪些,每个过滤器的order (执行顺序)是多少,以及是否启用等信息。这对于 Zuul问题的定位很有用。访问:http://localhost:9501/actuator/filters,返回如下内容:
{
"error":[
{
    "class":"org.springframework.cloud.netflix.zuul.filters.post.SendErrorFilt
    er",
    "order":0,
    "disabled":false,
    "static":true
    }
],
"post":[
    {
    "class":"org.springframework.cloud.netflix.zuul.filters.post.SendResponseF
    ilter",
    "order":1000,
    "disabled":false,
    "static":true
    }
],
"pre":[
    {
    "class":"org.springframework.cloud.netflix.zuul.filters.pre.DebugFilter",
    "order":1,
    "disabled":false,
    "static":true
    },
    {
    "class":"org.springframework.cloud.netflix.zuul.filters.pre.FormBodyWrappe
    rFilter",
    "order":-1,
    "disabled":false,
    "static":true
    },
    {
    "class":"org.springframework.cloud.netflix.zuul.filters.pre.Servlet30Wrapp
    erFilter",
    "order":-2,
    "disabled":false,
    "static":true
    },
    {
    "class":"org.springframework.cloud.netflix.zuul.filters.pre.ServletDetecti
    onFilter",
    "order":-3,
    "disabled":false,
    "static":true
    },
    {
    "class":"org.springframework.cloud.netflix.zuul.filters.pre.PreDecorationF
    ilter",
    "order":5,
    "disabled":false,
    "static":true
    }
],
"route":[
	{
    "class":"org.springframework.cloud.netflix.zuul.filters.route.SimpleHostRo
    utingFilter",
    "order":100,
    "disabled":false,
    "static":true
    },
    {
    "class":"org.springframework.cloud.netflix.zuul.filters.route.RibbonRoutin
    gFilter",
    "order":10,
    "disabled":false,
    "static":true
    },
    {
    "class":"org.springframework.cloud.netflix.zuul.filters.route.SendForwardF
    ilter",
    "order":500,
    "disabled":false,
    "static":true
    }
]
}
Zuul大部分功能都是通过过滤器来实现的。Zuul中定义了四种标准过滤器类型,这些过滤器类型对应于请求的典型生命周期。
(1) PRE:这种过滤器在请求被路由之前调用。我们可利用这种过滤器实现身份验证、在集群中选择请求的微服务、记录调试信息等。
(2) ROUTING:这种过滤器将请求路由到微服务。这种过滤器用于构建发送给微服务的请求,并使用Apache HttpClient或Netfilx Ribbon请求微服务。
(3) POST:这种过滤器在路由到微服务以后执行。这种过滤器可用来为响应添加标准的HTTP Header、收集统计信息和指标、将响应从微服务发送给客户端等。
(4) ERROR:在其他阶段发生错误时执行该过滤器。
4.路有详细配置
(1)自定义指定微服务的访问路径
在 yml 文件中配置以下内容:
zuul:
  routes:
    provider-article: /provider-article-proxy/**   #provider-article必须为注册到Eureka的服务名
完成配置后,重启服务,可以通过: http://localhost:9501/provider-article-proxy/article/3 访问文章微服务,provider-article 微服务就会被映射到 /provider-article-proxy/** 路径
(2)忽略指定服务
可以使用 zuul.ignored-services 配置需要忽略的服务,多个服务间用“逗号”分隔。例如:
此处需要删除 6.1中的配置,然后重启服务访问:http://localhost:9501/provider-article/article/发现已不能正常访问;
zuul:
  ignored-services: provider-article
(3)忽略所有微服务,只路由指定微服务
很多情况下,只允许 Zuul 路由指定的微服务,此时可以将 zuul.ignored-services 设置为:"*",例如:
zuul:
  ignored-services: "*" #使用'*'可以忽略所有微服务
  routes:
    provider-article: /provider-article-proxy/**
(4)同时指定微服务的 serviceId 和 对应路径,例如:
zuul:
  ignored-services: "*" #使用'*'可以忽略所有微服务
  routes:
    article-route: #该配置方式中,article-route 只是给路由一个名词,可以任意起名
      service-id: provider-article
      path: /provider-article-proxy/** #service-id 对应的路径
测试:访问 http://localhost:9501/provider-article-proxy/article/
(5)同时指定 path 和 URL,例如:
zuul:
  ignored-services: "*" #使用'*'可以忽略所有微服务
   routes:
     article-route: #该配置方式中,article-route 只是给路由一个名词,可以任意起名
     #service-id: provider-article
      path: /provider-article-proxy/** # url 对应的路径
      url: http://localhost:8001/ # 指定的url
测试:访问 http://localhost:9501/provider-article-proxy/article/3,发现只有端口为 8001 的 article
微服务被访问。可以尝试修改 url 中的端口为 8002 或 8003 进行测试。
说明: 使用这种配置方式不能使用 Ribbon 来负载多个 URL 。
(6)同时指定 path 和 URL ,且不破坏 Zuul 的 Ribbon 等特性
zuul:
  ignored-services: "*" #使用'*'可以忽略所有微服务
  routes:
    article-route: #该配置方式中,article-route 只是给路由一个名词,可以任意起名
      service-id: provider-article
      path: /provider-article-proxy/**

ribbon:
  eureka:
    enabled: false  # 为 Ribbon 禁用 Eureka
#服务名称,可以随意定义,这里与eureka里注册的名称一样。
provider-article: #此处需要与 zuul.routes.article-route.service-id 值一致,区分大小写
  ribbon:
    listOfServers:
http://localhost:8001,http://localhost:8002,http://localhost:8003
这样就可以即指定 path 与 URL, 又不会破坏 Zuul 与 Ribbon 特性。
注意:zuul.routes.article-route.service-id 与 ribbon本地负载的服务名称一致,如上文代码所示。
(7)路由前缀
在配置文件中增加:zuul.prefix: /zuul-api ,新增后如下:
zuul:
  ignored-services: "*" #使用'*'可以忽略所有微服务
  routes:
    article-route: #该配置方式中,article-route 只是给路由一个名词,可以任意起名
      service-id: provider-article
      path: /provider-article-proxy/**
  prefix: /zuul-api #配置路由地址前缀
测试: 访问 http://localhost:9501/zuul-api/provider-article-proxy/article/
(8)忽略某些路径
我们在 6.2、6.3 章节讲了如何忽略微服务,但有些情况需要更细粒度的路由控制,例如:想让Zuul 代理某个微服务,同时想保护该服务的某些敏感路径(比如带 admin 的路径)。此时可以使用zuul.ignored-patterns 指定要忽略的路径(这里不演示了):
zuul:
  ignored-patterns: /**/admin/** # 忽略所有包含/admin/的路径
(9)本地转发
当访问 Zuul 的 /path-a/** ,将转发到 Zuul 的 /path-b/** 。
zuul:
   #ignored-services: "*" #使用'*'可以忽略所有微服务
   routes:
     article-route: #该配置方式中,article-route 只是给路由一个名词,可以任意起名
     #service-id: provider-article
       path: /path-a/**
       url: forward:/path-b
5.Zuul 的安全与Header
(1)敏感Header的设置
一般来说,可在同一系统中的服务之间共享Header.不过应尽量防止让一些敏感的Header外泄。因此,在很多场景下,需要通过为路由指定一系列敏感Header列表。例如:
zuul:
#ignored-services: "*" #使用'*'可以忽略所有微服务
  routes:
    article-route: #该配置方式中,article-route 只是给路由一个名词,可以任意起名
       service-id: provider-article
       path: /provider-article-proxy/**
       sensitive-headers: Cookie,Set-Cookie #客户端请求头带有此信息时,将不会转发给下级服务。
注意:未指定任何敏感头信息时,默认配置: Cookie、Set-Cookie、Authorization 三个头信息
也可用 zuul.sensitiveHeaders 全局指定敏感 Header,例如:
zuul:
  sensitive-headers: Cookie,Set-Cookie #全局指定敏感 Header,被指定的头信息将不被转发给下级服务
需要注意的是,如果使用zuul.routes.*.sensitiveHeaders的配置方式,会覆盖掉全局的配置。
测试:
1)在provider-article服务的ArticleController中添加以下代码:
/**
* 测试 Zuul 忽略 header 头信息。
* @param id
* @param request
* @return
*/
@GetMapping("/headers/article/{id}")
public Article testHeader(@PathVariable("id") Long id, HttpServletRequest
request){
    System.out.println("token = " + request.getHeader("token"));
    System.out.println("Cookie = " + request.getHeader("Cookie"));
    System.out.println("Set-Cookie = " + request.getHeader("Set-Cookie"));
    System.out.println("Authorization = " +request.getHeader("Authorization"));
    return articleService.selectById(id);
}
2)在 zuul-gateway 微服务的yml配置文件中配置以下内容:
zuul:
   sensitive-headers: Cookie,Set-Cookie #全局指定敏感 Header,被指定的头信息将不被转发给下级服务
   routes:
     article-route: #该配置方式中,article-route 只是给路由一个名词,可以任意起名
       service-id: provider-article
       path: /provider-article-proxy/**
       sensitive-headers: Cookie,Set-Cookie #客户端请求头带有此信息时,将不会转发给下级服务。
3)结论:
1 、token 头信息已被忽略,其值没有被转发至下游服务;
2 、当配置 zuul.routes.article-route.sensitive-headers: Cookie,Set-Cookie 后,Cookie、Set-Cookie 的值没有被转发至下游服务,而 Authorization 头信息的值则被正常转发至下游服务。
(2)忽略Header
可使用zuul.ignoredHeaders属性丢弃一些Header,例如:
zuul:
  ignored-headers: token #不会被转发至下级服务
这样设置后,Header1和Header2将不会传播到其他微服务中。
6.Zuul 过滤器
(1)编写自定义过滤器
package com.niit.filter;

import com.netflix.zuul.ZuulFilter;
import com.netflix.zuul.context.RequestContext;
import com.netflix.zuul.exception.ZuulException;
import org.apache.commons.lang.StringUtils;
import org.springframework.cloud.netflix.zuul.filters.support.FilterConstants;
import javax.servlet.http.HttpServletRequest;
/**
* Zuul 过滤器,实现路由检查
*/
public class AuthorizedRequestFilter extends ZuulFilter {

    /**
    * 过滤器的类型。可选值有:
    * pre - 前置过滤
    * route - 路由后过滤
    * error - 异常过滤
    * post - 远程服务调用后过滤
    * @return
    */
    @Override
    public String filterType() {
    return FilterConstants.PRE_TYPE;
    }
    /**
    * 同种类的过滤器的执行顺序
    * 通过数字指定 ,优先级为 0 ,数字越大,优先级越低
    * @return
    */
    @Override
    public int filterOrder() {
    return 0 ;
    }
    /**
    * 是否执行该过滤器,此处为true,说明需要过滤
    * @return
    */
    @Override
    public boolean shouldFilter() {
    return true;
    }
    /**
    * 过滤器的具体逻辑。
    * @return
    * @throws ZuulException
    */
    @Override
    public Object run() throws ZuulException {
        RequestContext ctx = RequestContext.getCurrentContext();
        HttpServletRequest request = ctx.getRequest();
        System.out.println("--->>> AuthorizedRequestFilter " +request.getMethod() + ", " + request.getRequestURL().toString() );
        String token = request.getParameter("token");// 获取请求的参数
        if (StringUtils.isNotBlank(token)) {
            ctx.setSendZuulResponse(true); //对请求进行路由
            ctx.setResponseStatusCode( 200 );
            ctx.set("isSuccess", true);
            return null;
        } else {
            ctx.setSendZuulResponse(false); //不对其进行路由
            ctx.setResponseStatusCode( 400 );
            ctx.setResponseBody("token is empty");
            ctx.set("isSuccess", false);
            return null;
        }
    }
}
(2)将过滤器注入到容器当中
在 MyZuulApplication 主启动类里加入以下代码:
@Bean
public AuthorizedRequestFilter getAuthorizedRequestFilter(){
    return new AuthorizedRequestFilter();
}
7.集成Feign与Zull
实现Feign接口直接访问Zull 网关服务
(1)在 consumer-feign微服务中的feign包下增加IZuulClientService接口
package com.niit.feign;
import com.niit.feign.fallback.IArticleClientServiceFallbackFactory;
import com.niit.feign.fallback.IZuulClientServiceFallbackFactory;
import com.niit.model.Article;
import com.niit.model.User;
import org.springframework.cloud.openfeign.FeignClient;
import org.springframework.web.bind.annotation.*;
import java.util.List;

@FeignClient(name="HNUSPRINGCLOUD-ZUUL-GATEWAY"/*, configuration =
FeignLogConfiguration.class*/,fallbackFactory =IZuulClientServiceFallbackFactory.class)
public interface IZuulClientService {

    @GetMapping(path="/provider-articleproxy/article/{id}"/*,method=RequestMethod.GET*/)
    public Article getById(@PathVariable("id") Long id);

    @PostMapping("/provider-article-proxy/article")
    public String add(@RequestBody Article article);

    @GetMapping("/provider-article-proxy/article")
    public List<Article> list(Article article);

    @DeleteMapping("/provider-article-proxy/article/{id}")
    public String deleteById(@PathVariable("id") Long id);

    /* 根据ID获取用户信息 */
    @GetMapping(path = "/provider-user-proxy/user/{id}")
    public User getUserById(@PathVariable("id") Long id);
}
==注意:==因为Zuul没有controller实现这些接口方法,所以他们的名字可以随便写;这里需要查看 zuul-gateway 路由网关中是否配置全局前缀(prefix: /zuul-api #配置路由地址前 缀),如果已配置,则需要在请求地址前增加 /zuul-api
(2)新建 IZuulClientServiceFallbackFactory
在 consumer-feign 微服务中的feign.fallback 包下新建 IZuulClientServiceFallbackFactory 类,具体如下:
package com.niit.feign.fallback;
import com.niit.feign.IZuulClientService;
import com.niit.model.Article;
import com.niit.model.User;
import feign.hystrix.FallbackFactory;
import org.springframework.stereotype.Component;
import java.util.List;
@Component
public class IZuulClientServiceFallbackFactory implements
FallbackFactory<IZuulClientService> {
    @Override
    public IZuulClientService create(Throwable throwable) {
        return new IZuulClientService() {
            @Override
            public Article getById(Long id) {
                Article article = new Article();
                article.setTitle("IZuulClientServiceFallbackFactory.IZuulClientService ID为
                【" +id+ "】的文章服务已不可用,服务暂时被降级处理!");
                return article;
            }
            @Override
            public String add(Article article) {
            	return null;
            }
            @Override
            public List<Article> list(Article article) {
            	return null;
            }
            @Override
            public String deleteById(Long id) {
            	return null;
            }
        };
    }
}
(3)测试
重启相关服务,访问:http://localhost/consumer/article/article/5
存在问题:
com.netflix.zuul.exception.ZuulException: Forwarding error
at
org.springframework.cloud.netflix.zuul.filters.route.RibbonRoutingFilter.handleException(RibbonRoutingFilter.java:189) ~[spring-cloud-netflix-zuul2.0.0.RELEASE.jar:2.0.0.RELEASE]
at
org.apache.tomcat.util.threads.TaskThread$WrappingRunnable.run(TaskThread.jav
a:61) [tomcat-embed-core-8.5.35.jar:8.5.35]
at java.lang.Thread.run(Thread.java:748) [na:1.8.0_211]
......
Caused by: com.netflix.client.ClientExceptio
解决方案:
请将 zuul-gateway 配置文件 application.yml 中的以下内容注释掉:
#ribbon:
  #eureka:
    #enabled: false # 为Ribbon 禁用 Eureka
8.Zuul网关服务的容错(zuul自带的fallback)
(1)概述
zuul是一个代理服务,但如果被代理的服务突然断了,这个时候zuul上面会有出错信息,例如,停止 provider服务再访问,页面就会出错。
现在服务的调用方已经做了处理,不会出现这样的错误信息,但一般来说,对于zuul本身代理方,也应该进行zuul的降级处理。
例如访问:http://localhost/consumer/article/getArticleAndUser/5,就会正常显示结果,只是返回预备响应信息。
(2)实现
1)在 zuul-gateway 微服务中的 com.niit.fallback包下创建Java类:ProviderFallback(实现FallbackProvider接口),具体内容如下:
package com.niit.fallback;
import org.springframework.cloud.netflix.zuul.filters.route.FallbackProvider;
import org.springframework.http.HttpHeaders;
import org.springframework.http.HttpStatus;
import org.springframework.http.client.ClientHttpResponse;
import org.springframework.stereotype.Component;
import java.io.ByteArrayInputStream;
import java.io.IOException;
import java.io.InputStream;
@Component
public class ProviderFallback implements FallbackProvider {
    @Override
    public String getRoute() {
    return "*"; //表示熔断拦截的服务,* 表示拦截所有服务
    }
    /**
    * 定制返回内容
    * 告诉 Zuul 断路出现是,会提供一个什么返回值来处理请求
    * @param route
    * @param cause
    * @return
    */
    @Override
    public ClientHttpResponse fallbackResponse(String route, Throwablecause) {
    	return new ClientHttpResponse() {
            @Override
            public HttpStatus getStatusCode() throws IOException {
                return HttpStatus.BAD_REQUEST;
            }
            @Override
            public int getRawStatusCode() throws IOException {
                return HttpStatus.BAD_REQUEST.value();
            }
            @Override
            public String getStatusText() throws IOException {
                return HttpStatus.BAD_REQUEST.getReasonPhrase();
            }
            @Override
            public void close() {
            }
            @Override
            public InputStream getBody() throws IOException {
                return new ByteArrayInputStream("网关提示信息:该服务不可用,请稍后再试!".getBytes());
            }
            @Override
            public HttpHeaders getHeaders() {
                HttpHeaders headers = new HttpHeaders();
                headers.set("Content-Type", "text/html; charset=UTF-8");
                return headers;
            }
        };
    }
}
(3)测试
1 、重启 zuul-gateway 网关服务;
2 、停止provider微服务;
3 、访问:http://localhost:9501/provider-article-proxy/article/
Eureka config配置中心
1.概述
(1)为什么要统一管理微服务配置
当一个系统从传统项目转成分布式项目后,具体的业务模块会被拆分成多个具体的微服务,为了更好的处理系统高可用问题,微服务不可避免的需要做集群操作,这样微服务的数量就变得更加多了,原来我们一个项目只需要管理一个或少数几个配置文件即可,现在因为微服务的关系我们需要管理几十上百个配置文件(项目大的话甚至更多),此时每修改一次配置文件就要重新发布N个服务显然工作量增大N倍且对开发者来说很不友好,而且因为服务过多,文件管理容易混乱从而增加开发人员的工作成本(一个文件替换错误可能出现蝴蝶效应式的系统问题),所以需要一个方便集中管理文件且可以简化因配置文件更改而重启服务的办法,配置文件管理中心由此而生。
(2)Spring Cloud Config 简介
Config是springcloud中的一个组件,我们把配置文件上传到一个远端仓库(git,svn等),configServer连接这个远端仓库,获取仓库中配置文件的信息,在以http的形式传递给我们的各个微服务。微服务基于此可以实现热部署模式将配置文件的配置更新到系统容器环境中,这样就免去了人为重新部署项目的问题,配置文件放在具体仓库统一管理也在极大程度上避免了因文件过多而导致管理混乱的问题。
2.准备工作
(1)准备git账号
在github、gitee上注册都可以。
(2)建git仓库,用于存放配置文件
创建一个仓库,公共/私有 的都可以。
(3)创建配置文件
在仓库中创建 1 个文件,文件名为:application.yml,内容如下:
spring:
  profiles:
	active:
		- dev
---
spring:
  profiles: dev
	application:
	  name: springcloud-config-test-dev
---
spring:
  profiles: default
	application:
	  name: springcloud-config-test-defaul
3.搭建 Config Server
(1)创建一个名为 hnuspringcloud-config 的微服务;
(2)引入依赖
1)spring-cloud-config-server
2)eureka-client
<dependencies>
    <dependency>
    <groupId>org.springframework.cloud</groupId>
    <artifactId>spring-cloud-config-server</artifactId>
    </dependency>
    <dependency>
    <groupId>org.springframework.cloud</groupId>
    <artifactId>spring-cloud-starter-netflix-eureka-client</artifactId>
    </dependency>
</dependencies>
(3)创建配置文件 application.yml
server:
  port: 3344
spring:
  application:
	name: springcloud-config
  cloud:
	config:
	  server:
		git:
#此处配置git仓库信息,下方有详细配置
eureka:
  client:
	service-url:
	  defaultZone:
http://eureka:7001/eureka,http://eureka2:7002/eureka,http://eureka3:7003/eureka
  instance:
	prefer-ip-address: true # 在地址栏上使用IP地址进行显示
	instance-id: config
(4)接上文:git 配置方式
1)配置方式一:#使用 https 访问
spring:
  application:
	name: springcloud-config
  cloud:
	config:
	  server:
		git:
		  uri: https://gitee.com/xxxxx/xxxxxxx.git #使用 https 访问
		  username: 这里是账号
		  password: 这里是密码
2)配置方式二: 使用 ssh 访问
spring:
  application:
	name: springcloud-config
  cloud:
	config:
      server:
		git:
		  uri: git@gitee.com:xxxxx/xxxxx.git # 使用 ssh 访问
		  ignore-local-ssh-settings: true
		  private-key: |
			-----BEGIN RSA PRIVATE KEY-----
			#省略密钥
			-----END RSA PRIVATE KEY-----
(5)创建启动类
1)所需注解:@EnableConfigServer
package com.niit;
import org.springframework.boot.SpringApplication;
import org.springframework.boot.autoconfigure.SpringBootApplication;
import org.springframework.cloud.config.server.EnableConfigServer;

@EnableConfigServer
@SpringBootApplication
public class ConfigApplication {
    public static void main(String[] args) {
    SpringApplication.run(ConfigApplication.class, args);
    }
}
(6)测试
| 访问形式 | 访问路径 |
|---|---|
| /{application}/{profile}[/{label}] | http://localhost:3344/application/dev/master http://localhost:3344/application/test/master |
| /{application}-{profile}.ym | http://localhost:3344/application-dev.yml http://localhost:3344/application-test.yml |
| /{label}/{application}-{profile}.yml | http://localhost:3344/master/application-dev.yml http://localhost:3344/master/application-test.yml |
| /{application}-{profile}.properties | 与2对应 |
| /{label}/{application}- {profile}.properties | 与3对应 |
4.搭建Config Client
(1)新建名为 hnuspringcloud-config-client 的微服务模块
(2)引入依赖
1)spring-cloud-starter-config
<dependencies>
    <dependency>
    <groupId>org.springframework.cloud</groupId>
    <artifactId>spring-cloud-starter-config</artifactId>
    </dependency>
    <dependency>
    <groupId>org.springframework.boot</groupId>
    <artifactId>spring-boot-starter-web</artifactId>
    </dependency>
    <dependency>
    <groupId>org.springframework.cloud</groupId>
    <artifactId>spring-cloud-starter-netflix-eureka-client</artifactId>
    </dependency>
</dependencies>
(3)创建bootstrap.yml文件
spring:
  cloud:
	config:
	  name: config-client-application # 定义要读取的资源文件的名称
	  profile: dev  #本次访问的配置项,决定了当前模块使用配置文件中的哪个开发环境,与Github里的spring.profiles属性对应
	  label: master #定义配置文件所在的分支
	  uri: http://localhost:3344 # SpringCloudConfig的服务地址
知识点拓展:关于bootstrap.yml文件的说明
若application.yml 和 bootStrap.yml 在同一目录下,则 bootStrap.yml 的加载顺序要高于application.yml,即bootStrap.yml 会优先被加载。
原理:bootstrap.yml 用于应用程序上下文的引导阶段。
• bootstrap.yml 由父Spring ApplicationContext加载。
• bootstrap.yml 可以理解成系统级别的一些参数配置,这些参数一般是不会变动的。
• application.yml 可以用来定义应用级别的,如果搭配 spring-cloud-config 使用application.yml 里面定义的文件可以实现动态替换。
(4)配置 application.yml 文件
spring:
  application:
	name: hnuspringcloud-config-client # 编写应用的名称
(5)新建 springboot 启动类
package com.niit;
import org.springframework.boot.SpringApplication;
import org.springframework.boot.autoconfigure.SpringBootApplication;
@SpringBootApplication
public class ConfigClientApplication {
    public static void main(String[] args) {
    	SpringApplication.run(ConfigClientApplication.class,args);
    }
}
(6)新建 ConfigClientController 接口类
package com.niit.controller;
import org.springframework.beans.factory.annotation.Value;
import org.springframework.web.bind.annotation.RequestMapping;
import org.springframework.web.bind.annotation.RestController;
@RestController
public class ConfigClientController {

    @Value("${spring.application.name}")
    private String applicationName;

    @Value("${server.port}")
    private String port;

    @RequestMapping("/config")
    public String getConfig() {
    	return "ApplicationName = " + this.applicationName + "、port = "+ this.port;
    }
}
(7)测试
1)启动 hnuspringcloud-eureka 服务;
2)启动 hnuspringcloud-config 服务;
3)启动 hnuspringcloud-config-client 服务;
4)访问:http://localhost:8201/config
5)修改 gitee 上的配置文件内容;
6)再次访问:http://localhost:8201/config
发现:响应内容没有发生变化,重启客户端服务(config-client),再次访问。
5.Config Server 的高可用
我们现在在 bootstrap.yml 配置文件中的 springcloud config 服务器地址是单个的,当 config 服务出现问题以后会引起服务雪崩,所以我们要了解 config 高可用问题。
说明:因为时间关系,我们就不搭建 config 集群了,这里只对 config-client 端进行优化,具体如下:
(1)修改 bootstrap.yml 文件
spring:
  cloud:
	config:
	  name: config-client-application # 定义要读取的资源文件的名称
	  profile: dev  #本次访问的配置项,决定了当前模块使用配置文件中的哪个开发环境,与Github里的spring.profiles属性对应
	  label: master # 定义配置文件所在的分支
	  #uri: http://localhost:3344 # SpringCloudConfig的服务地址
	  discovery:
        enabled: true #通过配置中心加载配置文件
        service-id: SPRINGCLOUD-CONFIG # 在eureka之中注册的服务ID
eureka:
  client:
    service-url:
      defaultZone:
http://localhost:7001/eureka,http://localhost:7002/eureka2,http://localhost:7003/eureka3
(2)测试
1)重启 config-client 服务;
2)访问 http://localhost:8202/config 发现:可以正常访问 config-client
6.使用 /refresh 端点手动刷新配置
(1)概述
Spring Cloud Config分服务端和客户端,服务端负责将git(svn)中存储的配置文件发布成REST接口,客户端可以从服务端REST接口获取配置。但客户端并不能主动感知到配置的变化,从而主动去获取新的配置。
客户端如何去主动获取新的配置信息呢,springcloud已经给我们提供了解决方案,每个客户端通过POST方法触发各自的/refresh。
(2)新建 config 客户端
1)新建名为 hnuspringcloud-config-client-refresh 的微服务;
2)修改 pom.xml 文件
引入依赖:
<dependencies>
<dependency>
<groupId>org.springframework.cloud</groupId>
<artifactId>spring-cloud-starter-config</artifactId>
</dependency>
<dependency>
<groupId>org.springframework.boot</groupId>
<artifactId>spring-boot-starter-web</artifactId>
</dependency>
<!-- springboot 监控服务 -->
<dependency>
<groupId>org.springframework.boot</groupId>
<artifactId>spring-boot-starter-actuator</artifactId>
</dependency>
<!--<dependency>
<groupId>org.springframework.cloud</groupId>
<artifactId>spring-cloud-starter-netflix-eureka-client</artifactId>
</dependency>-->
</dependencies>
3)新建 application.yml
spring:
  application:
    name: hnuspringcloud-config-client-refresh # 编写应用的名称

management:
# springboot 1.5.X 以上默认开通了安全认证
  endpoints:
    web:
#base-path: / #默认是/actuator 前缀,可以在这里修改
      exposure:
        include: "*"
# include: refresh,health,info #打开部分
# springboot 2.x 默认只开启了info、health的访问,*代表开启所有访问
4)新建 bootstrap.yml
spring:
  cloud:
    config:
      name: config-client-application # 定义要读取的资源文件的名称
      profile: test # 定义profile的 名称
      label: master # 定义配置文件所在的分支
      # 搭建 config server 高可用之后,不能直接访问单个 config server 地址。
      uri: http://localhost:3344 # SpringCloudConfig的服务地址
5)新建启动类
package com.niit;

import org.springframework.boot.SpringApplication;
import org.springframework.boot.autoconfigure.SpringBootApplication;
@SpringBootApplication
public class ConfigClientRefreshApplication {
    public static void main(String[] args) {
    SpringApplication.run(ConfigClientRefreshApplication.class,args);
    }
}
6)新建 controller
需要给 加载变量的类 上面加上 @RefreshScope ,在客户端执行 /refresh 的时候就会更新此类下面的变量值。代码如下:
package com.niit.controller;
import org.springframework.beans.factory.annotation.Value;
import org.springframework.cloud.context.config.annotation.RefreshScope;
import org.springframework.web.bind.annotation.RequestMapping;
import org.springframework.web.bind.annotation.RestController;
@RestController
@RefreshScope
public class ConfigClientController {
    @Value("${spring.application.name}")
    private String applicationName;

    @Value("${server.port}")
    private String port;

    @Value("${hnuspringcloud.hello}")
    private String helloStr;

    @RequestMapping("/config")
    public String getConfig() {
    return "ApplicationName = " + this.applicationName + "、port = " + this.port + "、hello = " + this.helloStr;
    }
}
7)修改 gitee 仓库中的配置文件
在配置文件 config-client-application.yml 中增加
hnuspringcloud:
  hello: dev-v0.3
(3)测试
1)启动 config server 微服务;
2)启动 config-client-refresh 微服务;
3)访问:http://localhost:8202/config
响应内容如下:
ApplicationName = hnuspringcloud-config-client、port = 8202、hello = test-v0.3
4)修改 gitee 仓库中的 config-client-application.yml
hnuspringcloud:
  hello: dev-v0.4
5)通过 jmeter 以 POST 方法访问 http://localhost:8202/actuator/refresh
config-client-refresh 微服务 控制台输出以下日志:
2021-06-02 00:10:57.430 INFO 11928 --- [nio-8202-exec-6]
s.c.a.AnnotationConfigApplicationContext : Refreshing
org.springframework.context.annotation.AnnotationConfigApplicationContext@1
48c898f: startup date [Wed Jun 02 00:10:57 CST 2021]; root of context
hierarchy
6)再次访问 http://localhost:8202/config 发现响应内容已经更新
7.使用 Spring Cloud Bus 自动刷新配置
(1)创建配置中心服务端
1)复制微服务 hnuspringcloud-config ,更改名称为 hnuspringcloud-config-bus
2)修改pom.xml 文件
引入 RabbitMQ 依赖
<dependency>
<groupId>org.springframework.cloud</groupId>
<artifactId>spring-cloud-starter-bus-amqp</artifactId>
</dependency>
3)修改 application.yml 文件
新增如下内容:
spring.cloud.bus.trace.enabled=true
rabbitmq:
  host: localhost
  port: 5672 # RabbitMQ的监听端口
  username: guest # 用户名
  password: guest # 密码
增加后内容 如下:
server:
 port: 3344

spring:
  application:
    name: springcloud-config-bus
  cloud:
    bus:
      trace:
        enabled: true
    config:
      server:
        git:
          uri: https://gitee.com/ibrahim01/hnuspringcloudconfig.git
            rabbitmq:
            host: localhost
            port: 5672 # RabbitMQ的监听端口
            username: guest # 用户名
            password: guest # 密码
eureka:
  client:
    service-url:
      defaultZone:
    http://eureka:7001/eureka,http://eureka2:7002/eureka,http://eureka3:7003/eureka
  instance:
    prefer-ip-address: true # 在地址栏上使用IP地址进行显示
    instance-id: config-bus
management:
  endpoints:
    web:
      exposure:
        include: "*"
4)启动类中增加 @EnableEurekaClient
(2)创建配置中心客户端
1)复制微服务 hnuspringcloud-config-client-refresh 改名为hnuspringcloud-config-client-bus
2)修改 pom.xml 文件
引入 RabbitMQ 依赖:
<dependency>
<groupId>org.springframework.cloud</groupId>
<artifactId>spring-cloud-starter-bus-amqp</artifactId>
</dependency>
3)修改 application.yml 文件
rabbitmq:
  host: localhost
  port: 5672 # RabbitMQ的监听端口
  username: guest # 用户名
  password: guest # 密码
(3)测试
1)启动 config server 微服务;
2)启动 config-bus 微服务;
3)启动 config-client-bus 微服务;
4)访问:http://localhost:8202/config
响应内容如下:
ApplicationName = hnuspringcloud-config-client、port = 8102、hello = test-v0.1
5)修改 gitee 仓库中的 config-client-application.yml
hnuspringcloud:
  hello: dev-v0.2
6)通过 jmeter 以 POST 方法访问 http://localhost:3344/actuator/bus-refresh
7)再次访问 http://localhost:8202/config
Stream 消息驱动
1.概述
Spring Cloud Stream 是一个用来为微服务应用构建消息驱动能力的框架。它可以基于Spring Boot 来创建独立的,可用于生产的Spring 应用程序。他通过使用Spring Integration来连接消息代理中间件以实现消息事件驱动。Spring Cloud Stream 为一些供应商的消息中间件产品提供了个性化的自动化配置实现,引用了**发布-订阅、消费组、分区的三个核心概念**。目前仅支持RabbitMQ、Kafka。
在系统开发里面难免用到消息队列,但各个的消息队列又有所区别,Spring Cloud Stream的作用就是屏蔽各种消息队列的区别,对消息队列的API进行进一步的抽象,使得在springcloud里面能更加方便的集成各种消息系统.
应用模型: Spring Cloud Stream由一个中间件中立的核组成。应用通过Spring Cloud Stream插入的input和output通道与外界交流。通道通过指定中间件的Binder实现与外部代理连接。
业务开发者不再关注具体消息中间件,只需关注Binder对应用程序提供的抽象概念来使用消息中间件实现业务即可。
绑定器Binder: 通过定义绑定器作为中间层,实现了应用程序与消息中间件细节之间的隔离。通过向应用程序暴露统一的Channel通道,使得应用程序不需要再考虑各种不同的消息中间件的实现。当需要升级消息中间件,或者是更换其他消息中间件产品时,我们需要做的就是更换对应的Binder绑定器而不需要修改任何应用逻辑 。目前只提供了RabbitMQ和Kafka的Binder实现。
总结: 屏蔽底层消息中间件的差异,降低切换成本,统一消息的编程模型。
通过定义绑定器Binder 作为中间层,实现了应用程序与消息中间件细节之间的隔离。
参考资料:
官方文档:https://spring.io/projects/spring-cloud-stream#overview
官方API文档:https://docs.spring.io/spring-cloud-stream/docs/current/reference/html/
中文参考手册:https://m.wang1314.com/doc/webapp/topic/20971999.html
2.搭建消息生产者
(1)新建微服务 hnuspringcloud-stream-provider
(2)引入依赖
1)spring-cloud-starter-stream-rabbit
2)spring-cloud-stream
<dependencies>
    <dependency>
        <groupId>org.springframework.cloud</groupId>
        <artifactId>spring-cloud-stream</artifactId>
    </dependency>
    <dependency>
        <groupId>org.springframework.cloud</groupId>
        <artifactId>spring-cloud-starter-stream-rabbit</artifactId>
    </dependency>
    <dependency>
        <groupId>com.niit</groupId>
        <artifactId>hnuspringcloud-api</artifactId>
    </dependency>
    <dependency>
        <groupId>org.springframework.boot</groupId>
        <artifactId>spring-boot-starter-test</artifactId>
        <scope>test</scope>
    </dependency>
</dependencies>
(3)创建 application.yml 文件
server:
  port: 8401

spring:
  cloud:
    stream:
      binders: # 在此处配置要绑定的rabbitmq的服务信息;
        defaultRabbit: # 表示定义的名称,用于于binding整合
          type: rabbit # 消息组件类型
          environment: # 设置rabbitmq的相关的环境配置
            spring:
              rabbitmq:
                addresses: localhost
                port: 5672
                username: guest
                password: guest
                virtual-host: /
      bindings: # 服务的整合处理
        output: # 这个名字是一个通道的名称
          destination: hnuExchange # 表示要使用的Exchange名称定义
          content-type: application/json # 设置消息类型,本次为对象json,如果是文本则设置“text/plain”
          binder: defaultRabbit # 设置要绑定的消息服务的具体设置
  application:
    name: hnuspringcloud-stream-provider
(4)新建消息发送接口类
package com.niit.service;

import com.niit.model.Article;

public interface IMessageProvider {
    public void sendArticle(Article article);
}
(5)新建消息发送接口实现类
1)@EnableBinding(Source.class)
2)private MessageChannel output;
package com.niit.service.impl;
import com.niit.model.Article;
import com.niit.service.IMessageProvider;
import org.springframework.beans.factory.annotation.Qualifier;
import org.springframework.cloud.stream.annotation.EnableBinding;
import org.springframework.cloud.stream.messaging.Source;
import org.springframework.messaging.MessageChannel;
import org.springframework.messaging.support.MessageBuilder;
import javax.annotation.Resource;

@EnableBinding(Source.class)
public class MessageProviderImpl implements IMessageProvider {
    @Resource
    private MessageChannel output;
    @Override
    public void sendArticle(Article article) {
    	output.send(MessageBuilder.withPayload(article).build());
    }
}
(6)新建主启动类
package com.niit;
import org.springframework.boot.SpringApplication;
import org.springframework.boot.autoconfigure.SpringBootApplication;

@SpringBootApplication
public class StreamProviderApplication {
    public static void main(String[] args) {
    	SpringApplication.run(StreamProviderApplication.class, args);
    }
}
(7)新建测试用例,测试消息发送
1)@SpringBootTest(classes = StreamProviderApplication.class)
2)@RunWith(SpringRunner.class)
3)IMessageProvider iMessageProvider
package com.niit.test;

import com.niit.StreamProviderApplication;
import com.niit.model.Article;
import com.niit.service.IMessageProvider;
import org.junit.Test;
import org.junit.runner.RunWith;
import org.springframework.boot.test.context.SpringBootTest;
import org.springframework.test.context.junit4.SpringRunner;
import javax.annotation.Resource;

@SpringBootTest(classes = StreamProviderApplication.class)
@RunWith(SpringRunner.class)
public class TestMessageProvider {
    @Resource
    private IMessageProvider iMessageProvider;
    @Test
    public void testSend(){
        Article article = new Article();
        article.setId(5L);
        article.setTitle("测试消息发送标题");
        article.setLikes(1000L);
        iMessageProvider.sendArticle(article);
    }
}
(8)测试
1)启动 Eureka 服务;
2)启动 消息发送生产者(StreamProviderApplication) 微服务;
3)运行测试用例:TestMessageProvider
4)查看 RabbitMQ Server Web 页面
3.搭建消息消费者
(1)新建名为 hnuspringcloud-stream-consumer 的微服务
(2)引入依赖
<dependencies>
    <dependency>
        <groupId>org.springframework.cloud</groupId>
        <artifactId>spring-cloud-stream</artifactId>
    </dependency>
    <dependency>
        <groupId>org.springframework.cloud</groupId>
        <artifactId>spring-cloud-starter-stream-rabbit</artifactId>
    </dependency>
    <dependency>
        <groupId>com.niit</groupId>
        <artifactId>hnuspringcloud-api</artifactId>
    </dependency>
</dependencies>
(3)新建 application.yml 配置文件
server:
  port: 8402
spring:
  application:
    name: hnuspringcloud-stream-consumer
  cloud:
    stream:
      binders: # 在此处配置要绑定的rabbitmq的服务信息;
        defaultRabbit: # 表示定义的名称,用于于binding整合
          type: rabbit # 消息组件类型
            environment: # 设置rabbitmq的相关的环境配置
            spring:
            rabbitmq:
              addresses: localhost
              port: 5672
              username: guest
              password: guest
              virtual-host: /
      bindings: # 服务的整合处理
	    input: # 这个名字是一个通道的名称
		  destination: hnuExchange # 表示要使用的Exchange名称定义
          content-type: application/json # 设置消息类型,本次为对象json,如果是文本则设置“text/plain”
          binder: defaultRabbit # 设置要绑定的消息服务的具体设置
(4)新建消息接收监听器
1)@EnableBinding(Sink.class)
2)@StreamListener(Sink.INPUT)
package com.niit.listener;
import com.niit.model.Article;
import org.springframework.cloud.stream.annotation.EnableBinding;
import org.springframework.cloud.stream.annotation.StreamListener;
import org.springframework.cloud.stream.messaging.Sink;
import org.springframework.messaging.Message;
import org.springframework.stereotype.Component;
@Component
@EnableBinding(Sink.class)
public class MessageListener {

    @StreamListener(Sink.INPUT)
    public void input(Message<Article> message) {
        System.err.println("【*** 消费者接收消息 ***】" +
        message.getPayload());
    }
}
(5)新建主启动类
package com.niit;
import org.springframework.boot.SpringApplication;
import org.springframework.boot.autoconfigure.SpringBootApplication;

@SpringBootApplication
public class StreamConsumerApplication {
    public static void main(String[] args) {
    	SpringApplication.run(StreamConsumerApplication.class, args);
    }
}
(6)测试
1)启动 Eureka 服务
2)启动 消息消费者(StreamConsumerApplication)微服务
3)启动 消息生产者进行消息发送;
4)查看 消息消费者 终端是否有日志输出
4.分组(队列)
在消费者的配置文件中增加以下内容:
bindings.input.group: hnu_group #同一组的消费者公用一个队列
分组其实就是消息中间件中的队列。
(1)消费组和分区的设置
1)给消费者设置消费组和主题
设置消费组: spring.cloud.stream.bindings.<通道名>.group=<消费组名>
设置主题: spring.cloud.stream.bindings.<通道名>.destination=<主题名>
2)给生产者指定通道的主题:spring.cloud.stream.bindings.<通道名>.destination=<主题名>
3)消费者开启分区,指定实例数量与实例索引
开启消费分区: spring.cloud.stream.bindings.<通道名>.consumer.partitioned=true
消费实例数量: spring.cloud.stream.instanceCount=1 (具体指定)
实例索引: spring.cloud.stream.instanceIndex=1 #设置当前实例的索引值
4)生产者指定分区键
分区键: spring.cloud.stream.bindings.<通道名>.producer.partitionKeyExpress=<分区键>
分区数量: spring.cloud.stream.bindings.<通道名>.producer.partitionCount=<分区数量>
5.自定义消息通道
(1)在 hnuspringcloud-api 微服务中引入stream依赖
<dependency>
<groupId>org.springframework.cloud</groupId>
<artifactId>spring-cloud-starter-stream-rabbit</artifactId>
</dependency>
<dependency>
<groupId>org.springframework.cloud</groupId>
<artifactId>spring-cloud-starter-stream-rabbit</artifactId>
</dependency>
(2)在 hnuspringcloud-api 微服务中新建自定义通道接口
package com.niit.channel;
import org.springframework.cloud.stream.annotation.Input;
import org.springframework.cloud.stream.annotation.Output;
import org.springframework.messaging.MessageChannel;
import org.springframework.messaging.SubscribableChannel;

//将输入管道和输出管道整合到一个类中
public interface MyCustomChannel {
    public static final String OUTPUT = "hnu_output";
    public static final String INPUT = "hnu_input";
    /** 注解标识输入通道,通过该输入通道接收的消息进入应用程序 */
    @Input(MyCustomChannel.INPUT)
    SubscribableChannel input();
    /** 注解标识输出通道,发布的消息将通过该输出通道离开应用程序 */
    @Output(MyCustomChannel.OUTPUT)
    MessageChannel output();
}
(3)在消息生产者微服务中新建消息发送接口类
package com.niit.service;
import com.niit.model.Article;
public interface IMessageProviderCustom {
    public void sendArticle(Article article);
}
(4)在消息生产者微服务中新建消息发送接口实现类
package com.niit.service.impl;
import com.niit.channel.MyCustomChannel;
import com.niit.model.Article;
import com.niit.service.IMessageProvider;
import com.niit.service.IMessageProviderCustom;
import org.springframework.beans.factory.annotation.Qualifier;
import org.springframework.cloud.stream.annotation.EnableBinding;
import org.springframework.messaging.MessageChannel;
import org.springframework.messaging.support.MessageBuilder;
import javax.annotation.Resource;

@EnableBinding(MyCustomChannel.class)
public class MessageProviderCustomImpl implements IMessageProviderCustom {
    @Resource
    @Qualifier(MyCustomChannel.OUTPUT)
    private MessageChannel channel;
    @Override
    public void sendArticle(Article article) {
    	channel.send(MessageBuilder.withPayload(article).build());
    }
}
(5)修改消息生产者微服务中的application配置文件
在 bindings 节点下增加以下内容:
hnu_output: # 这个名字是一个通道的名称
  destination: hnuCustomExchange # 表示要使用的Exchange名称定义
  content-type: application/json # 设置消息类型,本次为对象json,如果是文本则设置“text/plain”
  binder: defaultRabbit # 设置要绑定的消息服务的具体设置
(6)在消息生产者微服务中新建测试用例
在 TestMessageProvider 中添加以下内容:
1)IMessageProviderCustom iMessageProviderCustom
@Resource
private IMessageProviderCustom iMessageProviderCustom;
@Test
public void testCustomSend(){
    Article article = new Article();
    article.setId(5L);
    article.setTitle("[iMessageProviderCustom]测试消息发送标题");
    article.setLikes(1000L);
    iMessageProviderCustom.sendArticle(article);
}
(7)在消息消费者微服务中
package com.niit.listener;
import com.niit.channel.MyCustomChannel;
import com.niit.model.Article;
import org.springframework.cloud.stream.annotation.EnableBinding;
import org.springframework.cloud.stream.annotation.StreamListener;
import org.springframework.messaging.Message;
import org.springframework.stereotype.Component;
@Component
/** 指信道channel 和 exchange 绑定在一起 */
@EnableBinding(MyCustomChannel.class)
public class MessageCustomListener {
    @StreamListener(MyCustomChannel.INPUT)
    public void input(Message<Article> message) {
    System.err.println("【*** 消费者MessageCustomListener接收消息 ***】" +
    message.getPayload());
    }
}
(8)修改消息消费者微服务中的application配置文件
在 bindings 节点下增加以下内容
hnu_input: # 这个名字是一个通道的名称
  destination: hnuCustomExchange # 表示要使用的Exchange名称定义,需要与生产者中一致
  content-type: application/json # 设置消息类型,本次为对象json,如果是文本则设置“text/plain”
  binder: defaultRabbit # 设置要绑定的消息服务的具体设置
(9)测试
1)启动 Eureka 微服务;
2)启动消息消费者微服务
3)运行消息生产者微服务中的测试用例,查看消费者微服务日志是否有消息接收。
Spring Cloud Sleuth 链路跟踪
1.概述
(1)背景及链路追踪原理
微服务之间通过网络进行通信。如果能够跟踪每个请求,了解请求经过哪些微服务(从而了解信息 是如何在服务之间流动)、请求耗费时间、网络延迟、业务逻辑耗费时间等指标,那么就能更好地分析 系统瓶颈、解决系统问题。因此,微服务跟踪很有必要。
Sping Cloud Sleuth为Spring Cloud提供了分布式跟踪的解决方案,它大量借用了Google Dapper、Twitter Zipkin和Apache HTrace的设计。
关于Sleuth的术语:
span(跨度):基本工作单元。span用一个 64 位的id唯一标识。除ID外,span还包含其他数据,例如描述、时间戳事件、键值对的注解(标签),span ID、span父ID等。span被启动和停止时,记录了时间信息。初始化span被称为**“root span”**,该span的id和trace的ID相等。
trace(跟踪):一组共享“root span”的span组成的树状结构称为trace。trace也用一个 64 位的ID唯一标识,trace中的所有span都共享该trace的ID。
annotation(标注):annotation用来记录事件的存在,其中,核心annotation用来定义请求的开始和结束。
CS(Client Sent客户端发送):客户端发送一个请求,该annotation描述了span的开始。
SR(Server Received服务器端接收):服务端获得请求并准备处理它。如果用SR减去CS时间戳,就能得到网络延迟。
SS(Server Sent服务端发送):该annotation表明完成请求处理(当响应发回客户端时)。如果用SS减去SR时间戳,就能得到服务器端处理请求所需要的时间。
CR(Client Received客户端接收):span结束的标识。客户端成功接受到服务器端的响应。如果CR减去CS时间戳,就能得到客户端发送请求到服务器响应的时间。
下图描述了微服务的跟踪:
(2)什么是Zipkin
Zipkin是Twitter开源的分布式实时数据跟踪系统(Distributed Tracking System),基于GoogleDapper的论文设计而成,Google开源了 Dapper链路追踪组件,并在 2010 年发表了论文《Dapper, aLarge-Scale Distributed Systems Tracing Infrastructure》,这篇文章是业内实现链路追踪的标杆和理论基础,具有非常大的参考价值。
Zipkin它的主要功能是收集系统的时序数据,从而追踪微服务架构的系统延时等问题,从而达到链路调用监控跟踪作用,另外Zipkin还提供了一个非常友好的UI界面,来帮助分析追踪数据。除此之外,Zipkin提供了可插拔数据存储方式:In-Memory、MySql、Cassandra以及Elasticsearch。
Zipkin官网地址:http://zipkin.io
分布式跟踪系统有一些成熟的开源产品,比如:韩国Naver的Pinpoint,Apache的HTrace,阿里的鹰眼EagleEye,京东的Hydra等,这些产品我们也把他们叫做APM(应用性能管理)工具。
下图展示了Zipkin的基础架构,它主要由 4 个核心组件构成:
Collector:收集器组件,它主要用于处理从外部系统发送过来的跟踪信息,将这些信息转换为Zipkin内部处理的Span格式,以支持后续的存储、分析、展示等功能。
Storage:存储组件,它主要对处理收集器接收到的跟踪信息,默认会将这些信息存储在内存中,我们也可以修改此存储策略,通过使用其他存储组件将跟踪信息存储到数据库中。
RESTful API:API 组件,它主要用来提供外部访问接口。比如给客户端展示跟踪信息或是外接系统访问以实现监控等。
Web UI:UI 组件,基于 API 组件实现的上层应用,通过 UI 组件用户可以方便而有直观地查询和分析跟
踪信息。
Zipkin分为两端,一个是Zipkin服务端,一个是Zipkin客户端,客户端也就是微服务的应用。客户端会配置服务端的URL地址,一旦发生服务间的调用的时候,会被配置在微服务里面的Sleuth的监听器监听,并生成相应的Trace和Span信息发送给服务端。发送的方式主要有两种,一种是HTTP报文的方式,还有一种是消息总线的方式如:RabbitMQ。
最终我们可以总结出来,Sleuth和Zipkin的关系就好比Spring Boot Actuator和Spring Boot Admin之间的关系,一个用于产生数据,一个用于存储、分析、展示数据。
2.搭建 Sleuth Server
(1)新建名为 hnuxpringcloud-sleuth 微服务
(2)引入依赖
1)spring-cloud-starter-sleuth
2)spring-cloud-starter-zipkin、zipkin-serve、zipkin-autoconfigure-ui
<dependencies>
<dependency>
<groupId>org.springframework.cloud</groupId>
<artifactId>spring-cloud-starter-sleuth</artifactId>
</dependency>
<dependency>
<groupId>org.springframework.cloud</groupId>
<artifactId>spring-cloud-starter-zipkin</artifactId>
</dependency>
<dependency>
<groupId>io.zipkin.java</groupId>
<artifactId>zipkin-server</artifactId>
<version>2.9.3</version>
</dependency>
<dependency>
<groupId>io.zipkin.java</groupId>
<artifactId>zipkin-autoconfigure-ui</artifactId>
<version>2.9.3</version>
</dependency>
</dependencies>
(3)新建 application 配置文件
server:
  port: 9401
spring:
  application:
    name: hnuspringcloud-zipkin-server
management:
  metrics:
    web:
      server:
        auto-time-requests: false #可以尝试关闭
(4)创建主启动类
package com.niit;
import org.springframework.boot.SpringApplication;
import org.springframework.boot.autoconfigure.SpringBootApplication;
import zipkin.server.internal.EnableZipkinServer;
@EnableZipkinServer
@SpringBootApplication
public class SleuthApplication {
    public static void main(String[] args) {
        SpringApplication.run(SleuthApplication.class, args);
    }
}
(5)启动测试
访问:http://localhost:8601/zipkin/
3.改造微服务,集成 Sleuth 链路跟踪
在以下微服务中进行配置:
hnuspringcloud-consumer-feign
hnuspringcloud-provider-article-hystrix
hnuspringcloud-provider-user-hystrix
hnuspringcloud-zull-gateway
(1)引入依赖
1)spring-cloud-starter-sleuth
2)spring-cloud-starter-zipkin ?zipkin不负责产生数据,为什么要引入
<!-- 引入 sleuth 链路跟踪的依赖,主要用于监控请求链路 -->
<dependency>
<groupId>org.springframework.cloud</groupId>
<artifactId>spring-cloud-starter-sleuth</artifactId>
</dependency>
<dependency>
<groupId>org.springframework.cloud</groupId>
<artifactId>spring-cloud-starter-zipkin</artifactId>
</dependency>
(2)修改 application.yml 配置文件
spring:
  zipkin:
    base-url: http://localhost:8601 #所有的数据提交到此服务之中
    sender:
      type: WEB #提交的类型是web 服务
  sleuth:
    sampler:
      probability: 1.0 # 定义抽样比率,默认为0.1
(3)启动测试
依次启动以下服务:
hnuspringcloud-eureka
• hnuspringcloud-consumer-feign
• hnuspringcloud-provider-article-hystrix
• hnuspringcloud-provider-user-hystrix
• hnuspringcloud-zull-gateway
4.数据持久化
现在成功实现了一个 SpringCloudSleuth 的基本操作,但会发现,如果重新启动
【hnuspringcloud-sleuth】服务,所有的链路跟踪数据都会丢失,那么这些数据应该存储到数据库里面的。
但又有另外一个问题,如果请求并发量特别大,对于mysql来说可能会承受不了这么大的并发,为了解决这个问题,可以使用消息队列缓冲处理,最后才从mq中把数据存到mysql中。
(1)在数据库中创建 Zipkin表
DROP DATABASE IF EXISTS zipkin ;

CREATE DATABASE zipkin CHARACTER SET UTF8 ;
USE zipkin ;

CREATE TABLE IF NOT EXISTS zipkin_spans (
`trace_id_high` BIGINT NOT NULL DEFAULT 0 COMMENT 'If non zero, this
means the trace uses 128 bit traceIds instead of 64 bit',
`trace_id` BIGINT NOT NULL,
`id` BIGINT NOT NULL,
`name` VARCHAR( 255 ) NOT NULL,
`parent_id` BIGINT,
`debug` BIT( 1 ),
`start_ts` BIGINT COMMENT 'Span.timestamp(): epoch micros used for endTs
query and to implement TTL',
`duration` BIGINT COMMENT 'Span.duration(): micros used for minDuration
and maxDuration query'
) ENGINE=INNODB ROW_FORMAT=COMPRESSED CHARACTER SET=utf8 COLLATE
utf8_general_ci;

ALTER TABLE zipkin_spans ADD UNIQUE KEY(`trace_id_high`, `trace_id`, `id`)
COMMENT 'ignore insert on duplicate';
ALTER TABLE zipkin_spans ADD INDEX(`trace_id_high`, `trace_id`, `id`)
COMMENT 'for joining with zipkin_annotations';
ALTER TABLE zipkin_spans ADD INDEX(`trace_id_high`, `trace_id`) COMMENT
'for getTracesByIds';
ALTER TABLE zipkin_spans ADD INDEX(`name`) COMMENT 'for getTraces and
getSpanNames';
ALTER TABLE zipkin_spans ADD INDEX(`start_ts`) COMMENT 'for getTraces
ordering and range';

CREATE TABLE IF NOT EXISTS zipkin_annotations (
`trace_id_high` BIGINT NOT NULL DEFAULT 0 COMMENT 'If non zero, this
means the trace uses 128 bit traceIds instead of 64 bit',
`trace_id` BIGINT NOT NULL COMMENT 'coincides with
zipkin_spans.trace_id',
`span_id` BIGINT NOT NULL COMMENT 'coincides with zipkin_spans.id',
`a_key` VARCHAR( 255 ) NOT NULL COMMENT 'BinaryAnnotation.key or
Annotation.value if type == -1',
`a_value` BLOB COMMENT 'BinaryAnnotation.value(), which must be smaller
than 64KB',
`a_type` INT NOT NULL COMMENT 'BinaryAnnotation.type() or -1 if
Annotation',
`a_timestamp` BIGINT COMMENT 'Used to implement TTL; Annotation.timestamp
or zipkin_spans.timestamp',
`endpoint_ipv4` INT COMMENT 'Null when Binary/Annotation.endpoint is
null',
`endpoint_ipv6` BINARY(16) COMMENT 'Null when Binary/Annotation.endpoint
is null, or no IPv6 address',
`endpoint_port` SMALLINT COMMENT 'Null when Binary/Annotation.endpoint is
null',
`endpoint_service_name` VARCHAR(255) COMMENT 'Null when
Binary/Annotation.endpoint is null'
) ENGINE=INNODB ROW_FORMAT=COMPRESSED CHARACTER SET=utf8 COLLATE
utf8_general_ci;

CREATE TABLE IF NOT EXISTS zipkin_dependencies (
`day` DATE NOT NULL,
`parent` VARCHAR(255) NOT NULL,
`child` VARCHAR(255) NOT NULL,
`call_count` BIGINT,
`error_count` BIGINT
) ENGINE=INNODB ROW_FORMAT=COMPRESSED CHARACTER SET=utf8 COLLATE
utf8_general_ci;
(2)修改微服务【hnuspringcloud-sleuth】中的pom.xml文件
引入数据库、消息队列的依赖
<dependency>
<groupId>org.springframework.amqp</groupId>
<artifactId>spring-rabbit</artifactId>
</dependency>
<dependency>
<groupId>io.zipkin.java</groupId>
<artifactId>zipkin-autoconfigure-collector-rabbitmq</artifactId>
<version>2.9.3</version>
</dependency>
<dependency>
<groupId>io.zipkin.java</groupId>
<artifactId>zipkin-autoconfigure-storage-mysql</artifactId>
<version>2.9.4</version>
</dependency>
(3)修改微服务【hnuspringcloud-sleuth】中的application.yml文件
增加以下内容:
zipkin:
  collector:
   sample-rate: 1.0
   http:
     enabled: false
   rabbitmq:
     addresses: localhost:5672
     username: guest
     password: guest
     virtual-host: /
     queue: zipkin
  storage:
   type: mysql
    mysql:
     host: localhost
     port: 3306
     username: root
     password: root
     db: zipkin
(4)修改客户端的pom文件引入依赖
hnuspringcloud-consumer-feign
hnuspringcloud-provider-article-hystrix
hnuspringcloud-provider-user-hystrix
hnuspringcloud-zull-gateway
<dependency>
<groupId>org.springframework.cloud</groupId>
<artifactId>spring-cloud-stream-binder-rabbit</artifactId>
</dependency>
(5)修改客户端的配置文件中zipkin的配置
hnuspringcloud-consumer-feign
hnuspringcloud-provider-article-hystrix
hnuspringcloud-provider-user-hystrix
hnuspringcloud-zull-gateway
将配置文件中 spring.zipkin.sender.type 的值 WEB 改为 RABBIT
spring:
  zipkin:
   base-url: http://localhost:8601 #所有的数据提交到此服务之中
  sender:
    type: RABBIT #提交的类型是web 服务
  sleuth:
    sampler:
      probability: 1.0 # 定义抽样比率,默认为0.1
  application:
     name: customer-feign


 1267
1267


 被折叠的 条评论
为什么被折叠?
被折叠的 条评论
为什么被折叠?
 到【灌水乐园】发言


