


文章目录
一,张量
张量是一种特殊的数据结构,与数组和矩阵非常相似。在PyTorch中,我们使用张量对模型的输入和输出以及模型的参数进行编码。
张量有点类似于numpy的ndarrays,不同是张量可以在GPU或者其他硬件加速器上运行。
二,创建张量
1. 直接从数据来创建张量
Tensor函数
PyTorch中的tensor函数是一个创建张量的工厂函数,可以用来快速创建各种类型的张量。它有多个参数,以下是一些常见的参数及其解释:
data:要转换为张量的数据,可以是numpy数组、Python列表或标量值。
dtype:张量的数据类型,默认为float32。
device:指定张量所在的设备,例如CPU或GPU。
requires_grad:指定是否需要计算梯度,默认为False。
以下是一些使用例子:
python
import torch

# 创建一个5x3的随机张量
x = torch.tensor([[1, 2, 3], [4, 5, 6], [7, 8, 9], [10, 11, 12], [13, 14, 15]])
print(x)

# 创建一个形状为(2, 3, 4)的全零张量
y = torch.zeros(2, 3, 4)
print(y)

# 将一个numpy数组转换为张量
import numpy as np
a = np.array([[1, 2], [3, 4]])
b = torch.tensor(a)
print(b)

# 创建一个形状为(2, 3)的全一张量,并将其存储在GPU上
z = torch.ones(2, 3, device='cuda:0')
print(z)
这只是一些基本使用例子,你还可以使用其他参数和方法来实现更复杂的操作,例如逐元素加法、矩阵乘法、张量切片等。PyTorch的tensor函数非常强大,可以满足各种需要。
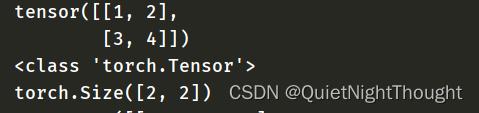
TODO :从数据直接创建张量
data = [[1, 2],[3, 4]]
x_data = torch.tensor(data)

print(x_data)
print(type(x_data))
print(x_data.shape)
看下结果:
2. 从numpy数据创建张量
from_numpy函数
在PyTorch中,from_numpy函数是用于从NumPy数组创建张量的工厂函数之一。这个函数将NumPy数组转换为PyTorch张量,在转换时不会复制数据,因此可以节省内存和时间。
以下是该函数的参数及其解释:
numpy_array:要转换为张量的NumPy数组。
requires_grad:指定是否需要计算梯度,默认为False。
以下是一个示例,演示如何使用from_numpy函数将NumPy数组转换为PyTorch张量:
import numpy as np
import torch

# 创建一个3x3的NumPy数组
np_array = np.array([[1, 2, 3], [4, 5, 6], [7, 8, 9]])

# 使用from_numpy函数将NumPy数组转换为PyTorch张量
tensor = torch.from_numpy(np_array)

print(type(tensor)) # 输出:<class 'torch.Tensor'>
print(tensor) # 输出:tensor([[1, 2, 3], [4, 5, 6], [7, 8, 9]], dtype=torch.int32)
可以看到,通过使用from_numpy函数,我们可以轻松地将NumPy数组转换为PyTorch张量,并且不需要进行任何额外的操作。此外,由于PyTorch张量与NumPy数组共享底层内存,因此对其中一个的更改可能会影响另一个的值。
从numpy数据创建张量
np_array = np.array(data)
print('np_array:',np_array)
x_np = torch.from_numpy(np_array)

print('x_np:',x_np)  #可以看到数据类型也是自动识别,也可以自己制定

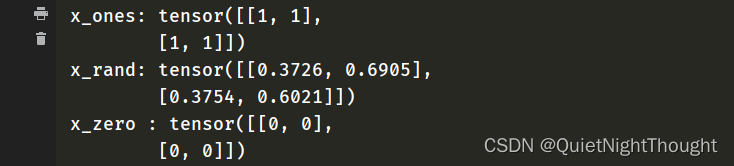
3. 从另一个张量来进行创建张量
例如:从另一个张量来创建一个全是0或者全是1的张量,
data = [[1, 2],[3, 4]]
x_data = torch.tensor(data)


#创建全是0的张量


x_zero = torch.ones_like(x_data) # retains the properties of x_data
print('x_zero :',x_zero )


#创建全是1的张量

x_ones = torch.ones_like(x_data) # retains the properties of x_data
print('x_ones:',x_ones)


#创建随机数张量,这些随机数的范围都是0-1之间的


x_rand = torch.rand_like(x_data,dtype=torch.float)
print('x_rand:',x_rand)
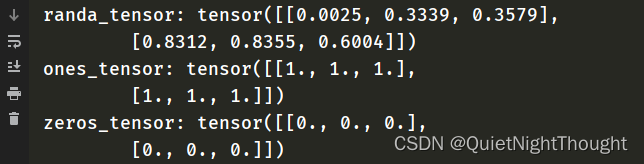
4. 使用随机值或者常数值来创建张量
shape = (2,3)
randa_tensor = torch.rand(shape)
ones_tensor = torch.ones(shape)
zeros_tensor = torch.zeros(shape)

print('randa_tensor:',randa_tensor)
print('ones_tensor:',ones_tensor)
print('zeros_tensor:',zeros_tensor)
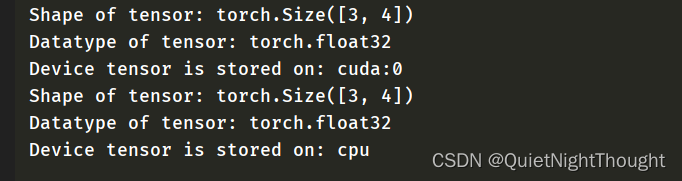
5. 张量的属性,张量属性描述了他们的形状,数据类型和存储他们的设备
tensor_test = torch.rand((3,4),device='cuda:0')
tensor_test_ = torch.rand(3,4)

print(f"Shape of tensor: {tensor_test.shape}")
print(f"Datatype of tensor: {tensor_test.dtype}")
print(f"Device tensor is stored on: {tensor_test.device}")


print(f"Shape of tensor: {tensor_test_.shape}")
print(f"Datatype of tensor: {tensor_test_.dtype}")
print(f"Device tensor is stored on: {tensor_test_.device}")
6. 创建序列张量
a = torch.arange(10)

print('a:',a)
print('a_shape:',a.shape)
print('a_type:',type(a))

7. 创建自定义数值张量
PyTorch中的full函数
在PyTorch中,full函数是用于创建指定形状并填充特定值的张量的工厂函数之一。它的语法如下:
torch.full(size, fill_value, dtype=None, device=None, requires_grad=False)
以下是该函数的参数及其解释:
size:张量的形状,可以是一个整数或一个元组或者一个列表。
fill_value:要填充到新张量中的数值。
dtype:新张量的数据类型,默认为float32。
device:新张量所在的设备,例如CPU或GPU。
requires_grad:指定是否需要计算梯度,默认为False。
以下是一个示例,演示如何使用full函数创建全0或全1的张量:
import torch

# 创建一个形状为(2, 3)且填充全0的张量
x = torch.full((2, 3), 0)
print(x)

# 创建一个形状为(3,)且填充全1的张量,并将其存储在GPU上
y = torch.full((3,), 1, dtype=torch.float32, device='cuda')
print(y)
输出结果如下:

tensor([[0, 0, 0],
        [0, 0, 0]])
tensor([1., 1., 1.], device='cuda:0')
可以看到,通过使用full函数,我们可以快速创建指定形状和值的张量,并在需要时指定数据类型、设备等选项。
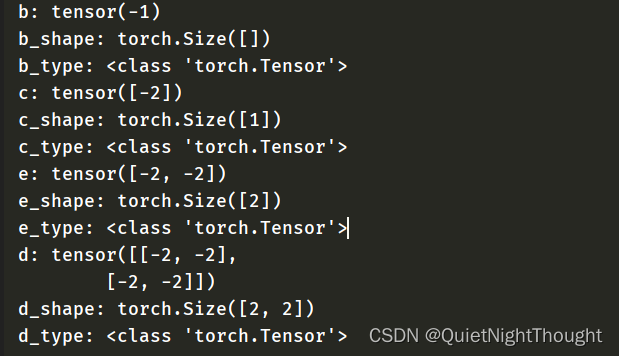
创建自定义张量
#标量
b = torch.full([],-1)

print('b:',b)
print('b_shape:',b.shape)
print('b_type:',type(b))


#向量 创建形状为(1,)且填充全-2的张量
c = torch.full([1],-2)

print('c:',c)
print('c_shape:',c.shape)
print('c_type:',type(c))

#向量 创建形状为(2,)且填充全-2的张量
e = torch.full([2],-2)

print('e:',e)
print('e_shape:',e.shape)
print('e_type:',type(e))


#矩阵 创建形状为(2,2)且填充全-2的矩阵张量
d = torch.full([2,2],-2)

print('d:',d)
print('d_shape:',d.shape)
print('d_type:',type(d))


 278
278


 被折叠的 条评论
为什么被折叠?
被折叠的 条评论
为什么被折叠?
 到【灌水乐园】发言


