


基本操作由三个函数完成:measure()、layout()、draw(),其内部又分别包含了onMeasure()、onLayout()、onDraw()三个子方法(回调函数)。
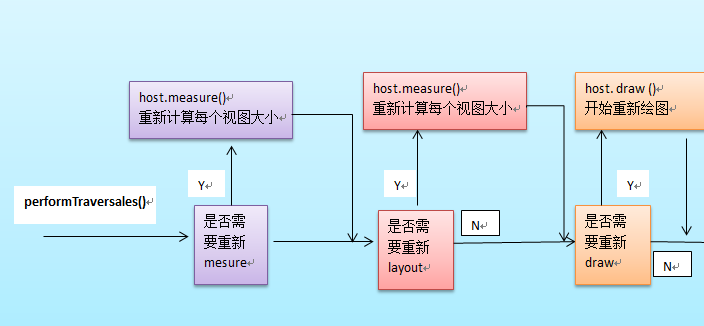
整个View树的绘图流程是在ViewRoot.java类的performTraversals()函数展开的,该函数做的执行过程可简单概况为根据之前设置的状态,判断是否需要重新计算视图大小(measure)、是否重新需要安置视图的位置(layout)、以及是否需要重绘(draw)。
其中measure、layout、draw可以看做动词,measure(测量大小)后才能进行layout(确定位置),然后才能draw(绘制),他们都是public的方法,前两个还是final的,根本没打算被子类继承。真正有变数的是on...回调函数,继承View(ViewGroup)时可以Override,on可以理解为当...时。
具体流程如下:
1、measure
用于计算View Tree的大小,即视图的宽度和长度,回调onMeasure函数。
// View.java中measure的函数原型
public final void measure(int widthMeasureSpec, int heightMeasureSpec) {
    if ((mPrivateFlags & FORCE_LAYOUT) == FORCE_LAYOUT ||
            widthMeasureSpec != mOldWidthMeasureSpec ||
            heightMeasureSpec != mOldHeightMeasureSpec) {

        // first clears the measured dimension flag
        mPrivateFlags &= ~MEASURED_DIMENSION_SET;

        if (ViewDebug.TRACE_HIERARCHY) {
            ViewDebug.trace(this, ViewDebug.HierarchyTraceType.ON_MEASURE);
        }

        // measure ourselves, this should set the measured dimension flag back
        onMeasure(widthMeasureSpec, heightMeasureSpec);

        // flag not set, setMeasuredDimension() was not invoked, we raise
        // an exception to warn the developer
        if ((mPrivateFlags & MEASURED_DIMENSION_SET) != MEASURED_DIMENSION_SET) {
            throw new IllegalStateException("onMeasure() did not set the"
                    + " measured dimension by calling"
                    + " setMeasuredDimension()");
        }

        mPrivateFlags |= LAYOUT_REQUIRED;
    }

    mOldWidthMeasureSpec = widthMeasureSpec;
    mOldHeightMeasureSpec = heightMeasureSpec;
}
onMeasure函数需要两个参数:widthMeasureSpec和heightMeasureSpec(width and height measure specifications),这是两个int值,包含两部分:mode和size(高两位表示mode,低30位表示size,具体参见MeasureSpec类),在onMeasure计算出的widht和height应该尽量满足measure specifications,否则父容器可以选择如clipping,scrolling或者抛出异常,或者(也许是用新的specifications)再次调用onMeasure()。
一但width和height计算好了,就应调用View.setMeasuredDimension(int measuredWidth, int measuredHeight)方法对View的成员变量mMeasuredWidth和mMeasuredHeight变量赋值,否则将导致抛出异常,而measure的主要目的就是对View树中的每个View的mMeasuredWidth和mMeasuredHeight进行赋值,一旦这两个变量被赋值,则意味着该View的测量工作结束。
// onMeasure的函数原型
protected void onMeasure(int widthMeasureSpec, int heightMeasureSpec) {
    setMeasuredDimension(getDefaultSize(getSuggestedMinimumWidth(), widthMeasureSpec),
            getDefaultSize(getSuggestedMinimumHeight(), heightMeasureSpec));
}

// setMeasuredDimension的函数原型
protected final void setMeasuredDimension(int measuredWidth, int measuredHeight) {
    mMeasuredWidth = measuredWidth;
    mMeasuredHeight = measuredHeight;

    mPrivateFlags |= MEASURED_DIMENSION_SET;
}
View默认的onMeasure函数实现就只调用了一个setMeasureDimension函数,重载的话(ViewGroup必须重载实现onMeasure函数)大致流程应该如下所示:
// 重载的onMeasure过程
private void onMeasure(int widthMeasureSpec , int heightMeasureSpec) {
    // 设置该view的实际宽(mMeasuredWidth)高(mMeasuredHeight)
    // 1、该方法必须在onMeasure调用,否者报异常。
    setMeasuredDimension(w, h)

    // 2、如果该View是ViewGroup类型,则对它的每个子View进行measure()过程
    int childCount = getChildCount()

    for(int i=0; i < childCount; i++) {
        // 2.1、获得每个子View对象引用
        View child = getChildAt(i)

        // 整个measure()过程就是个递归过程
        // 该方法只是一个过滤器,最后会调用measure()过程 ;或者 measureChild(child , h, i)方法
        measureChildWithMargins(child, h, i)

        // 其实,对于我们自己写的应用来说,最简单的办法是去掉框架里的该方法,直接调用view.measure(),如下:
        // child.measure(h, l)
    }
}

// measureChildWithMargins具体实现在ViewGroup.java里。
protected  void measureChildWithMargins(View v, int height, int width) {
    v.measure(h, l)
}
在自定义的View中需要重载onMeasure函数的话,关于MeasureSpec可能需要如下代码:
if (specMode == MeasureSpec.EXACTLY) {
    // We were told how big to be
    result = specSize;
} else { // MeasureSpec.UPSPECIFIED
    // Measure the text
    result = (int) mTextPaint.measureText(mText) + getPaddingLeft()
            + getPaddingRight();
    if (specMode == MeasureSpec.AT_MOST) {
        // Respect AT_MOST value if that was what is called for by measureSpec
        result = Math.min(result, specSize);
    }
}
2、layout
用于设置视图在屏幕中显示的位置,有两个基本操作(1)setFrame(l,t,r,b),l,t,r,b即子视图在父视图中的具体位置,该函数用于将这些参数保存起来;(2)onLayout(),在View中这个函数什么都不会做,提供该函数主要是为viewGroup类型布局子视图用的;
layout函数原型,位于View.java
/* final 标识符 , 不能被重载 , 参数为每个视图位于父视图的坐标轴
 * @param l Left position, relative to parent
 * @param t Top position, relative to parent
 * @param r Right position, relative to parent
 * @param b Bottom position, relative to parent
 */
public final void layout(int l, int t, int r, int b) {
    boolean changed = setFrame(l, t, r, b); //设置每个视图位于父视图的坐标轴
    if (changed || (mPrivateFlags & LAYOUT_REQUIRED) == LAYOUT_REQUIRED) {
        if (ViewDebug.TRACE_HIERARCHY) {
            ViewDebug.trace(this, ViewDebug.HierarchyTraceType.ON_LAYOUT);
        }

        onLayout(changed, l, t, r, b);//回调onLayout函数 ,设置每个子视图的布局
        mPrivateFlags &= ~LAYOUT_REQUIRED;
    }
    mPrivateFlags &= ~FORCE_LAYOUT;
}
如果该View是个ViewGroup类型,需要遍历每个子视图childView,调用该子视图的layout()方法去设置它的坐标值。
//回调View视图里的onLayout过程 ,该方法只由ViewGroup类型实现
private void onLayout(int left, int top, right, bottom) {

    //如果该View不是ViewGroup类型
    //调用setFrame()方法设置该控件的在父视图上的坐标轴

    setFrame(l ,t , r ,b) ;
    //--------------------------

    //如果该View是ViewGroup类型,则对它的每个子View进行layout()过程
    int childCount = getChildCount() ;

    for(int i=0 ;i<childCount ;i++){
        //2.1、获得每个子View对象引用
        View child = getChildAt(i) ;
        //整个layout()过程就是个递归过程
        child.layout(l, t, r, b) ;
   }
}
3、draw
利用前两部得到的参数,将视图显示在屏幕上,到这里也就完成了整个的视图绘制工作。值得注意的是每次发起绘图时,并不会重新绘制每个View树的视图,而只会重新绘制那些"需要重绘”的视图,View类内部变量包含了一个标志位DRAWN,当该视图需要重绘时,就会为该View添加该标志位。有三个基本操作(1)绘制背景;(2)如果要视图显示渐变框,这里会做一些准备工作;(3)绘制视图本身,即调用onDraw()函数。在view中onDraw()是个空函数,每个View都需要重载该方法。而ViewGroup则不需要实现该函数,因为作为容器是“没有内容“的,其包含了多个子view,而子View已经实现了自己的绘制方法,因此只需要告诉子view绘制自己就可以了,也就是下面的dispatchDraw()方法。(4)绘制子视图,即dispatchDraw()函数。在view中不需要重载该方法,值得说明的是,ViewGroup类已经为我们重写了dispatchDraw()的功能实现,应用程序一般不需要重写该方法,但可以重载父类函数实现具体的功能。(5)如果需要(应用程序调用了setVerticalFadingEdge或者setHorizontalFadingEdge),开始绘制渐变框;(6)绘制滚动条;
//回调View视图里的onLayout过程 ,该方法只由ViewGroup类型实现
private void draw(Canvas canvas){
    //该方法会做如下事情
    //1 、绘制该View的背景
    //2、为绘制渐变框做一些准备操作
    //3、调用onDraw()方法绘制视图本身
    //4、调用dispatchDraw()方法绘制每个子视图,dispatchDraw()已经在Android框架中实现了,在ViewGroup方法中。
        // 应用程序程序一般不需要重写该方法,但可以捕获该方法的发生,做一些特别的事情。
    //5、绘制渐变框
}

//ViewGroup.java中的dispatchDraw()方法,应用程序一般不需要重写该方法
@Override
protected void dispatchDraw(Canvas canvas) {
    //其实现方法类似如下:
    int childCount = getChildCount() ;

    for(int i=0 ;i<childCount ;i++){
        View child = getChildAt(i) ;
        //调用drawChild完成
        drawChild(child,canvas) ;
    }
}
//ViewGroup.java中的dispatchDraw()方法,应用程序一般不需要重写该方法
protected void drawChild(View child,Canvas canvas) {
    // ....
    //简单的回调View对象的draw()方法,递归就这么产生了。
    child.draw(canvas) ;

    //.........
}
从上面可以看出自定义View需要最少覆写onMeasure()和onDraw()两个方法,自定义viewGroup的时候需要最少覆写onMeasure()和onLayout()方法。
整个界面的更新依次执行measure、layout、draw操作,从ViewRoot按照从根到叶子的顺序绘制view。


 355
355

 被折叠的 条评论
为什么被折叠?
被折叠的 条评论
为什么被折叠?
 到【灌水乐园】发言


