


一个可以用来管理一组Drawable的集合, 并给集合里面的图片指定位置, 使之有一个叠加的效果
资源放置位置:
Eclipse/AS: res/drawable/filename.xml
引用用法:
In Java: R.drawable.filename
In XML: @drawable/filename
语法:
<?xml version="1.0" encoding="utf-8"?>
<layer-list
    xmlns:android="http://schemas.android.com/apk/res/android" >
    <item
        android:drawable="@[package:]drawable/drawable_resource"
        android:id="@[+][package:]id/resource_name"
        android:top="dimension"
        android:right="dimension"
        android:bottom="dimension"
        android:left="dimension" />
</layer-list>- 首个标签必须是layer-list
- 可以添加多个item, item里面可以放置bitmap/shape标签, 先添加的item会放置在最底层
- drawable: 图片源文件的引用
- id: 给每个item图片创建id, 一般没什么用, findViewById用, 这里没什么
- top: 图片资源距离顶部的距离 (单位是:dip/px/sp, 建议用dip/dp)
- right: 图片资源距离右边的距离
- bottom: 图片资源距离底部的距离
- left: 图片资源距离左边的距离
example:
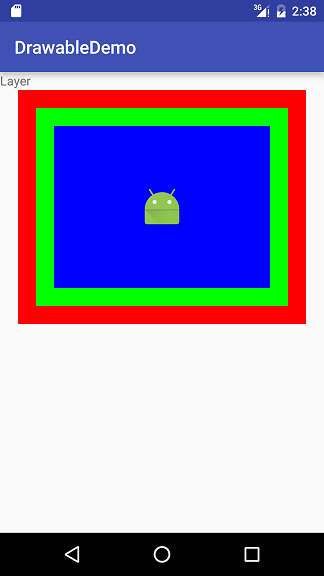
布局XML代码:
<?xml version="1.0" encoding="utf-8"?>
<LinearLayout xmlns:android="http://schemas.android.com/apk/res/android"
              xmlns:tools="http://schemas.android.com/tools"
              android:layout_width="match_parent"
              android:layout_height="match_parent"
              android:orientation="vertical">

    <!--Layer-->
    <TextView
        android:layout_width="match_parent"
        android:layout_height="300dip"
        android:background="@drawable/layerdrawable"
        android:text="Layer"/>
</LinearLayout>
layerdrawable.xml
<?xml version="1.0" encoding="utf-8"?>
<layer-list
    xmlns:android="http://schemas.android.com/apk/res/android">
    <item
        android:id="@+id/shape"
        android:bottom="20dip"
        android:left="20dip"
        android:right="20dip"
        android:top="20dip">
        <shape android:shape="rectangle">
            <solid android:color="#ff0000"/>
        </shape>
    </item>
    <item
        android:id="@+id/shape"
        android:bottom="40dip"
        android:left="40dip"
        android:right="40dip"
        android:top="40dip">
        <shape android:shape="rectangle">
            <solid android:color="#00ff00"/>
        </shape>
    </item>
    <item
        android:id="@+id/shape"
        android:bottom="60dip"
        android:left="60dip"
        android:right="60dip"
        android:top="60dip">
        <shape android:shape="rectangle">
            <solid android:color="#0000ff"/>
        </shape>
    </item>
    <item>
        <bitmap
            android:antialias="true"
            android:dither="true"
            android:filter="true"
            android:gravity="center"
            android:src="@mipmap/ic_launcher"
            android:tileMode="disabled">
        </bitmap>
    </item>
</layer-list>
可能你想说:这有什么用? 能用在哪里?
比如这样:

我不知道你们看到这个图片的时候会怎么考虑,外面一个shape图片, 里面还有一个小搜索图标,还有一个文字,这么下来至少也三个控件,
现在用Layer就简单了, 这里还有个小技巧:你可以让你们的美工中间的文字和图片做成一张图片,这样布局起来就轻松很多了;
一个shape图片和一个图片的叠加,然后设置一个城一个View的background就OK了,只要写一个控件
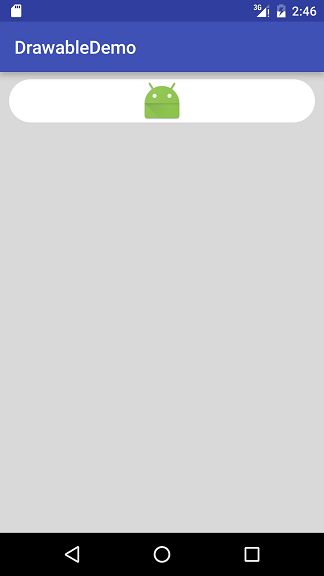
中间的图片我就用ic_luncher替代了
来看下布局代XML码多简洁,只需要一个View设置background
<?xml version="1.0" encoding="utf-8"?>
<LinearLayout xmlns:android="http://schemas.android.com/apk/res/android"
              android:layout_width="match_parent"
              android:layout_height="match_parent"
              android:background="#22000000"
              android:orientation="vertical">

    <View
        android:layout_width="match_parent"
        android:layout_height="48dip"
        android:layout_marginBottom="8dip"
        android:layout_marginLeft="10dip"
        android:layout_marginRight="10dip"
        android:layout_marginTop="8dip"
        android:background="@drawable/layer_test"/>
</LinearLayout>
layer_test.xml代码
<?xml version="1.0" encoding="utf-8"?>
<layer-list
    xmlns:android="http://schemas.android.com/apk/res/android">
    <item>
        <shape android:shape="rectangle">
            <corners android:radius="50dip"/>
            <solid android:color="@android:color/white"/>
        </shape>
    </item>
    <item
        android:drawable="@mipmap/ic_launcher"
        android:gravity="center">
    </item>
</layer-list>


 被折叠的 条评论
为什么被折叠?
被折叠的 条评论
为什么被折叠?
 到【灌水乐园】发言


