


cluster-01 : yum server
cluster-02:mysql server,ambari server
安装思路:
在生产环境中,应该是没有外网链接的环境,或者做了外网隔离,因此在离线环境下搭建集群很有价值。在内网集群中搭建yum服务器,安装ambari和集群,是一种比较好的解决思路。
安装步骤:
- 搭建Yum源服务器
- 安装MySQL服务
- 安装Ambari服务
安装过程:
(一)搭建Yum源服务器
1)安装http server
在cluster-01上安装apaceh http服务。
检查是否已经安装apache http服务
[root@cluster-01 ~]$ which httpd
如果没有出现目录信息,则说明没有安装。
[root@cluster-01 ~]$ sudo yum install httpd
安装成功之后,apache工作目录默认在/var/www/html。
配置
检查端口是否占用,apache http服务使用80端口
[root@cluster-01 ~]$ netstat -nltp | grep 80
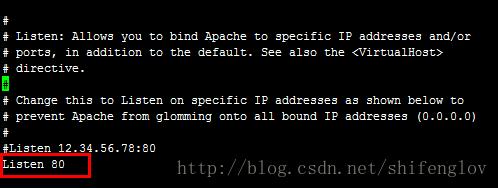
如果有占用情况,安装完毕之后需要修改apache http服务的端口号:
[root@cluster-01 ~]$ sudo vi /etc/httpd/conf/httpd.conf
修改监听端口,Listen 80为其他端口。
启动
[root@cluster-01 ~]$ sudo service httpd start
可以在浏览器中查看http://cluster-01 看到apache server的一些页面信息,表示启动成功。
2)添加rpm包到repository中
添加HDP 相关rpm包
下载HDP2.2.0的包
http://public-repo-1.hortonworks.com/HDP/centos6/HDP-2.2.0.0-centos6-rpm.tar.gz
http://public-repo-1.hortonworks.com/HDP-UTILS-1.1.0.20/repos/centos6/HDP-UTILS-1.1.0.20-centos6.tar.gz
解压之后,会有HDP,HDP-UTILS-1.1.0.17的目录生成。
下载ambari的包
此处我们使用自己编译好的
ambari-server-1.6.1.1.noarch.rpm
ambari-agent-1.6.1.1.noarch.rpm
注意:如果不使用己编译好的rpm包,也可以使用官网下载的
http://public-repo-1.hortonworks.com/ambari/centos6/ambari-1.6.1-centos6.tar.gz
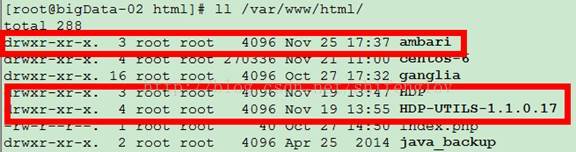
将这些包复制到/var/www/html/centos-6/
[root@cluster-01 html]# ll /var/www/html/
说明:
ambari目录:包含ambari-server,ambari-agent,ambari-log4j等rpm包
HDP目录:包含hadoop的生态圈的组件,比如hdfs,hive,hbase,mahout等
HDP-UTILS-1.1.0.17目录:包含HDP平台所包含的工具组件等,比如nagios,ganglia,puppet等
3)创建Yum repository
在本地安装createrepo软件。
检查是否已经安装:
[root@cluster-01 ~]$ which createrepo
如果出现在具体的目录,则说明已经安装
安装:
[root@cluster-01 ~]$ sudo yum install createrepo
创建repository:
[root@cluster-01 ~]$ sudo createrepo /var/www/html/centos-6/
修改客户端Yum源配置
在ambari安装的节点做如下操作:
将/etc/yum.repos.d下的所有repo做备份,然后删除,创建一个ambari.repo,写入以下内容:
[root@cluster-01 ~]# vi /etc/yum.repos.d/ambari.repo
[ambari-1.x]
name=Ambari 1.x
baseurl=http://public-repo-1.hortonworks.com/ambari/centos6/1.x/GA
gpgcheck=1
gpgkey=http://public-repo-1.hortonworks.com/ambari/centos6/RPM-GPG-KEY/RPM-GPG-KEY-Jenkins
enabled=0 (注意,不启用)
priority=1
[Updates-ambari-1.6.1]
name=ambari-1.6.1 - Updates
baseurl=http://cluster-01/ambari/centos6/1.x/updates/1.6.1
enabled=1
priority=1
注意:
baseurl=http://<your server IP>/ambari/centos6/1.x/updates/1.6.1
ambari/centos6/1.x/updates/1.6.1与yum repository地址相对应。可以在浏览器中,
查看这个地址http://cluster-01/ambari/centos6/1.x/updates/1.6.1
清除缓存:
[root@cluster-01 ~]$ sudo yum clean all
测试下:
[root@cluster-01 ~]$ sudo yum repolist
如果出现仓库的名称等输出,则说明配置成功。
如图所示,出现对应的repository即可。
1)安装
通过yum安装mysql:
[root@cluster-02 ~]$ sudo yum install mysql-server
启动mysql服务
[root@cluster-02 ~]$ sudo service mysqld start
安装MySQL JDBC Connector:
[root@cluster-02 root]$ sudo yum install mysql-connector-java
2)配置
1)启动mysql服务
[root@cluster-02 ~]# service mysqld start
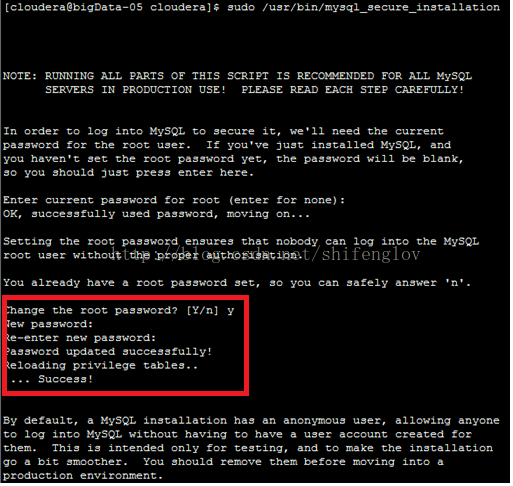
2)为root用户设置新密码等初始化工作
[root@cluster-01 ~]$ sudo /usr/bin/mysql_secure_installation
3)为ambari创建数据库,配置相应用户和权限
[root@cluster-02 ~]# mysql -u root –p
mysql> create database ambari;
Query OK, 1 row affected (0.00 sec)
mysql> use ambari;
Database changed
mysql>
CREATE USER 'ambari'@'%' IDENTIFIED BY 'ambari';
GRANT ALL PRIVILEGES ON *.* TO 'ambari'@'%';
CREATE USER 'ambari'@'localhost' IDENTIFIED BY 'ambari';
GRANT ALL PRIVILEGES ON *.* TO 'ambari'@'localhost';
CREATE USER 'ambari'@'cluster-02' IDENTIFIED BY 'ambari';
GRANT ALL PRIVILEGES ON *.* TO 'ambari'@'cluster-02';
FLUSH PRIVILEGES;
3)启动
mysql设置为开机自启动
[root@cluster-05 root]$ sudo chkconfig mysqld on
[root@cluster-05 root]$ sudo chkconfig –list
mysqld 0:off 1:off 2:on 3:on 4:on 5:on 6:off
1)安装
yum安装,所有依赖yum自动下载,只需要执行命令即可。
[root@cluster-02 root]# yum install ambari-server
出现Complete! 则可
2)配置
[root@cluster-02 root]# ambari-server setup
Daemon运行的账号设置
Customize user account for ambari-server daemon [y/n] (n)?
输入:y
Enter user account for ambari-server daemon (root):
输入:root
检查防火墙是否关闭
Adjusting ambari-server permissions and ownership...
Checking firewall...
WARNING: iptables is running. Confirm the necessary Ambari ports are accessible. Refer to the Ambari documentation for more details on ports.
OK to continue [y/n] (y)?
输入:y
检查JDK
Checking JDK...
[1] - Oracle JDK 1.7 + Java Cryptography Extension (JCE) Policy Files 7
[2] - Oracle JDK 1.6 + Java Cryptography Extension (JCE) Policy Files 6
[3] - Custom JDK
==============================================================================
Enter choice (1):
输入:3
输入:/usr/local/jdk1.7.0_51/ (jdk的home,根据情况输入)
Choose one of the following options:
[1] - PostgreSQL (Embedded)
[2] - Oracle
[3] - MySQL
[4] - PostgreSQL
==============================================================================
Enter choice (1):
输入:3
Hostname (localhost):
Port (3306):
Database Name (ambari):
Username (ambari):
输入:(什么也不输入,直接“回车”)
Enter Database Password (cluster):
Re-enter password:
输入:ambari
WARNING: Before starting Ambari Server, you must run the following DDL against the database to create the schema: /var/lib/ambari-server/resources/Ambari-DDL-MySQL-CREATE.sql
Proceed with configuring remote database connection properties [y/n] (y)?
输入:y
注意,此刻需要切换到mysql中执行相应脚本操作。
需要登录到mysql数据库,执行以下脚本Ambari-DDL-MySQL-CREATE.sql
[root@cluster-02 ~]# mysql -u root –p
mysql> use ambari;
Database changed
mysql> source /var/lib/ambari-server/resources/Ambari-DDL-MySQL-CREATE.sq
执行脚本,成功。
验证脚本是否初始化成功,出现以下table列表。
mysql> show tables;
+-------------------------------+
| Tables_in_ambari |
+-------------------------------+
| ClusterHostMapping |
| QRTZ_BLOB_TRIGGERS |
| QRTZ_CALENDARS |
| QRTZ_CRON_TRIGGERS |
| QRTZ_FIRED_TRIGGERS |
| QRTZ_JOB_DETAILS |
| QRTZ_LOCKS |
3)启动
[root@cluster-02 root]# ambari-server start
Using python /usr/bin/python2.6
Starting ambari-server
Ambari Server running with 'root' privileges.
Organizing resource files at /var/lib/ambari-server/resources...
Server PID at: /var/run/ambari-server/ambari-server.pid
Server out at: /var/log/ambari-server/ambari-server.out
Server log at: /var/log/ambari-server/ambari-server.log
Waiting for server start....................
Ambari Server 'start' completed successfully.
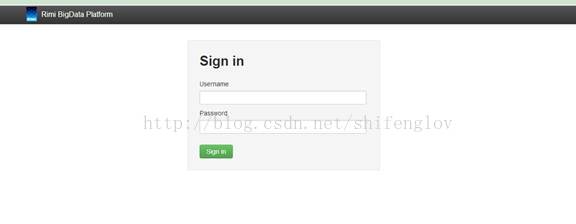
启动成功。
登录 http://<Your Server IP>:8080
参考资料:
Ambari安装文档
https://cwiki.apache.org/confluence/display/AMBARI/Installation+Guide+for+Ambari+1.6.1
Hortonworks公司(Ambari发挥到极致)
原创文章,欢迎转载,转载请标明出处 http://blog.csdn.net/shifenglov/article/details/41831983


 4597
4597

 被折叠的 条评论
为什么被折叠?
被折叠的 条评论
为什么被折叠?
 到【灌水乐园】发言


