


今天写了一个Android 3D的实例,现录如下.
1)建立 OPGL ES 环境准备
① 分别实现接口 GLSurfaceView 和 GLSurfaceView.Renderer
② 添加
<uses-feature android:glEsVersion="0x00020000" android:required="true" />
③
package com.joygame.sh.opegl.es.activity;
import android.app.Activity; import android.opengl.GLSurfaceView; import android.os.Bundle;
import com.joygame.sh.opegl.es.renderer.MyGLRenderer;
/** * Our OpenGL program's main activity */ public class MyGLActivity extends Activity { private GLSurfaceView glView; // Use GLSurfaceView // Call back when the activity is started, to initialize the view @Override protected void onCreate(Bundle savedInstanceState) { super.onCreate(savedInstanceState); glView = new GLSurfaceView(this); // Allocate a GLSurfaceView glView.setRenderer(new MyGLRenderer(this)); // Use a custom renderer this.setContentView(glView); // This activity sets to GLSurfaceView } // Call back when the activity is going into the background @Override protected void onPause() { super.onPause(); glView.onPause(); } // Call back after onPause() @Override protected void onResume() { super.onResume(); glView.onResume(); } }
④
package com.joygame.sh.opegl.es.renderer;
import javax.microedition.khronos.egl.EGLConfig; import javax.microedition.khronos.opengles.GL10;
import android.content.Context; import android.opengl.GLSurfaceView; import android.opengl.GLU;
import com.joygame.sh.opegl.es.shape.Square; import com.joygame.sh.opegl.es.shape.Triangle;
/** * OpenGL Custom renderer used with GLSurfaceView */ public class MyGLRenderer implements GLSurfaceView.Renderer {
Context context; // Application's context Triangle triangle; // ( NEW ) Square quad; // ( NEW )
// Constructor public MyGLRenderer(Context context) { this.context = context; // Set up the data-array buffers for these shapes ( NEW ) triangle = new Triangle(); // ( NEW ) quad = new Square(); // ( NEW ) }
// Call back when the surface is first created or re-created @Override public void onSurfaceCreated(GL10 gl, EGLConfig config) { gl.glClearColor(0.0f, 0.0f, 0.0f, 1.0f); // Set color's clear-value to // black gl.glClearDepthf(1.0f); // Set depth's clear-value to farthest gl.glEnable(GL10.GL_DEPTH_TEST); // Enables depth-buffer for hidden // surface removal gl.glDepthFunc(GL10.GL_LEQUAL); // The type of depth testing to do gl.glHint(GL10.GL_PERSPECTIVE_CORRECTION_HINT, GL10.GL_NICEST); // nice // perspective // view gl.glShadeModel(GL10.GL_SMOOTH); // Enable smooth shading of color gl.glDisable(GL10.GL_DITHER); // Disable dithering for better // performance
// You OpenGL|ES initialization code here // ...... }
// Call back after onSurfaceCreated() or whenever the window's size changes @Override public void onSurfaceChanged(GL10 gl, int width, int height) { if (height == 0) height = 1; // To prevent divide by zero float aspect = (float) width / height;
// Set the viewport (display area) to cover the entire window gl.glViewport(0, 0, width, height);
// Setup perspective projection, with aspect ratio matches viewport gl.glMatrixMode(GL10.GL_PROJECTION); // Select projection matrix gl.glLoadIdentity(); // Reset projection matrix // Use perspective projection GLU.gluPerspective(gl, 45, aspect, 0.1f, 100.f);
gl.glMatrixMode(GL10.GL_MODELVIEW); // Select model-view matrix gl.glLoadIdentity(); // Reset
// You OpenGL|ES display re-sizing code here // ...... }
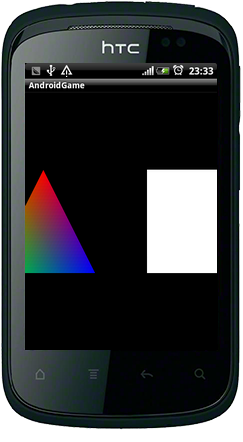
// Call back to draw the current frame. @Override public void onDrawFrame(GL10 gl) { // Clear color and depth buffers using clear-value set earlier gl.glClear(GL10.GL_COLOR_BUFFER_BIT | GL10.GL_DEPTH_BUFFER_BIT); gl.glLoadIdentity(); // Reset model-view matrix ( NEW ) gl.glTranslatef(-1.5f, 0.0f, -6.0f); // Translate left and into the screen ( NEW ) triangle.draw(gl); // Draw triangle ( NEW ) // Translate right, relative to the previous translation ( NEW ) gl.glTranslatef(3.0f, 0.0f, 0.0f); quad.draw(gl); } }
package com.joygame.sh.opegl.es.shape;
import java.nio.ByteBuffer; import java.nio.ByteOrder; import java.nio.FloatBuffer;
import javax.microedition.khronos.opengles.GL10;
/* * A triangle with 3 vertices. */ public class Triangle { private FloatBuffer vertexBuffer; // Buffer for vertex-array private FloatBuffer colorBuffer; // Buffer for color-array (NEW) private ByteBuffer indexBuffer; // Buffer for index-array private float[] vertices = { // Vertices of the triangle 0.0f, 1.0f, 0.0f, // 0. top -1.0f, -1.0f, 0.0f, // 1. left-bottom 1.0f, -1.0f, 0.0f // 2. right-bottom }; private byte[] indices = { 0, 1, 2 }; // Indices to above vertices (in CCW) private float[] colors = { // Colors for the vertices (NEW) 1.0f, 0.0f, 0.0f, 1.0f, // Red (NEW) 0.0f, 1.0f, 0.0f, 1.0f, // Green (NEW) 0.0f, 0.0f, 1.0f, 1.0f // Blue (NEW) };
// Constructor - Setup the data-array buffers public Triangle() { // Setup vertex-array buffer. Vertices in float. A float has 4 bytes. ByteBuffer vbb = ByteBuffer.allocateDirect(vertices.length * 4); vbb.order(ByteOrder.nativeOrder()); // Use native byte order vertexBuffer = vbb.asFloatBuffer(); // Convert byte buffer to float vertexBuffer.put(vertices); // Copy data into buffer vertexBuffer.position(0); // Rewind // Setup color-array buffer. Colors in float. A float has 4 bytes (NEW) ByteBuffer cbb = ByteBuffer.allocateDirect(colors.length * 4); cbb.order(ByteOrder.nativeOrder()); // Use native byte order (NEW) colorBuffer = cbb.asFloatBuffer(); // Convert byte buffer to float (NEW) colorBuffer.put(colors); // Copy data into buffer (NEW) colorBuffer.position(0); // Rewind (NEW) // Setup index-array buffer. Indices in byte. indexBuffer = ByteBuffer.allocateDirect(indices.length); indexBuffer.put(indices); indexBuffer.position(0); } // Render this shape public void draw(GL10 gl) { // Enable vertex-array and define the buffers gl.glEnableClientState(GL10.GL_VERTEX_ARRAY); gl.glVertexPointer(3, GL10.GL_FLOAT, 0, vertexBuffer); gl.glEnableClientState(GL10.GL_COLOR_ARRAY); // Enable color-array (NEW) gl.glColorPointer(4, GL10.GL_FLOAT, 0, colorBuffer); // Define color-array buffer (NEW)
// Draw the primitives via index-array gl.glDrawElements(GL10.GL_TRIANGLES, indices.length, GL10.GL_UNSIGNED_BYTE, indexBuffer); gl.glDisableClientState(GL10.GL_VERTEX_ARRAY); gl.glDisableClientState(GL10.GL_COLOR_ARRAY); // Disable color-array (NEW)
} }
Drawng a defined shape using OpenGL ES 2.0 requires a significant amount of code, because you must provide a lot of details to the graphics rendering pipeline. Specifically, you must define the following:
- Vertex Shader - OpenGL ES graphics code for rendering the vertices of a shape.
- Fragment Shader - OpenGL ES code for rendering the face of a shape with colors or textures.
- Program - An OpenGL ES object that contains the shaders you want to use for drawing one or more shapes.


 1695
1695

 被折叠的 条评论
为什么被折叠?
被折叠的 条评论
为什么被折叠?
 到【灌水乐园】发言


