


针对IOS7.1企业版发布报无法链接,暂时采用的是共享到网络的办法来解决,一种是使用dropbox,一种是使用skydrive
一、使用dropbox
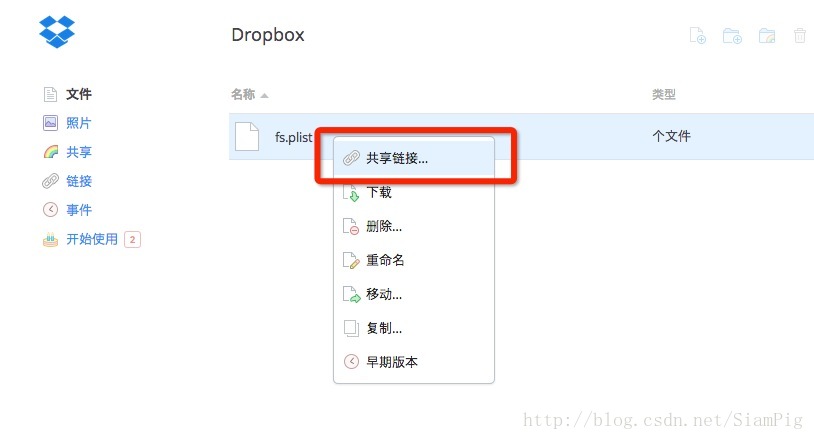
1、登录dropbox 将以前生成的plist文件上传到dropbox上。
2、右击该plist文件,在弹出的菜单中选择 共享链接,
2、在共享链接界面,点击获取链接

3、此时该plist文件的共享链接地址自动保存到粘贴板中,链接地址形如:https://www.dropbox.com/s/dy0x11ryifmffz1/fs.plist
4、将获取到的链接地址 www.dropbox.com 替换成 dl.dropboxusercontent.com 替换之后的链接地址形如:https://dl.dropboxusercontent.com/s/dy0x11ryifmffz1/fs.plist
5、此时你只需要将itms-services中的url地址替换为现在的新的地址即可。
二、使用skydrive共享
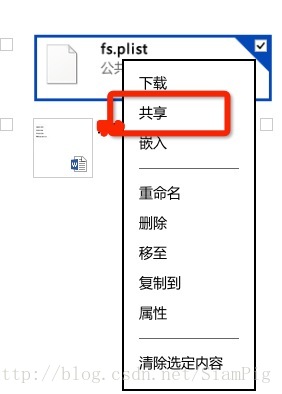
1、登录你的skydrive,同样是将你的plist文件上传到云空间
2、右击该plist文件选择共享
3、在弹出的分享界面,输入一个分享联系人邮箱(测试发现使用iPhone手机收发邮件获得的地址不会出问题,直接使用电脑收发邮件,获取到的地址,无法成功)

4、收发邮件,你会获得一个形如这样的地址:https://8wsg6q.blu.livefilestore.com/y2pUXvDvm1TIOW5GXJS6j8v9DFdndL11NESNIJJJowQ28c1Z2o02lhVqSSAn6k-Z-WJ0_39OiFh3QboaOC_yF2Yjk1XgBCiEsUsYeZkkAXjpEU/fs.plist?download&psid=1 (如果你获得地址形如:https://onedrive.live.com/?cid=e34af14af3518275&id=E34AF14AF3518275%21197&Bsrc=Share&Bpub=SDX.SkyDrive&authkey=!Aq96JhfNlS-UKL0 一般没戏,需要重新获取,尽量使用iPhone手机收取)
5、此时你只需要将itms-services中的url地址替换为现在的新的地址即可
注意:
在这两种共享中,均不需要对plist文件,ipa等文件做任何修改,你需要做的只有两件事,
1、将plist文件共享
2、修改itms-service里的url为现在plist的url地址。
三、制作个人受信用的根证书
四、
Tomcat下制作证书
备注:我的Tomcat是部署在我自己的Mac电脑上的,目录是/Library/Tomcat,所以我先
cd /Library/Tomcat
1、首先是生成服务端和客户端所需要的证书;
openssl genrsa -out server.key 1024
2、生成签署申请(注意除CommonName和organization Name以外可以为空,Common Name必须为服务器的ip或域名, 不是很清楚,反正我是全输入进去了):
# openssl req -new -out server.csr -key server.key
You are about to be asked to enter information that will be incorporated
into your certificate request.
What you are about to enter is what is called a Distinguished Name or a DN.
There are quite a few fields but you can leave some blank
For some fields there will be a default value,
If you enter '.', the field will be left blank.
-----
Country Name (2 letter code) [AU]:
State or Province Name (full name) [Some-State]:
Locality Name (eg, city) []:
Organization Name (eg, company) [Internet Widgits Pty Ltd]:
Organizational Unit Name (eg, section) []:
Common Name (e.g. server FQDN or YOUR name) []:192.168.1.101
Email Address []:
Please enter the following 'extra' attributes
to be sent with your certificate request
A challenge password []:123456
An optional company name []:
3、生成CA密钥:
openssl genrsa -out ca.key 1024
4、 利用CA的私钥产生CA的自签署证书(注意除CommonName和organization Name以外可以为空,Common Name必须为服务器的ip或域名,organization Name必须和上一次一致)(3650表示有效期10年):
# openssl req -new -x509 -days 3650 -key ca.key -out ca.crt
You are about to be asked to enter information that will be incorporated
into your certificate request.
What you are about to enter is what is called a Distinguished Name or a DN.
There are quite a few fields but you can leave some blank
For some fields there will be a default value,
If you enter '.', the field will be left blank.
-----
Country Name (2 letter code) [AU]:
State or Province Name (full name) [Some-State]:
Locality Name (eg, city) []:
Organization Name (eg, company) [Internet Widgits Pty Ltd]:
Organizational Unit Name (eg, section) []:
Common Name (e.g. server FQDN or YOUR name) []:192.168.1.101
Email Address []:
5、在当前目录下创建demoCA文件夹,里面创建文件夹newcerts以及文件index.txt和serial,serial内容是01,index.txt内容为空。
SiamPig-MacBook-Pro:Tomcat root# mkdir demoCA
SiamPig-MacBook-Pro:Tomcat root# cd demoCA/
SiamPig-MacBook-Pro:demoCA root# mkdir newcerts
SiamPig-MacBook-Pro:demoCA root# vi index.txt
SiamPig-MacBook-Pro:demoCA root# vi serial
SiamPig-MacBook-Pro:demoCA root# ls
index.txt newcerts serial
6、为服务器签署证书
openssl ca -in server.csr -out server.crt -cert ca.crt -keyfile ca.key
7、把服务端代码转换浏览器可以识别的PCS12 格式
openssl pkcs12 -export -in ca.crt -inkey ca.key -out server.p12
8、 使用jetty 中的PKCS12Import 工具类完成转换。(jetty-5.1.10.jar):
java -cp /Users/ailk/Desktop/jetty-5.1.10.jar org.mortbay.util.PKCS12Import server.p12 server.jks
Enter input keystore passphrase: Siam
Enter output keystore passphrase: Siam
Alias 0: 1
Adding key for alias 1
9、向服务器端安装server.jks证书,打开tomcat安装目录下的conf/server.xml,找到如下的节点:
<!-- Define a SSL HTTP/1.1 Connector on port 8443
This connector uses the NIO implementation that requires the JSSE
style configuration. When using the APR/native implementation, the
OpenSSL style configuration is required as described in the APR/native
documentation -->
<!--
<Connector port="8443" protocol="org.apache.coyote.http11.Http11NioProtocol"
maxThreads="150" SSLEnabled="true" scheme="https" secure="true"
clientAuth="false" sslProtocol="TLS"/>
-->
可以发现这个这个节点是注释掉的,取消这个注释,将这个节点修改成如下的:
<Connector port="8443" protocol="org.apache.coyote.http11.Http11NioProtocol"
maxThreads="150" SSLEnabled="true" scheme="https" secure="true"
clientAuth="false" sslProtocol="TLS" keystoreFile="/Library/Tomcat/server.jks" keystorePass="Siam" truststoreFile="/Library/Tomcat/server.jks" truststorePass="ailk"/>
keystoreFile
truststoreFile
这两个对应的都是你生成server.jks的路径,
keystorePass/truststorePass两个参数的值是我们在步骤八中输入的密码。
10、关闭服务器,重启,此时端口是8443,而不是8080.
11、将生成的ca.cert作为附件以邮件的形式发给设备,让设备安装该证书。
备注:
由于我个人的plist文件以及ipa包全部都是在这个服务器下面,所以有两个个地方都要进行修改,一个是
href="itms-services://?action=download-manifest&url=https://192.168.1.101:8443/examples/ios_install/jk.plist"
第二个就是plist文件中的两个地址也要进行相应的修改,要不然会提示暂时无法下载的错误。


 5398
5398


 被折叠的 条评论
为什么被折叠?
被折叠的 条评论
为什么被折叠?
 到【灌水乐园】发言


