


IDE:IntelliJ IDEA 2019.2.4 x64
操作系统:win10 x64 位 家庭版
Maven版本:apache-maven-3.6.3
文章目录

真正的SpringBoot
看一段正常的springboot启动类
代码如下所示
import org.mybatis.spring.annotation.MapperScan;
import org.springframework.boot.SpringApplication;
import org.springframework.boot.autoconfigure.SpringBootApplication;


@SpringBootApplication
public class ServiceCmnApplication {

    public static void main(String[] args) {
        SpringApplication.run(ServiceCmnApplication.class, args);
    }
}
手写一个简易版的springboot
一. 准备
首先准备两个模块
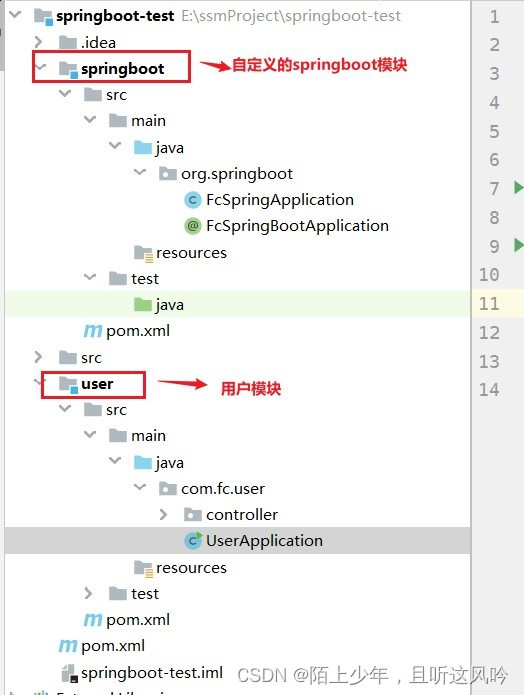
1.1 准备自定义的springboot模块
① FcSpringApplication类代码如下所示
package org.springboot;

import org.apache.catalina.*;
import org.apache.catalina.connector.Connector;
import org.apache.catalina.core.StandardContext;
import org.apache.catalina.core.StandardEngine;
import org.apache.catalina.core.StandardHost;
import org.apache.catalina.startup.Tomcat;
import org.springframework.web.context.WebApplicationContext;
import org.springframework.web.context.support.AnnotationConfigWebApplicationContext;
import org.springframework.web.servlet.DispatcherServlet;

public class FcSpringApplication {

    //自定义run方法
    public static void run(Class clazz) {

        //1.启动tomcat
        startTomcat();
    }

    //对Tomcat进行属性配置
    private static void startTomcat() {
        Tomcat tomcat = new Tomcat();

        Server server = tomcat.getServer();
        Service service = server.findService("Tomcat");

        Connector connector = new Connector();
        connector.setPort(8081);

        Engine engine = new StandardEngine();
        engine.setDefaultHost("localhost");

        Host host =  new StandardHost();
        host.setName("localhost");

        String contextPath = "";
        Context context = new StandardContext();
        context.setPath(contextPath);
        context.addLifecycleListener(new Tomcat.FixContextListener());

        host.addChild(context);

        engine.addChild(host);

        service.setContainer(engine);

        service.addConnector(connector);


        try {
            tomcat.start();
        } catch (LifecycleException e) {
            e.printStackTrace();
        }

    }
②自定义注解FcSpringBootApplication代码如下所示
package org.springboot;

public @interface FcSpringBootApplication {
}
1.2 准备用户模块User
①启动类UserApplication代码如下
import org.springboot.FcSpringApplication;
import org.springboot.FcSpringBootApplication;

@FcSpringBootApplication
public class UserApplication {

    public static void main(String[] args) {
        FcSpringApplication.run(UserApplication.class);

    }
}
这里先抛出一个问题
为何要将User模块的启动类作为值传入FcSpringApplication.run()方法中?
在传值之前,有个很重要的前提–需要启动Tomcat服务器
②UserController类代码如下
import org.springframework.web.bind.annotation.GetMapping;
import org.springframework.web.bind.annotation.RestController;
@RestController
public class UserController {
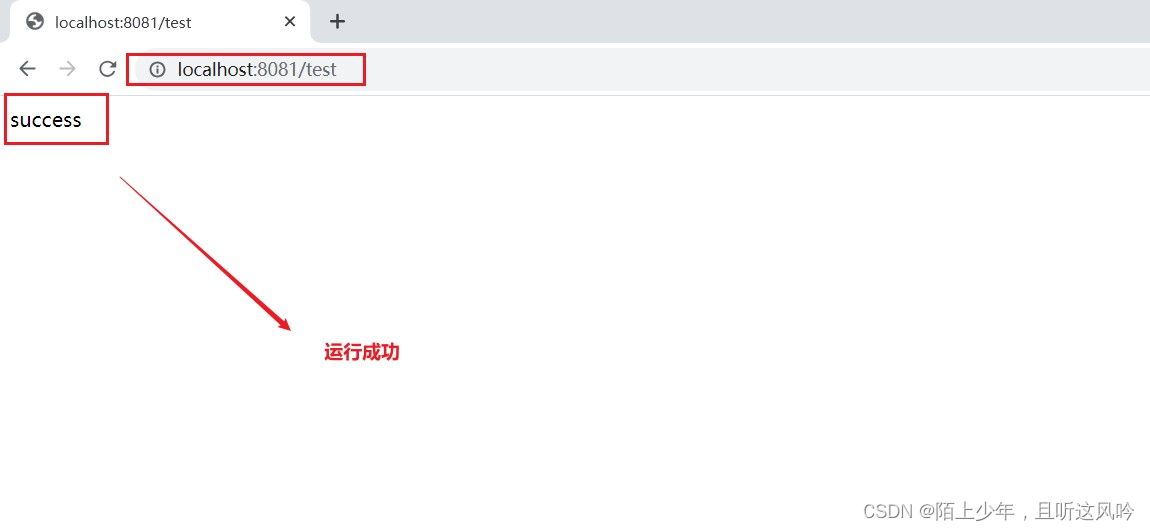
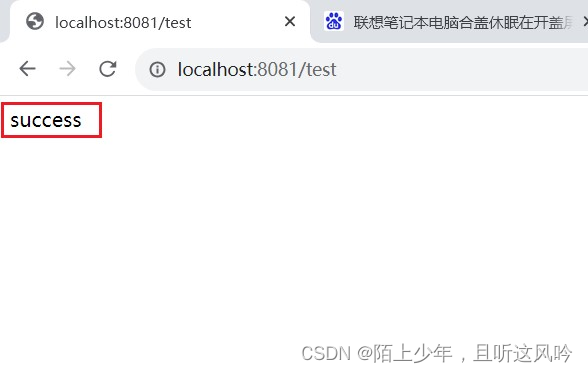
@GetMapping("/test")
public String test(){
return "success";
}
}
二. 运行测试
2.1 第一次运行测试
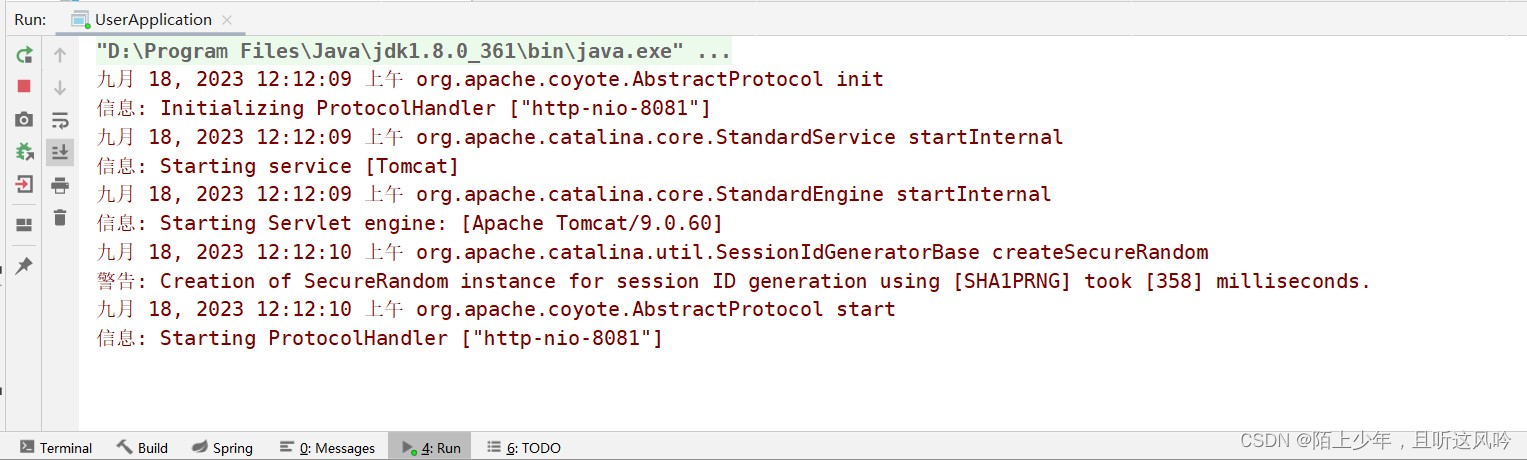
启动User模块,可以发现
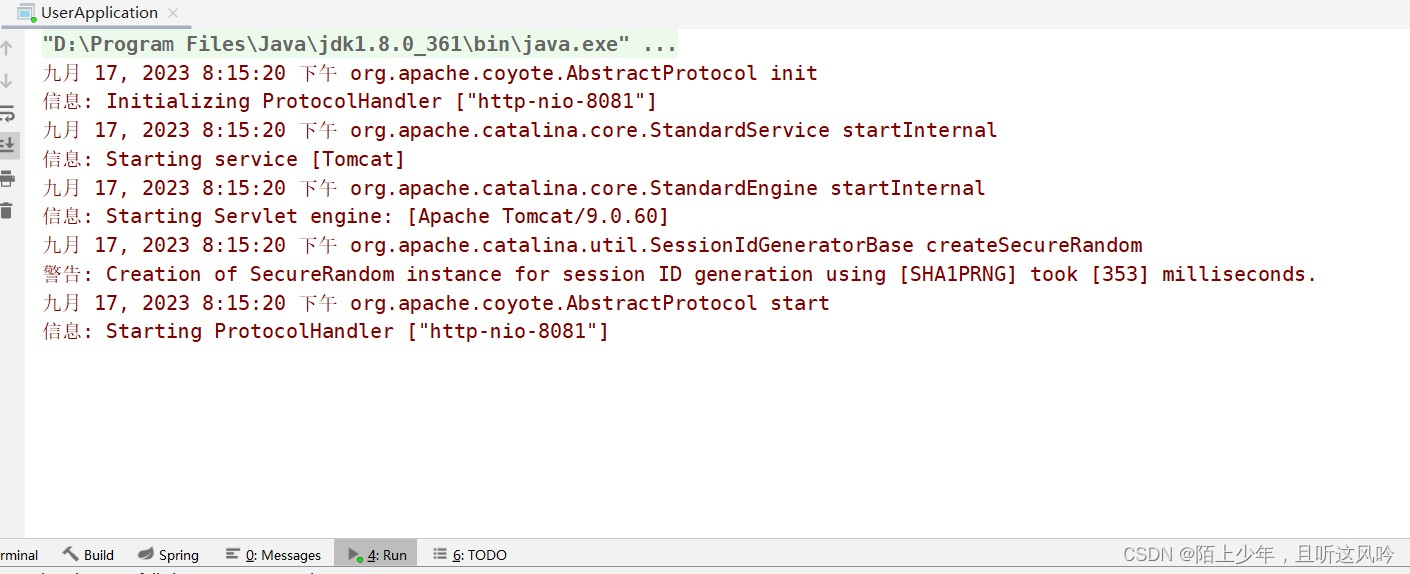
它报错了!!!
🤔为什么会报错?
因为自定义springboot模块没有实现“根据指定请求路径去寻找controller中对应的请求方法并返回结果”的功能,而这一功能正好是springmvc技术。故而我们只需在自定义springboot模块里的run()中整合springmvc技术即可
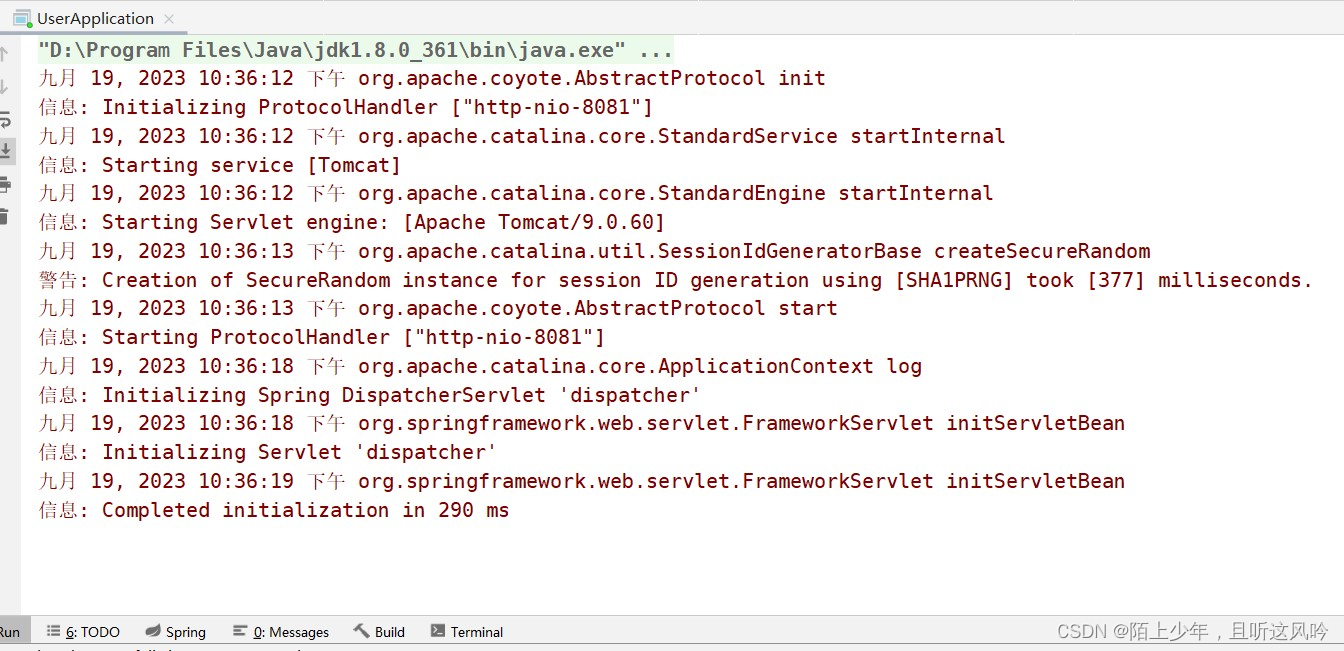
2.2 第二次运行测试
整合springmvc代码如下所示
tomcat.addServlet(contextPath, "dispatcher", new DispatcherServlet(webApplicationContext));
context.addServletMappingDecoded("/*", "dispatcher");
复制上述代码到run方法中

代码爆红了
通过查阅追踪SpringMvc中new DispatcherServlet()中的源码可知
public DispatcherServlet(WebApplicationContext webApplicationContext) {
    super(webApplicationContext);
    this.setDispatchOptionsRequest(true);
}
👉发现
它需要一个WebApplicationContext类型的对象,而这个WebApplicationContext类型是一个接口,它继承于ApplicationContext接口,而这个ApplicationContext接口实际上就是Spring容器。
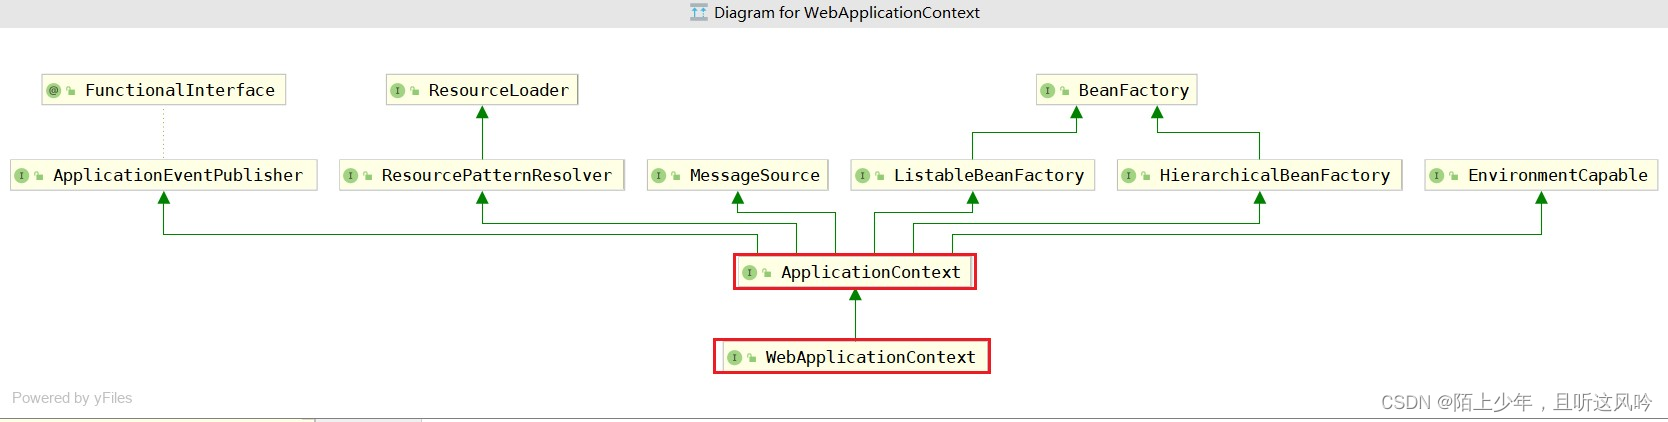
从这就不难猜到,DispatcherServlet需要从一个spring容器中去找请求路径相映射的处理方法并返回结果
👉结论
tomcat需要从传入的spring容器中去找UserController所对应的bean,进而找到对应请求路径映射的方法test
优化后整体代码示例如下
import org.apache.catalina.*;
import org.apache.catalina.connector.Connector;
import org.apache.catalina.core.StandardContext;
import org.apache.catalina.core.StandardEngine;
import org.apache.catalina.core.StandardHost;
import org.apache.catalina.startup.Tomcat;
import org.springframework.web.context.WebApplicationContext;
import org.springframework.web.context.support.AnnotationConfigWebApplicationContext;
import org.springframework.web.servlet.DispatcherServlet;

public class FcSpringApplication {

    public static void run(Class clazz) {
        //启动Tomcat之前,需要创建spring容器(找到UserController这个Bean)
        AnnotationConfigWebApplicationContext webApplicationContext = new AnnotationConfigWebApplicationContext(); //通过注解形式配置spring容器


        //启动tomcat
        startTomcat(webApplicationContext);
    }

    //对Tomcat进行属性配置
    private static void startTomcat(WebApplicationContext webApplicationContext) {
        Tomcat tomcat = new Tomcat();

        Server server = tomcat.getServer();
        Service service = server.findService("Tomcat");

        Connector connector = new Connector();
        connector.setPort(8081);

        Engine engine = new StandardEngine();
        engine.setDefaultHost("localhost");

        Host host =  new StandardHost();
        host.setName("localhost");

        String contextPath = "";
        Context context = new StandardContext();
        context.setPath(contextPath);
        context.addLifecycleListener(new Tomcat.FixContextListener());

        host.addChild(context);

        engine.addChild(host);

        service.setContainer(engine);

        service.addConnector(connector);

        tomcat.addServlet(contextPath, "dispatcher", new DispatcherServlet(webApplicationContext));
        context.addServletMappingDecoded("/*", "dispatcher");

        try {
            tomcat.start();
        } catch (LifecycleException e) {
            e.printStackTrace();
        }

    }
}
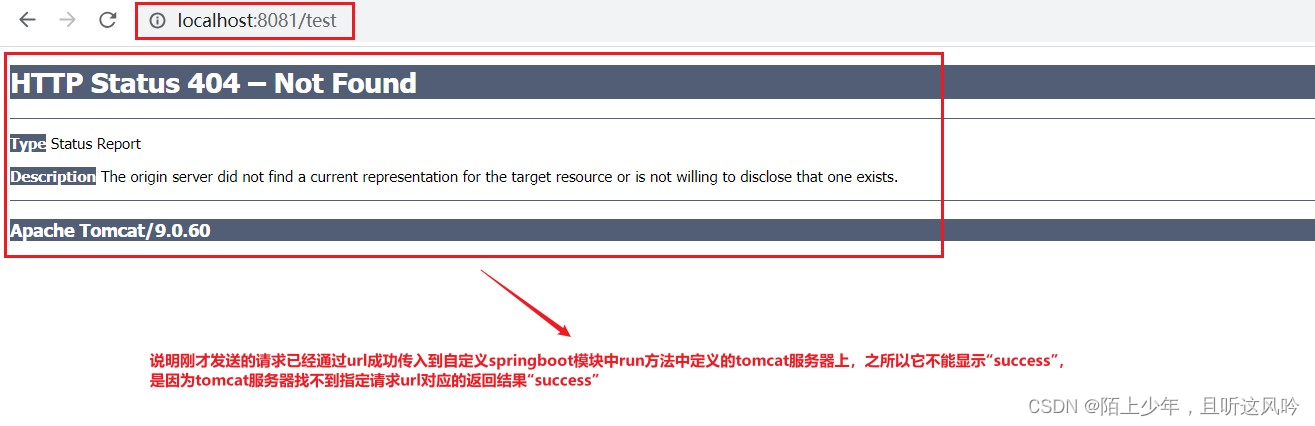
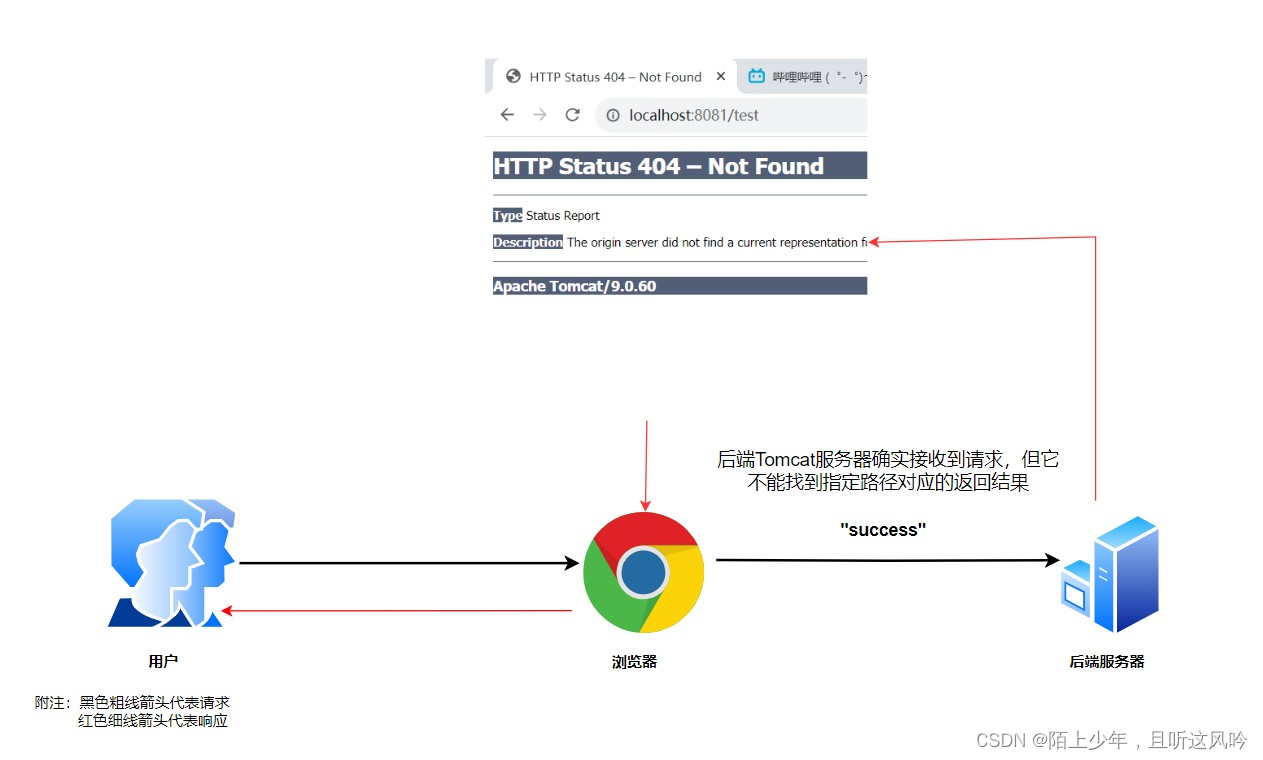
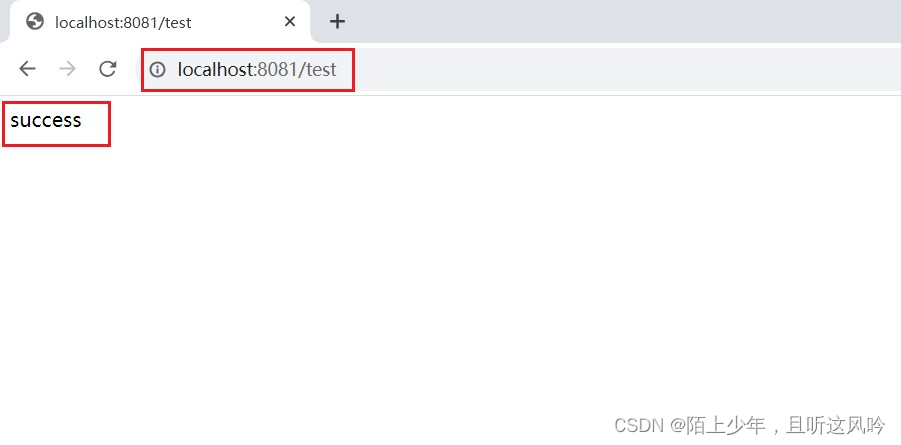
2.3 第三次运行测试
①运行User模块
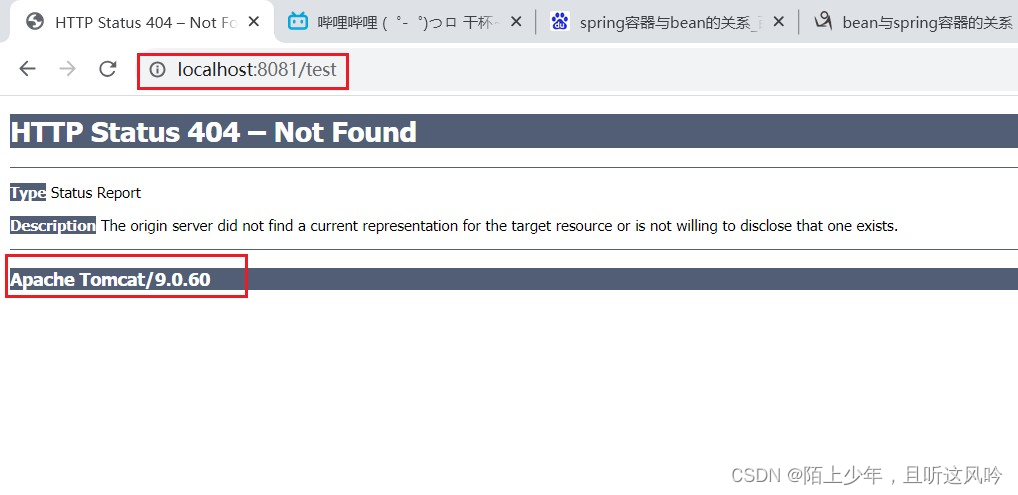
它还是显示这个报错界面!!!
👉分析
上述界面表明Tomcat服务器已经接收到了请求,但它找不到对应相映射的请求方法并返回结果
🤔疑问
DispatcherServlet明明已经整合进了Tomcat里,为何tomcat还是找不到?
👉原因
虽然启动Tomcat服务器之前已经构建好了一个Spring容器,但是这个spring容器此时是一个空的容器,它里面没有包含"/test"相映射的请求方法的bean
[UserController],没有bean,自然无从查起。
遂优化代码,如下所示
①在自定义SpringBoot模块中run方法里添加如下代码
public static void run(Class clazz) {
    //启动Tomcat之前,需要创建spring容器(找到UserController这个Bean)
    AnnotationConfigWebApplicationContext webApplicationContext = new AnnotationConfigWebApplicationContext(); //通过注解形式配置spring容器

    //将传入的类注册为spring容器的配置类
    webApplicationContext.register(clazz);

    //刷新spring容器
    webApplicationContext.refresh();
    //一旦刷新spring容器,便开始解析容器 --> 根据@ComponentScan中的包路径下去扫描,就会扫描到UserController这个bean,如果不写路径,默认扫描传入类的所在的包路径

    //启动tomcat
    startTomcat(webApplicationContext);
}
👉释义
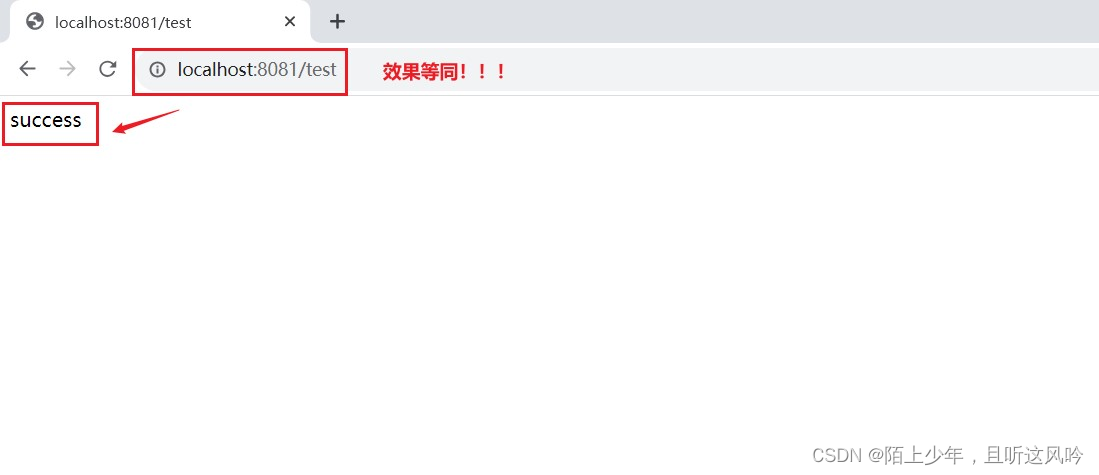
上述代码是将传入的类作为配置类在Spring容器中注册,当执行 webApplicationContext.register(clazz);webApplicationContext.refresh()时,就会刷新并解析spring容器,根据传入的配置类上方的“@ComponentScan(“com.fc.user”) ”注解,便会去扫描【com.fc.user】该包路径下的bean【UserController】,进而找到与"/test"相映射的请求方法,最终将返回方法的结果给前端页面
这里便回答了1.2中抛出的问题!!!
②在User模块中启动类上加上@ComponentScan(“com.fc.user”) – 扫描该包下所有的bean
import org.springframework.context.annotation.ComponentScan;
import org.springframework.web.bind.annotation.GetMapping;
import org.springframework.web.bind.annotation.RestController;

@RestController
@ComponentScan("com.fc,user")
public class UserController {


    @GetMapping("/test")
    public String test(){
        return "success";
    }
}
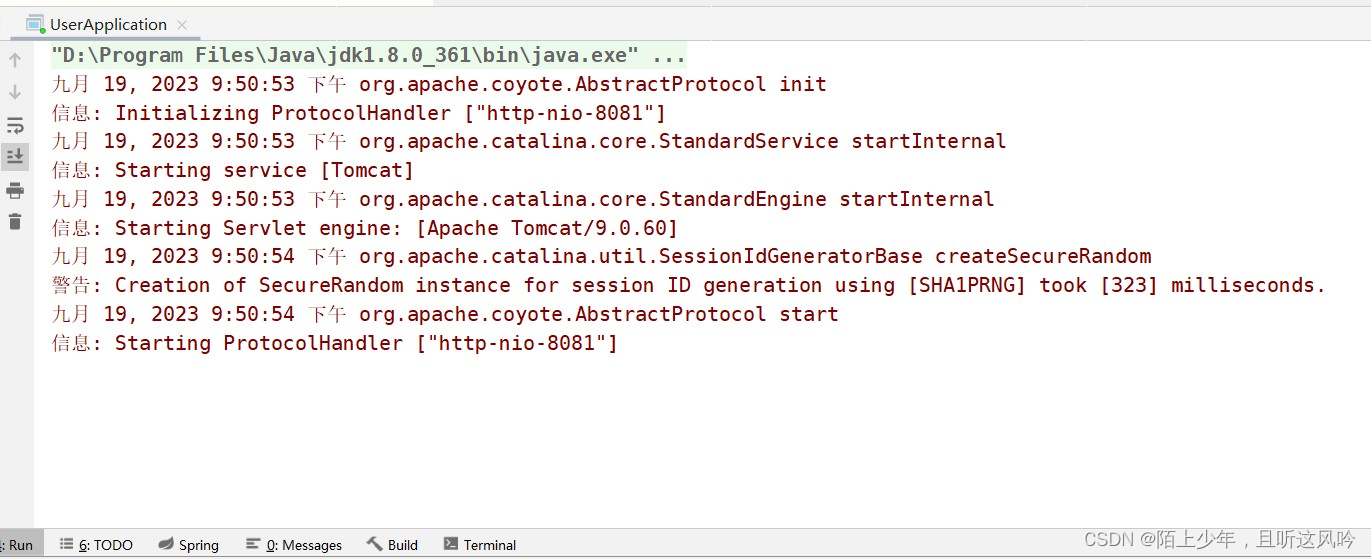
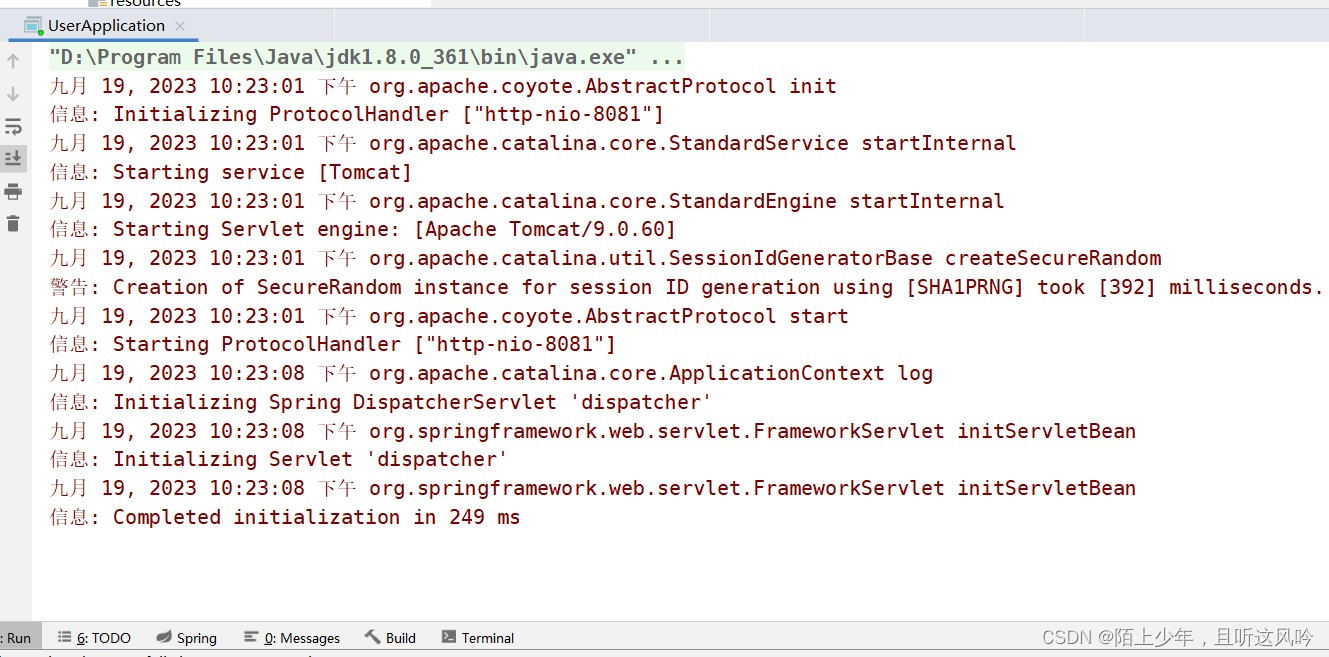
运行
总结
大致的执行流程就是用户在浏览器上发出的请求被tomcat服务器所接收,tomcat服务器便将请求交由Dispatcherservlet,Dispatcherservlet便会根据“/test"去Spring容器中去找UserController这个bean,在这个bean中去寻找“/test"相映射的执行方法,最后返回”success“给用户。
三. 改进优化
上述代码虽然实现了SpringBoot框架的基本功能,但也有很多不足
3.1 不足①
User模块中的启动类上不必再写上@ComponentScan,在自定义注解@FcSpringBootApplication中可以集成它
👉对比
- 且看如下真正的SpringBoot里@SpringBoot注解写法
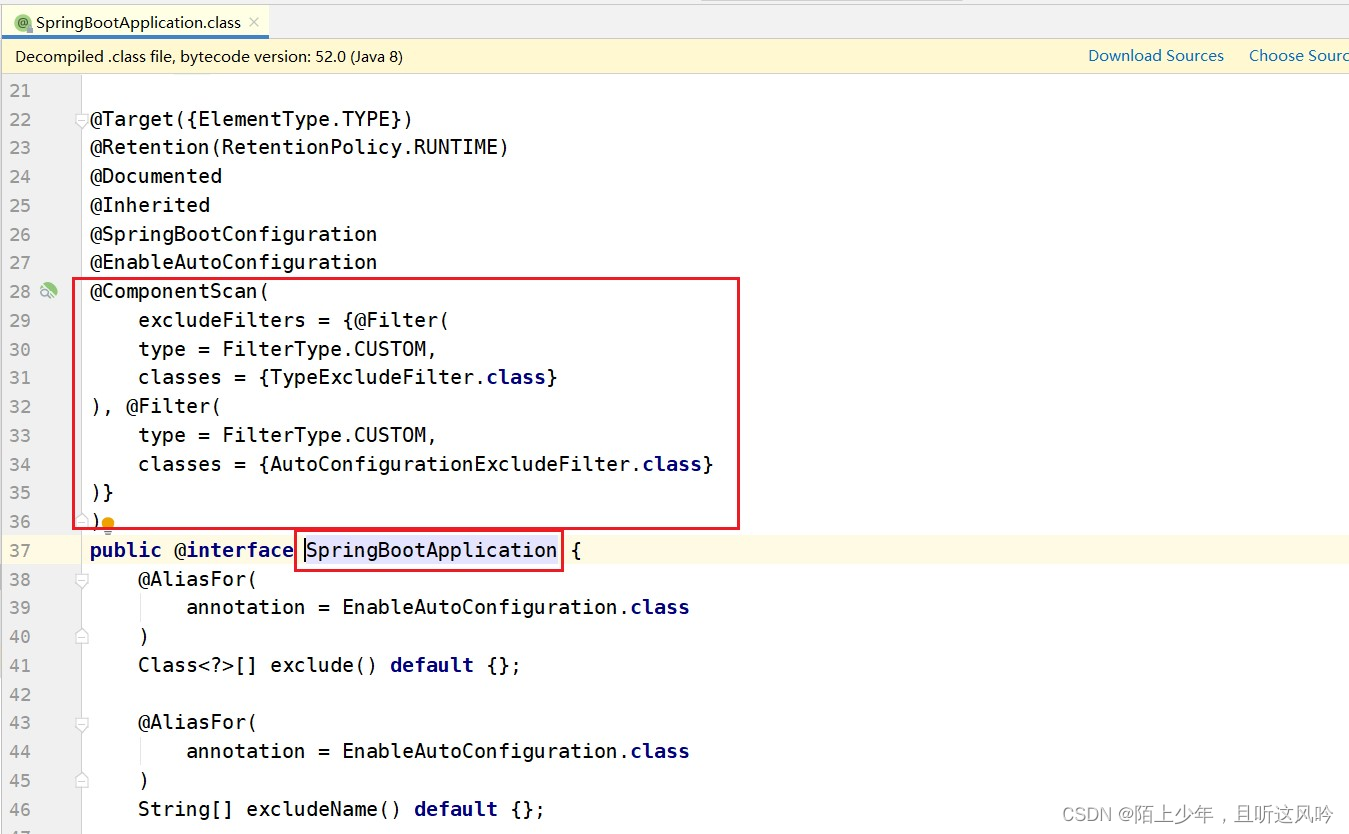
- 自己写的User模块启动类
import org.springboot.FcSpringApplication;
import org.springboot.FcSpringBootApplication;

@FcSpringBootApplication
@ComponentScan("com.fc.user")
public class UserApplication {

    public static void main(String[] args) {
        FcSpringApplication.run(UserApplication.class);

    }
}
改进优化代码如下所示
①User模块中的启动类上不再写上注解@ComponentScan()
@FcSpringBootApplication
public class UserApplication {

    public static void main(String[] args) {
        FcSpringApplication.run(UserApplication.class);

    }
}
②在自定义注解@FcSpringBootApplication中可以集成@ComponentScan()
import org.springframework.context.annotation.ComponentScan;

import java.lang.annotation.ElementType;
import java.lang.annotation.Retention;
import java.lang.annotation.RetentionPolicy;
import java.lang.annotation.Target;


@Target(ElementType.TYPE)
@Retention(RetentionPolicy.RUNTIME)
@ComponentScan
public @interface FcSpringBootApplication {

}
👉释义
Target(ElementType.TYPE) 和 @Retention(RetentionPolicy.RUNTIME) 是两个常用的注解属性。
@Target(ElementType.TYPE): 这个属性表示该注解可以用于类、接口(包括注解类型本身)、枚举声明以及注解类型的成员变量和方法,但不包括类的成员方法。换句话说,这个注解只能用于代码级别的注解,不能用于元注解(即注解的注解)。@Retention(RetentionPolicy.RUNTIME): 这个属性表示该注解在运行时仍然有效。RetentionPolicy是一个枚举类型,它有四个值:SOURCE(注解只在源码中保留,编译时会被丢弃),CLASS(注解在源码和字节码中都保留,运行时可以通过反射获取到),RUNTIME(注解在源码和字节码中都保留,运行时可以通过反射获取到,且可以通过动态代理等方式使用),PROTECTED(注解只在源码中保留,通过反射可以访问,但是不能通过动态代理等方式使用)。
👉运行
👉注意
如果@ComponentScan中没有写明扫描路径,Spring会默认解析扫描传入run方法中的那个类【配置类】所在的包路径,尽管我们在日常开发中习惯将启动类作为配置类传入run()中,但配置类不一定是启动类,因为我们完全可以再定义一个类作为配置类传入run()中,效果等同
不信?请看如下所示
案例:在User模块中自定义配置类MyApplocation并传入run()中,演示其效果
①定义自定义配置类MyApplocation
import org.springboot.FcSpringBootApplication;

@FcSpringBootApplication
public class MyApplication {
}
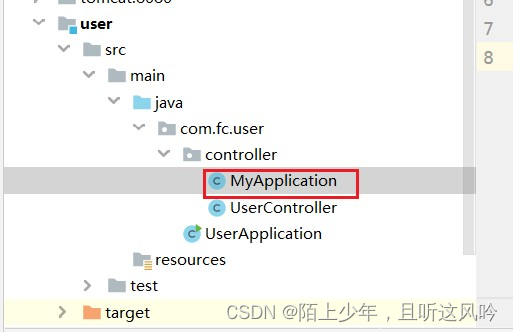
②将MyApplocation传入run()中
import com.fc.user.controller.MyApplication;
import org.springboot.FcSpringApplication;
import org.springboot.FcSpringBootApplication;
import org.springframework.context.annotation.ComponentScan;

@FcSpringBootApplication
public class UserApplication {

    public static void main(String[] args) {
        FcSpringApplication.run(MyApplication.class);
    }
}
👉运行
3.2 不足②
自定义SpringBoot模块中只能运行Tomcat服务器,不能运行Jetty服务器,扩展性较差;而Spring Boot支持三种内嵌式服务器:Tomcat、Jetty和Undertow。其中,Tomcat是Spring Boot中默认的内嵌服务器,但是开发者可以在application.properties文件中更改它。如果想使用其他服务器,可以在pom.xml文件中添加相应的依赖项,然后在application.properties文件中配置它。
🚩优化版1.0
可通过定义Bean的方式来决定Tomcat或jetty的使用
代码示例如下
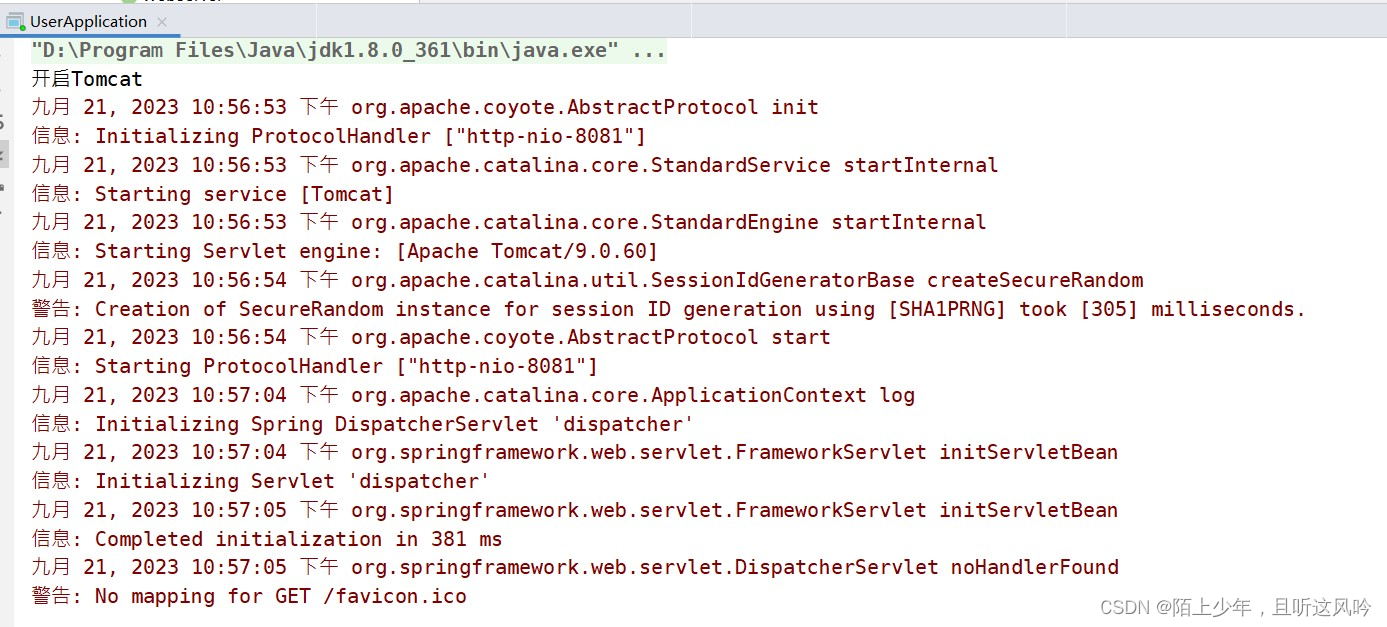
1.在自定义SpringBoot模块中使用 webServer.start()以启动服务器
import org.apache.catalina.*;
import org.apache.catalina.connector.Connector;
import org.apache.catalina.core.StandardContext;
import org.apache.catalina.core.StandardEngine;
import org.apache.catalina.core.StandardHost;
import org.apache.catalina.startup.Tomcat;
import org.springframework.web.context.WebApplicationContext;
import org.springframework.web.context.support.AnnotationConfigWebApplicationContext;
import org.springframework.web.servlet.DispatcherServlet;
import java.util.Map;
public class FcSpringApplication {
public static void run(Class clazz){
//启动Tomcat之前,需要创建spring容器(找到UserController这个Bean)
AnnotationConfigWebApplicationContext annotationConfigWebApplicationContext = new AnnotationConfigWebApplicationContext(); //通过注解形式配置spring容器
//将传入的类注册为spring容器的配置类
annotationConfigWebApplicationContext.register(clazz);
//刷新spring容器
annotationConfigWebApplicationContext.refresh();
//一旦刷新spring容器,便开始解析容器 --> 根据@ComponentScan中的包路径下去扫描,如果不写路径,默认扫描传入类的所在的包路径
//启动Tomcat
//startTomcat(annotationConfigWebApplicationContext);
//以上写法写死了嵌定Tomcat容器,过于单元,但是真正的springboot中内嵌支持不止一种容器,有Tomcat,jetty和Undertow
WebServer webServer = getWebServer(annotationConfigWebApplicationContext);
webServer.start();
}
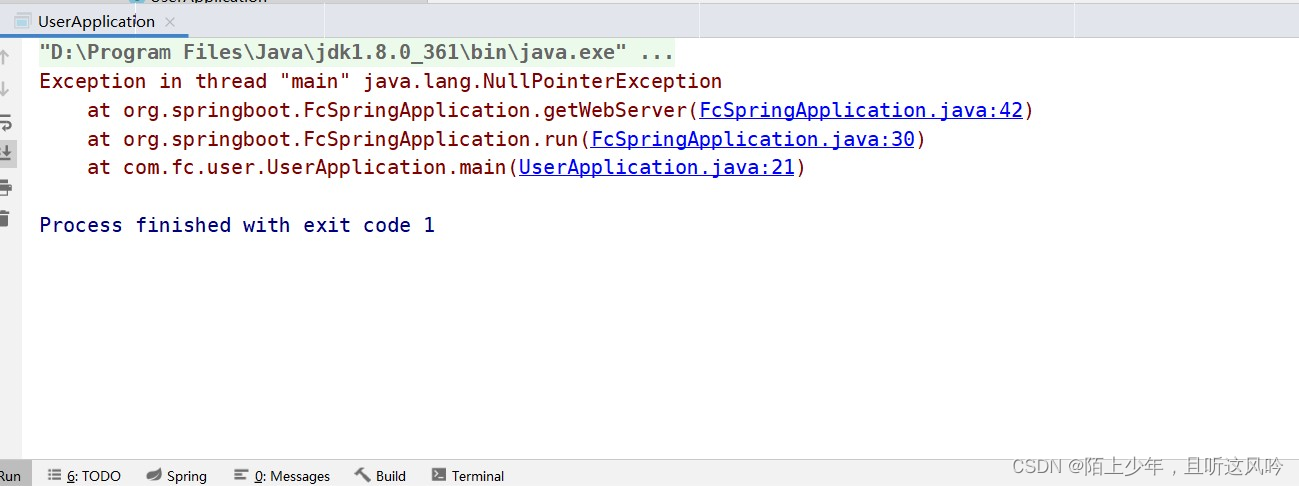
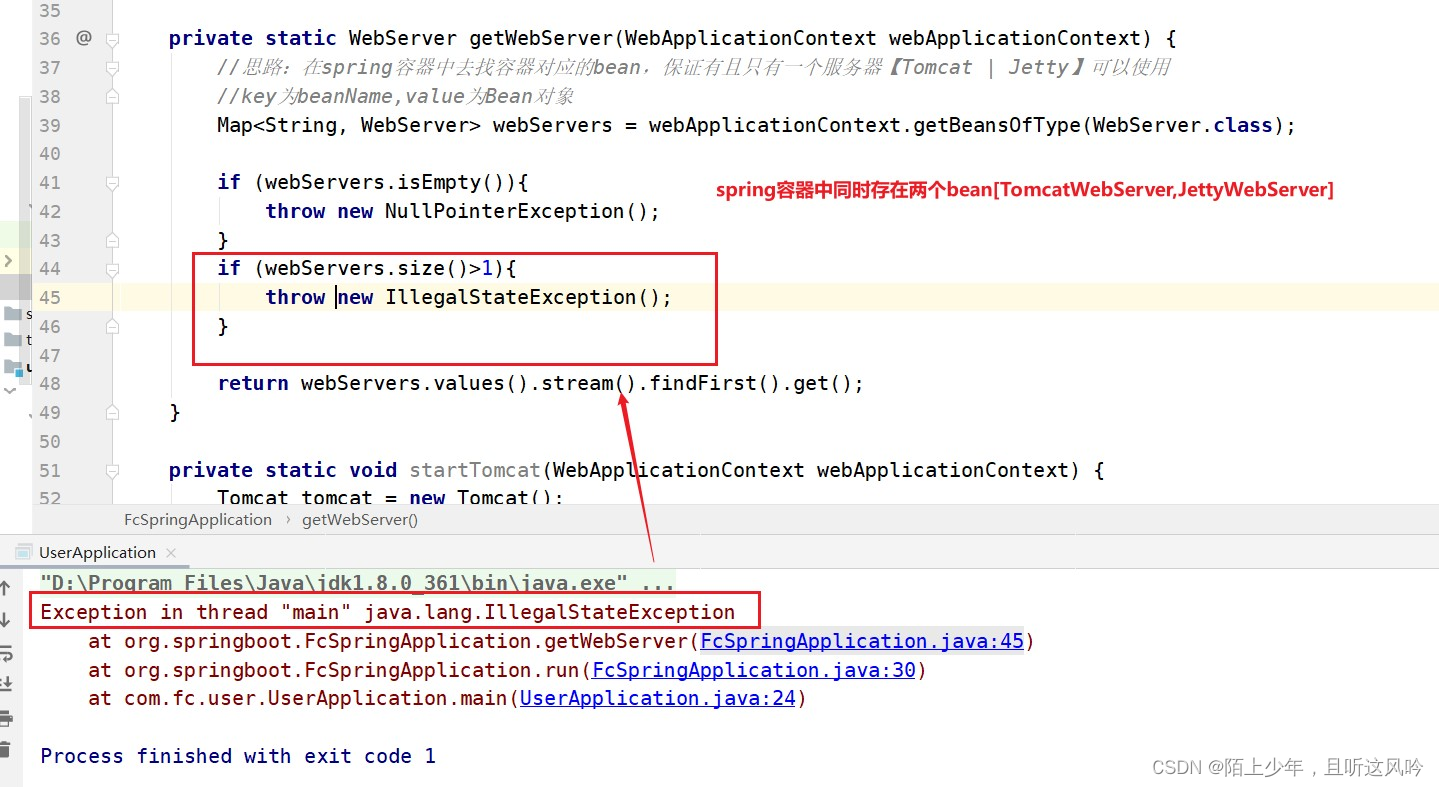
private static WebServer getWebServer(WebApplicationContext webApplicationContext) {
//在spring容器中去找容器对应的bean,有且只有一个容器【Tomcat/Jetty】可以使用
//key为beanName,value为Bean对象
Map<String, WebServer> webServers = webApplicationContext.getBeansOfType(WebServer.class);
if (webServers.isEmpty()){
throw new NullPointerException();
}
if (webServers.size()>1){
throw new IllegalStateException();
}
return webServers.values().stream().findFirst().get();
}
2.定义接口WebServer,接口WebServer的实现类TomcatWebServer与JettyWebServer
//接口WebServer
import org.springframework.web.context.WebApplicationContext;

public interface WebServer {

    void start(WebApplicationContext webApplicationContext);
}
//接口WebServer的实现类TomcatWebServer
import org.apache.catalina.*;
import org.apache.catalina.connector.Connector;
import org.apache.catalina.core.StandardContext;
import org.apache.catalina.core.StandardEngine;
import org.apache.catalina.core.StandardHost;
import org.apache.catalina.startup.Tomcat;
import org.springframework.web.context.WebApplicationContext;
import org.springframework.web.servlet.DispatcherServlet;

public class TomcatWebServer implements WebServer {

    @Override
    //对Tomcat进行属性配置
    public void start(WebApplicationContext webApplicationContext) {
        System.out.println("开启Tomcat");
        Tomcat tomcat = new Tomcat();

        Server server = tomcat.getServer();
        Service service = server.findService("Tomcat");

        Connector connector = new Connector();
        connector.setPort(8081);

        Engine engine = new StandardEngine();
        engine.setDefaultHost("localhost");

        Host host =  new StandardHost();
        host.setName("localhost");

        String contextPath = "";
        Context context = new StandardContext();
        context.setPath(contextPath);
        context.addLifecycleListener(new Tomcat.FixContextListener());

        host.addChild(context);

        engine.addChild(host);

        service.setContainer(engine);

        service.addConnector(connector);

        tomcat.addServlet(contextPath, "dispatcher", new DispatcherServlet(webApplicationContext));
        context.addServletMappingDecoded("/*", "dispatcher");

        try {
            tomcat.start();
        } catch (LifecycleException e) {
            e.printStackTrace();
        }

    }
}
//接口WebServer的实现类JettyWebServer
import org.apache.catalina.*;
import org.apache.catalina.connector.Connector;
import org.apache.catalina.core.StandardContext;
import org.apache.catalina.core.StandardEngine;
import org.apache.catalina.core.StandardHost;
import org.apache.catalina.startup.Tomcat;
import org.eclipse.jetty.util.Jetty;
import org.springframework.web.context.WebApplicationContext;
import org.springframework.web.servlet.DispatcherServlet;

public class JettyWebServer implements WebServer {

    @Override
    public void start(WebApplicationContext webApplicationContext) {
        System.out.println("启动Jetty");


    }
}
3.在User模块中启动类上定义TomcatWebserver的bean
import com.fc.user.controller.MyApplication;
import org.springboot.FcSpringApplication;
import org.springboot.FcSpringBootApplication;
import org.springboot.TomcatWebServer;
import org.springframework.context.annotation.Bean;
import org.springframework.context.annotation.ComponentScan;

@FcSpringBootApplication
public class UserApplication {

    @Bean
    public TomcatWebServer tomcatWebServer(){
        return new TomcatWebServer();
    }

    public static void main(String[] args) {
        FcSpringApplication.run(UserApplication.class);
    }
}
👉运行
这样,就可以通过定义Bean的形式来切换Tomcat或jetty的使用!!!
🚩优化版2.0
可通过pom文件定义依赖的方式来决定Tomcat或jetty的使用,且默认使用Tomcat
代码示例如下
1.在自定义SpringBoot模块中定义一个SpringBoot自动装配的配置类
@Configuration
public class WebServerAutoConfiguration {

    @Bean
    //如果pom文件中存在jetty的依赖,便产生这个bean
    @Conditional(JettyCondition.class)
    public JettyWebServer jettyWebServer(){
        return new JettyWebServer();
    }

    @Bean
    @Conditional(TomcatCondition.class) //只有满足类中的条件,才能产生bean
    public TomcatWebServer tomcatWebServer(){
        return new TomcatWebServer();
    }
}
2.定义JettyCondition类与TomcatCondition类,以设置产生bean的条件
//定义TomcatCondition类
import org.springframework.context.annotation.Condition;
import org.springframework.context.annotation.ConditionContext;
import org.springframework.core.type.AnnotatedTypeMetadata;

public class TomcatCondition implements Condition {

    @Override
    public boolean matches(ConditionContext context, AnnotatedTypeMetadata metadata) {
        try {
            context.getClassLoader().loadClass("org.apache.catalina.startup.Tomcat");
            return true;
        } catch (ClassNotFoundException e) {
            return false;
        }
    }
}

//--------------------------------------------------------------------------------
//定义JettyCondition类
import org.springframework.context.annotation.Condition;
import org.springframework.context.annotation.ConditionContext;
import org.springframework.core.type.AnnotatedTypeMetadata;

public class JettyCondition implements Condition {

    @Override
    public boolean matches(ConditionContext context, AnnotatedTypeMetadata metadata) {
        //如何判定pom文件中添加了jetty的依赖?如果jetty类存在,说明添加了jetty的依赖
        try {
            context.getClassLoader().loadClass("org.eclipse.jetty.util.Jetty");
            return true;
        } catch (Exception e) {
            return false;
        }
    }
}
👉运行
🤔为什么会触发空指针异常?
👉原因
因为上述定义的WebServerAutoConfiguration类没有被传入run方法中的容器配置类所扫描到,尽管上述类中定义的两个bean都满足条件并产生了。但由于没有被扫描到,两个bean没有被装载到spring容器中,故触发了空指针异常。
👉解决方案
在所传入run()方法中的容器配置类上导入WebServerAutoConfiguration类,使其可以被扫描到
代码示例如下
@FcSpringBootApplication
//导入WebServerAutoConfiguration类,使其可以被扫描到
@Import(WebServerAutoConfiguration.class)
public class UserApplication {

/*
    @Bean
    public TomcatWebServer tomcatWebServer(){
        return new TomcatWebServer();
    }
*/

    public static void main(String[] args) {
        FcSpringApplication.run(UserApplication.class);
    }
}
👉再次运行
报错了!!!
🤔why?
👉原因
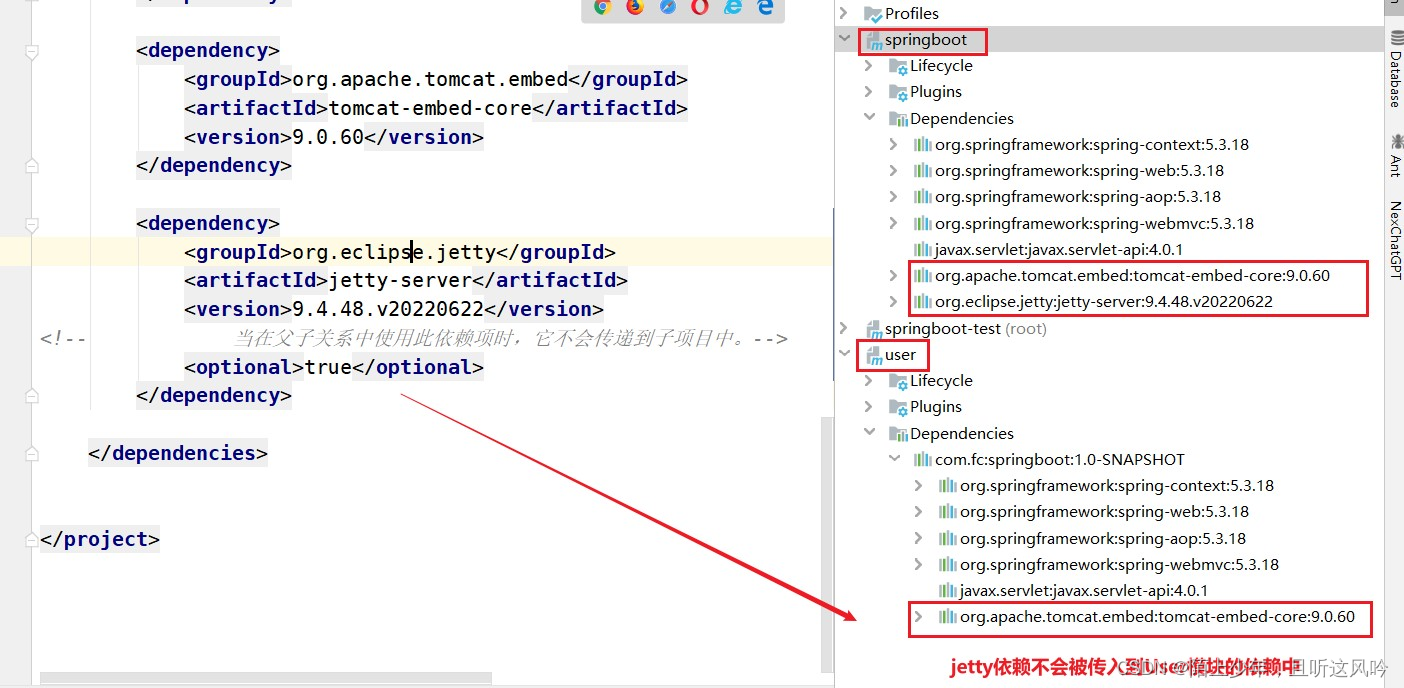
请看如下两个模块的maven依赖关系图
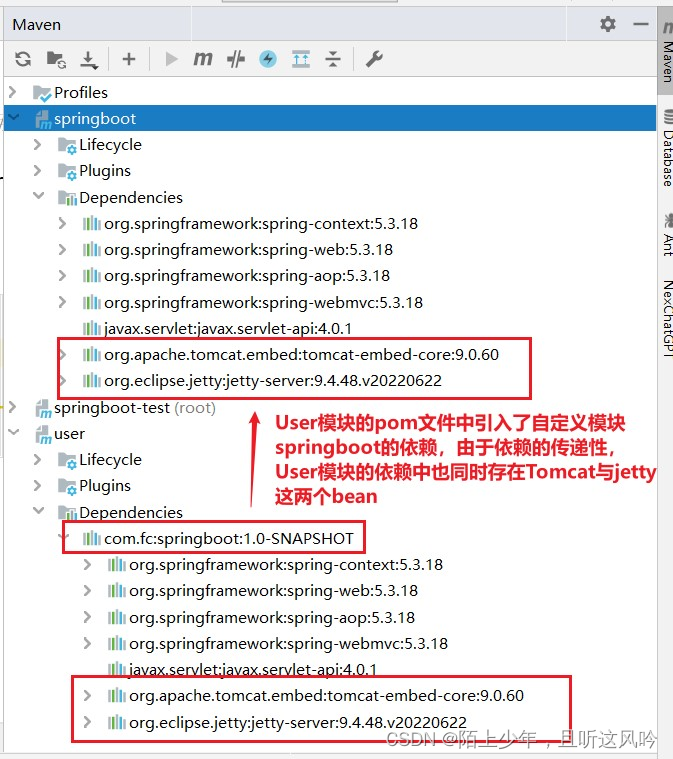
👉解决方案
将自定义springboot模块pom文件中jetty的依赖属性option设为true
设置如下所示
 <dependency>
      <groupId>org.eclipse.jetty</groupId>
      <artifactId>jetty-server</artifactId>
      <version>9.4.48.v20220622</version>
	<!--    当在父子关系中使用此依赖项时,它不会传递到子项目中。-->
      <optional>true</optional>
</dependency>
👉运行测试
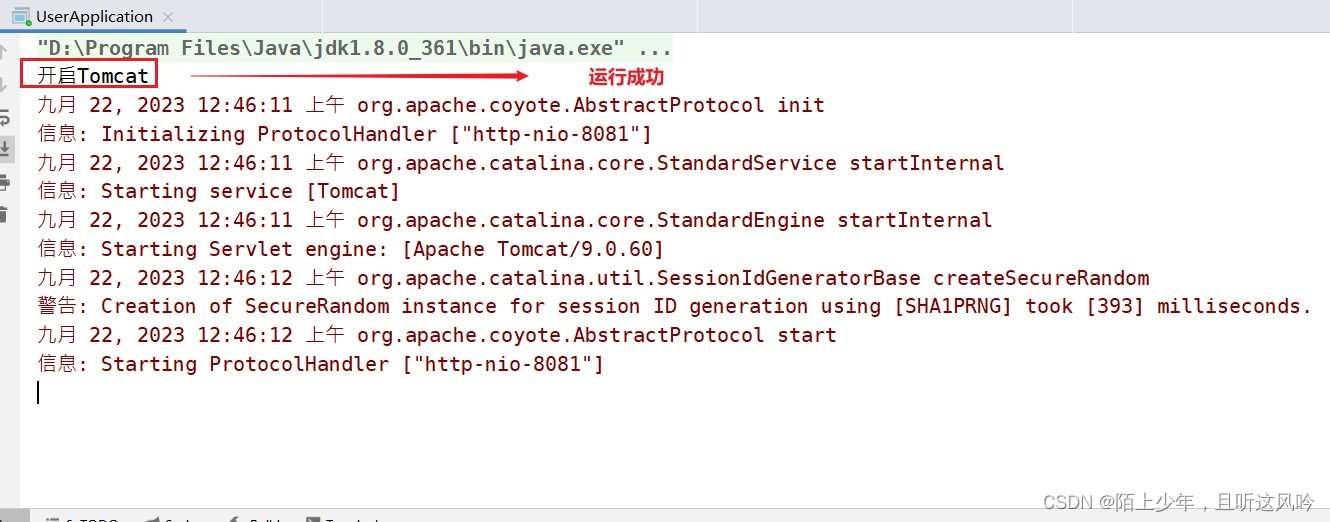
这与真正的SpringBoot框架“如果不指定服务器,默认调用Tomcat服务器”的特性相一致
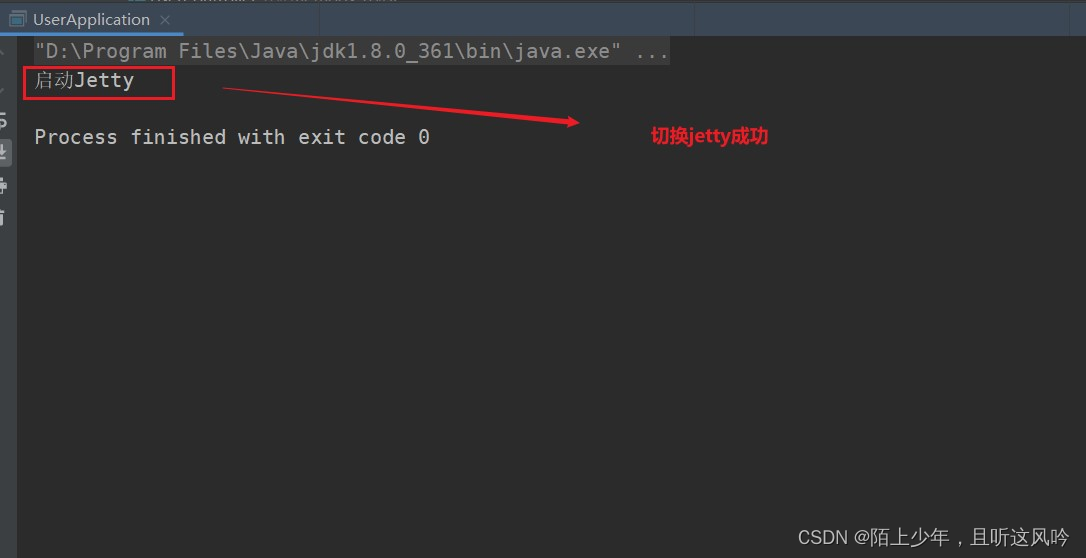
如果想切换jetty服务器,则须在User模块中使用exclusions标签排除tomcat容器的依赖,然后引入jetty的依赖,最后记得刷新maven,重新运行User模块即可。
代码示例如下
 <artifactId>user</artifactId>

    <dependencies>

        <dependency>
            <groupId>com.fc</groupId>
            <artifactId>springboot</artifactId>
            <version>1.0-SNAPSHOT</version>
            <scope>compile</scope>
            <!--  排除tomcat依赖          -->
            <exclusions>
                <exclusion>
                    <groupId>org.apache.tomcat.embed</groupId>
                    <artifactId>tomcat-embed-core</artifactId>
                </exclusion>
            </exclusions>
        </dependency>

        <!--  引入jetty的依赖    -->
        <dependency>
            <groupId>org.eclipse.jetty</groupId>
            <artifactId>jetty-server</artifactId>
            <version>9.4.48.v20220622</version>
        </dependency>

    </dependencies>
👉运行测试
再看此时如下两个模块的maven依赖关系
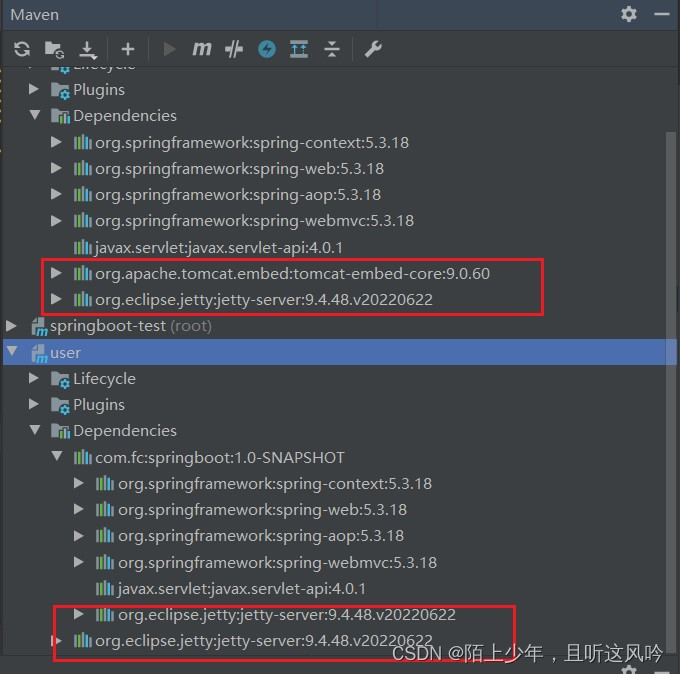
上述代码成功排除了tomcat的依赖,而只包含jetty的依赖!!!
四. 思考:为什么真正的SpringBoot中默认启动的是Tomcat容器?
打开一个基于SpringBoot的web应用项目的pom文件,如下所示
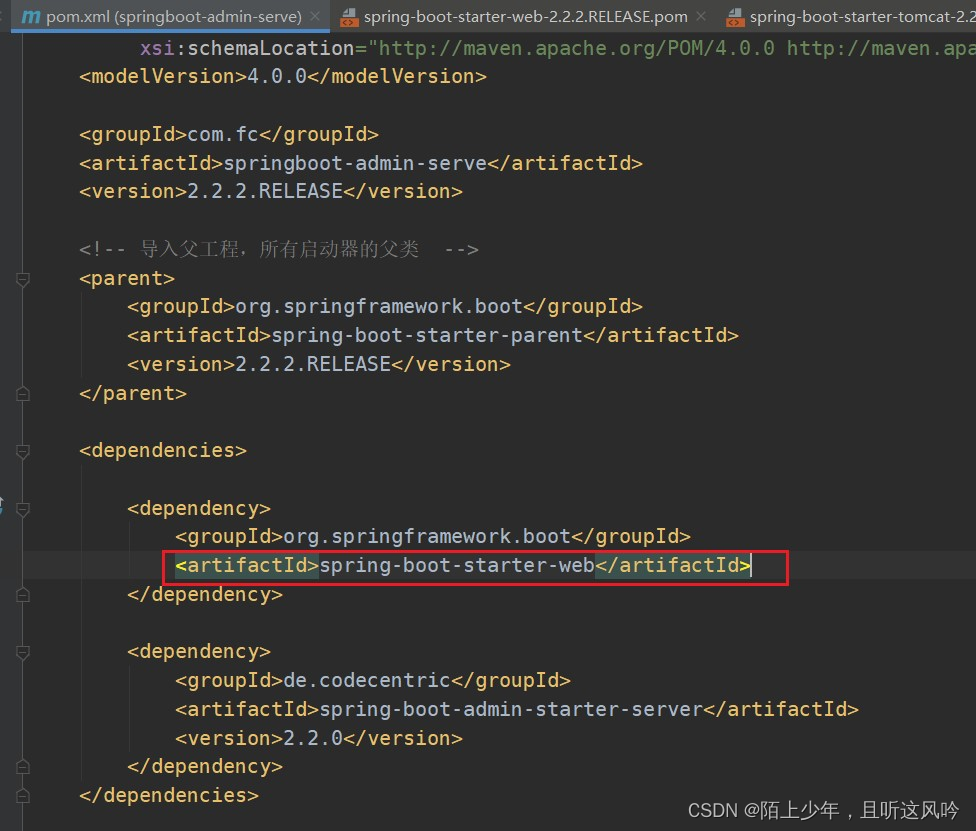
众所周知,spring-boot-starter-web是Spring Boot提供的一个依赖,它包含了开发Web应用所需的基本依赖库。使用该依赖可以快速搭建一个基于Spring Boot的Web应用,且无需手动配置大量的依赖库。
该依赖主要包括以下组件:
spring-boot-starter-tomcat: 内嵌的Tomcat服务器,用于运行Spring Boot Web应用。spring-boot-starter-web: Spring MVC核心组件,提供了创建Web应用所需的基本功能,如控制器、视图解析器等。spring-boot-starter-data-jpa: Spring Data JPA支持,简化了数据访问层的开发。spring-boot-starter-security: Spring Security支持,提供了安全的Web应用开发能力。spring-boot-starter-test: Spring Test框架支持,简化了单元测试和集成测试的开发。
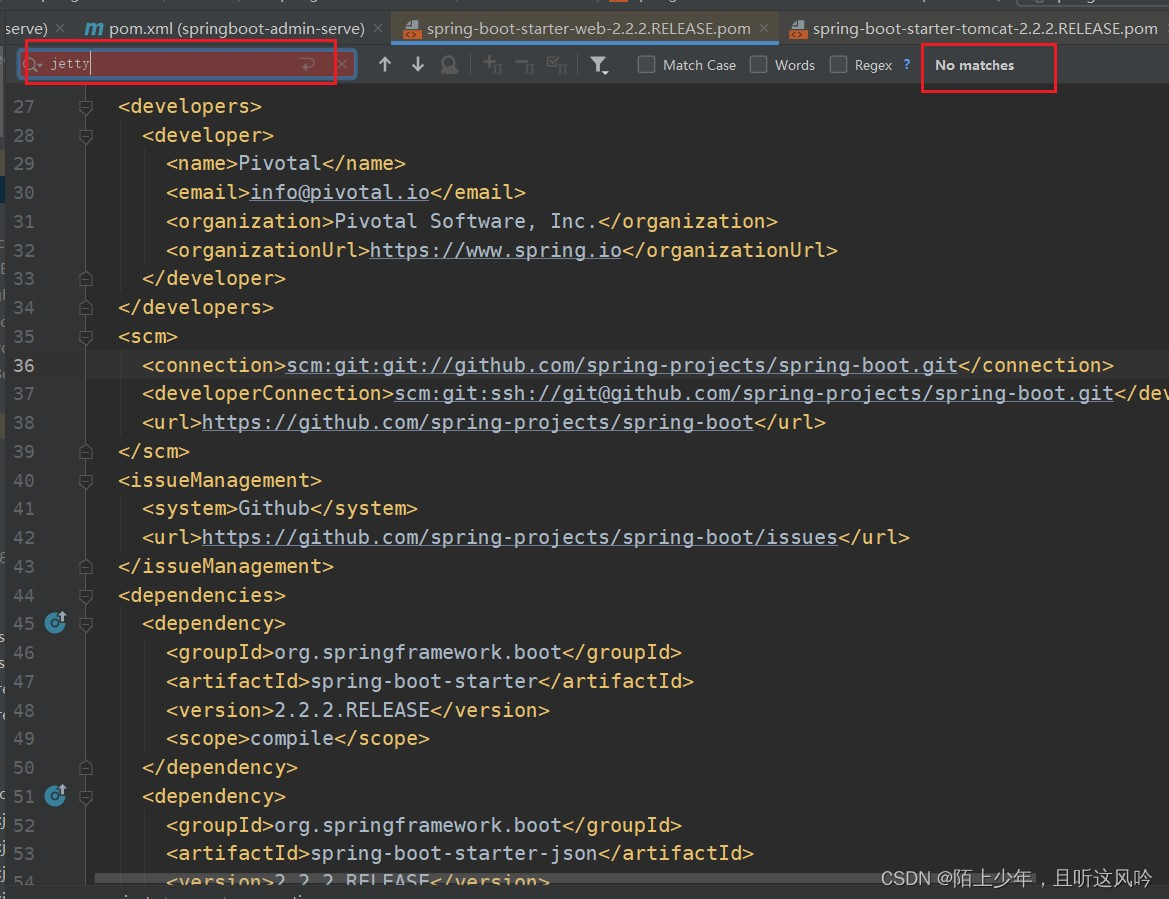
使用Ctrl + 鼠标左键点击追踪进入该文件,可以发现该文件只引入Tomcat容器的依赖,而无jetty的依赖
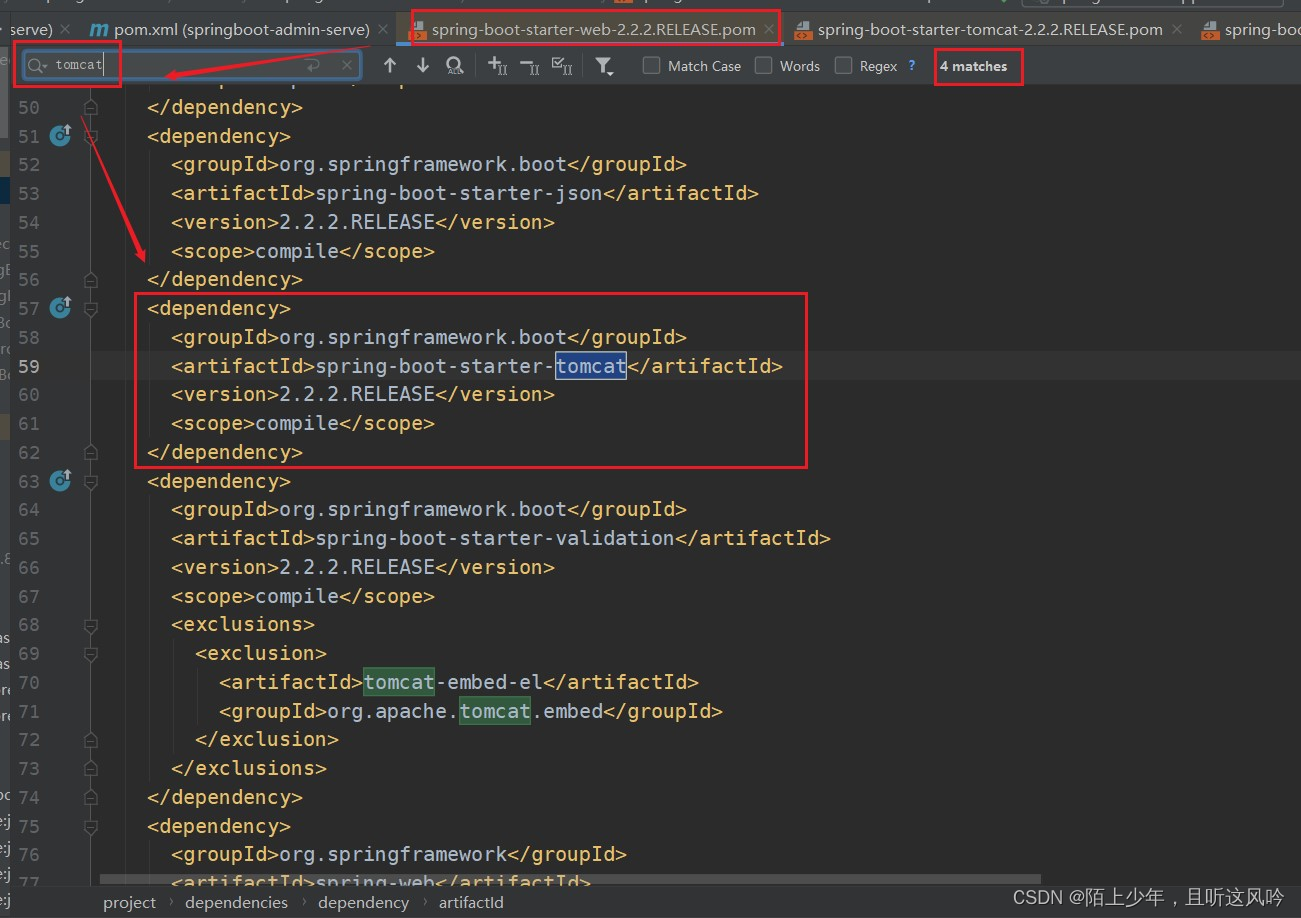
接着点进spring-boot-starter-tomcat的依赖里,如下所示
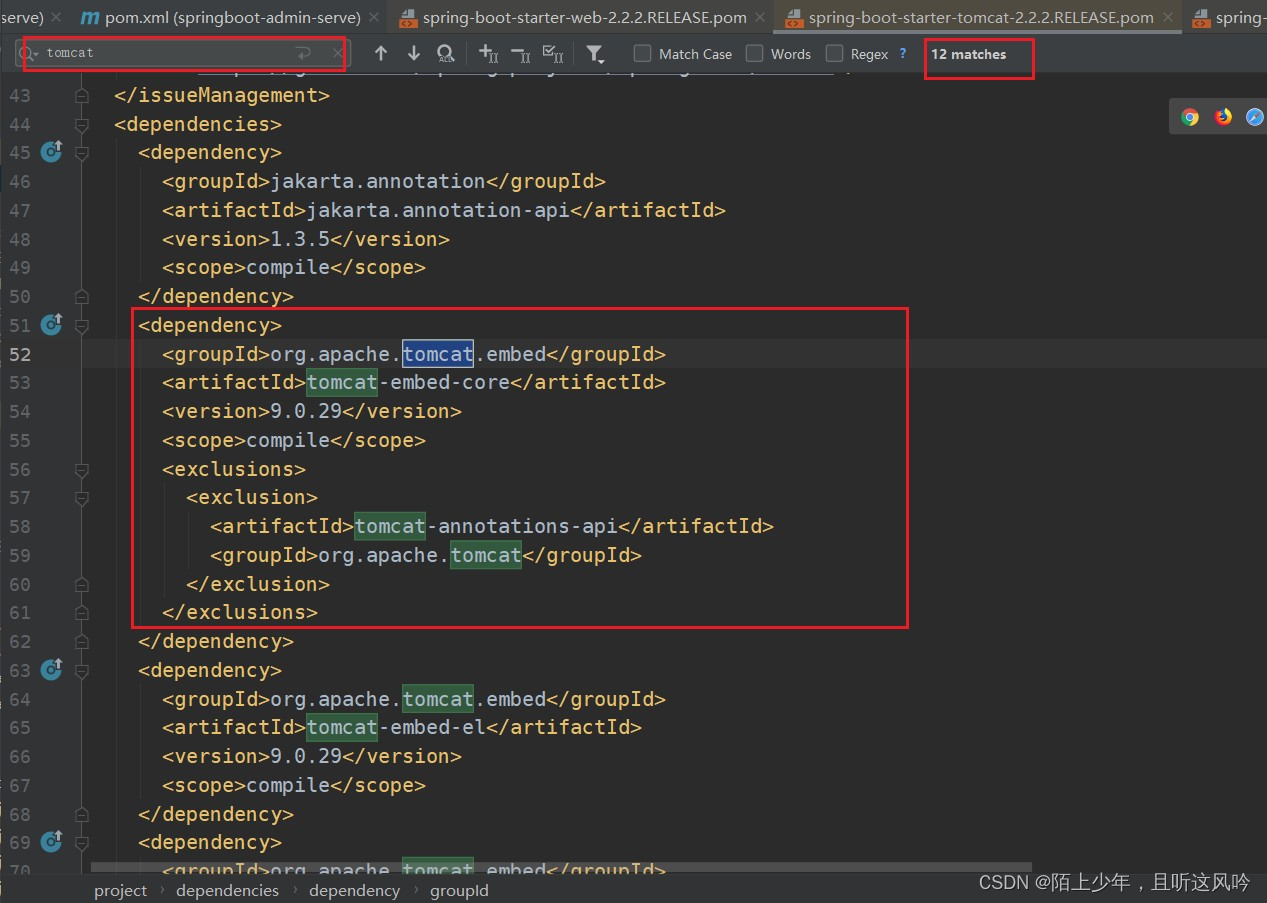
可以看到spring-boot-starter-tomcat包含了开发Web应用所需Tomcat的基本依赖库
该依赖主要包括以下组件:
spring-boot-starter-web: Spring MVC核心组件,提供了创建Web应用所需的基本功能,如控制器、视图解析器等。spring-boot-starter-data-jpa: Spring Data JPA支持,简化了数据访问层的开发。spring-boot-starter-security: Spring Security支持,提供了安全的Web应用开发能力。spring-boot-starter-test: Spring Test框架支持,简化了单元测试和集成测试的开发。
综上,因为springboot工程中只嵌入了一个Tomcat,而无jetty;如果想要使用别的容器,例如jetty,可以使用exclusions标签排除tomcat的依赖,并引入jetty的依赖,刷新maven重启项目即可。


 1万+
1万+


 被折叠的 条评论
为什么被折叠?
被折叠的 条评论
为什么被折叠?
 到【灌水乐园】发言


