


目录
最近再疯狂复习刷八股文,今天总结一下SpringBoot
SpringBoot总的来说(个人认为),大概分为5个模块
1.Spring原理(注解)2,SpringMVC原理 3,自动配置原理 4,SpringBoot启动原理
5,第三方配置的框架
SpringBoot启动过程
首先我们SpringBoot启动主要分为两步骤:1.创建SpringApplication 2.运行SpringApplication
看看SpringApplication里面的结构: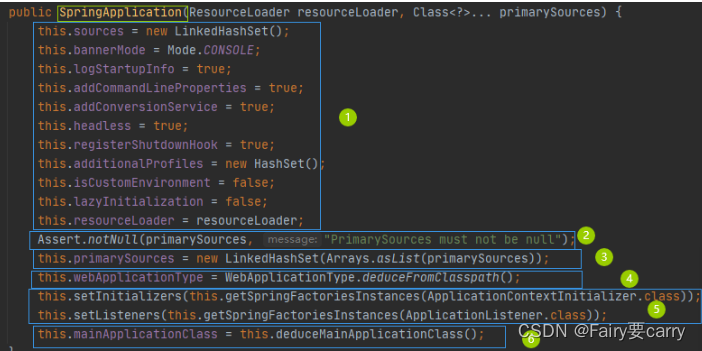
解释:1.里面保存了很多信息——>比如:自定义的环境,handless(缺少键盘等外部情况),懒加载,加载器等等
2.通过断言机制Assert判断当前类是否为空
注意会将我们启动的主类保存再LinkedHashSet中,然后运行通过deduceFromClassPath()方法判断运行项目的类型
public SpringApplication(ResourceLoader resourceLoader, Class<?>... primarySources) {
		this.resourceLoader = resourceLoader;
		Assert.notNull(primarySources, "PrimarySources must not be null");
		//1、先把主类保存起来
		this.primarySources = new LinkedHashSet<>(Arrays.asList(primarySources));
		//2、判断运行项目的类型
		this.webApplicationType = WebApplicationType.deduceFromClasspath();
		//3、扫描当前路径下META-INF/spring.factories文件的,加载ApplicationContextInitializer接口实例
		setInitializers((Collection) getSpringFactoriesInstances(ApplicationContextInitializer.class));
		//4、扫描当前路径下META-INF/spring.factories文件的,加载ApplicationListener接口实例
		setListeners((Collection) getSpringFactoriesInstances(ApplicationListener.class));
		this.mainApplicationClass = deduceMainApplicationClass();
	}
2.deduceFromClassPath()方法->判断运行项目的类型

3.然后就是getSpringFactoriesInstances(ApplicationContextInitializer.class)) 和getSpringFactoriesInstances(ApplicationListener.class))方法
目的时去Spring.factories中寻找ApplicationContextInitializer初始化器和ApplicationListener监听器
1、ApplicationContextInitializer 这个类当springboot上下文Context初始化完成后会调用
2、ApplicationListener 当springboot启动时事件change后都会触发
我们来说说ApplicationContextInitializer的概念:
ApplicationContextInitializer也是Spring框架原有的概念,这个类的主要目的就是 在ConfigurableApplicationContext类型(或者子类型)的ApplicationContext做refresh之前,允许我们对ConfigurableApplicationContext的实例做进一步的设置或者处理。(剪短说就是在容器刷新之前调用该类的 initialize 方法。并将 ConfigurableApplicationContext 类的实例传递给该方法)
场景:
- 通常用于需要对应用程序上下文进行编程初始化的web应用程序中。例如,根据上下文环境注册属性源或激活配置文件等。
public class DemoApplicationContextInitializer implements ApplicationContextInitializer {
    @Override
    public void initialize(ConfigurableApplicationContext applicationContext) {
        // do whatever you want with applicationContext,
        // e.g. applicationContext.registerShutdownHook();
    }
}
如果我们真的需要自定义一个ApplicationContextInitializer,那么只要像上面这样,通过SpringFactoriesLoader机制进行配置,或者通过SpringApplication.addInitializers(..)设置即可
下面我们来自定义ApplicationListener
public class StarterApplicationListener implements ApplicationListener {

    @Override
    public void onApplicationEvent(ApplicationEvent event) {
        System.out.println(event.toString());
        System.out.println("ApplicationListener .... " + System.currentTimeMillis());
    }

}
然后在META-INF/spring.factories 文件配置那两个类
org.springframework.context.ApplicationContextInitializer=\
org.admin.starter.test.listener.StarterApplicationContextInitializer

org.springframework.context.ApplicationListener=\
 org.admin.starter.test.listener.StarterApplicationListener
然后我们继续debug,因为我们之前时到getSpringFactoriesInstances()方法加载ApplicationInitializer和ApplicationListener的实例(很明显通过类对象反射得到我们的类信息)
这里再提一下反射真的重要,结合JVM来思考,简而言之这里就是通过类加载器加载字节码文件产生类对象,我们类对象中含有instanceKlass的地址(Class对象也就是我们常说的mirror,暴露给我,的Java层,也就是开发者,可以通过反射得到),了解JVM就知道每一个Java类都会创建一个C++实例,也就是Klass实例(里面有instanceKlass专门描述Java的)->存储了Java类中描述的方法字段等等,我们的Class对象与方法区中的klass互指,所以可以得到方法区中的类信息
然后之前人们所说的new一个对象得到信息,那是因为对象头里面含有klassword,这个指针指向了方法区的Klass从而得到类信息
(30条消息) 【JVM】底层实现(一):浅谈 OOP-Klass 对象模型_A minor的博客-CSDN博客
再回到我们的getSpringFactoriesInstances()方法
private <T> Collection<T> getSpringFactoriesInstances(Class<T> type) {
    	//返回指定类型(ApplicationListener)的实例
		return getSpringFactoriesInstances(type, new Class<?>[] {});
	}

//真正执行的方法
private <T> Collection<T> getSpringFactoriesInstances(Class<T> type, Class<?>[] parameterTypes, Object... args) {
    	//得到类加载器
		ClassLoader classLoader = getClassLoader();
		// 得到对应的bean的名字
		Set<String> names = new LinkedHashSet<>(SpringFactoriesLoader.loadFactoryNames(type, classLoader));
    	//利用反射生成实例化对象
		List<T> instances = createSpringFactoriesInstances(type, parameterTypes, classLoader, args, names);
		AnnotationAwareOrderComparator.sort(instances);
    	//添加到启动的listeners中
		return instances;
	}
上面就是SpringApplication初始化的代码,new SpringApplication()没做啥事情 ,利用SPI机制主要加载了META-INF/spring.factories 下面定义的事件监听器接口实现类
运行run()方法

1.StopWatch:创建一个Stopwatch实例,方便记录时间以及任务名字
2.然后start()记录启动时间
3.让应用进入headless模式:缺少显示设备的情况
4.获取所有 RunListener(运行监听器)【为了方便所有Listener进行事件感知】,然后遍历它们执行 starting() 方法
然后我们进入getRunListener()方法看看
发现是不是调用getSpringFactoriesInstances()方法在Spring.factories寻找事件监听器
 private SpringApplicationRunListeners getRunListeners(String[] args) {
        Class<?>[] types = new Class[]{SpringApplication.class, String[].class};
        return new SpringApplicationRunListeners(logger, this.getSpringFactoriesInstances(SpringApplicationRunListener.class, types, this, args));
}5.然后就是准备环境prepareEnvironment()

6.然后就是printBanner()打印我们的一个图标
7.this.createApplicationContext()根据项目类型创建我们的IOC容器,里面会注入几个核心组件类

8.然后就是refreshContext()刷新我们的容器
private void refreshContext(ConfigurableApplicationContext context) {
        // 转到定义看看
		refresh(context);
		if (this.registerShutdownHook) {
			try {
				context.registerShutdownHook();
			}
			catch (AccessControlException ex) {
				// Not allowed in some environments.
			}
		}
	}
protected void refresh(ApplicationContext applicationContext) {
Assert.isInstanceOf(AbstractApplicationContext.class, applicationContext);
//看看refresh()方法去
((AbstractApplicationContext) applicationContext).refresh();
}其实也就是Spring容器的启动代码
@Override
	public void refresh() throws BeansException, IllegalStateException {
		synchronized (this.startupShutdownMonitor) {
			// Prepare this context for refreshing.
			prepareRefresh();

			// Tell the subclass to refresh the internal bean factory.
			ConfigurableListableBeanFactory beanFactory = obtainFreshBeanFactory();

			// Prepare the bean factory for use in this context.
			prepareBeanFactory(beanFactory);

			try {
				// Allows post-processing of the bean factory in context subclasses.
				postProcessBeanFactory(beanFactory);

				// Invoke factory processors registered as beans in the context.
				invokeBeanFactoryPostProcessors(beanFactory);

				// Register bean processors that intercept bean creation.
				registerBeanPostProcessors(beanFactory);

				// Initialize message source for this context.
				initMessageSource();

				// Initialize event multicaster for this context.
				initApplicationEventMulticaster();

				// Initialize other special beans in specific context subclasses.
				onRefresh();

				// Check for listener beans and register them.
				registerListeners();

				// Instantiate all remaining (non-lazy-init) singletons.
				finishBeanFactoryInitialization(beanFactory);

				// Last step: publish corresponding event.
				finishRefresh();
			}

			catch (BeansException ex) {
				if (logger.isWarnEnabled()) {
					logger.warn("Exception encountered during context initialization - " +
							"cancelling refresh attempt: " + ex);
				}

				// Destroy already created singletons to avoid dangling resources.
				destroyBeans();

				// Reset 'active' flag.
				cancelRefresh(ex);

				// Propagate exception to caller.
				throw ex;
			}

			finally {
				// Reset common introspection caches in Spring's core, since we
				// might not ever need metadata for singleton beans anymore...
				resetCommonCaches();
			}
		}
}refresh()这里面调用了onRefresh()方法,进入一看发现调用了createWebServer()方法
protected void onRefresh() {
		super.onRefresh();
		try {
            //看到内置容器的影子了,进去看看
			createWebServer();
		}
		catch (Throwable ex) {
			throw new ApplicationContextException("Unable to start web server", ex);
		}
}createWebServer()中的getWebServerFactory()方法选择出了哪种web容器也就是tomcat
private void createWebServer() {
		WebServer webServer = this.webServer;
		ServletContext servletContext = getServletContext();
		if (webServer == null && servletContext == null) {
            //1、这个获取webServerFactory还是要进去看看
			ServletWebServerFactory factory = getWebServerFactory();
			this.webServer = factory.getWebServer(getSelfInitializer());
		}
		else if (servletContext != null) {
			try {
				getSelfInitializer().onStartup(servletContext);
			}
			catch (ServletException ex) {
				throw new ApplicationContextException("Cannot initialize servlet context",
						ex);
			}
		}
		initPropertySources();
	}
protected ServletWebServerFactory getWebServerFactory() {
// Use bean names so that we don't consider the hierarchy
String[] beanNames = getBeanFactory()
.getBeanNamesForType(ServletWebServerFactory.class);
if (beanNames.length == 0) {
throw new ApplicationContextException(
"Unable to start ServletWebServerApplicationContext due to missing "
+ "ServletWebServerFactory bean.");
}
if (beanNames.length > 1) {
throw new ApplicationContextException(
"Unable to start ServletWebServerApplicationContext due to multiple "
+ "ServletWebServerFactory beans : "
+ StringUtils.arrayToCommaDelimitedString(beanNames));
}
return getBeanFactory().getBean(beanNames[0], ServletWebServerFactory.class);
}public WebServer getWebServer(ServletContextInitializer... initializers) {
//tomcat这位大哥出现了
Tomcat tomcat = new Tomcat();
File baseDir = (this.baseDirectory != null ? this.baseDirectory
: createTempDir("tomcat"));
tomcat.setBaseDir(baseDir.getAbsolutePath());
Connector connector = new Connector(this.protocol);
tomcat.getService().addConnector(connector);
customizeConnector(connector);
tomcat.setConnector(connector);
tomcat.getHost().setAutoDeploy(false);
configureEngine(tomcat.getEngine());
for (Connector additionalConnector : this.additionalTomcatConnectors) {
tomcat.getService().addConnector(additionalConnector);
}
prepareContext(tomcat.getHost(), initializers);
return getTomcatWebServer(tomcat);
}
所以说内置的Servlet容器就是在onRefresh()方法中启动的,至此一个servlet容器就启动ok
9.然后就是stopWatch.stop()获取运行的时间

10.listeners.started(context):监听器调用,监听容器
void started(ConfigurableApplicationContext context) {
        Iterator var2 = this.listeners.iterator();

        while(var2.hasNext()) {
            SpringApplicationRunListener listener = (SpringApplicationRunListener)var2.next();
            listener.started(context);
        }

    }
default void started(ConfigurableApplicationContext context) {
} public void started(ConfigurableApplicationContext context) {
context.publishEvent(new ApplicationStartedEvent(this.application, this.args, context));
}然后我们跟进一下publishEvent()方法
public interface ApplicationEventPublisher {
    default void publishEvent(ApplicationEvent event) {
        this.publishEvent((Object)event);
    }

    void publishEvent(Object var1);
}
protected void publishEvent(Object event, @Nullable ResolvableType eventType) {
Assert.notNull(event, "Event must not be null");
Object applicationEvent;
if (event instanceof ApplicationEvent) {
applicationEvent = (ApplicationEvent)event;
} else {
applicationEvent = new PayloadApplicationEvent(this, event);
if (eventType == null) {
eventType = ((PayloadApplicationEvent)applicationEvent).getResolvableType();
}
}这里介绍一下ApplicationEventPublisher
(31条消息) ApplicationEventPublisher的使用学习_谦虚使人发胖的博客-CSDN博客_applicationeventpublisher
1.ApplicationEventPublisherAware
ApplicationEventPublisherAware 是由 Spring 提供的用于为 Service 注入 ApplicationEventPublisher 事件发布器的接口,使用这个接口,我们自己的 Service 就拥有了发布事件的能力。
用户注册后,不再是显示地调用其他的业务 Service,而是发布一个用户注册事件。
2.ApplicationListener
ApplicationListener接口是由 Spring 提供的事件订阅者必须实现的接口,我们一般把该 Service 关心的事件类型作为泛型传入。处理事件,通过 event.getSource() 即可拿到事件的具体内容
3.ApplicationEventPublisher
(31条消息) 观察者模式Spring之publishEvent事件处理_懒虫虫~的博客-CSDN博客_publishevent
ApplicationEventPublisher是ApplicationContext的父接口之一。这接口的作用是:Interface that encapsulates event publication functionality.
功能就是发布事件,也就是把某个事件告诉的所有与这个事件相关的监听


 1万+
1万+


 被折叠的 条评论
为什么被折叠?
被折叠的 条评论
为什么被折叠?
 到【灌水乐园】发言


