


第一次写文章有点紧张~~
这篇文章算是我对SSH的学习和实践吧
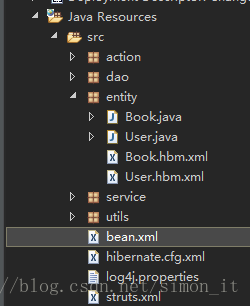
贴一张最后的图

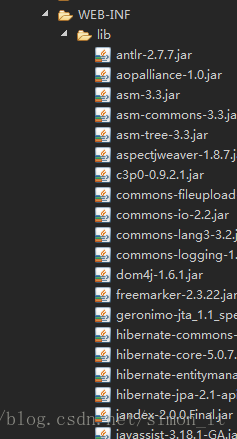
一、首先我们要先导入所需的所有jar包,点击打开链接,点击打开链接下载即可,把所有jar包放到lib文件夹下
二、创建action,service,dao,entity(实体类),实体类映射文件(xxx.hbm.xml),utils,log4j.properties
(1)创建UserAction
package action;

import java.util.List;

import javax.servlet.http.HttpServletRequest;

import org.apache.struts2.ServletActionContext;

import com.opensymphony.xwork2.ActionContext;
import com.opensymphony.xwork2.ActionSupport;
import entity.Book;
import service.UserService;

public class UserAction extends ActionSupport {

	private UserService userService;

	public void setUserService(UserService userService) {
		this.userService = userService;
	}
}package service;
import java.util.List;
import org.springframework.transaction.annotation.Transactional;
import dao.UserDao;
import entity.Book;
import entity.User;
@Transactional //事务管理注解
public class UserService {
private UserDao userDao;
public void setUserDao(UserDao userDao) {
this.userDao = userDao;
}
}package dao;
import java.util.List;
import entity.Book;
import entity.User;
public interface UserDao {
}userdaoimpl
package dao;

import java.util.List;

import org.springframework.orm.hibernate5.HibernateTemplate;

import com.opensymphony.xwork2.ActionContext;

import entity.Book;
import entity.User;

public class UserDaoImpl implements UserDao {

	private HibernateTemplate hibernateTemplate;

	public void setHibernateTemplate(HibernateTemplate hibernateTemplate) {
		this.hibernateTemplate = hibernateTemplate;
	}
}
(4)创建实体类(entity)
package entity;

public class User {
private int uid;
private String username;
private String password;
private String address;
private String phone;
public String getAddress() {
	return address;
}
public void setAddress(String address) {
	this.address = address;
}
public String getPhone() {
	return phone;
}
public void setPhone(String phone) {
	this.phone = phone;
}
public int getUid() {
	return uid;
}
public void setUid(int uid) {
	this.uid = uid;
}
public String getUsername() {
	return username;
}
public void setUsername(String username) {
	this.username = username;
}
public String getPassword() {
	return password;
}
public void setPassword(String password) {
	this.password = password;
}

}
(5)实体类映射文件(user.hbm.xml,表的名称和实体类名称对应)
<?xml version="1.0" encoding="UTF-8"?>
<!DOCTYPE hibernate-mapping PUBLIC
    "-//Hibernate/Hibernate Mapping DTD 3.0//EN"
    "http://www.hibernate.org/dtd/hibernate-mapping-3.0.dtd">
  <hibernate-mapping>
  <class name="entity.User" table="user">
  <id name="uid" column="uid">
  <generator class="native"></generator>
  </id>
  <property name="username" column="username"></property>
   <property name="password" column="password"></property>
   <property name="address" column="address"></property>
   <property name="phone" column="phone"></property>
  </class>
  </hibernate-mapping>
(6)识别语言的工具类(util)
package utils;
import org.hibernate.Session;
import org.hibernate.SessionFactory;
import org.hibernate.cfg.Configuration;
public class HibernateUtils {
	static Configuration cfg = null;
	static SessionFactory sessionFactory = null;
	static {
		cfg = new Configuration().configure();
		sessionFactory = cfg.buildSessionFactory();
	}

	public static Session getSessionobject() {
		return sessionFactory.getCurrentSession();
	}

	public static SessionFactory getSessionFactory() {
		return sessionFactory;
	}

	public static void main(String[] args) {

	}
}
(7)log4j.properties文件(记录日志)
### direct log messages to stdout ###
log4j.appender.stdout=org.apache.log4j.ConsoleAppender
log4j.appender.stdout.Target=System.err
log4j.appender.stdout.layout=org.apache.log4j.PatternLayout
log4j.appender.stdout.layout.ConversionPattern=%d{ABSOLUTE} %5p %c{1}:%L - %m%n

### direct messages to file mylog.log ###
log4j.appender.file=org.apache.log4j.FileAppender
log4j.appender.file.File=c:\mylog.log
log4j.appender.file.layout=org.apache.log4j.PatternLayout
log4j.appender.file.layout.ConversionPattern=%d{ABSOLUTE} %5p %c{1}:%L - %m%n

### set log levels - for more verbose logging change 'info' to 'debug' ###

log4j.rootLogger=info, stdout
三、创建Spring,Struts,hibernate的配置文件
(1)Spring配置文件我命名为bean.xml
<?xml version="1.0" encoding="UTF-8"?>
<beans xmlns="http://www.springframework.org/schema/beans"
	xmlns:xsi="http://www.w3.org/2001/XMLSchema-instance"
	xmlns:context="http://www.springframework.org/schema/context"
	xmlns:aop="http://www.springframework.org/schema/aop"
	xmlns:tx="http://www.springframework.org/schema/tx"
	xsi:schemaLocation="http://www.springframework.org/schema/beans
	http://www.springframework.org/schema/beans/spring-beans.xsd
	http://www.springframework.org/schema/context
	http://www.springframework.org/schema/context/spring-context.xsd
	http://www.springframework.org/schema/aop
	http://www.springframework.org/schema/aop/spring-aop.xsd
	http://www.springframework.org/schema/tx
	http://www.springframework.org/schema/tx/spring-tx.xsd">
	<!-- 基本配置 -->
	<bean id="dataSource" class="com.mchange.v2.c3p0.ComboPooledDataSource">
	<property name="driverClass" value="com.mysql.jdbc.Driver"></property>
	<property name="jdbcUrl" value="jdbc:mysql:///changebook"></property>
	<property name="user" value="root"></property>
	<property name="password" value="565587783"></property>
	</bean>
	<bean id="sessionFactory" class="org.springframework.orm.hibernate5.LocalSessionFactoryBean">
	<property name="dataSource" ref="dataSource"></property>
	<property name="configLocations" value="classpath:hibernate.cfg.xml"></property>
	</bean>
	<bean id="transactionManager" class="org.springframework.orm.hibernate5.HibernateTransactionManager">
	<property name="sessionFactory" ref="sessionFactory"></property>
	</bean>
	<bean id="hibernateTemplate" class="org.springframework.orm.hibernate5.HibernateTemplate">
	<property name="sessionFactory" ref="sessionFactory"></property>
	</bean>
	<tx:annotation-driven transaction-manager="transactionManager"/>
	<!-- 员工基本信息 -->
	<bean id="userAction" class="action.UserAction" scope="prototype">
	<property name="userService" ref="userService"></property>
	</bean>
	<bean id="userService" class="service.UserService">
	<property name="userDao" ref="userDaoImpl"></property>
	</bean>
	<bean id="userDaoImpl" class="dao.UserDaoImpl">
	<property name="hibernateTemplate" ref="hibernateTemplate"></property>
	</bean>
</beans>
(2)hibernate配置文件,为了方便,命名为hibernate.cfg.xml(自动在数据库里面创表,事先一定要存在连接池里面的数据库)
<?xml version="1.0" encoding="UTF-8"?>
<!DOCTYPE hibernate-configuration PUBLIC
    "-//Hibernate/Hibernate Configuration DTD 3.0//EN"
    "http://www.hibernate.org/dtd/hibernate-configuration-3.0.dtd">
    <hibernate-configuration>
    <session-factory>
    <property name="hibernate.show_sql">true</property>
    <property name="hibernate.format_sql">true</property>
    <property name="hibernate.hbm2ddl.auto">update</property>
    <property name="hibernate.dialect">org.hibernate.dialect.MySQLDialect</property>
    <mapping resource="entity/User.hbm.xml"></mapping>
    </session-factory>
    </hibernate-configuration>
(3)Struts配置文件
<?xml version="1.0" encoding="UTF-8"?>
<!DOCTYPE struts PUBLIC
	"-//Apache Software Foundation//DTD Struts Configuration 2.3//EN"
	"http://struts.apache.org/dtds/struts-2.3.dtd">
<struts>
	<package name="demo1" extends="struts-default" namespace="/">
	</package>
</struts>
四、最后一步至关重要,创建web.xml文件
在WEB-INF文件下
<?xml version="1.0" encoding="UTF-8"?>
<web-app xmlns:xsi="http://www.w3.org/2001/XMLSchema-instance"
	xmlns="http://java.sun.com/xml/ns/javaee"
	xsi:schemaLocation="http://java.sun.com/xml/ns/javaee http://java.sun.com/xml/ns/javaee/web-app_2_5.xsd"
	id="WebApp_ID" version="2.5">
	<display-name>ChangeBook</display-name>
	<context-param>
		<param-name>contextConfigLocation</param-name>
		<param-value>classpath:bean.xml</param-value>
	</context-param>
	<filter>
		<filter-name>struts2</filter-name>
		<filter-class>org.apache.struts2.dispatcher.ng.filter.StrutsPrepareAndExecuteFilter</filter-class>
	</filter>

	<filter-mapping>
		<filter-name>struts2</filter-name>
		<url-pattern>/*</url-pattern>
	</filter-mapping>
	<listener>
		<listener-class>org.springframework.web.context.ContextLoaderListener</listener-class>
	</listener>
	<welcome-file-list>
		<welcome-file>index.html</welcome-file>
		<welcome-file>index.htm</welcome-file>
		<welcome-file>index.jsp</welcome-file>
		<welcome-file>default.html</welcome-file>
		<welcome-file>default.htm</welcome-file>
		<welcome-file>default.jsp</welcome-file>
	</welcome-file-list>
</web-app>
五、到目前为止,我们环境就搭建完成,开始做登录窗口和功能
(1)前端登录页面-login.jsp
<%@ page language="java" contentType="text/html; charset=utf-8"
	pageEncoding="utf-8"%>
<!DOCTYPE html PUBLIC "-//W3C//DTD HTML 4.01 Transitional//EN" "http://www.w3.org/TR/html4/loose.dtd">
<html>
<%
	String path = request.getContextPath();
	String basePath = request.getScheme() + "://" + request.getServerName() + ":" + request.getServerPort()
			+ path + "/";
%>
<head>
<meta http-equiv="Content-Type" content="text/html; charset=ISO-8859-1">
<title>Insert title here</title>
<link rel="stylesheet" type="text/css"
	href="<%=basePath%>/easyui/themes/default/easyui.css" />
<link rel="stylesheet" type="text/css"
	href="<%=basePath%>/easyui/themes/icon.css" />
<script type="text/javascript" src="<%=basePath%>/easyui/jquery.min.js"></script>
<script type="text/javascript"
	src="<%=basePath%>/easyui/jquery.easyui.min.js"></script>
</head>
<body>
	<form action="userAction.action" method="post" class="main_form">
		<div class="top">
			<h1 class="item"></h1>
		</div>
		</br> </br> </br> </br>
		<div class="img">
			<img src="246.png" width=300px heigh=300px>

		</div>
		<div class="easyui-panel" title="用户登录" style="padding: 10px 150px;">
			</br> </br> </br> </br> </br> <a>账号</a>
			<div class="input_container">
				<input name="username" class="easyui-textbox"	data-options="prompt:'请输入用户名',iconCls:'icon-man'">
			</div>
			</br> </br> <a>密码</a>
			<div class="input_container">
				<input name="password" type="password"	class="easyui-textbox" data-options="prompt:'请输入密码',iconCls:'icon-lock'">
			</div>
			</br> </br> <input type="submit" value="确定">     <input
				type="reset" value="重置">    <a href="resign.jsp"
				class="easyui-linkbutton" style="padding:2px">注册</a></div>
	</form>
	</div>
	<div class="background">
		<img src="background.jpg" width="100%" height="100%">
	</div>
	<style type="text/css">
.main_form {
	margin: 32px auto;
	width: 480px;
}

.top {
	background-color: #ACD6FF;
	text-align: center;
}

.img {
	text-align: center;
}

.background {
	position: absolute;
	left: 0px;
	top: 0px;
	width: 100%;
	height: 100%;
	z-index: -1;
}

body {
	font-family: Arial, Helvetica, sans-serif;
	font-size: 1em;
	vertical-align: middle;
	font-weight: normal
}
</style>

</body>
</html>
(2)action,service,dao层
UserAction
package action;

import java.util.List;

import javax.servlet.http.HttpServletRequest;

import org.apache.struts2.ServletActionContext;

import com.opensymphony.xwork2.ActionContext;
import com.opensymphony.xwork2.ActionSupport;
import entity.Book;
import service.UserService;

public class UserAction extends ActionSupport {

	private UserService userService;

	public void setUserService(UserService userService) {
		this.userService = userService;
	}

	public String login() {
		HttpServletRequest request = ServletActionContext.getRequest();
		String username = request.getParameter("username");
		String password = request.getParameter("password");
		String shenfen = request.getParameter("shenfen");
		if (shenfen == null) {
			return "faillogin";
		}
		if (shenfen.equals("manager")) {
			return null;
		} else {
			if (userService.login(username, password) == null) {
				return "faillogin";
			} else {
				ActionContext.getContext().getSession().put("username", username);
				return "success";
			}
		}
	}
UserService
package service;

import java.util.List;

import org.springframework.transaction.annotation.Transactional;

import dao.UserDao;
import entity.Book;
import entity.User;
@Transactional
public class UserService {
 private UserDao userDao;

	public void setUserDao(UserDao userDao) {
	this.userDao = userDao;
}
	public User login(String username,String password) {
		return userDao.login(username,password);
	}
}
UserDao ,UserDaoImpl
package dao;

import java.util.List;

import entity.Book;
import entity.User;

public interface UserDao {
public User login(String username, String password);
}
package dao;
import java.util.List;
import org.springframework.orm.hibernate5.HibernateTemplate;
import com.opensymphony.xwork2.ActionContext;
import entity.Book;
import entity.User;
public class UserDaoImpl implements UserDao {
private HibernateTemplate hibernateTemplate;
public void setHibernateTemplate(HibernateTemplate hibernateTemplate) {
this.hibernateTemplate = hibernateTemplate;
}
@Override
public User login(String a, String b) {
List<User> list = (List<User>) hibernateTemplate.find("from User where username=? and password=?",
new String[] { a, b });
if (list.size() > 0) {
return list.get(0);
}
return null;
}
}(3)Struts文件配置
<?xml version="1.0" encoding="UTF-8"?>
<!DOCTYPE struts PUBLIC
	"-//Apache Software Foundation//DTD Struts Configuration 2.3//EN"
	"http://struts.apache.org/dtds/struts-2.3.dtd">
<struts>
	<package name="demo1" extends="struts-default" namespace="/">
		<action name="userAction" class="userAction" method="login">
		<result name="faillogin">/jsp/faillogin.jsp</result>
		<result name="success" >/jsp/home.jsp</result>
		</action>
</package>
到现在为止就大功造成,如有错误可以指出哈,毕竟我是新手中的新手
各位要注意类的名字大小写哦!!
最后写一下我学习的感悟:
Action获取前端的数据进行传参,传给service层,service再传给dao层,通过dao层对数据进行处理,返回给service,再返回给action,根据action里面的返回值通过配置Struts进行页面跳转,action相当于餐厅里的一个客人,而service相当于服务员,dao相当于厨师,从而进行由点菜,写菜,做菜,上菜的处理。
Action:根据方法的返回值发给struct,传递给service,返回值给前端(当前页面或者其他页面)。
Service:接收Action,返回值给Action
Dao:使用的具体方法
Daoimpl:接收Service,返回值给service
entity:实体类,有对应的属性
实体类映射文件:实体里面属性对应数据库里面的一个字段
utils:相当于方言的设置,对语句的便解
log4j.properties:记录日志
Spring:对对象属性的注入,从而建立新的对象,注入对象属性必须要有set方法存在,手动注入时要注意名称和定义的变量的名称一样不一样,同时可以用@service来创建对象,用@autowired对属性进行自动注入
Struts:对应Action类里面的对应方法起名,具体到类的位置和对应的方法,根据对应的方法返回值进行跳转
hibernate:处理数据库,映射关系的,有hql,hibernatetemple,自动建表等方法
web.xml:引入监听器,引入spring关键文件,加入Struts拦截器


 4万+
4万+

 被折叠的 条评论
为什么被折叠?
被折叠的 条评论
为什么被折叠?
 到【灌水乐园】发言


