


本人录制技术视频地址:https://edu.csdn.net/lecturer/1899 欢迎观看。
在前面的章节中,我已经介绍了自定义过度动画的基本使用,大家可以参照这里:动画特效十三:自定义过度动画之基本使用。这一节我使用更详细的例子来阐述它的使用及引申出一些其他知识点。效果图如下:

注意到,上面两个Demo中均是自定义导航控制器切换的效果。由于实现原理相似,我只对第一个效果进行说明。在具体分析之前,我们先看一张结构图,它详细的描述了实现自定义导航控制器效果的具体步骤。
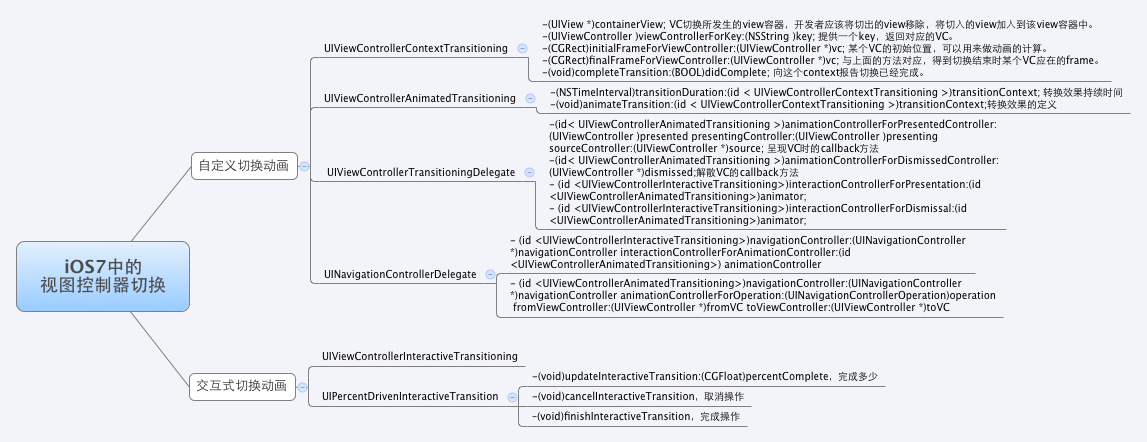
看起来很复杂的样子,现在我们就用第一个Demo进行上述方法的说明。
Step One: 主控制器遵循 UINavigationControllerDelegate 协议。
- (void)viewWillAppear:(BOOL)animated {
    [super viewWillAppear:animated];
     self.navigationController.delegate = self;
}这里是在viewWillAppear方法中完成的代理属性的初始化,不可以在viewDidLoad中初始化。如果在viewDidLoad中实现初始化,则导航控制器Push或者Pop的操作过程中,delegate对象就会丢失了,只会在第一次的时候起作用。
Step Two: 实现下面的代理方法,完成自定义的Push或者Pop操作。
- (nullable id <UIViewControllerAnimatedTransitioning>)navigationController:(UINavigationController *)navigationController上面的方法可以看出,它是要求返回一个遵守了id<UIViewControllerAnimatedTransitioning>>协议的对象。如果直接将返回结果设置为nil,可以看出就是系统默认的Push或者Pop操作。
Step Three: 自定义遵守了id<UIViewControllerAnimatedTransitioning>>协议的对象,处理自定义的过度动画。假设自定义的类为 LFPushAnimator, 则"Step Two"中的代码如下:
- (nullable id <UIViewControllerAnimatedTransitioning>)navigationController:(UINavigationController *)navigationController
                                            animationControllerForOperation:(UINavigationControllerOperation)operation
                                                         fromViewController:(UIViewController *)fromVC
                                                           toViewController:(UIViewController *)toVC  {
    if (operation == UINavigationControllerOperationPush) {
        LFPushAnimator *animator = [[LFPushAnimator alloc] init];
        return animator;
    } else {
        return nil;
    }
}Step Four: 处理自定义的过度动画。
@interface LFPushAnimator()
@property (nonatomic, strong) id<UIViewControllerContextTransitioning> transitionContext;
@property (nonatomic, strong) CAShapeLayer *maskLayer;
@end

@implementation LFPushAnimator
- (NSTimeInterval)transitionDuration:(nullable id <UIViewControllerContextTransitioning>)transitionContext {
    return 2.0f;
}
- (void)animateTransition:(id <UIViewControllerContextTransitioning>)transitionContext {
    self.transitionContext = transitionContext;
    UIView *containerView = [transitionContext containerView];
    FirstViewController *fromVC = (FirstViewController *)[transitionContext viewControllerForKey:UITransitionContextFromViewControllerKey];
    SecondViewController *toVC = (SecondViewController *)[transitionContext viewControllerForKey:UITransitionContextToViewControllerKey];

    [containerView addSubview:fromVC.view];
    [containerView addSubview:toVC.view];

    UIButton *button = fromVC.pushButton;
    UIBezierPath *startPath = [UIBezierPath bezierPathWithOvalInRect:button.frame];

    CGFloat centerToLeft = button.center.x;
    CGFloat centerToBottom = toVC.view.frame.size.height - button.center.y;
    CGFloat radius = sqrtf(centerToLeft * centerToLeft + centerToBottom * centerToBottom);
    // CGRectInset的计算公式
    /*
     r1.origin.x+=dx;//dx为正数是+=,负数则-=

     r1.size.width-=dx*2;

     r1.origin.y+=dy;//dy为正数是+=,负数则-=

     r1.size.height-=dy*2;
     */
    UIBezierPath *endPath = [UIBezierPath bezierPathWithOvalInRect:CGRectInset(button.frame, -radius, -radius)];

    self.maskLayer = [CAShapeLayer layer];
    // 设置最终的path为endPath,不然会反弹
    self.maskLayer.path = endPath.CGPath;
    toVC.view.layer.mask = self.maskLayer;

    CABasicAnimation *anim = [CABasicAnimation animationWithKeyPath:@"path"];
    anim.duration = [self transitionDuration:transitionContext];
    anim.fromValue = (__bridge id _Nullable)(startPath.CGPath);
    anim.toValue = (__bridge id _Nullable)(endPath.CGPath);
    anim.delegate = self;
    anim.timingFunction = [CAMediaTimingFunction functionWithName:kCAMediaTimingFunctionLinear];
    [self.maskLayer addAnimation:anim forKey:@"animation"];
}

- (void)animationDidStop:(CAAnimation *)anim finished:(BOOL)flag {
    //告诉 iOS 这个 transition 完成
    [self.transitionContext completeTransition:![self.transitionContext transitionWasCancelled]];

    [self.maskLayer removeAnimationForKey:@"animation"];

    [self.transitionContext viewControllerForKey:UITransitionContextToViewControllerKey].view.layer.mask = nil;
}

@end
如果大家已经学习过我以前介绍的关于动画处理的文章,相信很容易就能明白上述代码了。代码的难点就是从一个小圆过度到最终的大圆,其实就是数学计算的问题。请看下面的分析图
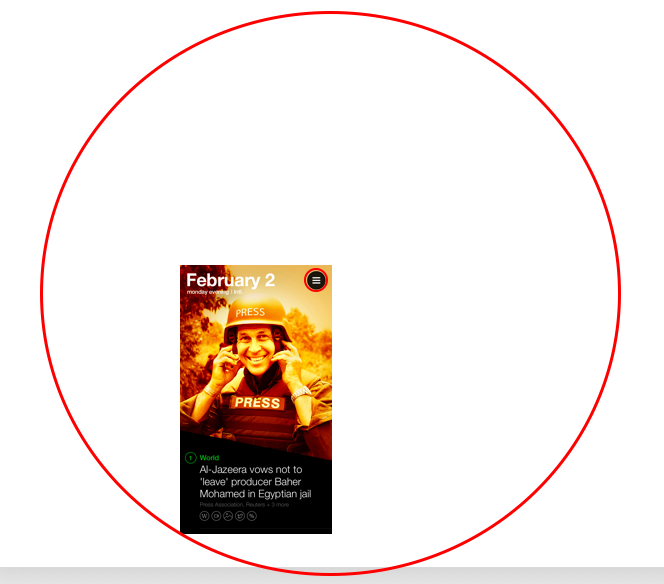
1. 上面的两个红色的圆是同心圆。
2. 动画过程中是从小圆慢慢扩散到大圆。
3. 扩散过程中被圆覆盖的地方就会透明化,然后就会显示出后面的内容,让人感觉上面一层图片是被"掀开的"。
Step Five:实现手动拖拽图片的效果。
1. 定义一个比例过度的属性,用户进行后面的控制操作。
@property (nonatomic, strong) UIPercentDrivenInteractiveTransition *percentTransition;2. 定义 UIScreenEdgePanGestureRecognizer手势,用它可以实现图片边角的拖拽效果。
- (void)viewDidLoad {
    [super viewDidLoad];
    self.view.frame = [UIScreen mainScreen].bounds;

    UIScreenEdgePanGestureRecognizer *edgePan = [[UIScreenEdgePanGestureRecognizer alloc] initWithTarget:self action:@selector(edgeEvent:)];
    edgePan.edges = UIRectEdgeLeft;
    [self.view addGestureRecognizer:edgePan];
}
3. 实现拖拽的具体方法。
- (void)edgeEvent:(UIScreenEdgePanGestureRecognizer *)edgePan {
    CGFloat transitionX = [edgePan translationInView:self.view].x;
    CGFloat percent = transitionX / self.view.frame.size.width;
    percent = MIN(1.0, MAX(0.0, percent));
    if (edgePan.state == UIGestureRecognizerStateBegan) {
        self.percentTransition = [[UIPercentDrivenInteractiveTransition alloc] init];
        // 这里结合使用
        [self.navigationController popViewControllerAnimated:YES];
    } else if (edgePan.state == UIGestureRecognizerStateChanged) {
        [self.percentTransition updateInteractiveTransition:percent];
    } else if (edgePan.state == UIGestureRecognizerStateEnded || edgePan.state == UIGestureRecognizerStateCancelled) {
        if (percent < 0.3) {
            [self.percentTransition cancelInteractiveTransition];
        } else {
            [self.percentTransition finishInteractiveTransition];
        }
    } else {
        self.percentTransition = nil;
    }
}


 1万+
1万+

 被折叠的 条评论
为什么被折叠?
被折叠的 条评论
为什么被折叠?
 到【灌水乐园】发言


