


基于 Vite + Vue3 + TS + sass + router + element-plus 的项目搭建
这是一个 Vite + Vue3 + TS 项目且包含 sass、router 和 element-plus
安装 vite
注意:Vite 需要 Node.js 版本 >= 14.6.0
查看 node 版本命令:node -v
查看 vite 版本命令:vite -v
npm
npm create vite@latest
yarn
yarn create vite
创建项目
npm
npm create vite@latest my-vue-app --template vue-ts
// 进入项目目录
cd my-vue-app
// 安装插件
npm install
// 启动
npm run dev
yarn
yarn create vite my-vue-app --template vue-ts
// 进入项目目录
cd my-vue-app
// 安装插件
yarn
// 启动
yarn dev
启动
sass
安装
npm
npm install sass sass-loader -D
yarn
yarn add sass sass-loader -D
使用
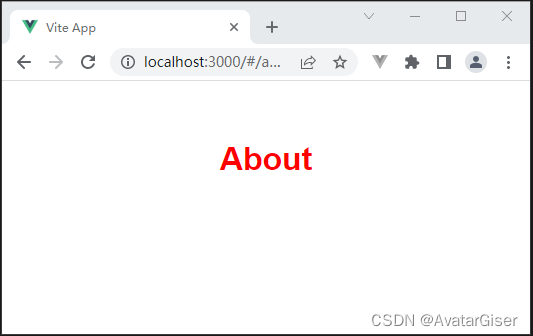
注意:about.vue 文件中 lang=“scss”
-
Scss是从Sass3引入进来的,scss语法有"{}“,”;"而sass没有,所以sass-loader对他们的解析是不一样的; -
Sass从第三代开始,放弃了缩进式风格,并且完全向下兼容普通的CSS代码,这一代的Sass也被称为Scss; -
如果使用 vscode 开发,建议安装插件
Live Sass Compiler;
<template>
    <div>
        <h1>About</h1>
    </div>
</template>
<style lang="scss">
h1 {
    color: red;
}
</style>
效果
router
安装
npm
npm install vue-router@4
yarn
yarn add vue-router@4
配置
这里只是简单使用,参考此处
src 目录下
- 新建 router/index.ts 文件;
- 新建 views 文件夹,放置路由页,如新建 home.vue 和 about.vue;
home.vue
<template>
    <div>
        <h1>Home</h1>
    </div>
</template>
about.vue
<template>
    <div>
        <h1>About</h1>
    </div>
</template>
router/index.ts
import { createRouter, createWebHashHistory } from 'vue-router'
import home from '../views/home.vue'
import about from '../views/about.vue'

// 定义路由
const routes = [
    {
        path: '/home', component: home
    },
    {
        path: '/about', component: about
    }
];

// 创建路由实例并传递 `routes` 配置
const router = createRouter({
    history: createWebHashHistory(),
    routes
});

export default router
main.ts 中挂载根实例
import { createApp } from 'vue'
import App from './App.vue'
import router from 'router/index.ts'

createApp(App)
.use(router) // 挂载到根实例
.mount('#app')
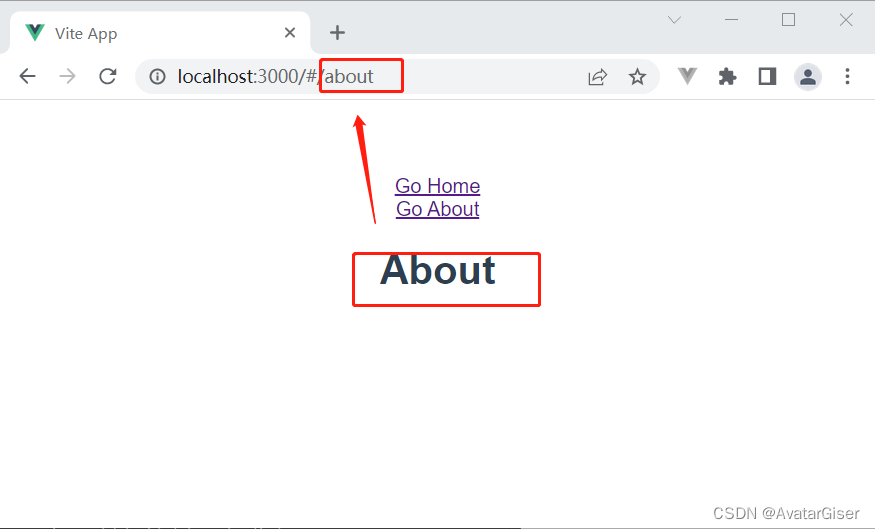
改造 App.vue
<template>
  <!--使用 router-link 组件进行导航。通过传递 `to` 来指定链接 -->
  <router-link to="/home">Go Home</router-link><br/>
  <router-link to="/about">Go About</router-link>
  <!-- 路由匹配到的组件将渲染在这里 -->
  <router-view/>
</template>

<style>
#app {
  font-family: Avenir, Helvetica, Arial, sans-serif;
  -webkit-font-smoothing: antialiased;
  -moz-osx-font-smoothing: grayscale;
  text-align: center;
  color: #2c3e50;
  margin-top: 60px;
}
</style>
效果
element-plus
安装
npm
npm install element-plus --save
yarn
yarn add element-plus
引入
main.ts 引入,仅全局引入,按需导入在此
import { createApp } from 'vue'
import App from './App.vue'
import router from './router/index.ts'
import ElementPlus from 'element-plus'
import 'element-plus/dist/index.css'

createApp(App)
.use(router) // 挂载到根实例
.use(ElementPlus)
.mount('#app')
Volar 支持
如果您使用 Volar,请在 tsconfig.json 中通过 compilerOptions.type 指定全局组件类型
tsconfig.json
{
  "compilerOptions": {
    // ...
    "types": ["element-plus/global"]
  }
}
使用
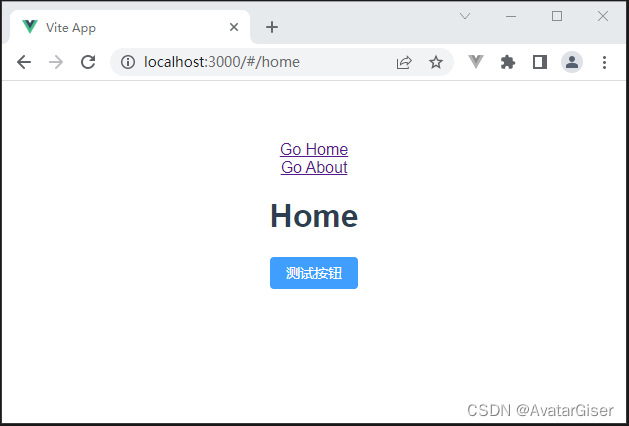
src/views/home.vue
<template>
    <div>
        <h1>Home</h1>
        <el-button type="primary">测试按钮</el-button>
    </div>
</template>
效果
其它
如果想使用 vue cli 创建项目,可参考《基于 Vue Cli4.x + Vue3 + TS + stylus +router + element-plus 的项目搭建》


 408
408


 被折叠的 条评论
为什么被折叠?
被折叠的 条评论
为什么被折叠?
 到【灌水乐园】发言


