maven/ SpringBoot 配置profile指定环境

maven 的 pom.xml 配置profile指定环境

<profiles>
        <!-- 开发环境 -->
        <profile>
            <id>dev</id>
            <!-- 可以通过 @env@ 获取env的值, env也可以换成其他名称 -->
            <properties>
                <env>dev</env>
            </properties>
            <activation>
            <!-- 指定默认环境 -->
                <activeByDefault>true</activeByDefault>
            </activation>
        </profile>
        <!-- 测试环境 -->
        <profile>
            <id>test</id>
            <properties>
                <env>test</env>
            </properties>
        </profile>
        <!-- 生产环境 -->
        <profile>
            <id>prod</id>
            <properties>
                <env>prod</env>
            </properties>
        </profile>
    </profiles>

SpringBoot 获取 maven 配置的环境

在 application.properties 中添加以下配置,获取配置的环境:

可以通过 @env@ 获取maven配置的 profile属性env的值。

spring.profiles.active=@env@

当 spring.profiles.active 为 dev 时,会读取 application-dev.properties 的配置。

当 spring.profiles.active 为 test 时,会读取 application-test.properties 的配置。

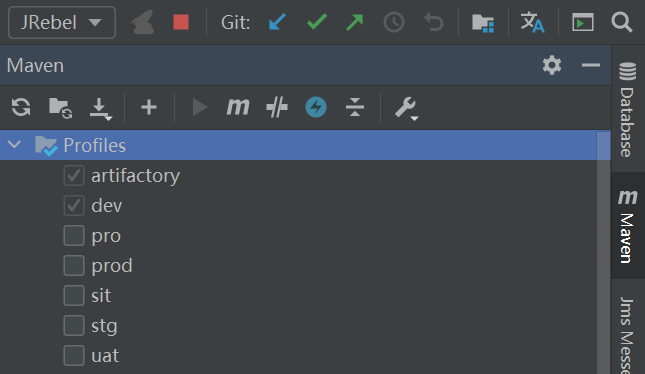
Intellij idea 切换 profile 环境

点击侧栏的 maven,然后点击 profile。

maven 打包指定环境

打包的时候,如果需要指定不同的环境。

以下的 -P后面是环境变量,可选择dev开发环境,或其他环境进行打包。-DskipTests表示跳过测试。

mvn clean package -Pdev -DskipTests
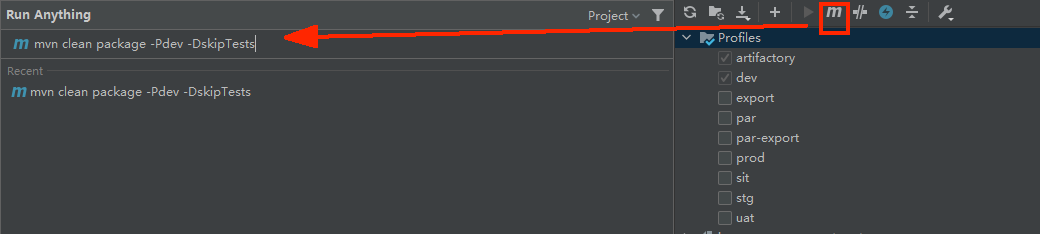
Maven的理解

详情见: https://www.cnblogs.com/expiator/p/9694940.html

  • 0
    点赞
  • 0
    收藏
    觉得还不错? 一键收藏
  • 0
    评论
在开发过程中,我们经常需要配置不同的环境,例如开发环境、测试环境和生产环境等。这些环境配置通常是不同的,因此我们需要在不同的环境中使用不同的配置文件。 对于使用 Maven 构建项目的 Java 开发人员来说,可以使用 Mavenprofile 功能来实现不同环境配置分离。 以下是实现 Spring Boot 生产环境和测试环境配置分离的步骤: 1. 在项目的 pom.xml 文件中添加 profile: ```xml <profiles> <profile> <id>dev</id> <properties> <activatedProperties>dev</activatedProperties> </properties> <activation> <activeByDefault>true</activeByDefault> </activation> </profile> <profile> <id>prod</id> <properties> <activatedProperties>prod</activatedProperties> </properties> </profile> </profiles> ``` 2. 在 src/main/resources 目录下创建两个配置文件: application-dev.properties: ```properties spring.datasource.url=jdbc:mysql://localhost:3306/dev_db spring.datasource.username=root spring.datasource.password=123456 ``` application-prod.properties: ```properties spring.datasource.url=jdbc:mysql://localhost:3306/prod_db spring.datasource.username=root spring.datasource.password=123456 ``` 3. 在 pom.xml 文件中配置 Maven 插件: ```xml <build> <plugins> <plugin> <groupId>org.apache.maven.plugins</groupId> <artifactId>maven-resources-plugin</artifactId> <version>3.1.0</version> <executions> <execution> <id>copy-resources</id> <phase>validate</phase> <goals> <goal>copy-resources</goal> </goals> <configuration> <outputDirectory>${basedir}/target/classes</outputDirectory> <resources> <resource> <directory>src/main/resources</directory> <filtering>true</filtering> <includes> <include>application*.properties</include> </includes> </resource> </resources> <overwrite>true</overwrite> </configuration> </execution> </executions> </plugin> </plugins> </build> ``` 4. 在 Spring Boot 主类中添加 @PropertySource 注解: ```java @SpringBootApplication @PropertySource("classpath:application-${activatedProperties}.properties") public class Application { public static void main(String[] args) { SpringApplication.run(Application.class, args); } } ``` 现在,当我们使用 Maven 打包项目时,可以通过指定不同的 profile 来选择不同的配置文件。例如,使用以下命令打包生产环境: ``` mvn clean package -Pprod ``` 这将使用 application-prod.properties 配置文件,而不是 application-dev.properties。

“相关推荐”对你有帮助么?

  • 非常没帮助
  • 没帮助
  • 一般
  • 有帮助
  • 非常有帮助
提交
评论
添加红包

请填写红包祝福语或标题

红包个数最小为10个

红包金额最低5元

当前余额3.43前往充值 >
需支付:10.00
成就一亿技术人!
领取后你会自动成为博主和红包主的粉丝 规则
hope_wisdom
发出的红包
实付
使用余额支付
点击重新获取
扫码支付
钱包余额 0

抵扣说明:

1.余额是钱包充值的虚拟货币,按照1:1的比例进行支付金额的抵扣。
2.余额无法直接购买下载,可以购买VIP、付费专栏及课程。

余额充值