


一.安装过程
当前工具主要是用来对ES中的数据进行数据导入/导出,以及对数据迁移相关,使用elasticdump工具需要使用到npm,所以需要安装相关的依赖 目前使用到的ES版本是7.x
安装NODE
通过npm安装elasticdump
# 本地安装和全局安装的区别在于它是否自动给你设置环境变量,其他的没有区别

# 本地安装
$ npm install elasticdump
$ ./bin/elasticdump

# 全局安装
$ npm install elasticdump -g
$ elasticdump
注:当前工具的安装,我目前是安装在ES集群本地的,当然可以安装在其他节点,只要网络能够被访问,但是因为在本地,所以走本地网卡,速度比较快!
二.使用elasticdump对数据导出
查看es的版本
haima@haima-PC:/media/haima/DEEPINOS/haima/后台管理切go$ curl -XGET localhost:9200
{
  "name" : "1fdffa0a6059",
  "cluster_name" : "docker-cluster",
  "cluster_uuid" : "GIxmC3CbQViGwrugI37jEw",
  "version" : {
    "number" : "7.3.1",
    "build_flavor" : "default",
    "build_type" : "docker",
    "build_hash" : "4749ba6",
    "build_date" : "2019-08-19T20:19:25.651794Z",
    "build_snapshot" : false,
    "lucene_version" : "8.1.0",
    "minimum_wire_compatibility_version" : "6.8.0",
    "minimum_index_compatibility_version" : "6.0.0-beta1"
  },
  "tagline" : "You Know, for Search"
}
{
  "name" : "node-66-1",
  "cluster_name" : "es6-test",
  "cluster_uuid" : "coSES9c4Q8SzOLGDSBS5OA",
  "version" : {
    "number" : "6.2.4",
    "build_hash" : "ccec39f",
    "build_date" : "2018-04-12T20:37:28.497551Z",
    "build_snapshot" : false,
    "lucene_version" : "7.2.1",
    "minimum_wire_compatibility_version" : "5.6.0",
    "minimum_index_compatibility_version" : "5.0.0"
  },
  "tagline" : "You Know, for Search"
}
ES中将数据导出为本地JSON文件
#格式:elasticdump --input {protocol}://{host}:{port}/{index} --output ./test_index.json
#例子:将ES中的test_index 中的索引导出
#导出当前索引的mapping结构
$ elasticdump --input http://127.0.0.1:9200/test3 --output ./test3_index_mapping.json --type=mapping
#导出当前索引下的所有真实数据
$ elasticdump --input http://127.0.0.1:9200/test3 --output ./test3_index.json --type=data
root@haima-PC:/usr/local/docker/efk# ll
总用量 20
drwxr-sr-x 3 root staff 4096 4月  11 01:08 .
drwxrwsrwx 8 root staff 4096 1月   3 20:30 ..
-rw-r--r-- 1 root staff  235 4月  11 01:08 test3_index.json
-rw-r--r-- 1 root staff  193 4月  11 00:15 test3_index_mapping.json
上面导出的两个文件都是在导入到
ES中所需要的,一个是mapping文件,另外一个是数据,当然mapping也可以自己手动建立
导出的test3_index_mapping.json mapping的内容
{"test_index":{"mappings":{"properties":{"age":{"type":"long"},"birth":{"type":"date"},"height":{"type":"long"},"name":{"type":"text","fields":{"keyword":{"type":"keyword","ignore_above":256}}}}}}}
导出的test3_index.json 数据的内容
{"_index":"test_index","_type":"_doc","_id":"2","_score":1,"_source":{"name":"lisi","age":20,"birth":"1997-01-05"}}
{"_index":"test_index","_type":"_doc","_id":"1","_score":1,"_source":{"age":10,"birth":"2010-10-20","name":"lisi","height":180}}
错误:在安装完成之后,进行首次使用过程中出现错误,错误主要是
CALL_AND_RETRY_LAST Allocation failed - JavaScript heap out of memory,出现当前错误
解决:试过多种方式,但是最终了能够使程序完整跑出来是因为将内存参数调大
#下面两个参数只需要设置一个,我两个都用过,目前记不清用的是哪个起的作用,应该是第一个,所以先设置第一个的参数
$ export NODE_OPTIONS--max-old-space-size=8192
$ export NODE_OPTIONS="--max-old-space-size=8192"
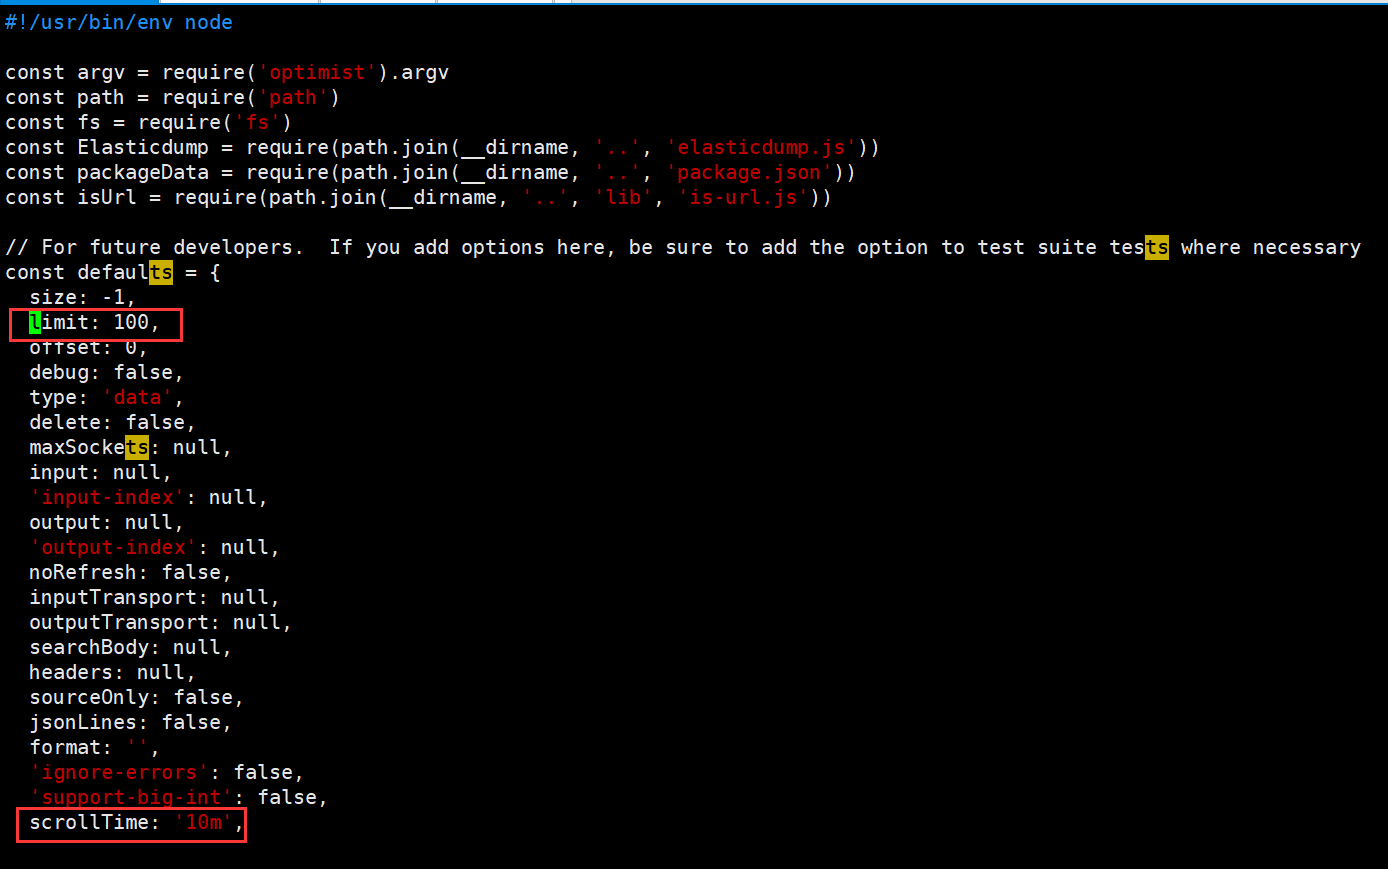
上面内容设置完成之后,还需要注意,在使用过程中需要注意,limit(默认值100)参数和scrollTime(默认值10m),这两个参数都有默认值,
limit:代表的是每次通过请求从ES中请求的数量,之前我将该参数设置为1000,但是出现了内存溢出,默认值就好
scrollTime:当前参数代表的是以当前数据生成一个类似镜像的东西,然后通过这个镜像去查询,如果是后面有新的数据进来是不会被纳入的,默认值是10m(分钟),也就是说,如果数据比较多,导出可能耗时比较久,那么可以将当前参数设置大一些,满足能够将数据导出完
如何修改参数:
/usr/local/node-v12.14.1-linux-x64/bin在安装目录下,找到
elasticdump脚本文件中,找到对应的参数进行修改vim /usr/local/node-v12.14.1-linux-x64/bin/elasticdump
通过直接命令跟参数的形式进行修改,如:
elasticdump --limit=200 --input http://127.0.0.1/test_index --output ./test_index
三.本地json导入到es中
通过上面导出,已经导出了两个文件,一个是数据文件,一个是mapping文件,进行数据导入:
数据导入需要进行检查:
- 在需要导入的
ES创建索引,并且保持索引和type和mapping文件中的一致- 是否存在
mapping.json,这个取决于你是否导出,没倒出也可以自己手动建立,建立过程这里不细说- 是否存在相同索引(是否为同一ES中):存在需要修改导出的
mapping.json中的索引信息,不存在可以直接导入;
数据导入:
# 创建索引
$ curl -XPUT http://127.0.0.1:9200/test_index
#因为导入的是mapping,所以设置type为mapping
$ elasticdump --input ./test3_index_mapping.json --output http://127.0.0.1:9200/ --type=mapping
#因为导入的是data(真实数据)所以设置type为data
$ elasticdump --input ./test3_index.json --output http://127.0.0.1:9200/ --type=data
执行过程:
# 创建索引
$ curl -XPUT http://127.0.0.1:9200/test_index
{"acknowledged":true,"shards_acknowledged":true,"index":"test_index"}

# 导入mapping
root@haima-PC:/usr/local/docker/efk# elasticdump --input ./test3_index_mapping.json --output http://127.0.0.1:9200/ --type=mapping
Sat, 10 Apr 2021 17:40:35 GMT | starting dump
Sat, 10 Apr 2021 17:40:35 GMT | got 1 objects from source file (offset: 0)
Sat, 10 Apr 2021 17:40:36 GMT | sent 1 objects to destination elasticsearch, wrote 1
Sat, 10 Apr 2021 17:40:36 GMT | got 0 objects from source file (offset: 1)
Sat, 10 Apr 2021 17:40:36 GMT | Total Writes: 1
Sat, 10 Apr 2021 17:40:36 GMT | dump complete

# 导入数据
root@haima-PC:/usr/local/docker/efk# elasticdump --input ./test3_index.json --output http://127.0.0.1:9200/ --type=data
Sat, 10 Apr 2021 17:43:54 GMT | starting dump
Sat, 10 Apr 2021 17:43:54 GMT | got 2 objects from source file (offset: 0)
Sat, 10 Apr 2021 17:43:55 GMT | sent 2 objects to destination elasticsearch, wrote 2
Sat, 10 Apr 2021 17:43:55 GMT | got 0 objects from source file (offset: 2)
Sat, 10 Apr 2021 17:43:55 GMT | Total Writes: 2
Sat, 10 Apr 2021 17:43:55 GMT | dump complete

# 删除索引
$ curl -XDELETE http://127.0.0.1:9200/test_index
{"acknowledged":true}
如上所示,为导入过程
导入导出具体参数要看数据量决定,并且要看单条数据大小决定参数的调整


 4964
4964


 被折叠的 条评论
为什么被折叠?
被折叠的 条评论
为什么被折叠?
 到【灌水乐园】发言


