


Java的IO流是实现输入/输出的基础,它可以方便地实现数据的输入/输出操作,在Java中把不同的输入/输出源抽象表述为"流"。
流是一组有顺序的,有起点和终点的字节集合,是对数据传输的总称或抽象。即数据在两设备间的传输称为流,流的本质是数据传输,根据数据传输特性将流抽象为各种类,方便更直观的进行数据操作。
流有输入和输出,输入时是流从数据源流向程序。输出时是流从程序传向数据源,而数据源可以是内存,文件,网络或程序等。
I/O分类
IO体系是复杂的,涉及到的类的数量很多,而我们去接纳这个体系的前提就是有大局观。而为了呈现大局,就要对体系本身做分级讨论,分级的前提又是对知识的分组,归纳,总结。一个复杂的体系,知识往往相互勾连,嵌套,因此往往不能只用一种眼光来看待整个事物。用多个视角看待世界,必然会出现一些概念重复,知识点重复。接下来我们用三种视角来看我们的IO体系。
流式部分
所谓流,是一种抽象出来的介质,可以将其当成一个水管,水管中的水就是流动的数据。而我们处理对象就是这样的动态流动的水管。
输入流和输出流
既然将流比作水管中的水,那么这个水流就会有方向性,根据数据流向不同分为:输入流和输出流。而输入流,输出流的视角是站在代码的视角上。这样一来,输入流的含义就是,从远方推送过来的数据,因此只能从中读取数据,而不能向其写入数据。反过来,输出流是指代码往管子里注水,把数据推送到远方,因此只能向其写入数据,而不能从中读取数据。
字节流和字符流
水管中的水是字节,但是也可以是字符,字符和编码相关。如果传输的是一段文本,自然使用字符来处理更加方便,更有效率。
因此这种分法的区别只在于处理,传输的数据的数据单元不同。
节点流和处理流
这个时候我们开始关系连接着水管的东西是什么,我们同样有两种考虑。
- 直接和物理设备进行连通的,我们称为节点流,是一种低级流。例如,直连磁盘、网络获得的流。
- 连通到一种包装了的流进行沟通,这种包装之后的流,我们称为处理流。毕竟是包装过的,所以更强大,被称为高级流。
处理流是不会直接和数据源打交道的,这样一来,只要使用相同的处理流,程序就可以采用完全相同的输入/输出代码来访问不同的数据源,随着处理流所包装节点流的变化,程序实际所访问的数据源也相应地发生变化。既可以消除不同节点流的实现差异,也可以提供更方便的方法来完成输入/输出功能。
非流式部分
主要包含一些辅助流式部分的类,例如:
- File 沟通计算机本地文件,文件夹。
- RandomAccessFile 可以任意跳转到文件的指定位置进行编辑。
- FileDescriptor 文件描述,内部包含和物理机沟通的文件描述符。
其他类
文件读取部分的与安全相关的类,如:SerializablePermission类,以及与本地操作系统相关的文件系统的类,如:FileSystem类和Win32FileSystem类和WinNTFileSystem类
本地文件处理详解
与本地文件沟通的流经常用到,这里先将这部分相关类进行介绍。这个过程中可以初步感受流的运作。
File类详解
File类的目的是和当前计算机的文件系统打通,可以说是文件系统的一个抽象。我们知道虚拟机的出现是为了屏蔽各种不同系统之间的区别,提供开发者相同的操作api。File相关的类就很好的体现了这一点。
这里将File类的一些关键方法做一下分类。
首先是产生一个File对象,这个对象代表了对本地某个路径的指向,不管其真实是否存在此文件。产生File对象需要使用其构造函数,File类提供了三个不同的构造函数,以不同的参数形式灵活地接收文件和目录名信息:
// 使用路径构造一个对象
File (String  pathname){}
// 创建parent的文件夹下的child文件对象
File (String  parent  ,  String child){}
// 同上,只不过parent已经是一个文件对象了
File (File parent  , String child){}
手里拿到File对象之后,就可以针对这个File指向捕获其相关信息:
// 判断文件或目录是否存在
public boolean exists()
// 判断是文件还是目录
public boolean isFile()
// 判断是文件还是目录
public boolean isDirectory()
// 返回文件名或目录名
public String getName()
// 返回文件或目录的路径
public String getPath()
// 获取文件的长度
public long length()
// 如果file是目录性质,将目录中所有文件名保存在字符串数组中返回
public String[ ] list ()
获得File的相关信息之后就可以针对这个文件或者目录进行操作了,例如:
// 创建文件
public void createNewFile();
// 重命名文件
public boolean renameTo(File newFile);
// 删除文件
public void delete();
// 创建目录
public boolean mkdir();
关于如何修改文件内容需要依靠流,这部分我们在后面聊。
Files工具类
File类有大量方法,在使用过程中还是比较繁琐的。在1.7中随着nio包下出现了Files工具类,提供了多种操作文件系统中文件的方法。其中Files会和Path相结合使用。
new~
以new打头的api帮助将Path转换为流/channel等,api如下:
// 将path转换为输入输出流
public static InputStream newInputStream(Path path, OpenOption... options)
public static OutputStream newOutputStream(Path path, OpenOption... options)

// 将path转换为channel
public static SeekableByteChannel newByteChannel(Path path, OpenOption... options) throws IOException {}
public static SeekableByteChannel newByteChannel(Path path,  Set<? extends OpenOption> options, FileAttribute<?>... attrs){}

// 将path转换为可迭代的目录扫描器,提供iterator
public static DirectoryStream<Path> newDirectoryStream(Path dir) throws IOException{}
public static DirectoryStream<Path> newDirectoryStream(Path dir, String glob) throws IOException{}
public static DirectoryStream<Path> newDirectoryStream(Path dir, DirectoryStream.Filter<? super Path> filter) throws IOException{}

// 将path转换为BufferReader/BufferWriter
public static BufferedReader newBufferedReader(Path path) throws IOException {}
public static BufferedReader newBufferedReader(Path path, Charset cs) throws IOException {}
public static BufferedWriter newBufferedWriter(Path path, OpenOption... options) throws IOException {}
public static BufferedWriter newBufferedWriter(Path path, Charset cs, OpenOption... options)throws IOException{}
api层面是一目了然的,其携带的参数需要解释一下。
第一个是Path,这个东西后续会详细介绍,简单理解就是指向一个文件路径,类似于File,但是Path是个接口,需要使用Paths创建Path:
Path path = Paths.get("/home/zifang/aa.txt");
第二个是OpenOption,它是一个接口,读取和写入操作都支持这个参数,它用来配置外面如何打开或是创建一个文件。OpenOption有两个实现类:LinkOption 和 StandardOpenOption。其中StandardOpenOption的枚举如下:
| READ | 以读取方式打开文件 |
|---|---|
| WRITE | 已写入方式打开文件 |
| CREATE | 如果文件不存在,创建 |
| CREATE_NEW | 如果文件不存在,创建;若存在,异常。 |
| APPEND | 在文件的尾部追加 |
| DELETE_ON_CLOSE | 当流关闭的时候删除文件 |
| TRUNCATE_EXISTING | 把文件设置为0字节 |
| SPARSE | 文件不够时创建新的文件 |
| SYNC | 同步文件的内容和元数据信息随着底层存储设备 |
| DSYNC | 同步文件的内容随着底层存储设备 |
LinkOption的枚举如下:
| NOFOLLOW_LINKS | 不包含符号链接的文件 |
|---|
第三个是FileAttribute,表达文件的附属信息,一般不需要填写。
create~
// 创建文件
public static Path createFile(Path path, FileAttribute<?>... attrs) throws IOException{}
// 创建文件夹
public static Path createDirectory(Path dir, FileAttribute<?>... attrs) throws IOException{}
// 递归式创建文件夹
public static Path createDirectories(Path dir, FileAttribute<?>... attrs) throws IOException{}

// 创建暂时文件
// prefix:
public static Path createTempFile(Path dir, String prefix, String suffix, FileAttribute<?>... attrs) throws IOException{}
public static Path createTempFile(String prefix, String suffix, FileAttribute<?>... attrs) throws IOException{}

// 创建暂时目录
public static Path createTempDirectory(Path dir, String prefix, FileAttribute<?>... attrs) throws IOException{}
public static Path createTempDirectory(String prefix, FileAttribute<?>... attrs) throws IOException{}

// 创建快捷方式,windows下createSymbolicLink需要管理员权限,否则报错
public static Path createSymbolicLink(Path link, Path target, FileAttribute<?>... attrs) throws IOException{}
// 反过来可以使用readSymbolicLink获得快捷方式指向的文件路径
public static Path createLink(Path link, Path existing) throws IOException {}
这部分提供大量文件/文件夹的创建api
基本信息读取
// 是否隐藏
public static boolean isHidden(Path path) throws IOException {}

// 是否是快捷方式
public static boolean isSymbolicLink(Path path) {}

// 是否是文件夹
public static boolean isDirectory(Path path, LinkOption... options) {}

// 是否是一个常规文件,即不是目录或符号链接等特殊文件类型
public static boolean isRegularFile(Path path, LinkOption... options) {}

// 最新修改时间
public static FileTime getLastModifiedTime(Path path, LinkOption... options) {}

// 文件大小
public static long size(Path path) throws IOException {}

// 文件是否存在
public static boolean exists(Path path, LinkOption... options) {}

// 文件是否不存在
public static boolean notExists(Path path, LinkOption... options) {}

// 是否可读
public static boolean isReadable(Path path) {}

// 是否可写
public static boolean isWritable(Path path) {}

// 是否可读
public static boolean isExecutable(Path path) {}
上述api可以获得文件的一般信息,有多种属性的判断
文件属性读取
public static <V extends FileAttributeView> V getFileAttributeView(Path path, Class<V> type, LinkOption... options)
public static <A extends BasicFileAttributes> A readAttributes(Path path, Class<A> type, LinkOption... options) throws IOException{
public static Object getAttribute(Path path, String attribute, LinkOption... options) throws IOException{
public static Map<String,Object> readAttributes(Path path, String attributes, LinkOption... options) throws IOException{
这部分对应了前文说的FileAttribute的相关知识。NIO.2专门在java.nio.file包下增加了一个attribute包(即java.nio.file.attribute),里面提供了大量的文件属性访问及修改API,基本上可以全面使用OS的文件系统功能。对于文件属性访问功能的设计,它将属性的集合都放在“视图”这种结构中,最顶层的是FileAttributeView,这是个接口,表示所有文件属性视图的父视图,而其低下则派生了很多各种类型的文件属性视图,这里介绍几个最常用的:
1)BasicFileAttributeView:基础文件属性,包括文件修改/创建时间、最后修改时间、文件大小、是否为目录、是否为快捷方式等。
2)FileOwnerAttributeView:文件主人的相关属性,其只有两个功能,一个是获取当前文件的所属人,另一个是修改当前文件的所属人。
3)DosFileAttributeView:获取和修改文件的Dos属性(Windows中的特性),比如检查文件是否为隐藏、是否是归档文件等。
4)UserDefinedFileAttributeView:用户自定义文件属性,一般OS在开发层面都允许用户自定义文件的一些属性,自定义属性必然使用键值对来表示,键是属性的名称(需要自定义),而值则是属性的值(属性的值可以是任意类型的,因此需要用二进制字节来保存,读取和保存时需要用到ByteBuffer)。
对于最常用的BasicFileAttributeView和DosFileAttributeView,Java还提供了更深一层的设计,需要通过各自的readAttributes方法分别获得BasicFileAttributes对象和DosFileAttributes对象才能真正访问其中的属性以及修改属性。如下:
AclFileAttributeView aclView = Files.getFileAttributeView(Paths.get("xxx.txt"), AclFileAttributeView.class);
UserDefinedFileAttributeView是一个自定义的属性视图,使用以下两个api可以对视图进行修改与读取:
int write(String name, ByteBuffer src);  // 直接向视图中写入一个键值对
int read(String name, ByteBuffer dst);  // 读取一个键值对
综上,这里给出一个demo看看效果:
public class Test {

	public static void main(String[] args) throws IOException, InterruptedException {
		Path path = Paths.get("out.txt");

		BasicFileAttributeView basicFileAttributeView = Files.getFileAttributeView(path, BasicFileAttributeView.class);
		BasicFileAttributes basicFileAttributes = basicFileAttributeView.readAttributes();
		System.out.println("创建时间 : " + new Date(basicFileAttributes.creationTime().toMillis()));

		DosFileAttributeView dosFileAttributeView = Files.getFileAttributeView(path, DosFileAttributeView.class);
		dosFileAttributeView.setHidden(true);

		// 写入一个属性
		UserDefinedFileAttributeView userDefinedFileAttributeView = Files.getFileAttributeView(path, UserDefinedFileAttributeView.class);
		userDefinedFileAttributeView.write("版权人", Charset.defaultCharset().encode("啦啦啦"));

		List<String> attrNames = userDefinedFileAttributeView.list(); // 读出所有属性
		for (String name: attrNames) {
			ByteBuffer bb = ByteBuffer.allocate(userDefinedFileAttributeView.size(name)); // 准备一块儿内存块读取
			userDefinedFileAttributeView.read(name, bb);
			bb.flip();
			String value = Charset.defaultCharset().decode(bb).toString();
			System.out.println(name + " : " + value);
		}
	}
}
文件内容读写
// 将文件读取为子节数组
public static byte[] readAllBytes(Path path) throws IOException {

// 将文件读取为字符串列表
public static List<String> readAllLines(Path path, Charset cs) throws IOException {
public static List<String> readAllLines(Path path) throws IOException {

// 将文件读取为字符串流
public static Stream<String> lines(Path path, Charset cs) throws IOException {
public static Stream<String> lines(Path path) throws IOException {

// 将子节数组写入文件
public static Path write(Path path, byte[] bytes, OpenOption... options) throws IOException
public static Path write(Path path, Iterable<? extends CharSequence> lines, Charset cs, OpenOption... options) throws IOException
public static Path write(Path path, Iterable<? extends CharSequence> lines, OpenOption... options) throws IOException
Files提供抽取/写入文件内容的方法,不需要手写各种流的处理,还是挺方便的
文件遍历与查找
public static Stream<Path> list(Path dir) throws IOException {}
public static Stream<Path> walk(Path start, int maxDepth, FileVisitOption... options) throws IOException{}
public static Stream<Path> walk(Path start, FileVisitOption... options) throws IOException {}
public static Stream<Path> find(Path start, int maxDepth, BiPredicate<Path, BasicFileAttributes> matcher, FileVisitOption... options) throws IOException{}
针对文件夹,Files提供遍历的方式,能力与newDirectoryStream方法类似,不过实现上会有区别。前者使用迭代器模式实现,这里的walkFileTree则是用visit模式实现。walkFileTree接受一个Path和FileVisitor作为参数。Path对象是需要遍历的目录,FileVistor则会在每次遍历中被调用。FileVisitor需要调用方自行实现,然后作为参数传入walkFileTree().FileVisitor的每个方法会在遍历过程中被调用多次。如果不需要处理每个方法,那么可以继承它的默认实现类SimpleFileVisitor,它将所有的接口做了空实现。如下代码所示:
public class WorkFileTree {
    public static void main(String[] args) throws IOException{
        Path startingDir = Paths.get("/home/zifang/Downloads");
        List<Path> result = new LinkedList<Path>();
        Files.walkFileTree(startingDir, new FindJavaVisitor(result));
        System.out.println("result.size()=" + result.size());
    }

    private static class FindJavaVisitor extends SimpleFileVisitor<Path>{
        private List<Path> result;
        public FindJavaVisitor(List<Path> result){
            this.result = result;
        }
        @Override
        public FileVisitResult visitFile(Path file, BasicFileAttributes attrs){
            if(file.toString().endsWith(".java")){
                result.add(file.getFileName());
            }
            return FileVisitResult.CONTINUE;
        }
    }
}
其他方法看入参就知道怎么用了,在这里不过多描述。
Path/Paths工具类
Path创建
Path是接口,因此不能进行实例化,需要使用Paths类。Paths提供两种初始化方式:
public static Path get(String first, String... more) {
    return FileSystems.getDefault().getPath(first, more);
}

public static Path get(URI uri) {
    String scheme =  uri.getScheme();
    if (scheme == null)
        throw new IllegalArgumentException("Missing scheme");

    // check for default provider to avoid loading of installed providers
    if (scheme.equalsIgnoreCase("file"))
        return FileSystems.getDefault().provider().getPath(uri);

    // try to find provider
    for (FileSystemProvider provider: FileSystemProvider.installedProviders()) {
        if (provider.getScheme().equalsIgnoreCase(scheme)) {
            return provider.getPath(uri);
        }
    }

    throw new FileSystemNotFoundException("Provider \"" + scheme + "\" not installed");
}
可以看到你可以直接传入一个路径地址,或者使用Uri来表达资源路径。
Path转换
Path指向了一个资源路径,可以将其转换为File或者URI。
URI toUri();
Path toAbsolutePath();
Path toRealPath(LinkOption... options) throws IOException;
File toFile();
Path信息获取
Path内包含一些简单信息抽取的api,如下所示:
// 判断是否是绝对路径
boolean isAbsolute();
// 获得当前path的根path
Path getRoot();
// 获得文件名字
Path getFileName();
// 获得path的父路径
Path getParent();
// 获得资源的路径数量,即 D:/a.text -> 2, D: -> 1, D:/aaa/a.text -> 3
int getNameCount();
// 配合getNameCount可以将路径中的各个部分进行抽取
Path getName(int index);
// 判断当前路径是否以参数开头
boolean startsWith(Path other);
boolean startsWith(String other);
// 判断当前路径是否以参数为结尾
boolean endsWith(Path other);
boolean endsWith(String other);
// 返回路径的字符串形式
String toString();
Path规整化
某些时候在我们需要处理的Path路径中可能会有一个或两个点,例如一个点 ‘.’ 表示的是当前目录,两个点’…’ 可以表示上一级目录,在将path作为字符串处理的时候将会引发麻烦,因此Path有相关的方法将一个点或者两个点进行消除。
// 返回一个路径,该路径是冗余名称元素的消除。
Path normalize();
// 转换为绝对路径
Path toAbsolutePath();
// 融合了方法和normalize()方法
Path toRealPath(LinkOption... options) throws IOException;
输入输出流详解
从上面的类分类可以看到,真正核心的是流式部分,也是java和其他东西沟通的核心部分。因此我们将会重点描述输入输出流的体系结构与使用方式。
输入输出流的体系结构
我们把平时经常用到的类摘出来,将其使用继承方式展示出来:
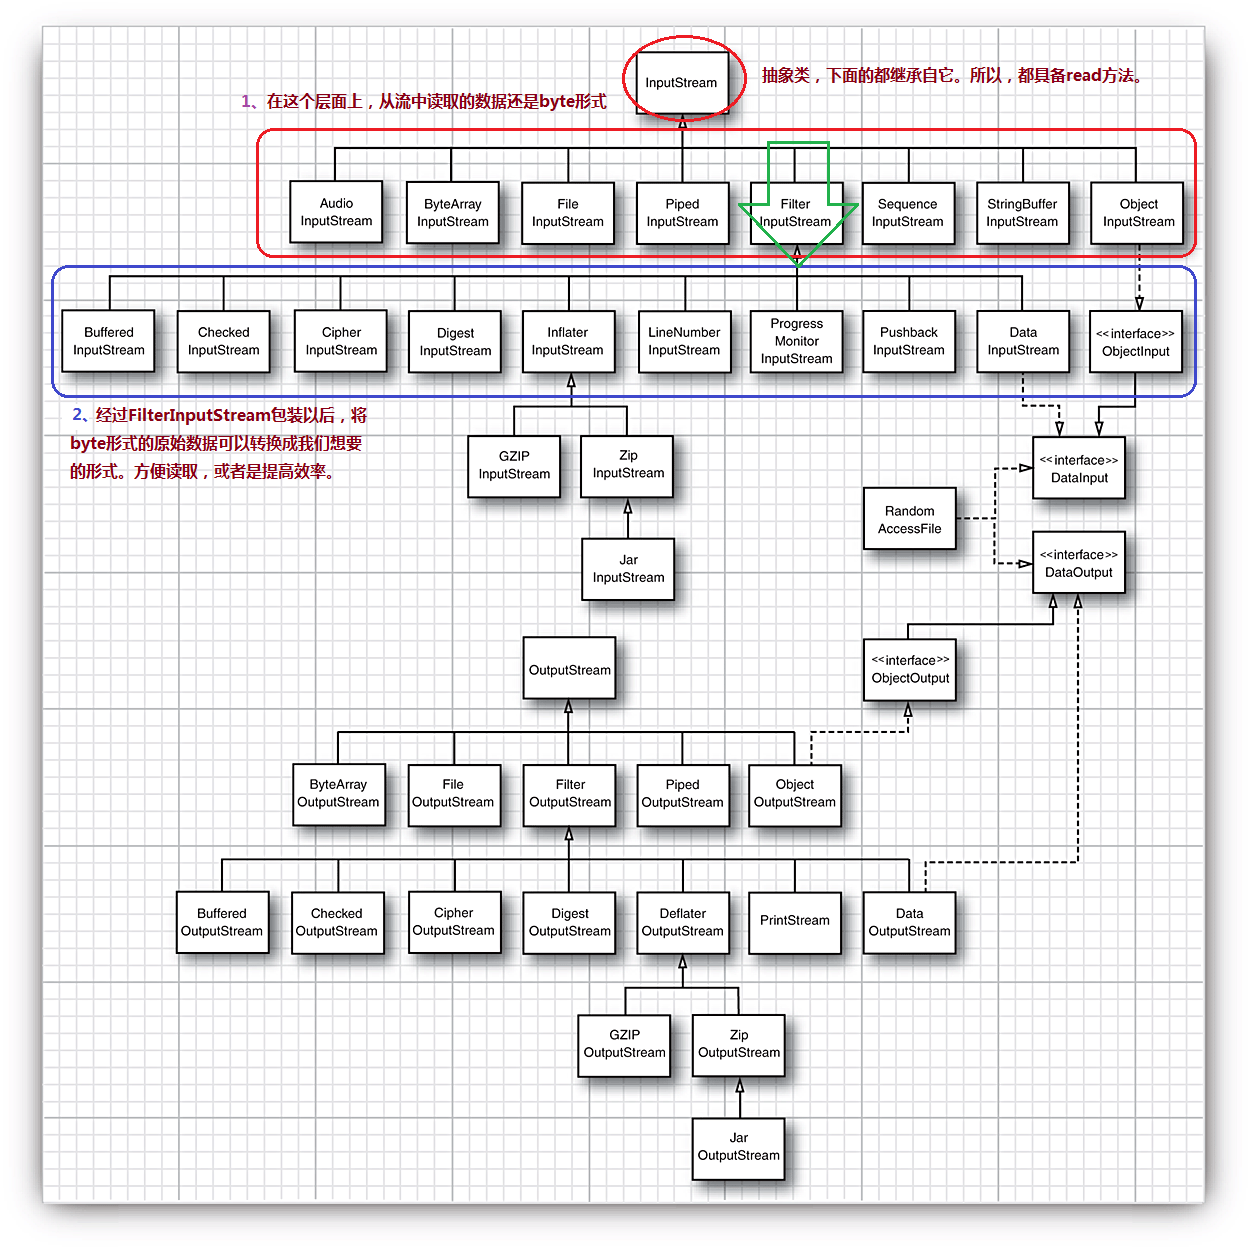
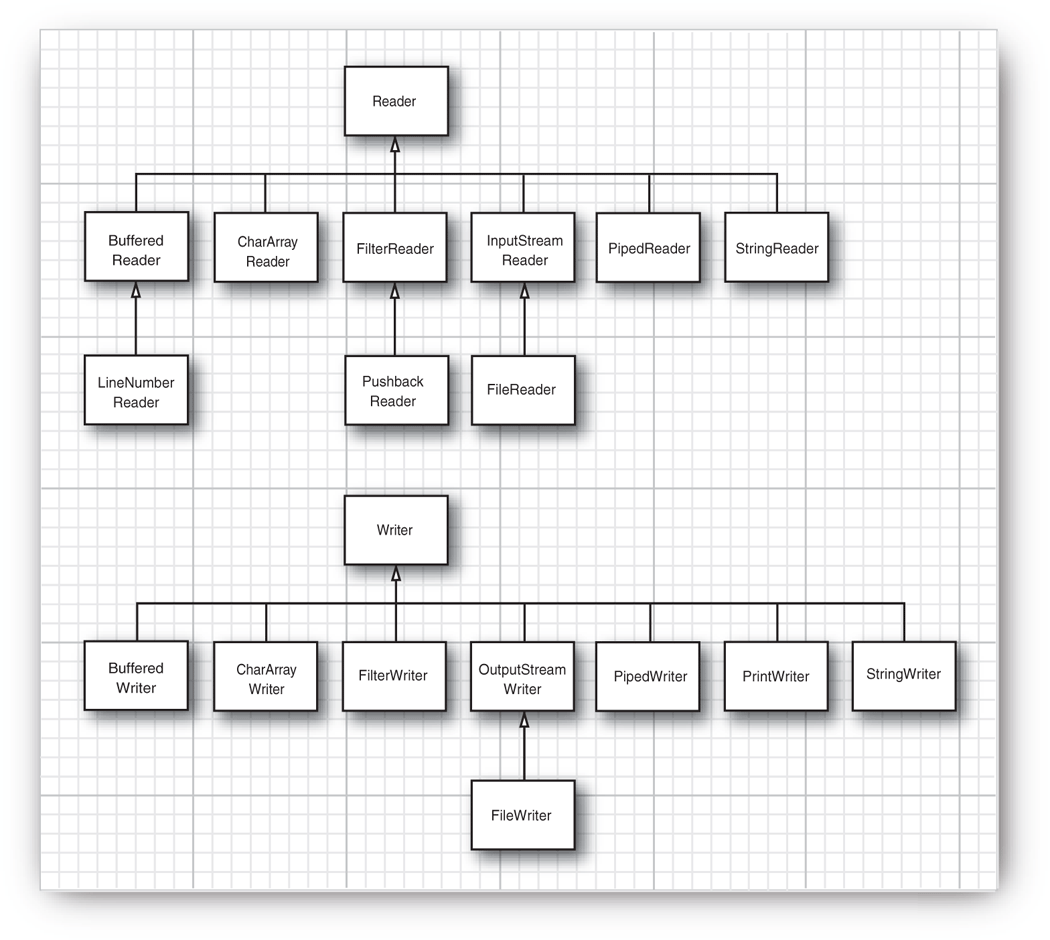
输入流与输出流
针对输入流,存在两个接口,分别是InputStream与Reader,两者差距是一个是处理子节,一个则是处理字符。在InputStream里面包含如下3个方法。
// 从输入流中读取单个字节,返回所读取的字节数据(字节数据可直接转换为int类型)
public abstract int read() throws IOException;

// 从输入流中最多读取b.length个字节的数据,并将其存储在字节数组b中,返回实际读取的字节数
public int read(byte b[]) throws IOException;

// 从输入流中最多读取len个字节的数据,并将其存储在数组b中
// 放入数组b中时,并不是从数组起点开始,而是从off位置开始,返回实际读取的字节数。
public int read(byte b[], int off, int len) throws IOException;
对应的在Reader中也包含类似的3个方法。
// 从输入流中读取单个字符,返回所读取的字符数据(字节数据可直接转换为int类型)。
int read();

// 从输入流中最多读取b.length个字符的数据,并将其存储在字节数组b中,返回实际读取的字符数。
int read(char[] b)

// 从输入流中最多读取len个字符的数据,并将其存储在数组b中,放入数组b中时,并不是从数组起点开始,而是从off位置开始,返回实际读取的字符数。
int read(char[] b,int off,int len);
对比InputStream和Reader所提供的方法,可以看到两个基类的功能基本是一样的。从代码上可以感受到,我们是使用一个byte数组或者一个char数组从流里面捞数据,捞完之后,相当于数据就存入了数组内,那么代码就可以针对捞出来的数据进行处理 。程序多次重复捞数据的动作,直到read(char[] chuf)或者read(byte[] b)方法返回-1,即表明到了输入流的结束点。
同样的,针对输出流存在两个接口,outputStream与Writer,分别处理字节与字符,在outputStream里面包含如下三个写数据的方法:
public abstract void write(int b) throws IOException;
public void write(byte b[]) throws IOException;
public void write(byte b[], int off, int len) throws IOException;
类似的,在Writer接口内也包含了如下三个写数据的核心方法:
public void write(int c) throws IOException
public void write(char cbuf[]) throws IOException
public void write(char cbuf[], int off, int len) throws IOException
InputStream/OutputStream和Reader/Writer的操作几乎一样,一般来说平常更多和字节打交道,用到字符流的场合不多。那么我们之后就重点来描述字节流。我们尝试使用流写一段代码,用最简单的方式去读取一个文件:
package com.zifang.ex.bust.chapter11.case1;

import java.io.FileInputStream;
import java.io.IOException;

/**
 * @author zifang
 */
public class ReadFile {
    public static void main(String[] args) throws IOException {
        FileInputStream fis = null;
        try {
            String filePath = "/Users/zifang/workplace/idea_workplace/JavaBust/src/main/resources/test.txt";
            //创建字节输入流
            fis=new FileInputStream(filePath);
            //创建一个长度为1024的数组
            byte[] b=new byte[1024];
            //用于保存的实际字节数
            int hasRead = 0;
            //使用循环来重复抠数据
            while((hasRead=fis.read(b))>0){
                //取出流里面的数据,然后将数据打印出来
                System.out.print(new String(b,0,hasRead));
            }
        }catch (IOException e){
            e.printStackTrace();
        } finally {
            fis.close();
        }
    }
}
同样的,我们使用最简单的方式去写入一个文件:
package com.zifang.ex.bust.chapter11.case1;

import java.io.FileOutputStream;
import java.io.IOException;

public class WriteFile {
    public static void main(String[] args) throws IOException {
        FileOutputStream fout = null;
        try {
            String filePath = "/Users/zifang/workplace/idea_workplace/JavaBust/src/main/resources/test_out.txt";
            //创建字节输入流
            fout=new FileOutputStream(filePath);
            fout.write("第一行".getBytes());
            fout.write("第二行".getBytes());
            fout.write("第三行".getBytes());
            fout.flush();
        }catch (IOException e){
            e.printStackTrace();
        } finally {
            fout.close();
        }
    }
}
FileOutputStream有一个重载的构造器:
public FileOutputStream(String name, boolean append){}
append来表达是否进行追加,不填默认是覆盖式的。
字节流与字符流
字节流和字符流使用是非常相似的,那么除了操作代码的不同之外,还有以下区别:
字节流在操作的时候本身是不会用到缓冲区的,是与文件本身直接操作的,而字符流在操作的时候是使用到缓冲区的。字节流在操作文件时,即使不关闭资源(close方法),文件也能输出,但是如果字符流不使用close方法的话,则不会输出任何内容,说明字符流用的是缓冲区,并且可以使用flush方法强制进行刷新缓冲区,这时才能在不close的情况下输出内容。
在所有的硬盘上保存文件或进行传输的时候都是以字节的方法进行的,包括图片也是按字节完成,而字符是只有在内存中才会形成的,所以使用字节的操作是最多的。如果要java程序实现一个拷贝功能,应该选用字节流进行操作(可能拷贝的是图片),并且采用边读边写的方式(节省内存)。
字节流字符流转换
虽然Java支持字节流和字符流,但有时需要在字节流和字符流两者之间转换。InputStreamReader和OutputStreamWriter,这两个为类是字节流和字符流之间相互转换的类。
InputSreamReader用于将一个字节流中的字节解码成字符,它有两个构造方法:
// 用默认字符集创建一个InputStreamReader对象
InputStreamReader(InputStream in);

// 接收已指定字符集名的字符串,并用该字符创建对象
InputStreamReader(InputStream in,String CharsetName);
OutputStream用于将写入的字符编码成字节后写入一个字节流,同样有两个构造方法:
OutputStreamWriter(OutputStream out);
用默认字符集创建一个OutputStreamWriter对象;
●  OutputStreamWriter(OutputStream out,String  CharSetName);
接收已指定字符集名的字符串,并用该字符集创建OutputStreamWrite对象
为了避免频繁的转换字节流和字符流,可以使用BufferedWriter与BufferedReader对以上两个类进行封装:
// BufferedWriter类封装了OutputStreamWriter类
BufferedWriter out=new BufferedWriter(new OutputStreamWriter(System.out));

// BufferedReader类封装了InputStreamReader类
BufferedReader in= new BufferedReader(new InputStreamReader(System.in)
从而可以利用下面的语句,可以从控制台读取一行字符串:
BufferedReader in=new BufferedReader(new InputStreamReader(System.in));
String line = in.readLine();
输入流与输出流转换
我们经常会遇到拿到一个输入流,然后不处理直接变成一个输出流,又或者将输入流内的数据抽出往输入流里面写入。类似于我们常见的文件拷贝,或者本地读取一个文件直接用网络发送出去都会遇到这个事儿。一般而言我们可以使用以下代码从输入流内获得数据:
private  static  void  copyStream(InputStream ips,OutputStream ops)  throws  Exception {
	byte [] buf =  new  byte [ 1024 ];
	int  len = ips.read(buf);
	while (len != - 1 ) {
		ops.write(buf, 0 ,len);
		len = ips.read(buf);
	}
}
如果你不想使用while干这个麻烦的事儿,也可以直接使用available方法获得所有的数据到内存中,再写出去。一般没什么问题,就怕输入流的数据的确很大,内存放不下。
private  static  void  copyStream(InputStream ips,OutputStream ops)  throws  Exception {
    byte [] buf =  new  byte [ ips.available() ];
    ips.read(buf);
    ops.write(buf);
}
基础流
文件流
@Test
public void test001() {
    FileInputStream fis = null;
    try {
        //创建文件字节输入流对象
        fis = new FileInputStream("/Users/zifang/workplace/idea_workplace/components/util-zex/src/main/resources/temp001.txt");
        //开始读
        int readData = 0;
        while ((readData = fis.read()) != -1) {
            System.out.println(readData);
        }
    } catch (IOException e) {
        e.printStackTrace();
    } finally {
        //在finally语句块中确保流一定关闭
        if (fis != null) {
            try {
                fis.close();
            } catch (IOException e) {
                e.printStackTrace();
            }
        }
    }
}
字节数组流
java.io.ByteArrayInputStream、java.io.ByteArrayOutputStream是可以将字节数组当作流输入来源、输出目的地的类。字节数组输出流在内存中创建一个字节数组缓冲区,所有发送到输出流的数据保存在该字节数组缓冲区中。可以看出这个一个类是专注于内存的,用于以IO流的方式来完成对字节数组的内容的读写,来支持类似内存虚拟文件或者内存映像文件的功能。这是这两个类存在的意义所在。创建字节数组输出流对象有以下几种方式:
// 创建一个32字节的默认大小的缓冲区
OutputStream out = new ByteArrayOutputStream();
// 另一个构造方法创建一个大小为 a 字节的缓冲区。
OutputStream out = new ByteArrayOutputStream(int a);
然后就可以使用以下的几个方法完成操作:
1) public void reset()
将此字节数组输出流的 count 字段重置为零,从而丢弃输出流中目前已累积的所有数据输出。
2) public byte[] toByteArray()
创建一个新分配的字节数组。数组的大小和当前输出流的大小,内容是当前输出流的拷贝。
3) public String toString()
将缓冲区的内容转换为字符串,根据平台的默认字符编码将字节转换成字符。
4) public void write(int w)
将指定的字节写入此字节数组输出流。
5) public void write(byte []b, int off, int len)
将指定字节数组中从偏移量 off 开始的 len 个字节写入此字节数组输出流。
6) public void writeTo(OutputStream outSt)
将此字节数组输出流的全部内容写入到指定的输出流参数中。
@Test
public void test002(){
    String str = "abcdef";

    ByteArrayInputStream in = new ByteArrayInputStream(str.getBytes());
    ByteArrayOutputStream out = new ByteArrayOutputStream();

    transform(in, out);

    System.out.println(out);
    System.out.println(Arrays.toString(out.toByteArray()));

    // 从键盘读,输出到显示器
    transform(System.in, System.out);
}

public static void transform(InputStream in, OutputStream out) {
    int ch = 0;

    try {
        while ((ch = in.read()) != -1) {
            int upperChar = Character.toUpperCase((char)ch);
            out.write(upperChar);
        } // close while
    } catch (Exception e) {
        e.printStackTrace();
    }
}
有时候我们需要对同一个InputStream对象使用多次,但第一次读取InputStream对象后,第二次再读取时可能已经到Stream的结尾了(EOFException)或者Stream已经close掉了。而InputStream对象本身不能复制,因为它没有实现Cloneable接口。此时,可以先把InputStream转化成ByteArrayOutputStream,后面要使用InputStream对象时,再从ByteArrayOutputStream转化回来就好了。
管道流
管道流用的比较少,个人感觉就是linux管道操作的一个对应的功能类:
cat aa.txt | grep "吃饭"
这里的|就是一个管道,一个管道沟通了两个进程。但是在java里面,在开发态,就没有进程的概念了,只有线程。因此管道流可以理解为是沟通了两个线程的东西。一个线程通过PipedOutputStream写入的数据可以被另一个线程通过相关联的PipedInputStream读取出来。需要注意的事儿是,当使用两个相关联的管道流时,需要将它们分配给不同的线程。read()方法和write()方法调用时会导致流阻塞,这意味着如果你尝试在一个线程中同时进行读和写,是会导致线程死锁的。
除了管道之外,一个JVM中不同线程之间还有许多通信的方式。实际上,线程在大多数情况下会传递完整的对象信息而非原始的字节数据。但是,如果你需要在线程之间传递字节数据,管道流是一个不错的选择。
@Test
public void test0003() throws IOException {
    /*定义管道字节流*/
    PipedInputStream  inputStream = new PipedInputStream();
    PipedOutputStream outputStream = new PipedOutputStream();

    inputStream.connect(outputStream);

    /*创建两个线程向管道流中读写数据*/
    new Thread(() -> {
        try {
            writeData(outputStream);
        } catch (IOException e) {
            e.printStackTrace();
        }
    }).start();

    new Thread(() -> {
        try {
            readData(inputStream);
        } catch (IOException e) {
            e.printStackTrace();
        }
    }).start();
}


public static void writeData(PipedOutputStream out) throws IOException {
    /*把0-100 之间的数写入管道中*/
    for (int i = 0; i < 100; i++) {
        String data = "-" + i;
        out.write(data.getBytes()); //把字节数组写入到输出管道流中
    }
    out.close();
}


public static void readData(PipedInputStream input) throws IOException {
    /*从管道中读取0-100*/
    byte[] bytes = new byte[1024];
    int len = input.read(bytes); //返回读到的字节数,如果没有读到任何数据返回-1
    while(len != -1){
        //把bytes数组中从0开始到len个字节转换为字符串打印出来
        System.out.println(new String(bytes,0,len));
        len = input.read(bytes); //继续从管道中读取数据
    }
    input.close();
}
合并流
合并流(SequenceInputStream):就是将两个输入流合并成一个输入流。读取的时候是先读第一个,读完了再读下面一个流。
@Test
public void test004(){
    //定义流
    SequenceInputStream sis = null;
    FileOutputStream fos = null;
    try {
        //创建合并流对象
        sis = new SequenceInputStream(
                new FileInputStream("/Users/zifang/workplace/idea_workplace/components/util-zex/src/main/resources/temp004_01.txt"),
                new FileInputStream("/Users/zifang/workplace/idea_workplace/components/util-zex/src/main/resources/temp004_02.txt"));
        //创建输出流对象
        fos = new FileOutputStream("/Users/zifang/workplace/idea_workplace/components/util-zex/src/main/resources/temp004.txt");
        //声明byte数组用于存储从输入流读取到的数据
        byte[] by = new byte[1024];
        //该变量纪录每次读取到的字符个数
        int len = 0;
        //读取输入流中的数据
        while((len = sis.read(by))!=-1){
            //输出从输入流中读取到的数据
            fos.write(by, 0, len);
        }
    }  catch (IOException e) {
        e.printStackTrace();
    }finally {
        //释放资源
        if (sis!=null){
            try {
                sis.close();
            } catch (IOException e) {
                e.printStackTrace();
            }
        }
        if (fos!=null){
            try {
                fos.close();
            } catch (IOException e) {
                e.printStackTrace();
            }
        }
    }
}
对象流
对象流的主要用作是对Java对象的序列化和反序列化的操作。序列化指的是将Java对象转换成字节序列的过程,反序列化则是将字节序列的数据恢复为Java对象的过程。在Java IO流中提供了两个对象流:ObjectInputStream和ObjectOutputStream,这两个类都属于字节流。其中ObjectOutputStream将Java对象以字节序列的形式写出到文件,实现对象的永久存储,它继承自OutputStream。ObjectInputStream是将之前使用ObjectOutputStream序列化的字节序列恢复为Java对象,它继承自InputStream。对于一个存在JVM中的对象来说,其内部的状态只是保存在内存中。当JVM退出之后,内存资源也就被释放,Java对象的内部状态也就丢失了。而在很多情况下,对象内部状态是需要被持久化的,将运行中的对象状态保存下来(最直接的方式就是保存到文件系统中),在需要的时候可以还原,即使是在Java虚拟机退出的情况下。除此之外,利用序列化机制可以使Java对象被网络传输,在网络的一端将对象序列化成字节流,经过网络传输到网络的另一端,可以从字节流重新还原为Java虚拟机中的运行状态中的对象。
java中一个对象要想序列化,该对象必须要实现Serializable接口,否则会抛出NotSerializableException异常。不希望序列化的字段则需要使用transient进行修饰。
我们来写出一个对象流,先定义Person类来承载数据:
import java.io.Serializable;

public class Person implements Serializable {
    private int id;
    private String name;
    private int age;

    public Person() {
    }

    public Person(int id, String name, int age) {
        this.id = id;
        this.name = name;
        this.age = age;
    }
    //getter、setter、toString方法省略
}
然后使用ObjectOutputStream来写出我们的字节流:
@Test
public void test005_1(){

    //定义对象流
    ObjectOutputStream oos = null;

    try {
        //创建对象流
        oos = new ObjectOutputStream(new FileOutputStream("/Users/zifang/workplace/idea_workplace/components/util-zex/src/main/resources/temp005.txt"));
        //序列化对象
        oos.writeObject(new Person(10001,"张三",20));
        oos.writeObject(new Person(10002,"李四",21));
        //刷新缓冲区
        oos.flush();
        System.out.println("序列化成功...");
    } catch (IOException e) {
        e.printStackTrace();
    }finally {
        //释放资源
        if (oos!=null){
            try {
                oos.close();
            } catch (IOException e) {
                e.printStackTrace();
            }
        }
    }
}
可以看到我们的数据已经写出到本地文件,内部是字节流,直接打开是看不懂的,需要借助反序列化类才能获得到其原始的样子。
@Test
public void test005_2(){
    //定义对象流
    ObjectInputStream ois = null;
    try {
        //创建对象输入流对象
        ois = new ObjectInputStream(new FileInputStream("/Users/zifang/workplace/idea_workplace/components/util-zex/src/main/resources/temp005.txt"));
        //反序列化对象
        Person person1 = (Person) ois.readObject();
        Person person2 = (Person) ois.readObject();
        System.out.println(person1);
        System.out.println(person2);
        System.out.println("反序列化成功...");
    } catch (IOException | ClassNotFoundException e) {
        e.printStackTrace();
    } finally {
        if (ois!=null){
            try {
                ois.close();
            } catch (IOException e) {
                e.printStackTrace();
            }
        }
    }
}
在使用ObjectInputStream反序列化时需要注意一点:在完成序列化操作后,如果对序列化对象进行了修改,比如增加某个字段,那么我们再进行反序列化就会抛出InvalidClassException异常,这种情况叫不兼容问题。解决的方法是:在对象中手动添加一个 serialVersionUID 字段,用来声明一个序列化版本号,之后再怎么添加属性也能进行反序列化,凡是实现Serializable接口的类都应该有一个表示序列化版本标识符的静态变量。
public class Person implements Serializable {
    //序列化版本号
    private static final long serialVersionUID = 5687485987455L;

    private int id;
    private String name;
    private int age;
    //getter、setter、toString、构造方法省略
}
音频流
AudioInputStream 是音频输入流,支持的文件格式有wav,au,和aiff。
package com.javanet.io;

import java.io.File;
import java.io.IOException;

import javax.sound.sampled.AudioFormat;
import javax.sound.sampled.AudioInputStream;
import javax.sound.sampled.AudioSystem;
import javax.sound.sampled.Clip;
import javax.sound.sampled.DataLine;
import javax.sound.sampled.LineUnavailableException;
import javax.sound.sampled.SourceDataLine;
import javax.sound.sampled.UnsupportedAudioFileException;
import javax.swing.JFrame;

import org.junit.Test;

public class TestInputStream extends JFrame {

	@Test
	public void testAudioInputStream() {
		File file;
		AudioInputStream ais = null;
		AudioFormat format;
		DataLine.Info info;
		SourceDataLine sdline = null;
		try {

			file = new File("D://Music//17.wav");
			ais = AudioSystem.getAudioInputStream(file);
			format = ais.getFormat();
			info = new DataLine.Info(SourceDataLine.class, format);
			sdline = (SourceDataLine) AudioSystem.getLine(info);
			sdline.open(format);
			sdline.start();

			int nBytesRead = 0;
			byte[] abData = new byte[524288];
			while (nBytesRead != -1) {
				nBytesRead = ais.read(abData, 0, abData.length);
				if (nBytesRead >= 0) {
					sdline.write(abData, 0, abData.length);
				}
			}


		} catch (UnsupportedAudioFileException | IOException | LineUnavailableException e) {
			e.printStackTrace();
		} finally {
			try {
				ais.close();
				//auline.drain()和auline.close()用来保证该声音文件播放完毕,如果去掉会出现声音未播放完即结束的情况。
				sdline.drain();
				sdline.close();
			} catch (IOException e) {
				e.printStackTrace();
			}
		}
	}

	@Test
	public void clipTest() {
		this.setDefaultCloseOperation(JFrame.EXIT_ON_CLOSE);
        this.setTitle("Test Sound Clip");
        this.setSize(300, 200);
        this.setVisible(true);

        try {

            // Open an audio input stream.
            // URL url = this.getClass().getResource("hello.wav");
            File file = new File("D://Music//17.wav");

            // AudioInputStream audioIn = AudioSystem.getAudioInputStream(url);
            AudioInputStream audioIn = AudioSystem.getAudioInputStream(file);
            // Get a sound clip resource.
            Clip clip = AudioSystem.getClip();
            // Open audio clip and load samples from the audio input stream.
            clip.open(audioIn);
            clip.start();
        } catch (UnsupportedAudioFileException e) {
            e.printStackTrace();
        } catch (IOException e) {
            e.printStackTrace();
        } catch (LineUnavailableException e) {
            e.printStackTrace();
        }
	}

	public static void main(String[] args) {
		new TestInputStream().clipTest();
	}
}
过滤流及其子类
FilterInputStream和FilterOutputStream分别是过滤输入流和过滤输出流,他们的作用是为基础流提供一些额外的功能。这里涉及到了装饰模式,装饰模式可以很方便的动态扩展一个对象的能力。
缓冲流
缓冲流是对一般的流的封装,按照字节/字符与输入/输出流的划分对应也有4个缓冲流,分别是BufferedInputStream,BufferedOutputStream,BufferedReader,BufferedWriter。例如子节缓冲流,可以使用构造函数传递一般流来构建缓冲流:
// 创建一个新的缓冲输入流
public BufferedInputStream(InputStream in){}
// 创建一个新的缓冲输出流
public BufferedOutputStream(OutputStream out){}
在使用上和其他的流别无二至,只不过缓冲流内部存在一个字节数组可以作为缓存,当每次read的量比较小,超过缓存的时候则触发从输入流获取一段数据缓存起来,以提高高频小数据量的读取效率。
推回输入流
我们之前描述过InputStream,这个东西你读到尾部,相当于就废了,你不能再干任何事儿,所以你可以使用ByteArrayInputStream去把InputStream的数据缓存一份,然后想第二次用的时候,拷贝一份就能继续使用了。而回推流则是可以帮助我们以更好的一种方式重复的使用一个输入流。 如下代码所示:
// 创建输入流管道
Reader reader = new FileReader("xxx.txt");
//  创建推回输入流并指定推回缓冲区大小为5,如果不指定,默认缓冲区大小为1。
PushbackReader push = new PushbackReader(reader,5);//该缓冲区大小不能小于被推回的数据,也就是现在的缓冲区只能存放5个字符,如若超出会报缓冲区溢出的异常。
char[] char2 = new char[5];	//创建长度为5的字符数组
System.out.println(push.read(chars));	//把输入流中读取到的数据存储进数组中
push.unread(char2);	//把char2数组推回缓冲区中
char[] char3 = new char[5];	//在创建长度为5的字符数组
System.out.println(push.read(char3));	//先读取缓冲区内的数据,所以读取到了之前推回缓冲区的那5个字符。
简单的说,unread(char[] cbuf) 方法会将数据复制到缓冲区,使得下一个读取,会读取缓冲区里面的数据,但读取完缓冲区的数据后,下一个读取又会回到之前记录指针记录到的位置开始。因此如果需要反复读取则需要反复进行unRead操作。PushbackInputStream类的常用方法有:
// 构造方法 将输入流放入到回退流之中
public PushbackInputStream(InputStream in{};
// 普通 读取数据
public int read(){}; throws IOException{}
// 普通方法 读取指定范围的数据
public int read(byte[] b,int off,int len) throws IOException{};
// 普通方法 回退一个数据到缓冲区前面
public void unread(int b) throws IOException{};
// 普通方法 回退一组数据到缓冲区前面
public void unread(byte[] b) throws IOException{};
// 普通方法 回退指定范围的一组数据到缓冲区前面
public void unread(byte[] b,int off,int len) throws IOException {};
数据流
DataInputStream和DataOutStream是数据流,可以很方便的将Java基本数据类型和String类型的数据写入到文件中。保留数据的同时也保留了数据类型,方便后期获取数据类型而不需要强转。如下代码所示:
import java.io.*;

/**
 * 数据流写入写出数据
 * 注意:用DataOutputStream写出的数据,必须用DataInputStream来读写
 *      写出的数据和读取的数据顺序必须保持一致,否则会抛出异常EOFException
 */
public class DataStreamTest {

    public static void main(String[] args) {
            wirteData();//写出数据
            readData();//读取数据
    }

    public static void wirteData() {
        //定义数据流
        DataOutputStream dos = null;
        try {
            //创建数据输出流对象
            dos = new DataOutputStream(new FileOutputStream("D:\\IO\\data.txt"));
            //写出数据
            dos.writeUTF("张三");
            dos.writeInt(20);
            dos.writeBoolean(true);
            dos.writeDouble(99999999.99);
        } catch (IOException e) {
            e.printStackTrace();
        } finally {
            if (dos!=null){
                try {
                    dos.close();
                } catch (IOException e) {
                    e.printStackTrace();
                }
            }
        }
    }

    public static void readData() {
        //定义数据流
        DataInputStream dis = null;
        try {
            //创建数据输入流对象
            dis = new DataInputStream(new FileInputStream("D:\\IO\\data.txt"));
            //写入数据
            String name = dis.readUTF();
            int age = dis.readInt();
            boolean isMale = dis.readBoolean();
            double money = dis.readDouble();
            //打印
            System.out.println("name:"+name);
            System.out.println("age:"+age);
            System.out.println("isMale:"+isMale);
            System.out.println("money:"+money);

        } catch (IOException e) {
            e.printStackTrace();
        }

    }
}
压缩流
压缩流的继承体系相比其他流较为复杂,这里先展示一下他们之间的关系:
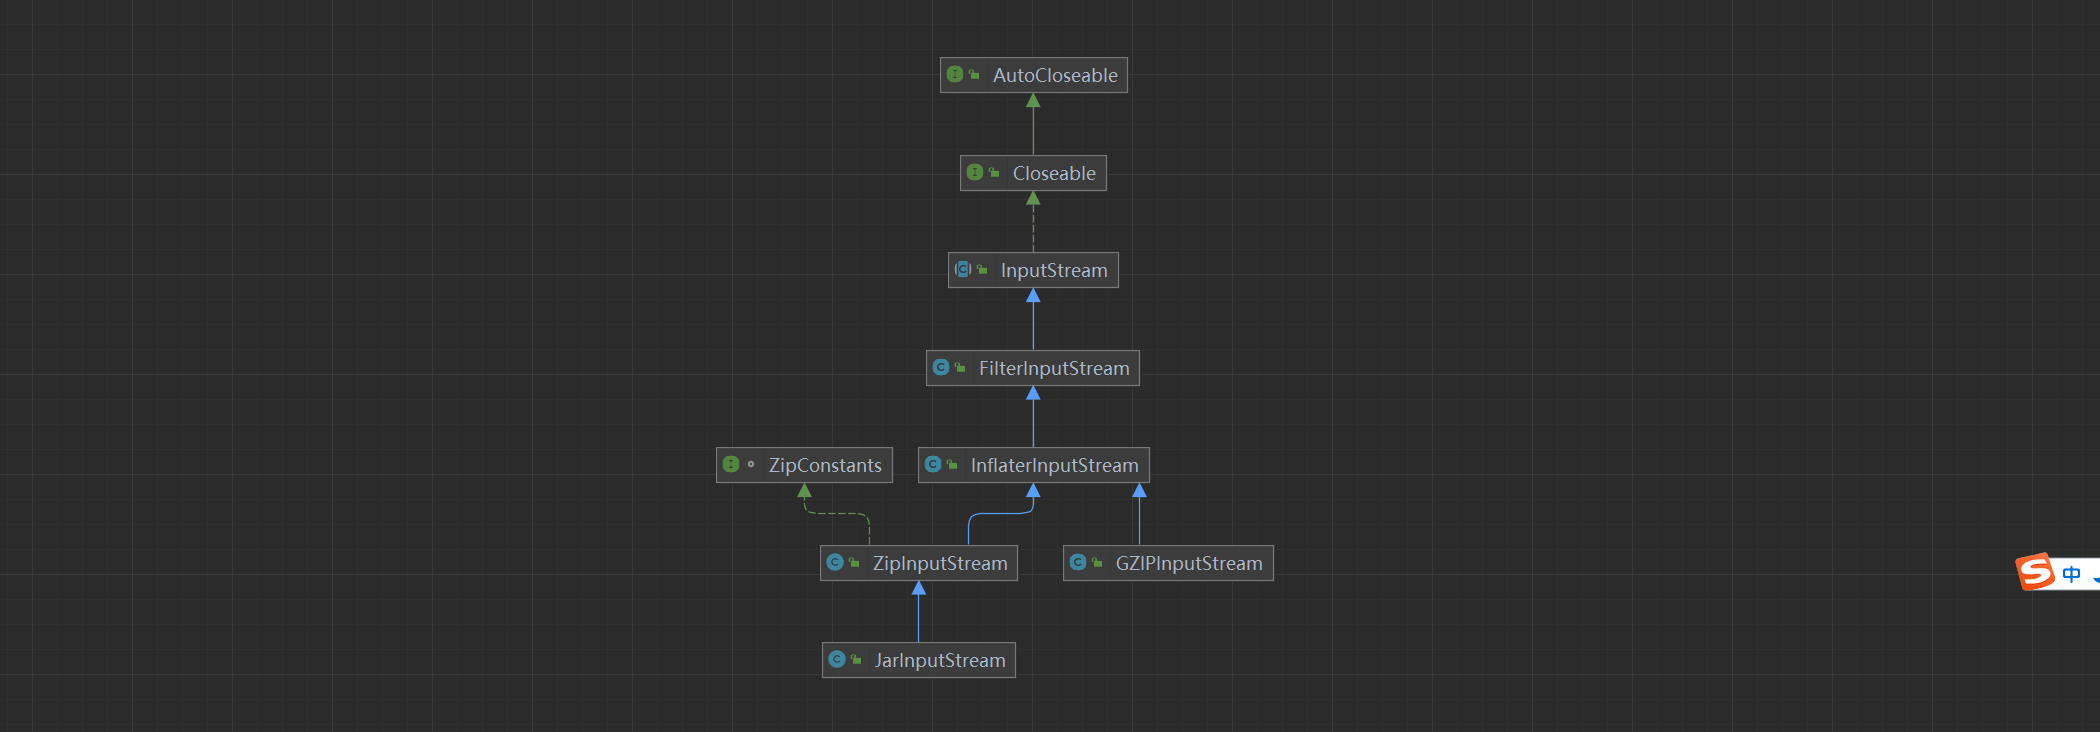
InflaterInputStream是解压缩输入流,其继承子类都具备解压缩能力。其子类有两个,分别是Gzip与Zip的解压缩。其中Jar也是一种zip,因此JarInputStream算作Zip解压缩流的子类,可以读取Jar文件中的内容,它比Zip多了一个Manifest条目。而Manifest 可用于存储有关 JAR 文件及其条目的元信息。这里提供ZipInputStream测试代码:
import java.util.zip.*;
import java.io.*;

public class ZipIt {
    public static void main(String args[]) throws IOException {
        if (args.length < 2) {
            System.err.println("usage: java ZipIt Zip.zip file1 file2 file3");
            System.exit(-1);
        }
        File zipFile = new File(args[0]);
        if (zipFile.exists()) {
            System.err.println("Zip file already exists, please try another");
            System.exit(-2);
        }
        FileOutputStream fos = new FileOutputStream(zipFile);
        ZipOutputStream zos = new ZipOutputStream(fos);
        int bytesRead;
        byte[] buffer = new byte[1024];
        CRC32 crc = new CRC32();
        for (int i=1, n=args.length; i < n; i++) {
            String name = args[i];
            File file = new File(name);
            if (!file.exists()) {
                System.err.println("Skipping: " + name);
                continue;
            }
            BufferedInputStream bis = new BufferedInputStream(
                new FileInputStream(file));
            crc.reset();
            while ((bytesRead = bis.read(buffer)) != -1) {
                crc.update(buffer, 0, bytesRead);
            }
            bis.close();
            // Reset to beginning of input stream
            bis = new BufferedInputStream(
                new FileInputStream(file));
            ZipEntry entry = new ZipEntry(name);
            entry.setMethod(ZipEntry.STORED);
            entry.setCompressedSize(file.length());
            entry.setSize(file.length());
            entry.setCrc(crc.getValue());
            zos.putNextEntry(entry);
            while ((bytesRead = bis.read(buffer)) != -1) {
                zos.write(buffer, 0, bytesRead);
            }
            bis.close();
        }
        zos.close();
    }
}
打印流
PrintStream是打印流,可以实现将任何数据类型的数据格式转为字符串输出。它是输出信息最为方便的类。打印流分为两种:字节打印流PrintStream、字符打印流PrintWriter。它们的内部提供了提供了一系列重载的print()和println()方法,用于多种数据类型的输出。我们最先接触的system.out中的print()和println()方法都是PringStream中的。
打印流的一些特点不负责数据源,只负责数据目的,也不会抛出IOException,但是可能抛出其他异常。执行写入之后会有自动flush的能力。以下是其测试代码:
import java.io.*;

public class PrintStreamTest {

    public static void main(String[] args) throws IOException {

        //打印流输出基本数据类型、字符串
        PrintStream ps1 = new PrintStream("D:\\IO\\print.txt");
        ps1.println(666);
        ps1.println(123.456);
        ps1.println(123456789L);
        ps1.println("中国牛逼");
        ps1.close();

        //打印流输出目的是流对象
        FileOutputStream fos = new FileOutputStream("D:\\IO\\print1.txt");
        PrintStream ps2 = new PrintStream(fos,true);//加个true表示开启自动flush功能
        ps2.print("China Niubility");
        ps2.close();

        //打印流复制文本
        BufferedReader br=new BufferedReader(new FileReader("D:\\IO\\print.txt"));
        PrintWriter pw=new PrintWriter(new FileWriter("D:\\IO\\printofcopy.txt"),true);
        String line =null;
        while((line=br.readLine())!=null){
            pw.println(line);
        }
        pw.close();
        br.close();
    }
}
随机存储文件流
RandomAccessFile是随机存储文件流,它是一个非常特殊的流,程序可以直接跳到文件的任意位置来读写数据。 因此如果我们希望只访问文件的部分内容,那就可以使用RandomAccessFile类。RandomAccessFile类的构造方法如下所示:
// 创建随机存储文件流,文件属性由参数File对象指定
public RandomAccessFile(File file , String mode){}
// 创建随机存储文件流,文件属性由指定名称的文件读取
public RandomAccessFile(String name , String mode){}
这两个构造方法均涉及到一个String类型的参数mode,它决定随机存储文件流的操作模式,其中mode值及对应的含义如下:
1)“r”:以只读的方式打开,调用该对象的任何write(写)方法都会导致IOException异常。
2)“rw”:以读、写方式打开,支持文件的读取或写入。若文件不存在,则创建之。
3)“rws”:以读、写方式打开,与“rw”不同的是,还要求对文件内容或元数据的每个更新都同步写入到底层设备。这里的“s”表示synchronous(同步)的意思
4)“rwd”:以读、写方式打开,与“rw”不同的是,还要对文件内容的每次更新都同步更新到潜在的存储设备中去。使用“rwd”模式仅要求将文件的内容更新到存储设备中,而使用“rws”模式除了更新文件的内容,还要更新文件的元数据(metadata),因此至少要求1次低级别的I/O操作
这里写一个测试代码:
import java.io.*;

/**
 * @author Administrator
 * @date 2020-02-29
 * @desc 随机存储流
 */
public class RandomAccessFileTest {

    public static void main(String[] args) throws IOException {

        //随机流读数据--r
        RandomAccessFile raf1 = new RandomAccessFile("D:\\IO\\RAF.txt", "r");
        byte[] buffer1 = new byte[1024];
        int len1;
        while ((len1=raf1.read(buffer1))!=-1){
            System.out.println(new String(buffer1,0,len1));
        };

        //随机流写数据--rw
        RandomAccessFile raf2 = new RandomAccessFile("D:\\IO\\RAF1.txt", "rw");
        byte[] buffer2 = new byte[1024];
        int len2;
        while ((len2=raf1.read(buffer2))!=-1){//注意这里是raf1,因为从RAF.txt读取数据,输出到RAF1.txt中
            raf2.write(buffer2,0,len2);
        };

        raf1.close();
        raf2.close();
    }
}
RandomAccessFile还有一个特殊的地方是它包含了一可以从超大的文本中快速定位我们的游标,用于标记当前读写处的位置。当前读写n个字节后,文件指示器将指向这n个字节后面的下一个字节处。除此之外,RandomAccessFile是可以自由的移动记录指针,即可以向前移动,也可以向后移动。RandomAccessFile包含了以下两个方法来操作文件的记录指针:
// 返回文件记录指针的当前位置
long getFilePointer(){};
// 将文件记录指针定位到pos位置
void seek(long pos){};
我们用上面的api试试:
import java.io.*;

public class RandomAccessFileMethodTest1 {

        public  static void main(String[] args) {
            RandomAccessFile raf=null;
            try {
                raf=new RandomAccessFile("D:\\IO\\test.txt","r");
                // 获取 RandomAccessFile对象文件指针的位置,初始位置为0
                System.out.print("输入内容:"+raf.getFilePointer());
                //移动文件记录指针的位置
                raf.seek(2);

                byte[] b=new byte[1024];
                int len=0;
                //循环读取文件
                while((len=raf.read(b))>0){
                    //输出文件读取的内容
                    System.out.print(new String(b,0,len));
                }
            }catch (IOException e){
                e.printStackTrace();
            }finally {
                try {
                    raf.close();
                } catch (IOException e) {
                    e.printStackTrace();
                }
            }
        }
}
使用RandomAccessFile实现向文件中追加内容的功能如下:
import java.io.*;

public class RandomAccessFileMethodTest2 {

    public  static void main(String[] args)throws IOException {
        RandomAccessFile raf=null;
        File file=null;
        try {
            // 以读写的方式打开一个RandomAccessFile对象
            raf=new RandomAccessFile("D:\\IO\\test.txt","rw");
            //将记录指针移动到该文件的最后
            raf.seek(raf.length());
            //向文件末尾追加内容
            raf.writeUTF("【这是追加内容】");
        }catch (IOException e){
            e.printStackTrace();
        }finally {
            raf.close();
        }
    }
}
使用RandomAccessFile实现向文件指定位置插入内容的功能
注:RandomAccessFile不能向文件的指定位置插入内容,如果直接将文件记录指针移动到中间某位置后开始输出,则新输出的内容会覆盖文件原有的内容,如果需要向指定位置插入内容,程序需要先把插入点后面的内容写入缓存区,等把需要插入的数据写入到文件后,再将缓存区的内容追加到文件后面。
import java.io.*;

/**
 * @author Administrator
 * @date 2020-02-29
 * @desc 随机存储流中的游标方法使永示例
 */
public class RandomAccessFileMethodTest3 {

    public  static void main(String[] args)throws IOException {
        insert("D:\\IO\\test.txt",10,"【插入指定位置指定内容】");
    }

    /**
     * 插入文件指定位置的指定内容
     * @param filePath 文件路径
     * @param pos  插入文件的指定位置
     * @param insertContent 插入文件中的内容
     * @throws IOException
     */
    public static void insert(String filePath,long pos,String insertContent)throws IOException{
        RandomAccessFile raf=null;
        File tmp= File.createTempFile("temp",null);
        tmp.deleteOnExit();
        try {
            // 以读写的方式打开一个RandomAccessFile对象
            raf = new RandomAccessFile(new File(filePath), "rw");
            //创建一个临时文件来保存插入点后的数据
            FileOutputStream fileOutputStream = new FileOutputStream(tmp);
            FileInputStream fileInputStream = new FileInputStream(tmp);
            //把文件记录指针定位到pos位置
            raf.seek(pos);
            raf.seek(pos);
            //------下面代码将插入点后的内容读入临时文件中保存-----
            byte[] buffer = new byte[64];
            //用于保存实际读取的字节数据
            int len = 0;
            //使用循环读取插入点后的数据
            while ((len = raf.read(buffer)) != -1) {
                //将读取的内容写入临时文件
                fileOutputStream.write(buffer, 0, len);
            }
            //-----下面代码用于插入内容 -----
            //把文件记录指针重新定位到pos位置
            raf.seek(pos);
            //追加需要插入的内容
            raf.write(insertContent.getBytes());
            //追加临时文件中的内容
            while ((len = fileInputStream.read(buffer)) != -1) {
                //将读取的内容写入临时文件
                raf.write(buffer, 0, len);
            }
        }catch (Exception e){
            throw  e;
        }
    }
}
上面的程序使用File类的createTempFile方法创建了一个临时文件(该文件将在JVM退出后被删除),用于保存被插入点后面的内容。程序先将文件中插入点后的内容读入临时文件中,然后重新定位到插入点,将需要插入的内容添加到文件后面,最后将临时文件的内容添加到文件后面,通过这个过程就可以向指定文件,指定位置插入内容。每次运行上面的程序,都会看到test.txt文件中多了一行内容。
加密流
CipherInputStream是一种基于密码的输入流,用于加密或解密数据流。它可以与其他输入流结合使用,将数据流加密或解密。CipherInputStream使用javax.crypto.Cipher加密引擎来处理数据流的加密或解密操作。它接收一个已初始化的Cipher对象作为参数,并使用该Cipher对象来进行相应的加密或解密操作。以下是CipherInputStream的说明和使用示例:
import javax.crypto.Cipher;
import javax.crypto.CipherInputStream;
import javax.crypto.spec.SecretKeySpec;
import java.io.FileInputStream;
import java.io.FileOutputStream;
import java.io.InputStream;
import java.io.OutputStream;
import java.security.Key;
import java.util.Base64;

public class CipherInputStreamExample {
    public static void main(String[] args) throws Exception {
        // 定义密钥
        String keyString = "0123456789ABCDEF";
        Key key = new SecretKeySpec(keyString.getBytes(), "AES");

        // 初始化加密引擎
        Cipher cipher = Cipher.getInstance("AES/ECB/PKCS5Padding");
        cipher.init(Cipher.ENCRYPT_MODE, key);

        // 创建输入流和输出流
        InputStream inputStream = new FileInputStream("input.txt");
        OutputStream outputStream = new FileOutputStream("output.txt");

        // 创建CipherInputStream
        CipherInputStream cipherInputStream = new CipherInputStream(inputStream, cipher);

        // 读取加密的数据,并写入输出流
        byte[] buffer = new byte[1024];
        int bytesRead;
        while ((bytesRead = cipherInputStream.read(buffer)) != -1) {
            outputStream.write(buffer, 0, bytesRead);
        }

        // 关闭流
        cipherInputStream.close();
        inputStream.close();
        outputStream.close();
    }
}
通过类似的方式,您也可以使用CipherInputStream来进行数据流的解密操作,只需将Cipher对象的加密模式设置为Cipher.DECRYPT_MODE即可。
NIO
前面我们介绍的各种IO操作的类,都是通过字节的移动来读取数据写入数据的。这种流会有一种特征:当你是用InputStrem的read方法去获得到数据的时候,当没有有效数据(例如从网络上获得到的InputStream,本地的文件流还没有被系统准备好的时候)可以被read的场合,会阻塞当前线程的执行。而我们这部分介绍的NIO的出现,赋予输入输出这种行为新的特性,这部分会放在java.nio包下。并且对以前的很多IO类作为基础进行了改写。
NIO简介
NIO采用内存映射的方式来处理输入/输出,它可以将文件的一部分或者全部映射到内存中,这样一来就像操作内存一样来操作文件了。NIO的包有以下几个核心部分组成:
- java.nio包,提供Buffer相关的类
- java.nio.channels,包含Chennel类与Selector相关的类
- java.nio.charset,包含各种编码相关的类
- java.nio.channels.spi包,包含提供Channel服务相关的类
- java.nio.charset.spi,包含各种编码相关的服务类
从概念上来说,数据处理领域下,NIO主要有两个概念:Buffer缓冲与channel通道。Channel通道的概念就是类比于之前的输入输出流,是一种承载数据的管道。它提供map的方式,将一块儿数据映射到内存。但是和Channel通道打交道的必须是Buffer缓冲,Buffer缓冲类似于我们之前使用的数组到输入流里面掏数据。NIO除此之外,还提供了将UNICODE字符串映射为字节序列以及逆映射操作的Charset类。
NIO真正大放异彩的地方是网络编程,在网络编程的模块会详细描述这部分知识。
BIO与NIO的底层策略模式
比方说,我们使用BIO进行数据的拷贝:
public class IOFileCopy {

    private static final int BUFFER_SIZE = 1024;

    public static void copyFile(String source, String target) {
        long start = System.currentTimeMillis();
        try(InputStream in = new FileInputStream(new File(source));
            OutputStream out = new FileOutputStream(new File(target))) {
            byte[] buffer = new byte[BUFFER_SIZE];
            int len;
            while ((len = in.read(buffer)) > 0) {
                out.write(buffer, 0, len);
            }

            System.out.println(String.format("IO file copy cost %d msc", System.currentTimeMillis() - start));
        } catch (Exception e) {
            e.printStackTrace();
        }
    }
}
传统IO中文件读取过程可以分为以下几步:
- 内核从磁盘读取数据到缓冲区,这个过程由磁盘操作器通过DMA操作将数据从磁盘读取到内核缓冲区,该过程不依赖CPU
- 用户进程在将数据从内核缓冲区拷贝到用户空间缓冲区
- 用户进程从用户空间缓冲区读取数据

反观NIO进行文件拷贝有两种实现方式,一是通过管道,二是通过文件内存内存映射。
第一种是管道,也就是Channel,它的transferFrom方法可以帮助我们进行数据的拷贝:
public class NIOFileCopy {

    public static void copyFile(String source, String target) {
        long start = System.currentTimeMillis();
        try(FileChannel input = new FileInputStream(new File(source)).getChannel();
            FileChannel output = new FileOutputStream(new File(target)).getChannel()) {
            output.transferFrom(input, 0, input.size());
        } catch (Exception e) {
            e.printStackTrace();
        }

        System.out.println(String.format("NIO file copy cost %d msc", System.currentTimeMillis() - start));
    }
}
第二种是文件内存映射,将内核空间地址与用户空间的虚拟地址映射到同一个物理地址,DMA 硬件可以填充对内核与用户空间进程同时可见的缓冲区了。用户进程直接从内存中读取文件内容,应用只需要和内存打交道,不需要进行缓冲区来回拷贝,大大提高了IO拷贝的效率。加载内存映射文件所使用的内存在Java堆区之外
public class NIOFileCopy2 {

    public static void copyFile(String source, String target) {
        long start = System.currentTimeMillis();
        try(FileInputStream fis = new FileInputStream(new File(source));
            FileOutputStream fos = new FileOutputStream(new File(target))) {
            FileChannel sourceChannel = fis.getChannel();
            FileChannel targetChannel = fos.getChannel();
            MappedByteBuffer mappedByteBuffer = sourceChannel.map(FileChannel.MapMode.READ_ONLY, 0, sourceChannel.size());
            targetChannel.write(mappedByteBuffer);
        } catch (FileNotFoundException e) {
            e.printStackTrace();
        } catch (IOException e) {
            e.printStackTrace();
        }

        System.out.println(String.format("NIO memory reflect file copy cost %d msc", System.currentTimeMillis() - start));
        File targetFile = new File(target);
        targetFile.delete();
    }
}
NIO的内存映射实际上就是少了一次从内核空间拷贝到用户空间的过程,将对用户缓冲区的读改为从内存读取。

Buffer操作类
Buffer类的核心概念
现在我们可以把Buffer类假想成一个基础数组操作的封装。事实上我们集合里面的List子类也是干这个事儿的。只不过Buffer倾向于数据的管理,集合倾向于数据对象的管理。集合内的个体可以拿来就用,但是Buffer这种管理数据的,是需要拿到其管理下的一部分或者全部来投入使用。除此之外我们的基本位运算符处理的就更细了 ,但是这么琢磨下来,上面描述的三种处理"集合数据"本质上是一回事儿。你也可以封装出方便的处理数据的类。
Buffer的方法设计非常不人性化,又引入了很多麻烦的概念,至少我学一遍忘一遍,demo写一遍忘一遍,要用的时候总要再看看源码或者文档才能把代码写出来。这样的话Buffer的处理每到一个新的框架内,设计者就会会变着法子再抽象一套出来,例如Netty。
在NIO技术的缓冲区中,存在4个核心技术点,分别是:
- capacity(容量)
- limit(限制)
- position(位置)
- mark(标记)
光看名字根本不知道这是个什么东西。我们先引入一个小demo,来直观的感受下我们的Buffer是个什么东西:
byte[] byteArray = new byte[] { 1, 2, 3 };
ByteBuffer bytebuffer = ByteBuffer.wrap(byteArray);
System.out.println(Arrays.toString(bytebuffer.array())); //打印出 [1, 2, 3]
ByteBuffer就是Buffer的一个子类,而获得ByteBuffer的方式就是使用ByteBuffer去把一个Byte数组吃掉,然后返回一个ByteBuffer。其背后就是在ByteBuffer内存储了一份数组。然后我们所有的相关方法取自ByteBuffer来完成我们要干的事情。有了这个铺垫我们再来看看上面提到的4个核心信息是个什么。
第一个是缓冲区的capacity,它代表包含元素的数量。用上面这个例子来简单的说就是ByteBuffer吃进去的数组长度多少,capacity就是多少。那么问题来了,Buffer下的所有的数据都可以进行访问处理吗?这个和最初的设计有关。我们之前提到Buffer可以通过某种方式对本地文件进行映射,那么这部分的数据是不是应该有限制?啥场景?就像锁住一部分数据给某个线程玩儿,锁住另外一部分给另外一个线程玩儿。怎么控制?limit就是干这个事儿的,limit表达缓冲区中的限制代表第一个不应该读取或写入元素的index,也就是处理的数据的位置的上限。有下限没有?没有,这就很让人生气,既有的Buffer设计让人感到奇怪,别扭。position有点像是下限的标记的意思,表达当前的此缓冲区的位置,啥意思呢,我们读取数据是按照顺序一个一个往下读的,当前停在那个位置上,下次就从这个位置往后挪一步。是不是有点像是游标的含义?mark呢,相当于在byte数组的某个位置上打个标记,等到合适的时候配合一些既有的方法让position回退到mark的位置上。
从上面的描述上来看,我们就可以从数值上出现下面的公式:0≤mark≤position≤limit≤capacity,其中limit和position可以人为地主动更改,不必在乎任何事儿,只要满足上面的不等式即可。光说没感觉,我们上个demo,来看看这部分相关的api是怎么玩儿的。
public class NioTest001 {

  public static void main(String[] args) throws Exception {
    // 我们定义出一个数组,里面10个参数
    byte[] byteArray = new byte[] { 0, 1, 2 , 3, 4, 5,6 ,7,8,9};
    ByteBuffer bytebuffer = ByteBuffer.wrap(byteArray);

    // 我们先打印初始化的时候的各个核心参数的数值
    print4Point(bytebuffer); // 打印:mark:-1|position:0|limit:10|capacity:10

    // 然后我们故意来读取数据
    readTimes(bytebuffer, 3);
    print4Point(bytebuffer); // 打印:mark:-1|position:3|limit:10|capacity:10
    // mark一下
    bytebuffer.mark();
    print4Point(bytebuffer); // 打印:mark:3|position:3|limit:10|capacity:10
    // 缩小limit
    bytebuffer.limit(8);
    print4Point(bytebuffer); // 打印:mark:3|position:3|limit:8|capacity:10
    // 手动调整position
    bytebuffer.position(5);
    print4Point(bytebuffer); // 打印:mark:3|position:5|limit:8|capacity:10
  }

  // 读取i次
  private static void readTimes(ByteBuffer bytebuffer, int i) {
    for(int j = 0;j<i;j++){
      bytebuffer.get();
    }
  }

  public static void print4Point(ByteBuffer byteBuffer) throws Exception {
    // mark的值没有显式的获取方式,我们用反射直接获取
    Field field = Buffer.class.getDeclaredField("mark");
    field.setAccessible(true);
    int markValue = (Integer) field.get(byteBuffer);

    System.out.println(
            "mark:"+markValue+"|" +
            "position:"+byteBuffer.position()+"|"+
            "limit:"+byteBuffer.limit()+"|"+
            "capacity:"+byteBuffer.capacity());
  }

}
从上面的demo就可以感受到ByteBuffer里面这4个核心的参数是个什么东西了。
这里呢,我们还有一个小的逻辑闭环没有处理,就是limit和position是可以人为调整的,那么limit调整的时候会对mark,position有什么影响呢?position调整会对mark有什么影响呢?看来还是要做demo试试看。
// 当前状况是 mark:3|position:5|limit:8|capacity:10
// 现在故意将limit调整到2
bytebuffer.limit(2);
print4Point(bytebuffer); // 打印:mark:-1|position:2|limit:2|capacity:10
可以看到,mark被丢弃了,成为了-1,position被归置到和limit一样的位置上。
// 当前状况是 mark:3|position:5|limit:8|capacity:10
// 现在故意将position调整到2
bytebuffer.position(2);
print4Point(bytebuffer); // mark:-1|position:2|limit:8|capacity:10
可以看到当我们调整了position,mark同样被丢弃了。可以看出来,mark但凡被触碰,就会被挤出去,直接被抛弃。capacity下,limit最牛逼,可以掌控position和mark的命运。position被limit挤,会变成和position一样的位置上。
除此之外我们还有一些重要的方法在这里说一下。
Buffer的剩余空间
我们手上有mark,position,limit,capacity,当前的缓冲区真正可以被读取的是介于position与limit之间的,所以Buffer类干脆就给我们一个方法 Buffer#remaining()来获得当前这个这个缓冲区还有多少数据量是可以访问的。其背后的算法很简单,就是limit - postion的值。
Buffer的初始化
java.nio.Buffer是抽象类,并不能直接实例化,他有7个子类,这7个子类的声明信息如下:
public abstract class ByteBuffer extends Buffer{}
public abstract class CharBuffer extends Buffer{}
public abstract class DoubleBuffer extends Buffer{}
public abstract class FloatBuffer extends Buffer{}
public abstract class IntBuffer extends Buffer{}
public abstract class LongBuffer extends Buffer{}
public abstract class ShortBuffer extends Buffe{}
所有的Buffer子类除了布尔,其他都是和我们java的基础类型一一对应。我们一般常用的是ByteBuffer,后面大部分场景都是使用这个类来作为切入口。
7个子类还是抽象类,不能直接制造其类,因此我们只能借助其他方式。
逻辑上,应该先介绍一下怎么进行Buffer的初始化再开始描述我们的Buffer的各种性质,但是ByteBuffer自身的概念实在有点麻烦,如果不先描述这些概念很难理解Buffer创建时候的各种参数。
ByteBuffer#wrapper
第一种,也是最简单最容易理解的一种,我们代码内部制造了一个byte数组,然后调用ByteBuffer.wrapper(byte[]array)方法进行管理。这种管理方式实际上是管理了传入数组的引用,因此在外部对数组进行更改,也会影响到ByteBuffer的数据,反之亦然。新制造这个ByteBuffer的时候,capacity和limit将为传入数组的长度,其位置position将为0,其标记mark是不确定的。
ByteBuffer.wrapper(byte[]array)方法还有一个重载方法,即,ByteBuffer.wrap(byte[]array,int offset,int length),使用这个方法制造出来的ByteBuffer的capacity将为array.length,其position为offset(0<offset<=array.length),limit为offset+length(0<length<=array.length-offset)。我们扒开源码看看:
public static ByteBuffer wrap(byte[] array, int offset, int length){
    try {
        return new HeapByteBuffer(array, offset, length);
    } catch (IllegalArgumentException x) {
        throw new IndexOutOfBoundsException();
    }
}

HeapByteBuffer(byte[] buf, int off, int len) {
    super(-1, off, off + len, buf.length, buf, 0);// 调用下面的父类方法
}

ByteBuffer(int mark, int pos, int lim, int cap, byte[] hb, int offset)
{
  super(mark, pos, lim, cap); // 调用下面的父类方法
  this.hb = hb;
  this.offset = offset;
}

Buffer(int mark, int pos, int lim, int cap) {
  if (cap < 0)
    throw new IllegalArgumentException("Negative capacity: " + cap);
  this.capacity = cap;
  limit(lim);
  position(pos);
  if (mark >= 0) {
    if (mark > pos)
      throw new IllegalArgumentException("mark > position: ("
                                         + mark + " > " + pos + ")");
    this.mark = mark;
  }
}
从上面的调用链可以看出来,ByteBuffer#wrapper的方式制造出来的真正子类是HeapByteBuffer,从名字上就可以看出来这是一种堆内的缓冲。
ByteBuffer#allocate
第二种,直接向堆申请一个缓冲。
ByteBuffer byteBuffer3 = ByteBuffer.allocate(100);
我们扒开源码看看:
public static ByteBuffer allocate(int capacity) {
  if (capacity < 0)
  	throw new IllegalArgumentException();
  return new HeapByteBuffer(capacity, capacity);
}

HeapByteBuffer(int cap, int lim) {
 	 super(-1, 0, lim, cap, new byte[cap], 0);
}
发现这种方式和ByteBuffer#wrapper本质上是一样的,也同样获得到一个HeapByteBuffer,只不过数组是在其内部被创建的。
ByteBuffer#allocateDirect
第三种,看名字,是申请了直接缓冲,啥是直接缓冲?这就是ByteBuffer迷人的地方了。我们扒开源码看看:
public static ByteBuffer allocateDirect(int capacity) {
	return new DirectByteBuffer(capacity);
}

DirectByteBuffer(int cap) {

    super(-1, 0, cap, cap);
    boolean pa = VM.isDirectMemoryPageAligned();
    int ps = Bits.pageSize();
    long size = Math.max(1L, (long)cap + (pa ? ps : 0));
    Bits.reserveMemory(size, cap);

    long base = 0;
    try {
        base = unsafe.allocateMemory(size);
    } catch (OutOfMemoryError x) {
        Bits.unreserveMemory(size, cap);
        throw x;
    }
    unsafe.setMemory(base, size, (byte) 0);
    if (pa && (base % ps != 0)) {
        // Round up to page boundary
        address = base + ps - (base & (ps - 1));
    } else {
        address = base;
    }
    cleaner = Cleaner.create(this, new Deallocator(base, size, cap));
    att = null;
}

// Unsafe类,native方法,再往前追溯就是JVM的C的实现了,后面我们开始调试JVM源码的时候会详细描述
public native long allocateMemory(long var1);
感受一下,这里真正产生"缓存"的地方最核心的语句就是 base = unsafe.allocateMemory(size);。base是什么?系统级别的内存基地址,相当于JVM开辟了一个系统内存级别的缓存,而不是JVM内部的堆上。unsafe类是个神奇的类,专门干底层的事情,多线程模块会详细描述这个类的高级用法。
Buffer初始化的方式比较
Buffer初始化的方式本质上只分为两种:直接缓冲区和非直接缓冲区。
我们先说说直接缓冲区,这个也是最具有技术含量的方式。其内部使用sun.misc.Unsafe类进行值的处理。而Unsafe类的作用是JVM与操作系统进行直接通信。直接缓冲区操作的数据不在JVM堆中,而是在内核空间中,这样提高运行效率。通过allacateDirect()的方式制造缓冲区的方式,背后进行内存的分配和释放所需的时间成本通常要高于非直接缓冲区,但运行效率远比非直接高。那为啥我们的NIO要引入这样的特性来完成看似简单的缓存呢?本质上是因为直接缓冲区提高运行效率的原理是每次调用基于操作系统的I/O操作之前或之后,JVM都会尽量避免将缓冲区的内容复制到中间缓冲区,或者从中间缓冲区中获取内容,这样就节省了一个步骤。
因此与此相对的非直接缓冲区是在内部直接对数组进行操作,并且是在JVM的堆中进行数组处理。每个人都可以制造出这样的byte数组操作工具类,没什么技术含量。
因为这里会有直接缓冲区的概念,当你拿到一个Buffer的时候,实际上你可能不知道这个Buffer是不是直接缓冲区,你可以使用Byffer#isDirect的方式来判定它是不是一个直接缓冲区。除此之外呢,还有个隐蔽的判定,就是直接缓冲区背后是没有可操作的数组的,因此可以使用Buffer#hasArray来判定是否有底层实现的数组。
除此之外你也可以选择是否创建出一个只读缓冲区。
byte[] byteArrayIn = { 1, 2, 3, 4, 5 };
ByteBuffer bytebuffer1 = ByteBuffer.wrap(byteArrayIn);
ByteBuffer bytebuffer2 = bytebuffer1.asReadOnlyBuffer();
调用asReadOnlyBuffer方法就可以将原本没有限制的缓冲区转换为只读缓冲区,这里注意,bytebuffer1与bytebuffer2背后的数组引用是一样的。所以针对bytebuffer1的数据更新是会反映到bytebuffer2的。与这个方法配套的Buffer#isReadOnly方法可以判定当前的缓冲区是否是一个只读缓冲区。
ByteBuffer类的使用
写入读出缓冲区
ByteBuffer是一个缓存,概念上可以将其认为背后是一个byte数组。我们对于缓存的数据操作分两种,写入与读出,分别为put和get的动作。这两个方法会有很多重载方法,而重载是针对相对位置操作和绝对位置的区分,各自重载的方法都有对应的另外一种操作。
ByteBuffer#put(byte b) 与 ByteBuffer#get()
这个配套方法是针对相对位置的操作。ByteBuffer#put(byte b)方法的作用是将给定的字节写入此缓冲区的position,然后position递增。ByteBuffer#get()方法的作用是类似的,在position的位上进行读取操作,获得position上的字节,然后position递增。
ByteBuffer#put(byte[]src,int offset,int length) 与 ByteBuffer#get(byte[]dst,int offset,intlength)
put(byte[]src,int offset,int length)方法是基于相对位置进行批量put操作,此方法将把给定源数组中的字节传输到此缓冲区当前位置中。在传输前会进行判定,当前的缓冲区是否可以存的下你put进去的数据。如果从该数组中复制的字节多于此缓冲区中的剩余字节( 即length>remaining() ),则不传输字节且将抛出BufferOverflowException异常。否则,此方法将给定数组中,从offset开始的length个字节复制到此缓冲区中。
ByteBuffer#get(byte[]dst,int offset,intlength)方法是基于相对位置进行批量get操作,此方法将此缓冲区当前位置的字节传输到给定的目标数组中。如果此缓冲中剩余的字节少于满足请求所需的字节( 即length>remaining() ),则不传输字节且抛出BufferUnderflowException异常。否则,此方法将此缓冲区中的length个字节复制到给定数组中。从此缓冲区的当前位置和数组中的给定偏移量位置开始复制。然后,此缓冲区的位置将增加length。
    public ByteBuffer get(byte[] dst, int offset, int length) {
        checkBounds(offset, length, dst.length);
        if (length > remaining())
            throw new BufferUnderflowException();
        int end = offset + length;
        for (int i = offset; i < end; i++)
            dst[i] = get();
        return this;
    }
看一眼源码,我们就能很清晰地看到这部分的逻辑。
ByteBuffer#put(byte[]src)和ByteBuffer#get(byte[]dst)
这个重载方法也很好理解,一口气把一个数组的数据丢进去,背后本质上就是调用了ByteBuffer#put(byte[]src,int offset,int length) 和 ByteBuffer#get(byte[]dst,int offset,intlength),其中offset=0,intlength = src.length。
put(int index,byte b) 和 get(int index)
上面描述的都是相对位置的处理,这里的这个方法增加了index,相当于是绝对位置的处理。put和get的绝对位置处理不会更改当前position的值,put方法也不会像ArrayList一样在指定位置插入一个值,而是在该位置上进行替换值。
put(ByteBuffer src)
put(ByteBuffer src)方法是相对位置处理的批量put方法,此方法将给定源缓冲区中的剩余字节传输到此缓冲区的当前位置中。如果源缓冲区中的剩余字节多于此缓冲区中的剩余字节,即src.remaining()>remaining(),则不传输字节且抛出BufferOverflowException异常。否则,此方法将给定缓冲区中的n=src.remaining()个字节复制到此缓冲区中,从每个缓冲区的当前位置开始复制。然后,这两个缓冲区的位置都增加n。
putXX()和getXX()
这种形式的类方法可以帮助我们直接放入基本数据,根据基本类型数据的长度,自动移动position
// 用来写入char值的相对put方法。将两个包含指定char值的字节按照当前的字节顺序写入到此缓冲区的当前位置,然后将该位置增加2。
putChar(char value){};
// 用于写入char值的绝对put方法。将两个包含给定char值的字节按照当前的字节顺序写入到此缓冲区的给定索引处。
putChar(int index,char value){};
// 用于写入double值的相对put方法。将8个包含给定double值的字节按照当前的字节顺序写入到此缓冲区的当前位置,然后将该位置增加8
putDouble(double value)方法的作用:。
putDouble(int index,double value)方法的作用:用于写入double值的绝对put方法(可选操作)。将8个包含给定double值的字节按照当前的字节顺序写入到此缓冲区的给定索引处。
putFloat(float value)方法的作用:用于写入float值的相对put方法(可选操作)。将4个包含给定float值的字节按照当前的字节顺序写入到此缓冲区的当前位置,然后将该位置增加4。
putFloat(int index,float value)方法的作用:用于写入float值的绝对put方法(可选操作)。将4个包含给定float值的字节按照当前的字节顺序写入到此缓冲区的给定索引处。
putInt(int value)方法的作用:用于写入int值的相对put方法(可选操作)。将4个包含给定int值的字节按照当前的字节顺序写入到此缓冲区的当前位置,然后将该位置增加4。
putInt(int index,int value)方法的作用:用于写入int值的绝对put方法(可选操作)。将4个包含给定int值的字节按照当前的字节顺序写入到此缓冲区的给定索引处。
putLong(long value)方法的作用:用于写入long值的相对put方法(可选操作)。将8个包含给定long值的字节按照当前的字节顺序写入到此缓冲区的当前位置,然后将该位置增加8。
putLong(int index,long value)方法的作用:用于写入long值的绝对put方法(可选操作)。将8个包含给定long值的字节按照当前的字节顺序写入到此缓冲区的给定索引处。
putShort(short value)方法的作用:用于写入short值的相对put方法(可选操作)。将两个包含指定short值的字节按照当前的字节顺序写入到此缓冲区的当前位置,然后将该位置增加2。
putShort(int index,short value)方法的作用:用于写入short值的绝对put方法(可选操作)。将两个包含给定short值的字节按照当前的字节顺序写入到此缓冲区的给定索引处。
还原缓冲区:clear()
Buffer#clear方法的作用是还原缓冲区到初始的状态,包含将位置设置为0,将限制设置为容量,并丢弃标记,回退到最开始的样子。
反转缓冲区:flip()
Buffer#flip()方法的作用是反转此缓冲区。首先将限制设置为当前位置,然后将位置设置为0。如果已定义了标记,则丢弃该标记。
一般我们称filp()为“切换成读模式”
重绕缓冲区:rewind()
Buffer#rewind方法的作用是重绕此缓冲区。将位置设置为0并丢弃标记。
压缩缓冲区:compact()
将缓冲区的当前位置和限制之间的字节(如果有)复制到缓冲区的开始处,即将索引p=position()处的字节复制到索引0处,将索引p+1处的字节复制到索引1处,依此类推,直到将索引limit() - 1处的字节复制到索引n=limit()-1-p处。然后,将缓冲区的位置设置为n+1,并将其限制设置为其容量。如果已定义了标记,则丢弃它。将缓冲区的位置设置为复制的字节数,而不是0,以便调用此方法后可以紧接着调用另一个相对put方法。
复制缓冲区:duplicate()
ByteBuffer duplicate()方法的作用:创建共享此缓冲区内容的新的字节缓冲区。新缓冲区的内容将为此缓冲区的内容。此缓冲区内容的更改在新缓冲区中是可见的,反之亦然。在创建新的缓冲区时,容量、限制、位置和标记的值将与此缓冲区相同,但是这两个缓冲区的位置、界限和标记值是相互独立的。当且仅当此缓冲区为直接缓冲区时,新缓冲区才是直接缓冲区。当且仅当此缓冲区为只读时,新缓冲区才是只读的。
比较缓冲区
缓冲区也是一个对象,需要和其他的对象进行比较。一般Object#equal负责这个事情。在缓冲区内其比较方式有两种,分别是Buffer#equals()和Buffer#compareTo()。我们把他们的源码拿出来:
public boolean equals(Object ob) {
    if (this == ob)
        return true;
    if (!(ob instanceof ByteBuffer))
        return false;
    ByteBuffer that = (ByteBuffer)ob;
    if (this.remaining() != that.remaining())
        return false;
    int p = this.position();
    for (int i = this.limit() - 1, j = that.limit() - 1; i >= p; i--, j--)
        if (!equals(this.get(i), that.get(j)))
            return false;
    return true;
}
public int compareTo(ByteBuffer that) {
    int n = this.position() + Math.min(this.remaining(), that.remaining());
    for (int i = this.position(), j = that.position(); i < n; i++, j++) {
        int cmp = compare(this.get(i), that.get(j));
        if (cmp != 0)
            return cmp;
    }
    return this.remaining() - that.remaining();
}
从equals()方法的源代码中可以分析出运算的4个主要逻辑。
1)判断是不是自身,如果是自身,则返回为true。
2)判断是不是ByteBuffer类的实例,如果不是,则返回false。
3)判断remaining()值是否一样,如果不一样,则返回false。
4)判断两个缓冲区中的position与limit之间的数据是否完全一样,只要有一个字节不同,就返回false,否则返回true。
通过源代码来看,两个缓冲区的capacity可以不相同,说明equals()方法比较的是position到limit的内容是否完全一样。
从compareTo(ByteBuffer that)方法的源代码中可以分析出运算的3个主要逻辑。
1)判断两个ByteBuffer的范围是从当前ByteBuffer对象的当前位置开始,以两个ByteBuffer对象最小的remaining()值结束说明判断的范围是remaining的交集。
2)如果在开始与结束的范围之间有一个字节不同,则返回两者的减数。
3)如果在开始与结束的范围之间每个字节都相同,则返回两者remaining()的减数。
通过源代码来看,两个缓冲区的capacity可以不相同,这个特性和equals()方法一致。
转换缓冲区
我们有时候拿到的是最原始的ByteBuffer,如果我们需要处理数据,直接处理Byte不是个好招,我们需要针对既有的缓冲区进行转换,变换为我们要用的类型的Buffer。ByteBuffer下有很多asXXXBuffer(),和基本数据类型的种类是对上的。例如asIntBuffer(),这个方法可以创建这个字节缓冲区的视图。新缓冲区的内容将从此缓冲区的当前位置开始,他们的内部数据内容是共享,但是这两个缓冲区的位置、限制和标记值是相互独立的。新制造出来的缓冲区,位置为0,其容量和限制将为此缓冲区中所剩余的字节数的1/4,标记被抹除。除此之外,当此缓冲区为直接缓冲区时,新缓冲区也会是直接缓冲区,当此缓冲区为只读时,新缓冲区也会是只读的。
Channel通道
通道主要就是用来传输数据的通路,NIO技术中的数据要放在缓冲区中进行管理,再使用通道将缓冲区中的数据传输到目的地。Buffer类的子类只有ByteBuffer和CharBuffer比较常用,其他缓冲区类的API也差不多。从Buffer类的继承关系来看,结构还是比较具有规律性的,但Channel接口的继承结构相对来讲就比较复杂了。在后续我们会详细描述。
Channel继承体系
Channel是一种对数据管道的抽象,在不同系统上其实现逻辑是不一样的,因此Channel本身是一个接口,先看看Channel本身的继承体系:

可以看到Channel与我们一般的io流类似,实现了Closeable与AutoCloseable接口,表示其可自动关闭。其代码如下:
public interface Channel extends Closeable {

    public boolean isOpen();

    public void close() throws IOException;
}
可以看到Channel接口仅定义了两个方法,提供是否打开的判断与关闭通道的行为。接下来我们将Channel的接口体系拿出来:
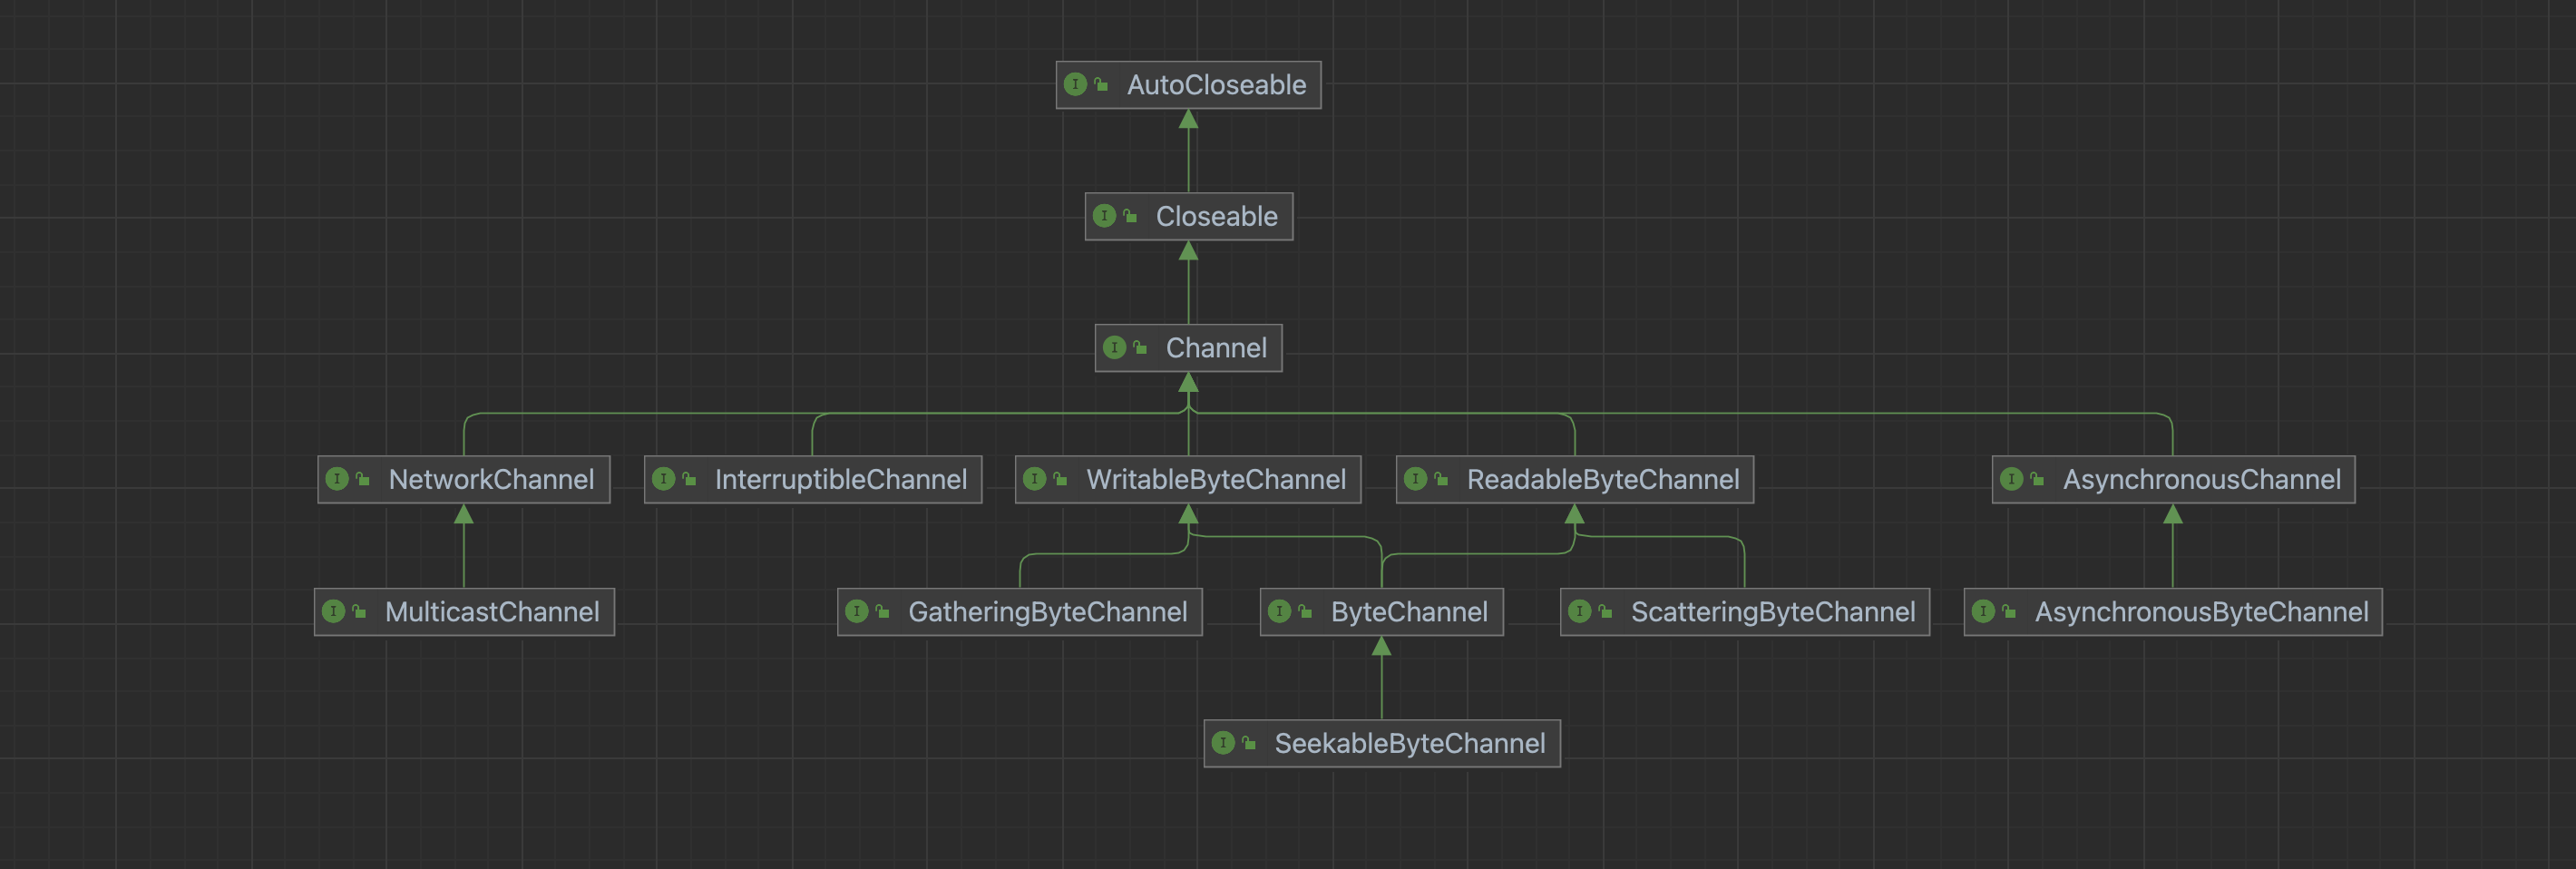
接下来我们仔细认识一下这些子类。
异步通道
AsynchronousChannel接口的作用是使通道支持异步I/O操作,如下是接口的源码,可以看到其没有新增方法,因此可以理解为它就是个标记接口。
public interface AsynchronousChannel extends Channel{
    @Override
    void close() throws IOException;
}
当一个通道实现了可异步或可关闭相关的接口时,如果调用这个正在I/O操作通道中的closs方法,将会导致I/O操作发生失败,并且出现Asynchronous CloseException异常。异步通道在多线程并发的情况下是线程安全的。某些通道的实现是可以支持并发读和写的,但是不允许在一个未完成的I/O操作上再次调用read或write操作。
直接实现自AsynchronousChannel的AsynchronousByteChannel接口的主要作用是使通道支持异步I/O操作,操作单位为字节。
public interface AsynchronousByteChannel extends AsynchronousChannel{

    <A> void read(ByteBuffer dst, A attachment, CompletionHandler<Integer,? super A> handler);

    Future<Integer> read(ByteBuffer dst);

    <A> void write(ByteBuffer src, A attachment, CompletionHandler<Integer,? super A> handler);

    Future<Integer> write(ByteBuffer src);
}
从AsynchronousByteChannel的接口定义上就能理解所谓的异步大致是什么样的。其实现方式有两种,一种是提供Future对象,一种是使用回调。
可读通道
ReadableByteChannel接口的主要作用是使通道允许对字节进行读操作。我们看下其源码:
public interface ReadableByteChannel extends Channel {

    public int read(ByteBuffer dst) throws IOException;
}
ReadableByteChannel定义了读取接口,必须配合ByteBuffer进行读取。该接口只允许有1个读操作在进行。如果1个线程正在1个通道上执行1个read操作,那么任何试图发起另一个read操作的线程都会被阻塞,直到第1个read操作完成。其他类型的I/O操作是否可以与read操作同时进行,取决于通道的类型。
实现自ReadableByteChannel的ScatteringByteChannel接口,可以说是它能力扩展,主要作用是可以从通道中读取字节到多个缓冲区中。
public interface ScatteringByteChannel extends ReadableByteChannel{
    public long read(ByteBuffer[] dsts, int offset, int length) throws IOException;
    public long read(ByteBuffer[] dsts) throws IOException;
}
可写通道
与ReadableByteChannel对应的就是可写通道,即WritableByteChannel接口,以下是其源码:
public interface WritableByteChannel extends Channel{
    public int write(ByteBuffer src) throws IOException;
}
WritableByteChannel必须使用ByteBuffer进行写入操作,实现自WritableByteChannel的GatheringByteChannel同样在原有基础上增强了接口能力,其主要作用是可以将多个缓冲区中的数据写入到通道中:
public interface GatheringByteChannel extends WritableByteChannel {

        public long write(ByteBuffer[] srcs, int offset, int length) throws IOException;

        public long write(ByteBuffer[] srcs) throws IOException;
}
读写通道
在设计上将读写能力分开了,但是对于通道而言可读可写的能力同时具备是一个很正常的事情,因此这里有个ByteChannel�,实现可读可写能力,后面的子类可直接实现ByteChannel即可,可以看到ByteChannel仅仅是对接口做了聚合处理。
public interface ByteChannel extends ReadableByteChannel, WritableByteChannel {}
直接实现自ByteChannel的SeekableByteChannel接口扩展了ByteChannel的能力,其主要作用是在字节通道中维护position,以及允许position发生改变。
public interface SeekableByteChannel extends ByteChannel {

    @Override
    int read(ByteBuffer dst) throws IOException;

    @Override
    int write(ByteBuffer src) throws IOException;

    long position() throws IOException;

    SeekableByteChannel position(long newPosition) throws IOException;

    long size() throws IOException;

    SeekableByteChannel truncate(long size) throws IOException;
}
网络通道
NetworkChannel是网络通道,主要作用是使通道与Socket进行关联,使通道中的数据能在Socket技术上进行传输。该接口中的bind方法用于将Socket绑定到本地地址,getLocalAddress方法返回绑定到此Socket的SocketAddress对象,并可以结合setOption和getOption方法用于设置和查询Socket相关的选项。
public interface NetworkChannel extends Channel {
    NetworkChannel bind(SocketAddress local) throws IOException;

    SocketAddress getLocalAddress() throws IOException;

    <T> NetworkChannel setOption(SocketOption<T> name, T value) throws IOException;

    <T> T getOption(SocketOption<T> name) throws IOException;

    Set<SocketOption<?>> supportedOptions();
}
继承自NetworkChannel的MulticastChannel同样与网络有关,主要作用是使通道支持IP多播。IP多播就是将多个主机地址进行打包,形成一个组,然后将IP报文向这个组进行发送,也就相当于同时向多个主机传输数据。
public interface MulticastChannel extends NetworkChannel{

    @Override
    void close() throws IOException;

    MembershipKey join(InetAddress group, NetworkInterface interf) throws IOException;

    MembershipKey join(InetAddress group, NetworkInterface interf, InetAddress source) throws IOException;
}
可中断通道
InterruptibleChannel 是可中断通道的含义,该接口的主要作用是使通道能以异步的方式进行关闭与中断。当通道实现了asynchronously和closeable特性的情况下,如果一个线程在一个能被中断的通道上出现了阻塞状态,那么当其他线程调用这个通道的close方法时,这个呈阻塞状态的线程将接收到AsynchronousCloseException异常。在这个基础上同时还实现了interruptible特性的话,如果一个线程在一个能被中断的通道上出现了阻塞状态,那么当其他线程调用这个阻塞线程的interrupt方法后,通道将被关闭,这个阻塞的线程将接收到ClosedByInterruptException异常,这个阻塞线程的状态一直是中断状态。
public interface InterruptibleChannel extends Channel {
    public void close() throws IOException;
}
FileChannel
前面介绍了NIO核心接口的作用,这里拿具体的一个实现类看看他的详细,这里我们挑选FileChannel。先看看FileChannel的继承关系:
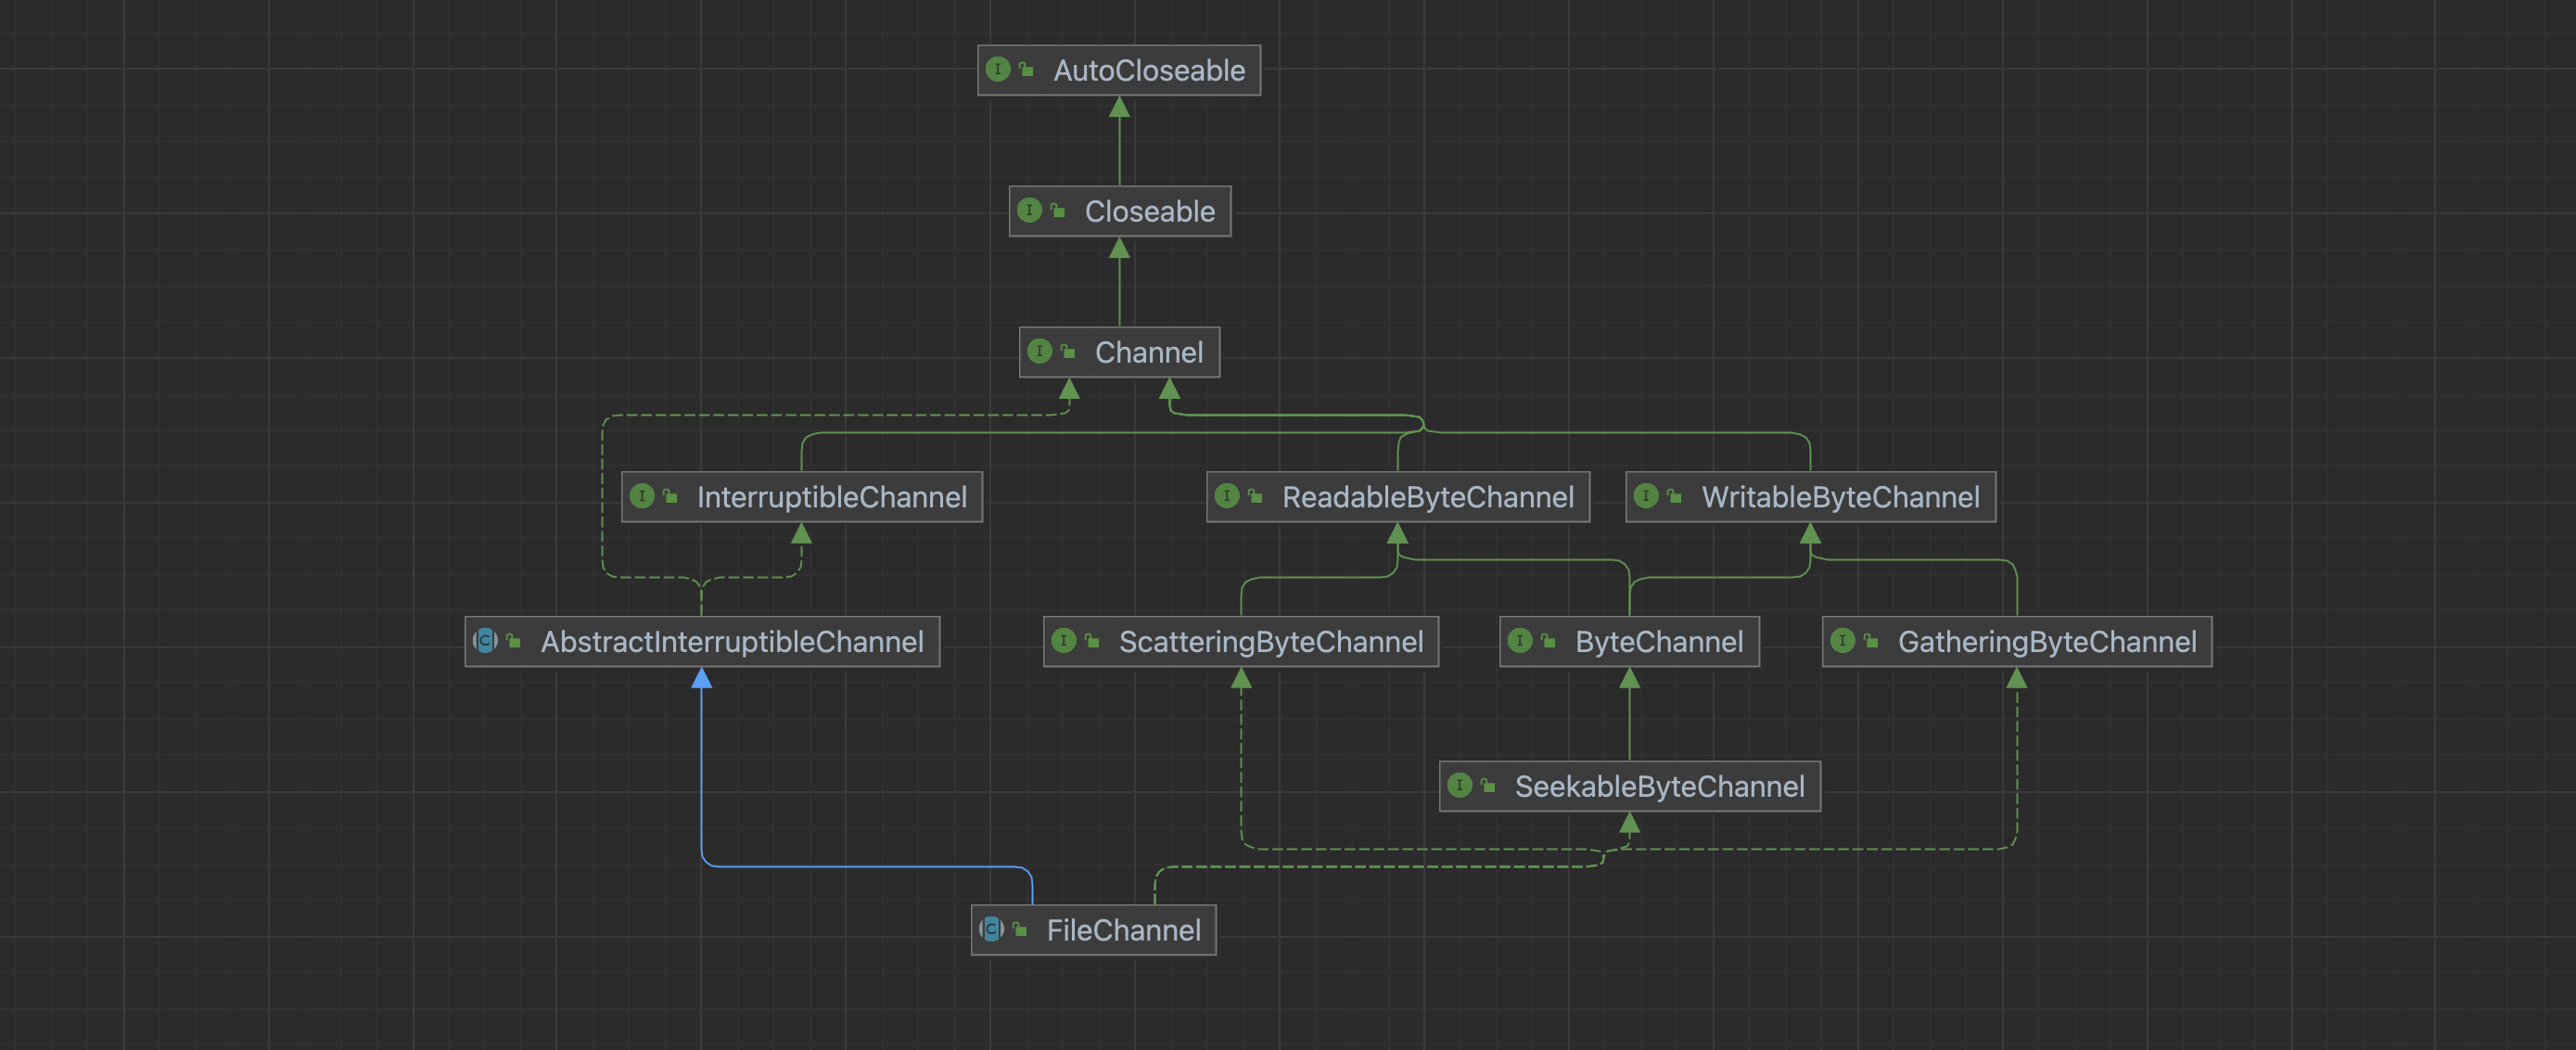
可以看到FileChannel实现了大部分上面提及的接口,直接继承自AbstractInterruptibleChannel。AbstractInterruptibleChannel类的主要作用是提供了一个可以被中断的通道基本实现类。此类封装了能使通道实现异步关闭和中断所需要的最低级别的机制。在调用有可能无限期阻塞的I/O操作的之前和之后,通道类必须分别调用begin和end方法,为了确保始终能够调用end方法,应该在try…finally块中使用这些方法:
boolean completed = false;
try {
    begin();
    completed = ...;  // 执行blocking I/O 操作
    return ...;       // 返回结果
} finally {
    end(completed);
}
写入数据
FileChanel的写入相关操作Api如下:
// 同步方法,将1个ByteBuffer缓冲区中的remaining字节序列写入通道的当前位置
int write(ByteBuffer src);

// 同步方法,将缓冲区的remaining剩余字节序列写入通道的指定位置
void write(ByteBuffer src,long position);

// 将每个缓冲区的remaining字节序列写入此通道的当前位置。等价于 write(srcs,0,srcs.length)
long write(ByteBuffer[] srcs);

// 将srcs从下标为offset开始,数量为length部分的缓冲区内字节序列写入到channel
long write(ByteBuffer[]srcs,int offset,int length);
我们这里给一个demo,看下上述api产生的效果:
@Test
public void test001() throws IOException {
    FileOutputStream fosRef = new FileOutputStream("/Users/zifang/workplace/idea_workplace/components/util-zex/src/main/resources/FileChannelTest001.txt");
    FileChannel fileChannel = fosRef.getChannel();
    try {

        System.out.println("当前文件大小:"+fileChannel.size());
        System.out.println("当前通道位置:"+fileChannel.position());


        ByteBuffer buffer1 = ByteBuffer.wrap("abcde".getBytes());

        // 写入abcde
        fileChannel.write(buffer1);
        System.out.println("写入buffer1后,文件大小:"+fileChannel.size());
        System.out.println("写入buffer1后,通道位置:"+fileChannel.position());

        // 将 '23' 从 c位置开始写,最终会成为 ab23e
        ByteBuffer buffer2 = ByteBuffer.wrap("12345".getBytes());
        buffer2.position(1);
        buffer2.limit(3);
        fileChannel.position(2);
        fileChannel.write(buffer2,2);

        // 将buffer3 从 1的位置开始写,最终会得到ag23e
        ByteBuffer buffer3 = ByteBuffer.wrap("g".getBytes());
        fileChannel.write(buffer3,1);

        // 制造三个ByteBuffer的数组,分别位置定位到1,批量写入,会写入stvw
        // 最终得到 ag23estvw
        ByteBuffer b4 = ByteBuffer.wrap("opq".getBytes());
        b4.position(1);
        ByteBuffer b5 = ByteBuffer.wrap("rst".getBytes());
        b5.position(1);
        ByteBuffer b6 = ByteBuffer.wrap("ovw".getBytes());
        b6.position(1);

        ByteBuffer[] buffers = new ByteBuffer[]{b4,b5,b6};
        // 定位到尾部
        fileChannel.position(fileChannel.size());
        fileChannel.write(buffers,1,2);

    } catch (IOException e) {
        e.printStackTrace();
    }
    fileChannel.close();
    fosRef.close();
}
读取数据
// 同步方法,将通道当前位置中的字节序列读入1个ByteBuffer缓冲区中的remaining空间中
// 返回值>0:  代表从通道的当前位置向ByteBuffer缓冲区中读的字节个数
// 返回值=0: 代表从通道中没有读取任何的数据,也就是0字节,有可能发生的情况就是缓冲区中没有remainging剩余空间了
// 返回值=-1:代表到达流的末端
int read(ByteBuffer dst);

// 同步方法,将通道内当前位置的字节序列依次读取到ByteBuffer列表
long read(ByteBuffer[] dsts)

// 同步方法,将通道中当前位置的字节序列读入以下标为offset开始的ByteBuffer[]数组中的remaining剩余空间中,并且连续写入length个ByteBuffer缓冲区。
long read(ByteBuffer[]dsts,int offset,int length)
文件内容是‘123456’,以下是demo:
@Test
public void test002() throws IOException {
    FileInputStream ref = new FileInputStream("/Users/zifang/workplace/idea_workplace/components/util-zex/src/main/resources/FileChannelTest002.txt");
    FileChannel fileChannel = ref.getChannel();
    try {

        System.out.println("当前文件大小:" + fileChannel.size());
        System.out.println("当前通道位置:" + fileChannel.position());

        ByteBuffer buffer1 = ByteBuffer.allocate(3);
        buffer1.position(1);
        fileChannel.read(buffer1);
        System.out.println("buffer1读取结果"+new String(buffer1.array()));


        // 定位到开始
        fileChannel.position(0);
        ByteBuffer buffer2 = ByteBuffer.allocate(3);
        fileChannel.read(buffer2,1);
        System.out.println("buffer2读取结果"+new String(buffer2.array()));

        // 定位到开始
        fileChannel.position(0);
        // 制造两个ByteBuffer的数组,分别位置定位到1,批量读取
        ByteBuffer b3 = ByteBuffer.allocate(3);
        b3.position(1);
        ByteBuffer b4 = ByteBuffer.allocate(3);
        b4.position(1);
        fileChannel.read(new ByteBuffer[]{b3,b4});
        System.out.println("b3,b4读取结果:"+new String(b3.array()) + new String(b4.array()));


    } catch (IOException e) {
        e.printStackTrace();
    }
    fileChannel.close();
    ref.close();
}
获得输出如下:
当前文件大小:6
当前通道位置:0
buffer1读取结果�12
buffer2读取结果234
b3,b4读取结果:�12�34
数据截断
truncate方法作用是将此通道的文件截取为给定大小。如果给定大小小于该文件的当前大小,则截取该文件,丢弃文件新末尾后面的所有字节。如果给定大小大于或等于该文件的当前大小,则不修改文件。无论是哪种情况,如果此通道的文件位置大于给定大小,则将位置设置为该大小。
@Test
public void test003() throws IOException {
    ByteBuffer byteBuffer1 = ByteBuffer.wrap("12345678".getBytes());
    FileOutputStream fosRef = new FileOutputStream("/Users/zifang/workplace/idea_workplace/components/util-zex/src/main/resources/FileChannelTest003.txt");

    FileChannel fileChannel = fosRef.getChannel();
    fileChannel.write(byteBuffer1);
    System.out.println("A size=" + fileChannel.size() + " position=" + fileChannel.position());
    fileChannel.truncate(3);
    System.out.println("B size=" + fileChannel.size() + " position=" + fileChannel.position());
    fileChannel.close();
    fosRef.flush();
    fosRef.close();
}
打开文件后会发现,内容是‘123’。
通道转换
long transferTo(long position,long count,WritableByteChannel dest);
long transferFrom(ReadableByteChannel src,long  position,long count);
上述两个方法分别将当前通道写出到另一个通道,与读取其他通道数据到当前通道,代码如下,从文件1内读取数据到文件2,再从文件2写出到文件3:
@Test
public void test004() throws IOException {
    RandomAccessFile file1 = new RandomAccessFile("/Users/zifang/workplace/idea_workplace/components/util-zex/src/main/resources/FileChannelTest004_1.txt", "rw");
    RandomAccessFile file2 = new RandomAccessFile("/Users/zifang/workplace/idea_workplace/components/util-zex/src/main/resources/FileChannelTest004_2.txt", "rw");
    RandomAccessFile file3 = new RandomAccessFile("/Users/zifang/workplace/idea_workplace/components/util-zex/src/main/resources/FileChannelTest004_3.txt", "rw");

    FileChannel fileChannel1 = file1.getChannel();
    FileChannel fileChannel2 = file2.getChannel();
    FileChannel fileChannel3 = file3.getChannel();

    long readLength = fileChannel2.transferFrom(fileChannel1, 0, 4);
    long writeLength = fileChannel2.transferTo(1, 2,fileChannel3);

    fileChannel1.close();
    fileChannel2.close();
    fileChannel3.close();

    file1.close();
    file2.close();
    file3.close();

}
最终结果:
文件1:123456
文件2:1234
文件3:23
执行锁定
可以通过通道对文件进行加锁操作,主要有两个,分别是lock与tryLock方法,lock方法签名如下:
FileLock lock(long position,long size,boolean share);
该方法作用是获取此通道的文件给定区域上的锁定。在可以锁定该区域之前、已关闭此通道之前或者已中断调用线程之前(以先到者为准),将阻塞此方法的调用。
在此方法调用期间,如果另一个线程关闭了此通道,则抛出AsynchronousCloseException异常。如果在等待获取锁定的同时中断了调用线程,则将状态设置为中断并抛出FileLockInterruptionException异常。如果调用此方法时已设置调用方的中断状态,则立即抛出该异常;不更改该线程的中断状态。
由position和size参数所指定的区域无须包含在实际的底层文件中,甚至无须与文件重叠。锁定区域的大小是固定的;如果某个已锁定区域最初包含整个文件,并且文件因扩大而超出了该区域,则该锁定不覆盖此文件的新部分。如果期望文件大小扩大并且要求锁定整个文件,则应该锁定的position从零开始,size传入大于或等于预计文件的最大值。零参数的lock方法只是锁定大小为Long.MAX_VALUE的区域。
第三个参数表达其文件锁是否为独占/共享。共享锁定可阻止其他并发运行的程序获取重叠的独占锁定,但是允许该程序获取重叠的共享锁定。独占锁定则阻止其他程序获取共享或独占类型的重叠锁定。某些操作系统不支持共享锁定,在这种情况下,自动将对共享锁定的请求转换为对独占锁定的请求。可通过调用所得锁定对象的isShared方法来测试新获取的锁定是共享的还是独占的。文件锁定是以整个Java虚拟机来保持的。但它们不适用于控制同一虚拟机内多个线程对文件的访问。共享锁之间、独占锁之间,以及共享锁与独占锁之间的关系,有以下4种情况:
1)共享锁与共享锁之间是非互斥关系;
2)共享锁与独占锁之间是互斥关系;
3)独占锁与共享锁之间是互斥关系;
4)独占锁与独占锁之间是互斥关系。
tryLock方法签名如下:
FileLock tryLock(long position,long size,boolean shared);
tryLock的参数与lock方法一致,该方法的作用是试图获取对此通道的文件给定区域的锁定。此方法不会阻塞。无论是否已成功地获得请求区域上的锁定,调用总是立即返回。如果由于另一个程序保持着一个重叠锁定而无法获取锁定,则此方法返回null。如果由于任何其他原因而无法获取锁定,则抛出相应的异常。
通过FileChannel类的lock或tryLock方法获取文件上的锁定时,就会创建一个FileLock对象FileLock类表示文件区域锁定的标记。
文件锁定对象最初是有效的。通过调用release方法、关闭用于获取该锁定的通道,或者终止Java虚拟机(以先到者为准)来释放锁定之前,该对象一直是有效的。可通过调用锁定的isValid方法来测试锁定的有效性。可通过调用isShared方法来确定它是独占的还是共享的。某些平台不支持共享锁定,在这种情况下,对共享锁定的请求被自动转换为对独占锁定的请求。单个Java虚拟机在某个特定文件上所保持的锁定是不重叠的。要测试某个候选锁定范围是否与现有锁定重叠,可使用overlaps方法。
通道映射
map方法签名如下
// position: 文件中的位置,映射区域从此位置开始;必须为非负数
// size: 要映射的区域大小;必须为非负数且不大于Integer.MAX_VALUE
MappedByteBuffer map(FileChannel.MapMode mode,long position,long size);
该方法的作用是将此通道的文件区域直接映射到内存中。可以通过下列3种模式将文件区域映射到内存中。mode选项有以下几种:
1)只读:试图修改得到的缓冲区将导致抛出ReadOnlyBufferException异常。(MapMode.READ_ONLY)
2)读取/写入:对得到的缓冲区的更改最终将传播到文件;该更改对映射到同一文件的其他程序不一定是可见的。(MapMode.READ_WRITE)
3)专用:对得到的缓冲区的更改不会传播到文件,并且该更改对映射到同一文件的其他程序也不是可见的;相反,会创建缓冲区已修改部分的专用副本。(MapMode.PRIVATE)
对于只读映射关系,此通道必须可以进行读取操作;对于读取/写入或专用映射关系,此通道必须可以进行读取和写入操作。
此方法返回的已映射字节缓冲区位置为零,限制和容量为size;其标记是不确定的。在缓冲区本身被作为垃圾回收之前,该缓冲区及其表示的映射关系都是有效的。
映射关系一经创建,就不再依赖于创建它时所用的文件通道。特别是关闭该通道对映射关系的有效性没有任何影响。很多内存映射文件的细节从根本上是取决于底层操作系统的,因此是未指定的。当所请求的区域没有完全包含在此通道的文件中时,此方法的行为是未指定的:未指定是否将此程序或另一个程序对底层文件的内容或大小所进行的更改传播到缓冲区;未指定将对缓冲区的更改传播到文件的频率。对于大多数操作系统而言,与通过普通的read/write方法读取或写入数千字节的数据相比,将文件映射到内存中开销更大。从性能的观点来看,通常将相对较大的文件映射到内存中才是值得的。
总结
无,写的累了


 4255
4255

 被折叠的 条评论
为什么被折叠?
被折叠的 条评论
为什么被折叠?
 到【灌水乐园】发言


