


目录
场景描述
相信大家都有这样的经历,一个视频太大,放到服务器上面,播放的时候,受服务器宽带和自己网络的影响访问会很慢。
经常看视频的小伙伴肯定看到过下面的场景,网页上视频播放的时候,会有一个m3u8的请求,然后再去请求key,再一个ts一个ts的下载。

这样有什么好处呢?就是当你视频五六百兆的大小,你可以通过工具将视频切片成一个个5兆大小的ts。然后生成m3u8文件,m3u8文件中包含每一个ts的名字和加密的key。关于m3u8这里不做介绍,不知道的可以百度一下。这样播放的时候,会一个一个的去获取ts文件,因为ts文件的大小5兆左右,一般来说,普通服务器上就能很快的访问到。
还有一个场景,比如说公司要求在视频播放快的基础上,还要保证视频不能被别人下载,也可以采用这个方式,将mp4切片然后加密。然后对key的获取做限制,这样别人也就无法下载你的视频了。
下面进入正题。
将一个mp4视频文件切割为多个ts片段,并在切割过程中对每一个片段使用 AES-128 加密,最后生成一个m3u8的视频索引文件;
需要的环境,JDK,和 ffmpeg。ffmpeg 的安装,可以百度一下,这里就不说了。
加密准备
生成enc.key
openssl rand 16 > enc.key ( 生成一个enc.key文件 )
生成 iv
openssl rand -hex 16 ( 生成一段字符串,记下来)

新建一个文件 enc.keyinfo 内容格式如下:
Key URI # enc.key的路径,使用http形式
Path to key file # enc.key文件
IV # 上面生成的iv
举个例子:enc.keyinfo内容如下:
https://xxx/maps/enc.key
/Users/bukesu/test/enc.key
28c81707c38a3221a7e0b932868e95d7
其中 https://xxx/maps/enc.key 你需要提供对外的接口,可以通过接口访问到enc.key文件的内容,你可以放到自己的web项目中,也可以放在nginx下面,通过natapp本地穿透提供给外部访问,我这里是用的是natappp配置的内网穿透。通过访问https://xxx/maps/enc.key可以下载enc.key
接下来咱们进行视频的分片
视频分片
这里先用命令进行视频分片加密
ffmpeg -y \
-i "/Users/bukesu/test/test.mp4" \
-hls_time "10" \
-hls_key_info_file "/Users/bukesu/test/enc.keyinfo" \
-hls_playlist_type "vod" \
-hls_list_size "0" \
-hls_segment_filename "/Users/bukesu/test/ts/file%d.ts" \
"/Users/bukesu/test/ts/playlist.m3u8"


hls_time:指定生成 ts 视频切片的时间长度s
hls_key_info_file:enc.keyinfo文件的位置
hls_list_size: 索引播放列表的最大列数 默认5,0 为不限制
hls_segment_filename:生成ts和m3u8文件的路径及文件名
到这里,视频分片加密就完成了,如何验证呢?
首先、配置nginx映射,
location /maps/ {
add_header Access-Control-Allow-Origin *;
add_header Access-Control-Allow-Methods "POST, GET, OPTIONS";
add_header Access-Control-Allow-Headers "Origin, Authorization, Accept";
add_header Access-Control-Allow-Credentials true;alias "/Users/bukesu/test/";
autoindex on; #开启nginx目录浏览功能autoindex_exact_size off; #文件大小从KB开始显示
autoindex_localtime on; #显示文件修改时间为服务器本地时间
}
启动nginx,我这里nginx使用的是6699端口,访问 http://localhost:6699/maps/ts/playlist.m3u8 可以下载playlist.m3u8文件,
将enc.key 也放到test目录下,所以访问 http://localhost:6699/maps/enc.key 也能进行下载
接下来将natapp 映射到nginx端口上,natapp的使用方法我这里就不详细说明了,配置如下
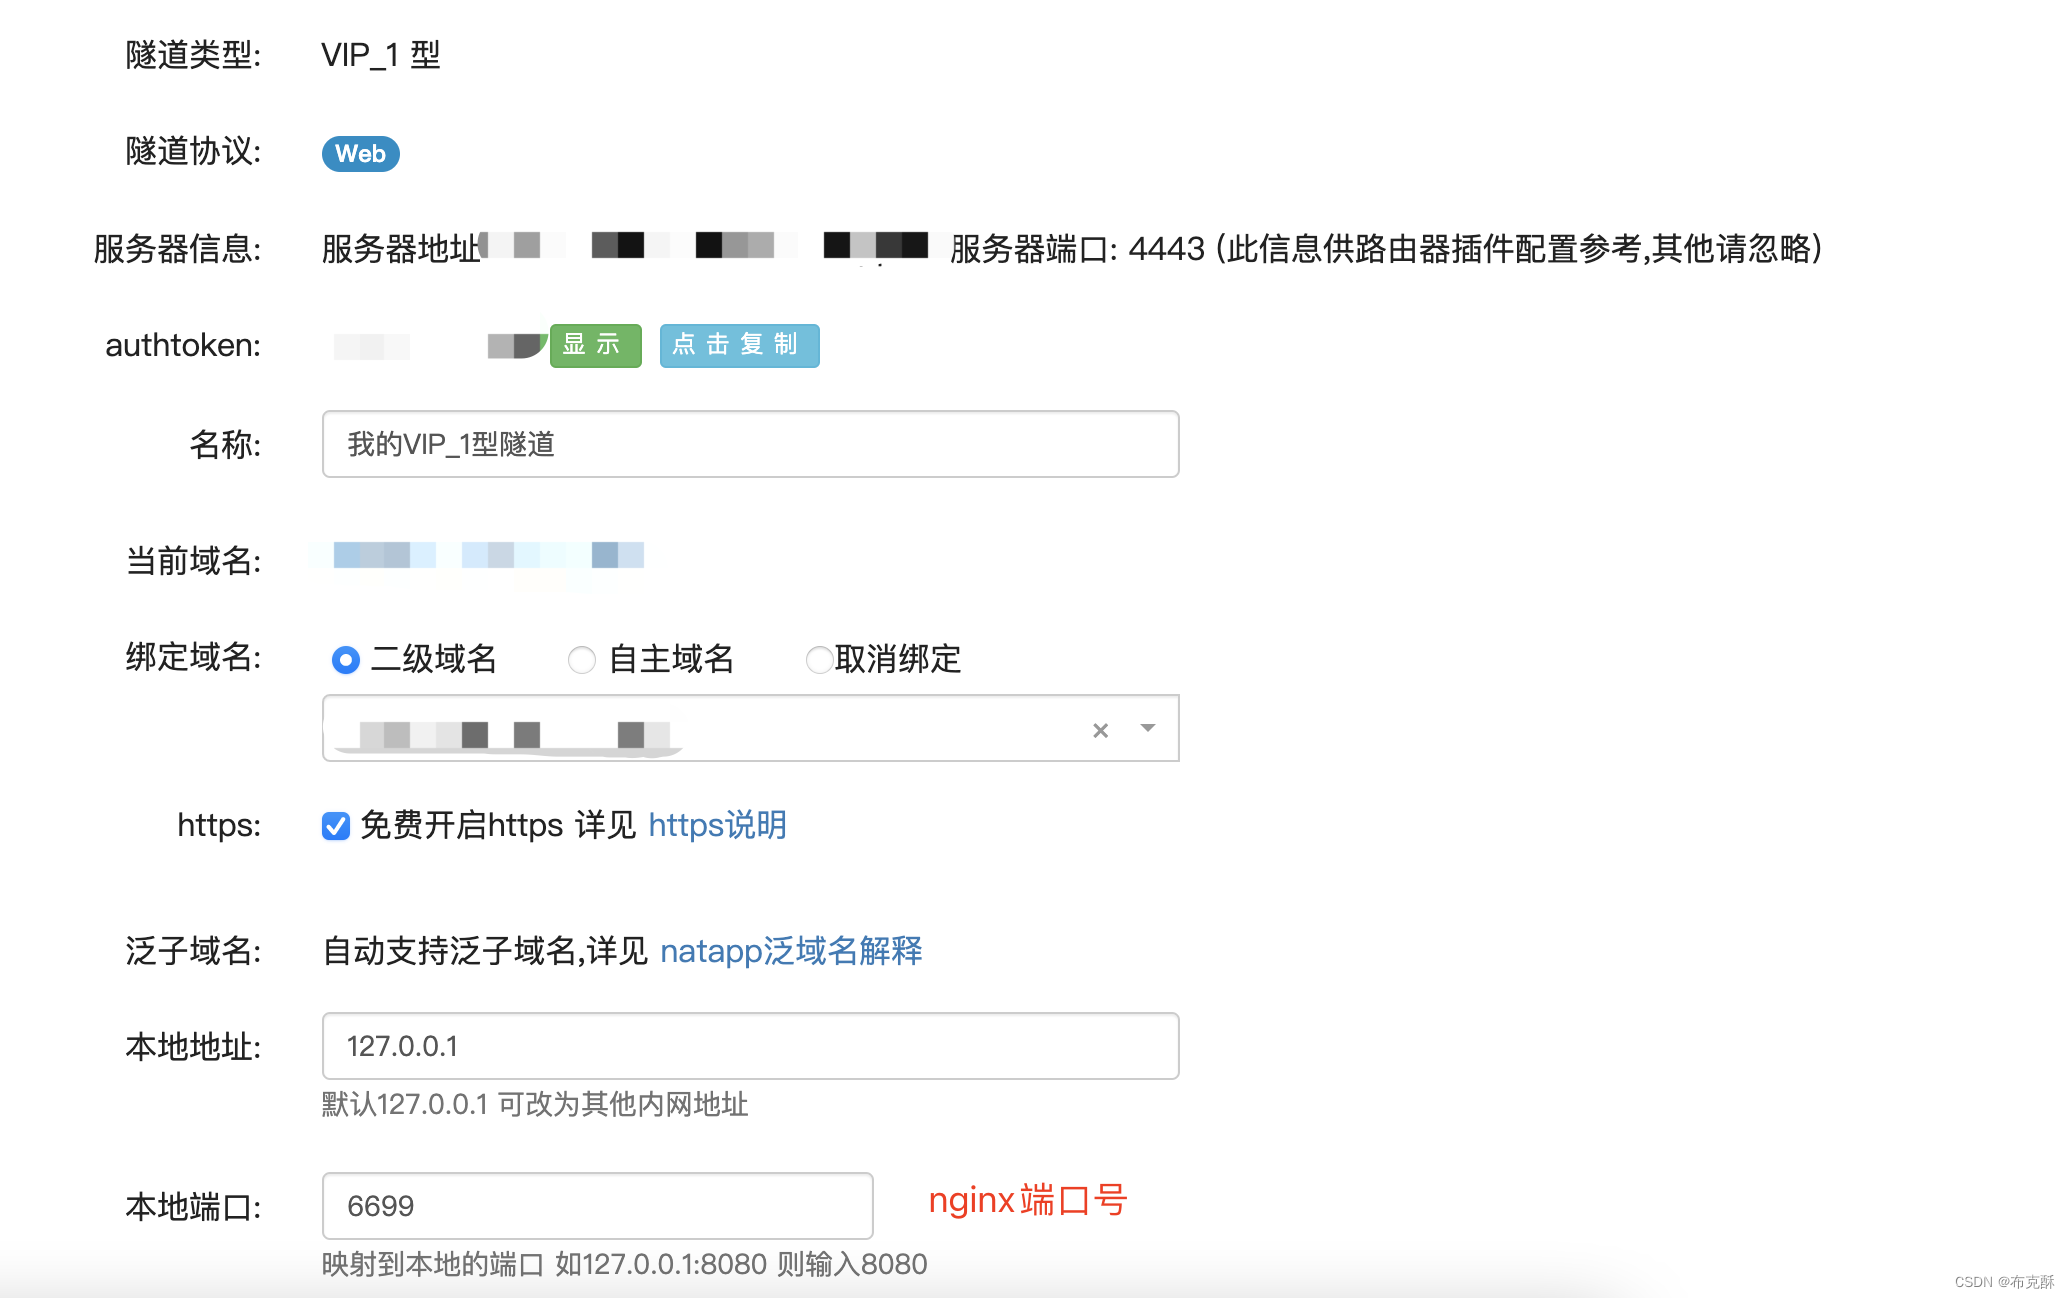
启动natapp,上面的两个地址
http://localhost:6699/maps/ts/playlist.m3u8
http://localhost:6699/maps/enc.key
就可以替换成域名进行访问了
https://xxx.com/maps/ts/playlist.m3u8
https://xxx.com/maps/enc.key
接下来开始验证,在浏览器输入 https://www.m3u8play.com/ 网址,输入https://xxx.com/maps/ts/playlist.m3u8,如下图:
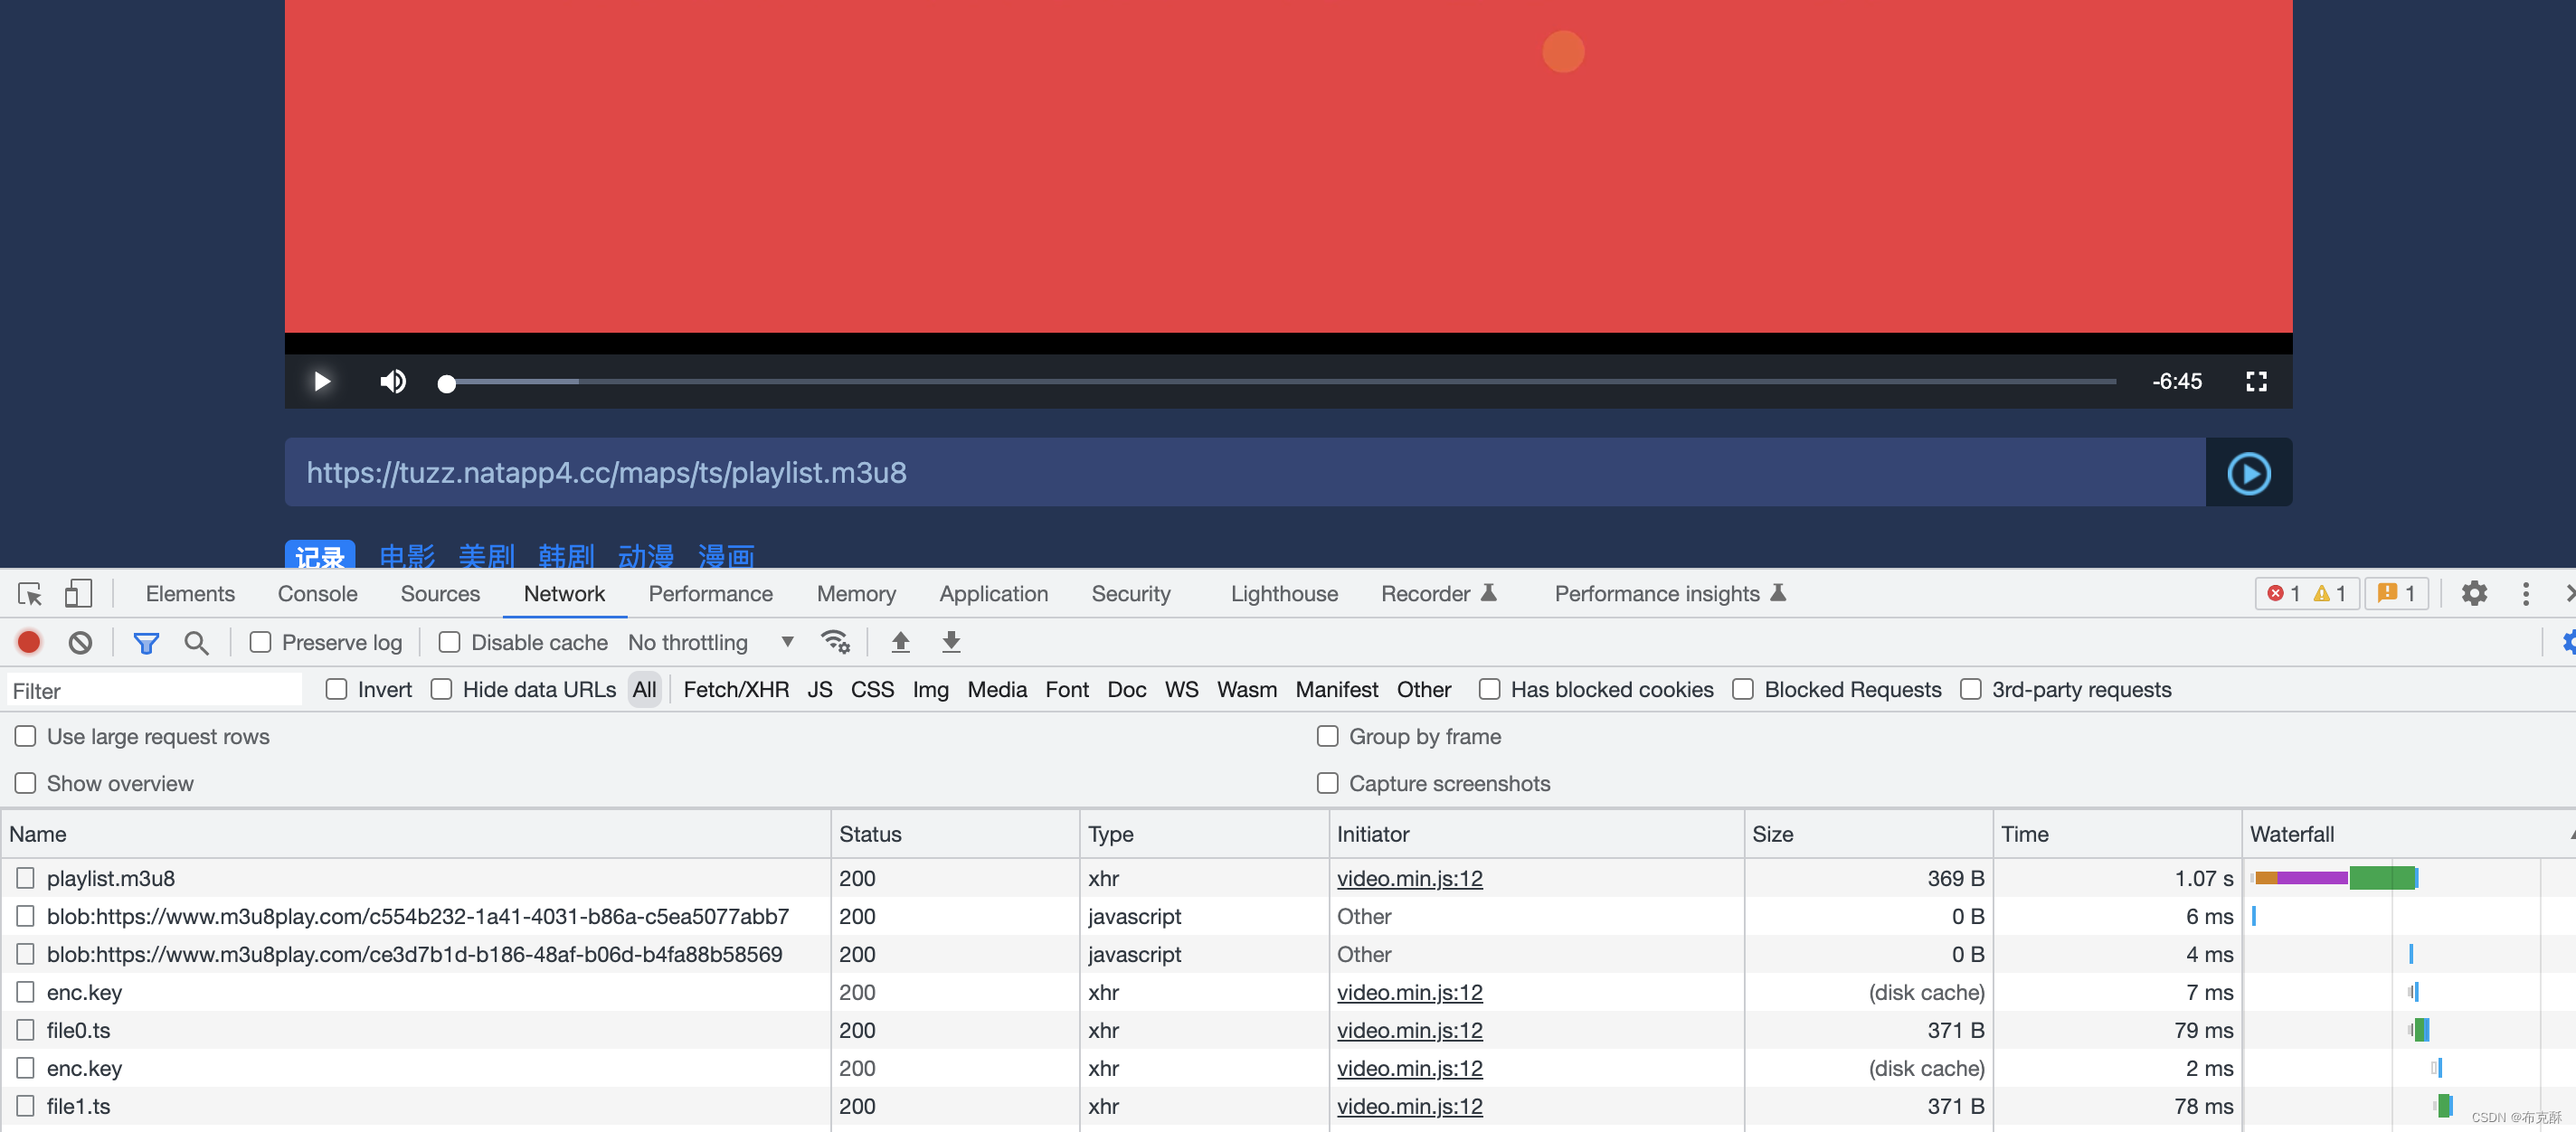
到这里 就出现了和文章最开始一样的效果了。
那么,java代码如何实现呢?
Java代码实现
新建 FFMpegUtils 工具类
@Slf4j
public class FFMpegUtils {


    public static String executeCommand(List<String> commonds,String FFMPEG_PATH) throws InterruptedException, IOException {
        log.info("开始视频分片");
        if (CollectionUtils.isEmpty(commonds)) {
            log.error("--- 指令执行失败,因为要执行的FFmpeg指令为空! ---");
            return null;
        }
        LinkedList<String> ffmpegCmds = new LinkedList<>(commonds);
        ffmpegCmds.addFirst(FFMPEG_PATH); // 设置ffmpeg程序所在路径
        log.info("--- 待执行的FFmpeg指令为:---" + ffmpegCmds);

        Runtime runtime = Runtime.getRuntime();
        Process ffmpeg = null;
        try {
            // 执行ffmpeg指令
            ProcessBuilder builder = new ProcessBuilder();
            builder.command(ffmpegCmds);
            ffmpeg = builder.start();
            log.info("--- 开始执行FFmpeg指令:--- 执行线程名:" + builder.toString());

            // 取出输出流和错误流的信息
            // 注意:必须要取出ffmpeg在执行命令过程中产生的输出信息,如果不取的话当输出流信息填满jvm存储输出留信息的缓冲区时,线程就回阻塞住
            PrintStream errorStream = new PrintStream(ffmpeg.getErrorStream());
            PrintStream inputStream = new PrintStream(ffmpeg.getInputStream());
            errorStream.start();
            inputStream.start();
            // 等待ffmpeg命令执行完
            ffmpeg.waitFor();

            // 获取执行结果字符串
            String result = errorStream.stringBuffer.append(inputStream.stringBuffer).toString();

//            boolean blank = StringUtils.isBlank(result);

            // 输出执行的命令信息
            String cmdStr = Arrays.toString(ffmpegCmds.toArray()).replace(",", "");
            System.err.println(result);
            String resultStr = StringUtils.isBlank(result) ? "【异常】" : "正常";
            log.info("--- 已执行的FFmepg命令: ---" + cmdStr + " 已执行完毕,执行结果: " + resultStr);
            return result;

        } finally {
            if (null != ffmpeg) {
                ProcessKiller ffmpegKiller = new ProcessKiller(ffmpeg);
                // JVM退出时,先通过钩子关闭FFmepg进程
                runtime.addShutdownHook(ffmpegKiller);
            }
        }
    }


    /**
     * 用于取出ffmpeg线程执行过程中产生的各种输出和错误流的信息
     */
    static class PrintStream extends Thread {
        InputStream inputStream = null;
        BufferedReader bufferedReader = null;
        StringBuffer stringBuffer = new StringBuffer();

        public PrintStream(InputStream inputStream) {
            this.inputStream = inputStream;
        }

        @Override
        public void run() {
            try {
                if (null == inputStream) {
                    log.error("--- 读取输出流出错!因为当前输出流为空!---");
                }
                bufferedReader = new BufferedReader(new InputStreamReader(inputStream));
                String line = null;
                while ((line = bufferedReader.readLine()) != null) {
                    log.info(line);
                    stringBuffer.append(line);
                }
            } catch (Exception e) {
                log.error("--- 读取输入流出错了!--- 错误信息:" + e.getMessage());
            } finally {
                try {
                    if (null != bufferedReader) {
                        bufferedReader.close();
                    }
                    if (null != inputStream) {
                        inputStream.close();
                    }
                } catch (IOException e) {
                    log.error("--- 调用PrintStream读取输出流后,关闭流时出错!---");
                }
            }
        }
    }

    /**
     * 在程序退出前结束已有的FFmpeg进程
     */
    private static class ProcessKiller extends Thread {
        private Process process;

        public ProcessKiller(Process process) {
            this.process = process;
        }

        @Override
        public void run() {
            this.process.destroy();
            log.info("--- 已销毁FFmpeg进程 --- 进程名: " + process.toString());
        }
    }
}
新建 VideoDemo类
@Slf4j
public class VideoDemo {

    public static void main(String[] args) throws IOException, InterruptedException {
        videoToTs("/Users/bukesu/test/test.mp4" );
    }


    public static String videoToTs(String objectName) throws IOException, InterruptedException {
        File file = new File(objectName);
        // 获取文件路径
        String parentPath = file.getParent();
        log.info("准备视频分片");
        String targetPath = parentPath + "/ts";

        FileUtil.mkdir(targetPath);
        List<String> commands = new ArrayList<>();
        commands.add("-i");
        commands.add(file.getAbsolutePath());
        commands.add("-profile:v");
        commands.add("baseline");
        commands.add("-level");
        commands.add("3.0");
        commands.add("-start_number");
        commands.add("0");
        commands.add("-hls_time"); //指定生成 ts 视频切片的时间长度s
        commands.add("20");
        //加密 需要借助openssl生成enc.keyinfo文件
        commands.add("-hls_key_info_file");
        commands.add("/Users/bukesu/test/enc.keyinfo");
        commands.add("-hls_list_size"); //索引播放列表的最大列数 默认5,0 为不限制
        commands.add("0");
        commands.add("-hls_segment_filename"); //输出 ts m3u8 文件路径
        commands.add(targetPath + "/file%d.ts");
        commands.add(targetPath + "/playlist.m3u8");
        FFMpegUtils.executeCommand(commands, "/usr/local/bin/ffmpeg");
        log.info("视频分片结束");
        return targetPath;
    }
}
运行main方法就可以进行分片加密了。
那之前说的enc.key,放在nginx下没做任何校验,肯定是不行的,所以这里就可以将enc.key放在项目resources目录下,如图:
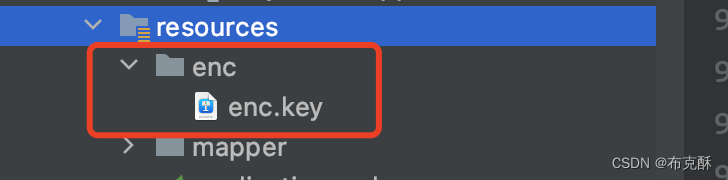
然后写一个接口获取 enc.key
String aesKey = "eb367ce6e5bhjg686t6F65r688767";
String key_vi = "0000000000000000";

@ApiOperation("获取enc.key")
    @GetMapping("/enc/enc.key")
    public void getEncKey(HttpServletRequest request, HttpServletResponse response) throws IOException {
        String header = request.getHeader("vhlsk");
        log.info("header:{}", header);
        if (StringUtils.isBlank(header)) {
            log.warn("没有请求头");
            return;
        }

        header = AESUtil.decode(aesKey, header,key_vi);

        // 当前时时间戳
        Long milliSecond = LocalDateTime.now().toInstant(ZoneOffset.of("+8")).toEpochMilli();
        Long offset = 300000L;//5分钟

        // 传过来的时间戳
        String substring = header.substring(5);
        long aLong = Long.parseLong(substring);

        // 接收到的时间戳和当前时间戳  在 5分钟范围内  有效
        if (aLong > (milliSecond - offset) && aLong < (milliSecond + offset)) {
            Resource resource = new DefaultResourceLoader().getResource("classpath:enc/enc.key");
            response.setContentType("application/force-download");
            response.setHeader("Content-Disposition", "attachment;fileName=" + URLEncoder.encode("enc.key", StandardCharsets.UTF_8));
            @Cleanup InputStream inputStream = resource.getInputStream();
            @Cleanup ServletOutputStream servletOutputStream = response.getOutputStream();
            IOUtils.copy(inputStream, servletOutputStream);
            response.flushBuffer();
        } else {
            log.warn("传入的header无效");
        }
    }
这里前端播放m3u8视频的时候,需要修改播放器请求头,获取 enc.key 时,加入了自定义请求头vhlsk,值是当前时间戳,时间戳前端通过AES进行加密,后台通过AES进行解密,然后判断判断在5分钟内就返回有效的enc.key。
这里的验证比较简单,如果想更加复杂,可以自己和前端对校验算法进行复杂化。
这样就可以防止别人下载你的视频了。
以上是个人理解,如有不对的地方,欢迎指正。
Tip:若有疑难问题需帮助,可注明来意,加V:w449044976


 2153
2153

 被折叠的 条评论
为什么被折叠?
被折叠的 条评论
为什么被折叠?
 到【灌水乐园】发言


