SpringBoot+JWT整合-解决登陆验证问题

SpringBoot2整合JWT

受这篇文章的启发:https://www.jianshu.com/p/e88d3f8151db

自己进一步理解,然后在作者的基础上进一步封装,然后重新整理一下笔记,关于JWT介绍部分,以及原理部分可以看上面那篇文章,这篇文章主要是代码,以及代码解释。本文代码GitHub:传送门

本文代码结构:

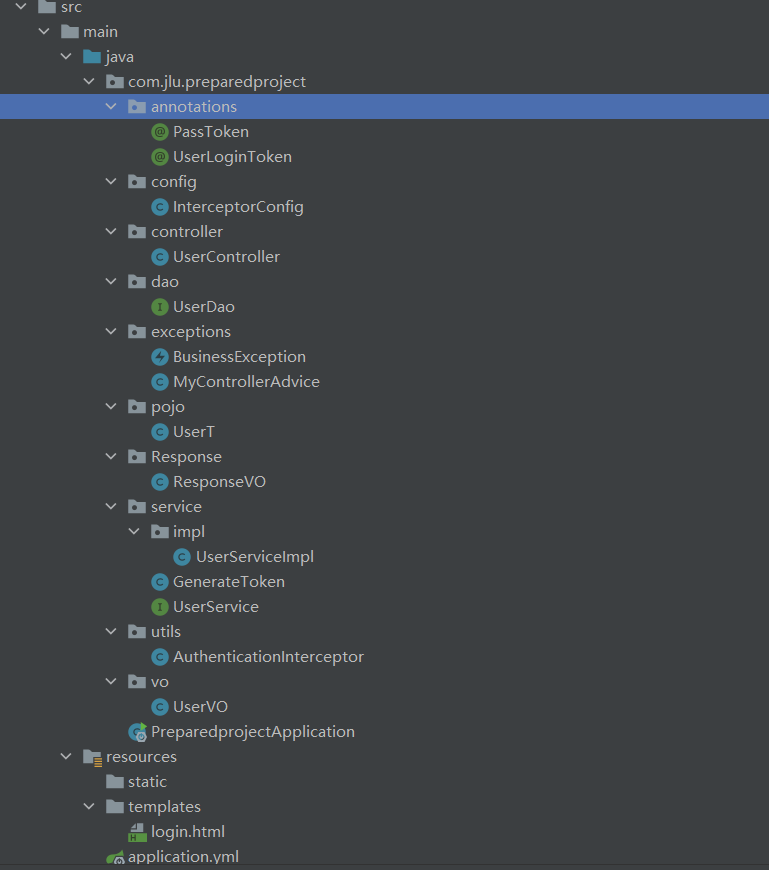
在作者的基础上,我对架构进行进一步的细分,包括VO层和POJO层,vo层是与前台数据交互的,pojo与数据库数据交互,本文的主要核心是拦截器,下面来解释拦截器的一些代码。

public class AuthenticationInterceptor implements HandlerInterceptor {

    @Autowired
    UserService userService;
    @Override
    public boolean preHandle(HttpServletRequest httpServletRequest, HttpServletResponse httpServletResponse, Object object) throws Exception {
        String token = httpServletRequest.getHeader("token");// 从 http 请求头中取出 token
        // 如果不是映射到方法直接通过
        if(!(object instanceof HandlerMethod)){
            return true;
        }
        // 这里的object是前面controller传过来的包含那个方法的对象,通过那个方法进入的拦截器
        HandlerMethod handlerMethod=(HandlerMethod)object; 
        Method method=handlerMethod.getMethod(); // 得到那个方法
        //检查是否有passtoken注释,有则跳过认证
        if (method.isAnnotationPresent(PassToken.class)) { // 查看那个方法上面有没有注解PassToken
            PassToken passToken = method.getAnnotation(PassToken.class);
            if (passToken.required()) {
                return true;
            }
        }
        //检查有没有需要用户权限的注解
        if (method.isAnnotationPresent(UserLoginToken.class)) {
            UserLoginToken userLoginToken = method.getAnnotation(UserLoginToken.class);
            if (userLoginToken.required()) {
                // 执行认证
                if (token == null) {
                    throw new BusinessException(501,"无token啦 请重新登陆"); // 自定义全局异常,以json返回
                }
                // 获取 token 中的 user id
                String userId ;
                try {
                    userId = JWT.decode(token).getAudience().get(0);
                } catch (JWTDecodeException j) {
                    throw new BusinessException(401,"解码错误");
                }
                UserT user = userService.findUserById(Integer.parseInt(userId));
                if (user == null) {
                    throw new BusinessException(402,"用户不存在,请重新登录");
                }
                // 验证 token
                JWTVerifier jwtVerifier = JWT.require(Algorithm.HMAC256(user.getPwd())).build();
                try {
                    jwtVerifier.verify(token);
                } catch (JWTVerificationException e) {
                    throw new BusinessException(403,"jwt验证失败");
                }
                return true;
            }
        }
        return true;
    }

    @Override
    public void postHandle(HttpServletRequest httpServletRequest,
                           HttpServletResponse httpServletResponse,
                           Object o, ModelAndView modelAndView) throws Exception {
    }
    @Override
    public void afterCompletion(HttpServletRequest httpServletRequest,
                                HttpServletResponse httpServletResponse,
                                Object o, Exception e) throws Exception {
    }
}

这里需要配置类:

@Configuration
public class InterceptorConfig implements WebMvcConfigurer {
    @Override
    public void addInterceptors(InterceptorRegistry registry) {
        registry.addInterceptor(authenticationInterceptor())
                .addPathPatterns("/**");
    }
    @Bean(name = "authintercepter")
    public AuthenticationInterceptor authenticationInterceptor() {
        return new AuthenticationInterceptor();
    }
}

自定义全局异常处理类:

@Data
public class BusinessException extends RuntimeException{
    private Integer code;
    private String msg;
    public BusinessException(Integer code, String msg) {
        this.code = code;
        this.msg = msg;
    }
}

这里的@RestControllerAdvice保证返回的是json字符串

@RestControllerAdvice
public class MyControllerAdvice {

    @ExceptionHandler(value = BusinessException.class)
    public Map errorHandler(BusinessException ex) {
        Map map = new HashMap();
        map.put("code", 100);
        map.put("msg", ex.getMsg());
        return map;
    }
}

通过注解的方式配置,可以省去很多需要判断是否登陆的过程,使用jwt可以实现前后端分离,是一种非常不错的方式。当然解决单点登陆也可以用springboot+redis实现分布式session,也是一个非常好的方案。

  • 2
    点赞
  • 2
    收藏
    觉得还不错? 一键收藏
  • 0
    评论
可以通过以下步骤在Spring Boot中集成JWT: 1. 添加java-jwt依赖包到pom.xml文件中: ```xml <dependency> <groupId>com.auth0</groupId> <artifactId>java-jwt</artifactId> <version>3.18.1</version> </dependency> ``` 2. 创建一个JWT工具类来生成和验证JWT令牌: ```java import com.auth0.jwt.JWT; import com.auth0.jwt.algorithms.Algorithm; import com.auth0.jwt.exceptions.JWTVerificationException; import com.auth0.jwt.interfaces.DecodedJWT; import java.util.Date; public class JwtUtils { private static final long EXPIRATION_TIME = 86400000; // 24 hours private static final String SECRET = "mySecret"; private static final String ISSUER = "myIssuer"; public static String generateToken(String username) { Date now = new Date(); Date expiryDate = new Date(now.getTime() + EXPIRATION_TIME); return JWT.create() .withSubject(username) .withIssuer(ISSUER) .withIssuedAt(now) .withExpiresAt(expiryDate) .sign(Algorithm.HMAC512(SECRET)); } public static String getUsernameFromToken(String token) throws JWTVerificationException { DecodedJWT jwt = JWT.require(Algorithm.HMAC512(SECRET)) .withIssuer(ISSUER) .build() .verify(token); return jwt.getSubject(); } } ``` 3. 在Spring Security配置中添加JWT过滤器,以验证JWT令牌: ```java import org.springframework.beans.factory.annotation.Autowired; import org.springframework.context.annotation.Configuration; import org.springframework.core.annotation.Order; import org.springframework.http.HttpStatus; import org.springframework.security.authentication.AuthenticationManager; import org.springframework.security.authentication.UsernamePasswordAuthenticationToken; import org.springframework.security.config.annotation.SecurityConfigurerAdapter; import org.springframework.security.config.annotation.web.builders.HttpSecurity; import org.springframework.security.config.annotation.web.configuration.WebSecurityConfigurerAdapter; import org.springframework.security.core.Authentication; import org.springframework.security.core.AuthenticationException; import org.springframework.security.web.authentication.HttpStatusEntryPoint; import org.springframework.security.web.authentication.UsernamePasswordAuthenticationFilter; import javax.servlet.FilterChain; import javax.servlet.ServletException; import javax.servlet.http.HttpServletRequest; import javax.servlet.http.HttpServletResponse; import java.io.IOException; @Configuration @Order(1) public class JwtConfig extends SecurityConfigurerAdapter<javax.servlet.Filter, HttpSecurity> { @Autowired private JwtAuthenticationProvider jwtAuthenticationProvider; @Override public void configure(HttpSecurity http) throws Exception { JwtAuthenticationFilter jwtAuthenticationFilter = new JwtAuthenticationFilter(); jwtAuthenticationFilter.setAuthenticationManager(http.getSharedObject(AuthenticationManager.class)); jwtAuthenticationFilter.setAuthenticationFailureHandler(new JwtAuthenticationFailureHandler()); http.addFilterBefore(jwtAuthenticationFilter, UsernamePasswordAuthenticationFilter.class); } private class JwtAuthenticationFilter extends UsernamePasswordAuthenticationFilter { @Override public Authentication attemptAuthentication(HttpServletRequest request, HttpServletResponse response) throws AuthenticationException { String token = request.getHeader("Authorization"); if (token == null || !token.startsWith("Bearer ")) { throw new JwtAuthenticationException("Invalid JWT token"); } String username = JwtUtils.getUsernameFromToken(token.substring(7)); if (username == null) { throw new JwtAuthenticationException("Invalid JWT token"); } return jwtAuthenticationProvider.authenticate(new UsernamePasswordAuthenticationToken(username, "")); } @Override protected void successfulAuthentication(HttpServletRequest request, HttpServletResponse response, FilterChain chain, Authentication authResult) throws IOException, ServletException { super.successfulAuthentication(request, response, chain, authResult); chain.doFilter(request, response); } } private class JwtAuthenticationFailureHandler extends HttpStatusEntryPoint { @Override public void commence(HttpServletRequest request, HttpServletResponse response, AuthenticationException authException) throws IOException, ServletException { response.setStatus(HttpStatus.UNAUTHORIZED.value()); } } } ``` 4. 创建一个JwtAuthenticationProvider来验证用户名和密码: ```java import org.springframework.beans.factory.annotation.Autowired; import org.springframework.security.authentication.AuthenticationProvider; import org.springframework.security.authentication.UsernamePasswordAuthenticationToken; import org.springframework.security.core.Authentication; import org.springframework.security.core.AuthenticationException; import org.springframework.security.core.userdetails.UserDetails; import org.springframework.security.core.userdetails.UserDetailsService; import org.springframework.security.crypto.password.PasswordEncoder; import org.springframework.stereotype.Component; @Component public class JwtAuthenticationProvider implements AuthenticationProvider { @Autowired private UserDetailsService userDetailsService; @Autowired private PasswordEncoder passwordEncoder; @Override public Authentication authenticate(Authentication authentication) throws AuthenticationException { String username = authentication.getName(); String password = (String) authentication.getCredentials(); UserDetails userDetails = userDetailsService.loadUserByUsername(username); if (!passwordEncoder.matches(password, userDetails.getPassword())) { throw new JwtAuthenticationException("Invalid username or password"); } return new UsernamePasswordAuthenticationToken(username, password, userDetails.getAuthorities()); } @Override public boolean supports(Class<?> authentication) { return authentication.equals(UsernamePasswordAuthenticationToken.class); } } ``` 5. 在Spring Security配置中添加JwtConfig: ```java import org.springframework.beans.factory.annotation.Autowired; import org.springframework.context.annotation.Configuration; import org.springframework.core.annotation.Order; import org.springframework.security.config.annotation.authentication.builders.AuthenticationManagerBuilder; import org.springframework.security.config.annotation.web.builders.HttpSecurity; import org.springframework.security.config.annotation.web.configuration.WebSecurityConfigurerAdapter; @Configuration public class SecurityConfig extends WebSecurityConfigurerAdapter { @Autowired private JwtAuthenticationProvider jwtAuthenticationProvider; @Override protected void configure(AuthenticationManagerBuilder auth) throws Exception { auth.authenticationProvider(jwtAuthenticationProvider); } @Override protected void configure(HttpSecurity http) throws Exception { http.csrf().disable() .antMatcher("/**") .authorizeRequests() .antMatchers("/login").permitAll() .anyRequest().authenticated() .and() .apply(new JwtConfig()); } } ``` 现在你就可以在Spring Boot应用程序中使用JWT进行身份验证了。

“相关推荐”对你有帮助么?

  • 非常没帮助
  • 没帮助
  • 一般
  • 有帮助
  • 非常有帮助
提交
评论
添加红包

请填写红包祝福语或标题

红包个数最小为10个

红包金额最低5元

当前余额3.43前往充值 >
需支付:10.00
成就一亿技术人!
领取后你会自动成为博主和红包主的粉丝 规则
hope_wisdom
发出的红包
实付
使用余额支付
点击重新获取
扫码支付
钱包余额 0

抵扣说明:

1.余额是钱包充值的虚拟货币,按照1:1的比例进行支付金额的抵扣。
2.余额无法直接购买下载,可以购买VIP、付费专栏及课程。

余额充值