


代码:https://github.com/MSChuan/Blog_Comment
Demo:https://mschuan.github.io/Blog_Comment/dist_prod/index.html
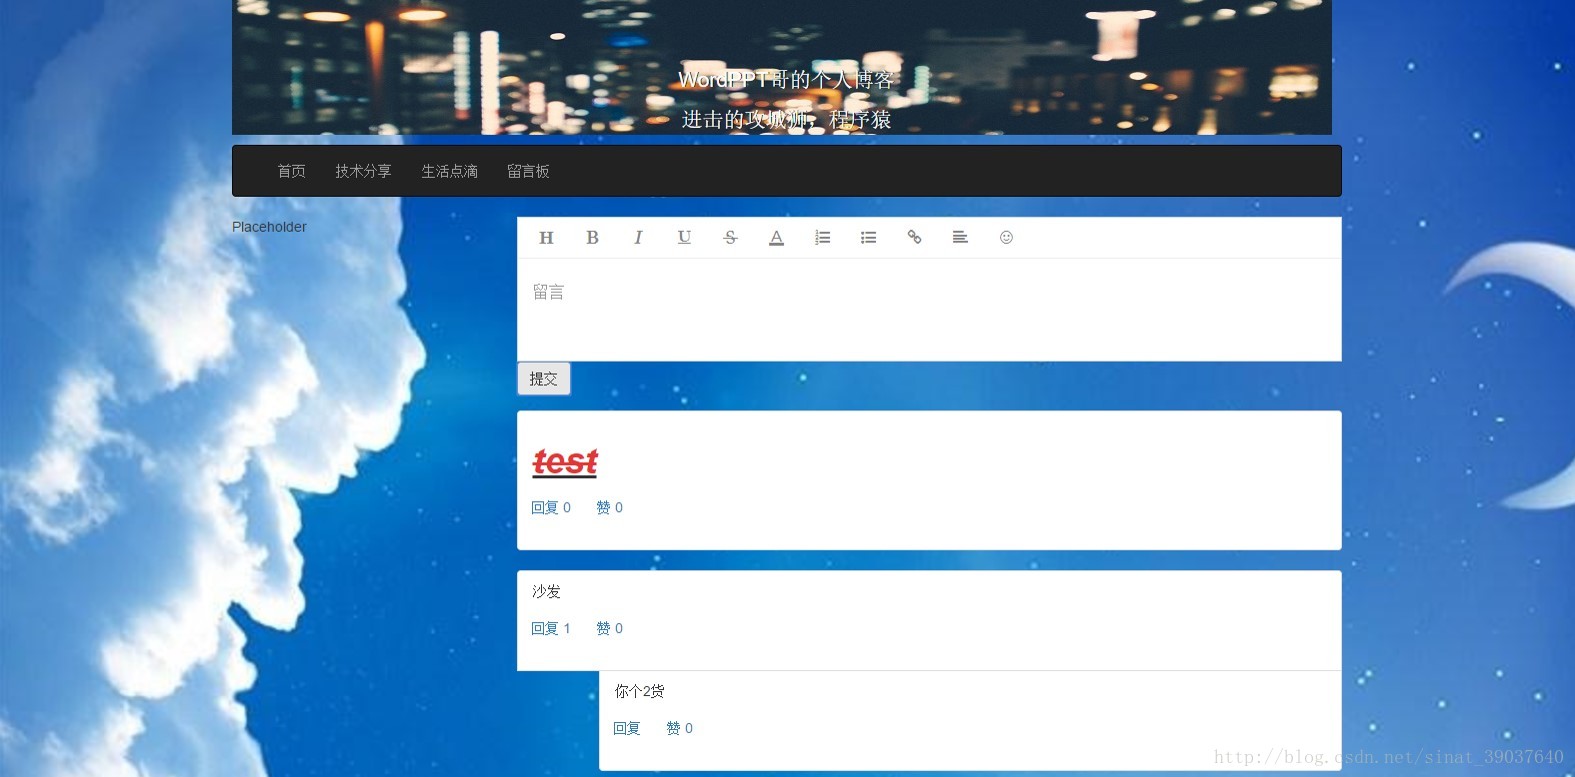
本文将实现一个简单的留言评论区,评论分为两种,如上图,这里使用parent comment称呼”test”和”沙发”这两条评论,”你个2货”是对”沙发”的回复,这里称为child comment。最上面的部分是添加parent comment的区域,每一条留言都有一个回复和赞按钮,用于回复产生child comment以及点赞,对应数目需要在点击后+1。
State
由于react+redux会维护一个全局状态树,所以我们首先要定义它,才能继续实现后续的代码编写。首先当然是评论的内容存储,每一条parent comment+related child comments看作一个package,于是我们可以用packages这样一个数组就能存储整个内容,每个package也是一个数组,每个元素都是一个object,包括评论的内容,回复数,点赞数,id,创建时间等。Besides,点击回复后需要弹出回复框,回复框出现的位置也需要在state中定义。
const initialState = {
    CommentState: {
        packages: [],
        replyBoxIndex: {
            packageIndex: -1,
            commentIndex: -1
        }
    }
};
这里定义了初始状态,回复框的出现位置需要两个索引,一个是package的索引,另一个就是package中哪条评论下方出现回复框,初始的-1表示没有回复框。
Action
从功能上看只有四个action,添加parent comment,添加child comment,点击回复按钮,点赞,于是定义这四个action,首先新建一个types.js文件,用于定义所有的action。
const types = {
    AddParentComment: 'AddParentComment',
    AddReplyBox: 'AddReplyBox',
    PraiseComment: 'PraiseComment',
    AddChildComment: 'AddChildComment',
};

export default types;
定义actionFactory,用于产生所有的action。
import types from './Types';

const actionFactory = {
    AddParentComment: (text, articleId) => ({
        type: types.AddParentComment,
        text: text,
        articleId: articleId
    }),
    AddReplyBox: (packageIndex, commentIndex) => ({
        type: types.AddReplyBox,
        packageIndex: packageIndex,
        commentIndex: commentIndex
    }),
    PraiseComment: (packageIndex, commentIndex, id) => ({
        type: types.PraiseComment,
        packageIndex: packageIndex,
        commentIndex: commentIndex,
        id: id
    }),
    AddChildComment: (packageIndex, id, text) => ({
        type: types.AddChildComment,
        packageIndex: packageIndex,
        text: text,
        id: id
    }),
};

export default actionFactory;
AddParentComment需要两个参数,一个是内容,另一个是文章id,当文章id为0时,我们认为是在留言板的留言。其余action的参数就不一一解释了,都较为简单。
Reducer
有了state和action,就能很清晰的写出reducer。
const packages = (state = initialState.CommentState.packages, action) => {
    switch(action.type) {
        case types.AddChildComment:
            if(action.id !== state[action.packageIndex][0].id) {
                return state;
            }
            return ([
                ...state.slice(0, action.packageIndex),
                [Object.assign({},state[action.packageIndex][0],{replyCount: state[action.packageIndex][0].replyCount + 1}),
                    ...state[action.packageIndex].slice(1), {text: action.text, created_at: '', praiseCount: 0, replyCount: 0, id: 0 }],
                ...state.slice(action.packageIndex + 1)
            ]);
        case types.AddParentComment:
            return ([[{text: action.text, created_at: '', praiseCount: 0, replyCount: 0, id: 0}], ...state]);
        case types.PraiseComment:
            return ([
                ...state.slice(0, action.packageIndex),
                [...state[action.packageIndex].slice(0, action.commentIndex),
                    Object.assign({}, state[action.packageIndex][action.commentIndex], {praiseCount: state[action.packageIndex][action.commentIndex].praiseCount + 1}),
                    ...state[action.packageIndex].slice(action.commentIndex + 1)],
                ...state.slice(action.packageIndex + 1)
            ]);
        default:
            return state;
    }
};
首先是packages,这里写的比较丑,比较好的做法是把那些很长很复杂的逻辑封装成函数,可以复用,也会让switch case更加清晰。
const replyBoxIndex = (state = initialState.CommentState.replyBoxIndex, action) => {
    switch(action.type) {
        case types.AddReplyBox:
            if(state.packageIndex === action.packageIndex && state.commentIndex === action.commentIndex) {
                return initialState.CommentState.replyBoxIndex;
            }
            return ({
                packageIndex: action.packageIndex,
                commentIndex: action.commentIndex
            });
        default:
            return state;
    }
};
对于回复框,这里实现了toggle,即点击同一个回复按钮可以开关对应的回复框。
React实现
整个结构也比较清楚,用一个Container把评论区包起来,下面定义两个Component,一个是添加parent comment,一个显示packages中的内容。
Container
class CommentContainer extends React.Component {
    constructor(props) {
        super(props);

        // 0 means this comment container is not related to any article
        this.articalId = props.articalId || 0;
    }
    componentDidMount() {
        // TODO: send request to fetch comments content
    }
    render() {
        const { state, actions } = this.props;
        let commentPackageList = state.packages.map((p, index) => {
            return (<div className="commentPackageBox" >
                        <CommentList
                            comments={p}
                            packageIndex={index}
                            replyBoxIndex={(index === state.replyBoxIndex.packageIndex) ? state.replyBoxIndex.commentIndex : -1}
                            actions={actions}
                        />
                    </div>);
        });

        return (<div>
                    <AddParentComment actions={actions} articalId={this.articalId} />
                    {commentPackageList}
                </div>);
    }
}
从store中拿到state,action,经过处理有传递给子组件,map函数在处理数组时特别好用。
Component
class AddParentComment extends React.Component {
    constructor(props) {
        super(props);
        this.editor = null;
    }
    componentDidMount() {
        const textbox = ReactDOM.findDOMNode(this.refs.AddParentCommentBox);
        this.editor = new Simditor({
            textarea: $(textbox),
            toolbar: ['title', 'bold', 'italic', 'underline', 'strikethrough', 'color', 'ol', 'ul', 'link', 'alignment', 'emoji'],
            emoji: {
                imagePath: config.emojiUrl
            }
        });
    }
    render() {
        const {actions, articalId} = this.props;
        return (<form>
                    <FormGroup controlId="AddParentCommentBox">
                        <FormControl componentClass="textarea" placeholder="留言" ref={'AddParentCommentBox'} />
                        <Button type="submit" onClick={(e) => {
                            e.preventDefault();
                            if(!!this.editor && this.editor.getValue() !== '') {
                                actions.AddParentComment(this.editor.getValue(), articalId);
                                this.editor.setValue('');
                            }
                        }}>提交</Button>
                    </FormGroup>
                </form>);
    }
}
组件的内容就是一个编辑框+提交按钮,使用react-bootstrap很容易就能实现。显示评论内容部分稍微复杂一点,首先是根据packages render出parent comment和child comment,若是需要显示回复框,则在对应的位置插入回复框,更好的做法是复用AddParentComment这个组件,因为回复框其实和AddParentComment是同构的。
class CommentList extends React.Component {
    constructor(props) {
        super(props);
        this.editor = null;
    }
    componentDidUpdate() {
        if(!!this.refs.commentReplyBox) {
            const textbox = ReactDOM.findDOMNode(this.refs.commentReplyBox);
            this.editor = new Simditor({
                textarea: textbox,
                toolbar: ['title', 'bold', 'italic', 'underline', 'strikethrough', 'color', 'ol', 'ul', 'link', 'alignment', 'emoji'],
                emoji: {
                    imagePath: config.emojiUrl
                }
            });
        }
    }
    render() {
        const {comments, packageIndex, replyBoxIndex, actions} = this.props;
        let list = comments.map((comment, index) =>{
            return (
                <ListGroupItem className="commentOutline">
                    <div className="commentContent" dangerouslySetInnerHTML={{__html: comment.text}}></div>
                    <Form horizontal>
                        <FormGroup>
                            <ControlLabel>{comment.created_at}</ControlLabel>
                            <Button bsStyle="link" eventKey={3} href="#" onClick={(e) => {
                                e.preventDefault();
                                actions.AddReplyBox(packageIndex, index);
                            }}>{'回复 ' + (index === 0 ? comment.replyCount : '')}</Button>
                            <Button bsStyle="link" eventKey={2} href="#" onClick={(e) => {
                                e.preventDefault();
                                actions.PraiseComment(packageIndex, index, comments[index].id);
                            }} >{'赞 ' + comment.praiseCount}</Button>
                        </FormGroup>
                    </Form>
                </ListGroupItem>
            );
        });

        if(replyBoxIndex >= 0) {
            list.splice(replyBoxIndex + 1, 0,
                <ListGroupItem id="commentReplyOutline">
                    <FormGroup controlId="commentReplyBox">
                        <FormControl componentClass="textarea" placeholder="回复" ref={'commentReplyBox'} />
                        <Button className="commentReplyBoxReplyButton" type="submit" onClick={(e) => {
                            e.preventDefault();
                            if(!!this.editor && this.editor.getValue() !== '') {
                                actions.AddChildComment(packageIndex, comments[0].id, this.editor.getValue());
                                actions.AddReplyBox(-1, -1);
                            }
                        }}>回复</Button>
                    </FormGroup>
                </ListGroupItem>
            );
        }

        return <ListGroup className="commentList">{list}</ListGroup>;
    }
}
写代码之前对于组件的封装考虑不是很到位,没有最大程度的复用组件,由于时间关系,就先mark一下。
最后加一下css,让child comment显示时能够有left margin,同时调整编辑框的高度。
.commentList {
  & > li:not(:first-child) {
      margin-left: 10%;
  }
}

.simditor-body {
    min-height: 100px !important;
}


 743
743

 被折叠的 条评论
为什么被折叠?
被折叠的 条评论
为什么被折叠?
 到【灌水乐园】发言


