


前言
关于NetApp的初始化配置文档网上应该有不少,但大多比较零散,借此机会把几年来配置Ontap的一些经验进行分享,本文会相对侧重一些技术细节及注意事项
首先,Ontap是个很好用的系统,但仅限CLI,WebUI尤其是9.7往后的版本非常难用,除了甲方用户的日常运维,不是特殊情况不建议在WebUI中进行配置,一方面现在WebUI中功能一再简化,大多数的定制化配置都没了,另一方面即使是和CLI中相同的配置由于Web的限制在很多情况下有些也无法正常配置
回到CLI,Ontap系统的命令行的易于使用主要体现在以下几方面:
1.所有集群命令可以用Tab补全及进行List(除了进入节点下)
2.整体的层级逻辑非常清晰
3.可以跨层级使用命令
这条可能比较抽象,举个例子其实就很清楚,比如我想配置ntp,但不确定从哪个上层目录进去,这时候直接使用下层命令同样生效,如下:
FAS2750::> ntp server
    create delete modify show

FAS2750::> ntp server show
  (cluster time-service ntp server show)
                                        Is
                                        Authentication
Server                         Version  Enabled        Key ID
------------------------------ -------  -------------- ------
x.x.x.x                    auto     false          -
可以看到ntp server是在cluster time-service下面,但也能直接使用,并且会提示正确路径,给个赞
综上,本文初始化全部以命令行进行配置及说明!
配置前准备
以下列出了配置前需要收集的一些信息,或者说需要了解的一些原理及注意事项
IP信息统计
根据实际的应用场景及安全需求实际需要的IP地址数量可能不一致,以下面这个案例为例做下说明:
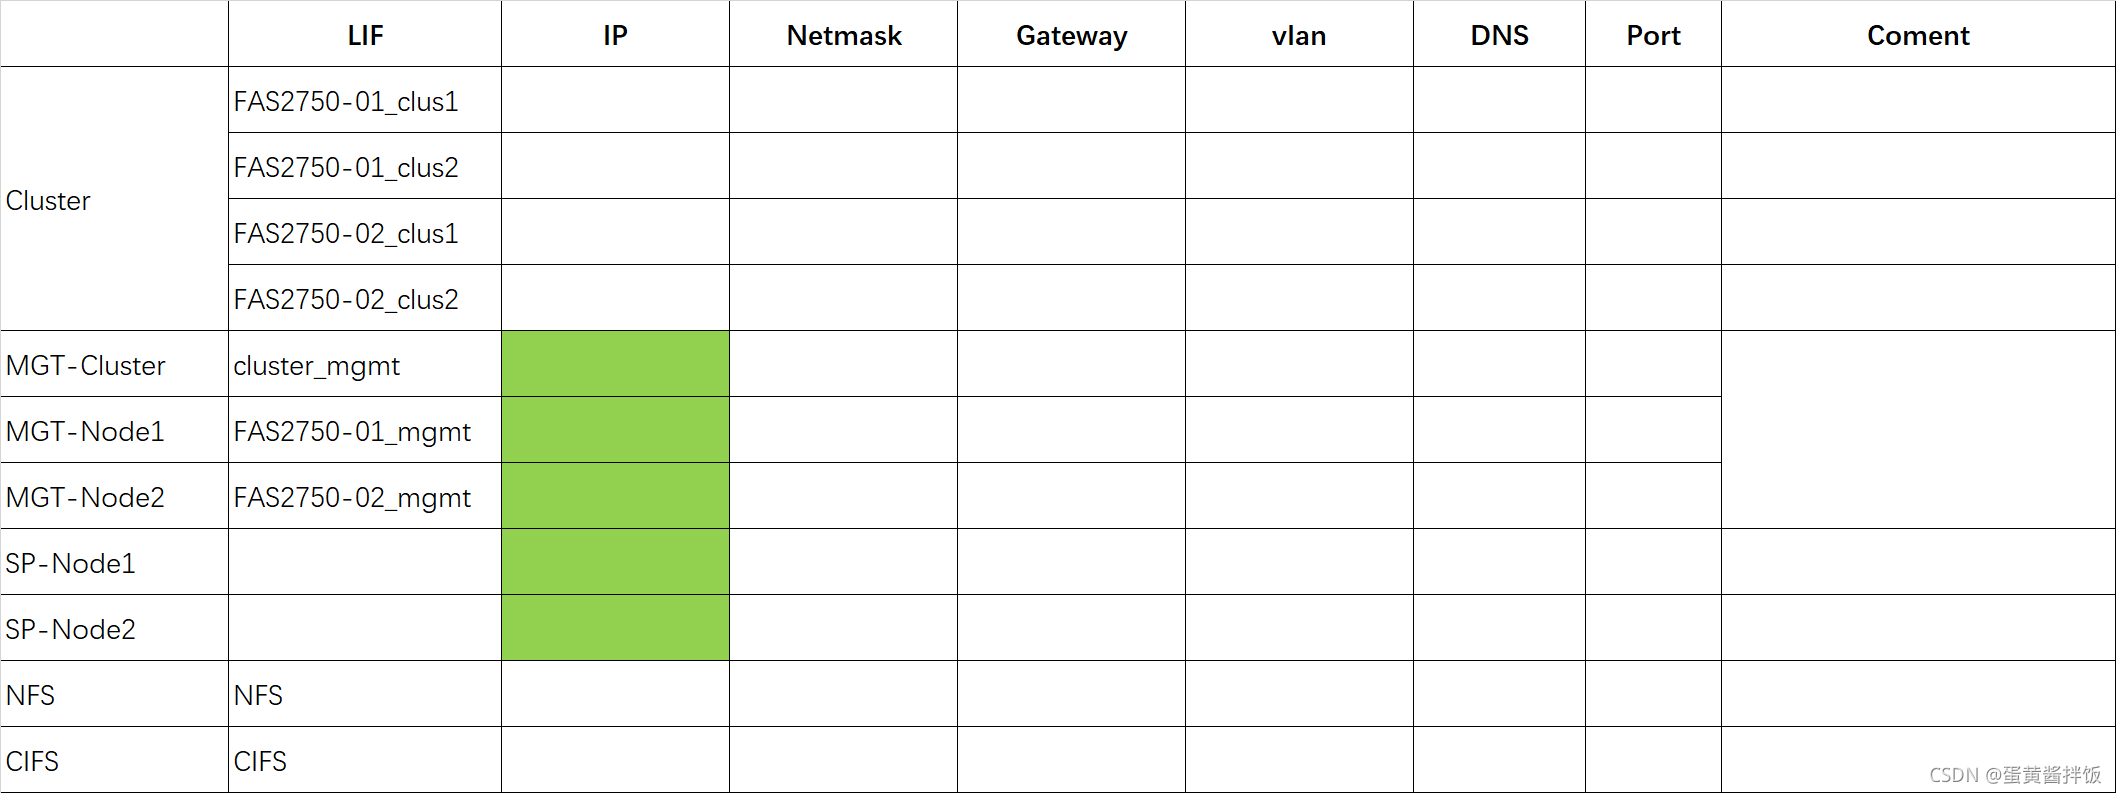
1.管理地址(必须)3个:1个集群管理地址,2个节点管理地址
2.SP地址2个:2个底层管理地址,相当于服务器BMC地址,配置完成后可以远程进行系统重装等操作
3.DNS地址:使用CIFS需要对接LDAP环境必须正确配置
4.业务地址:根据实际业务需求配置
另外关于Ontap的网络逻辑的几个层级:
1.Port,即物理口,设备上看到的e0开头的口
2.ifgrp,即端口组,通常来讲至少会绑定两个物理接口作为端口组,若存在vlan同一个ifgrp可以创建多个vlan-ifgrp
3.LIF,即Ontap实际进行业务通信的Interface接口,需要对应到某个物理端口或端口组,需要注意,同一个port或ifgrp可以属于多个interface
连线说明
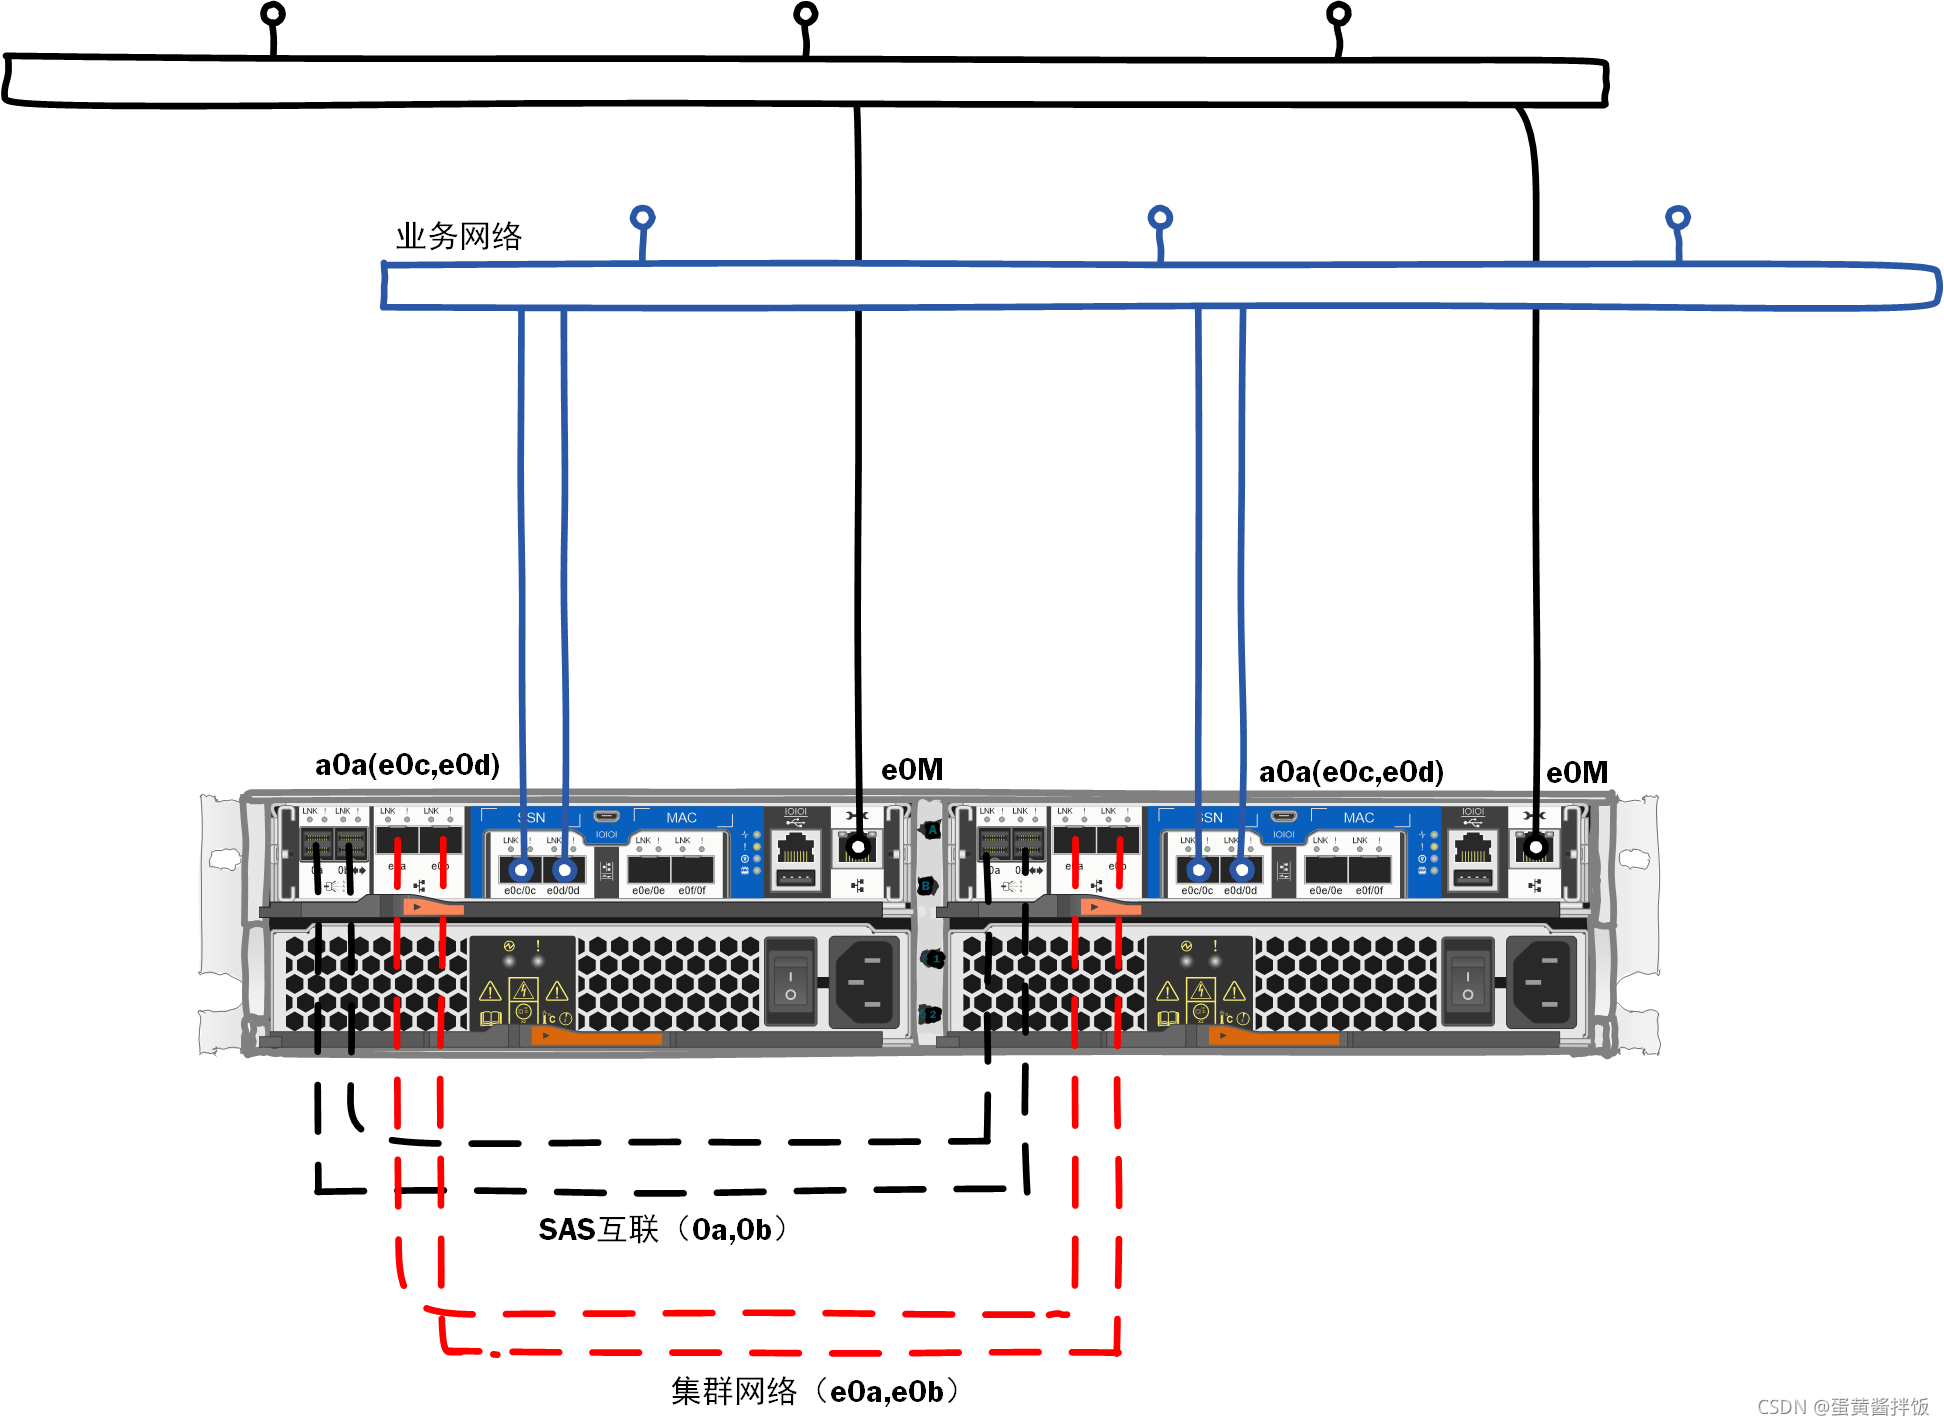
一台新NetApp FAS上架后需要完成以下连线:
1.SAS互联:单台存储无盘柜的情况下两控制器之间互联(0a-0b;0b-0a)
2.集群互联:单台NetApp默认使用Swtichless集群的情况下互联组成集群网络(e0a-e0a;e0b-e0b)
3.管理网络:两个控制器的e0M口连接到管理网络,同时SP地址复用该口
4.业务网络:其余业务网络根据实际情况连接至业务网络
磁盘划分规划
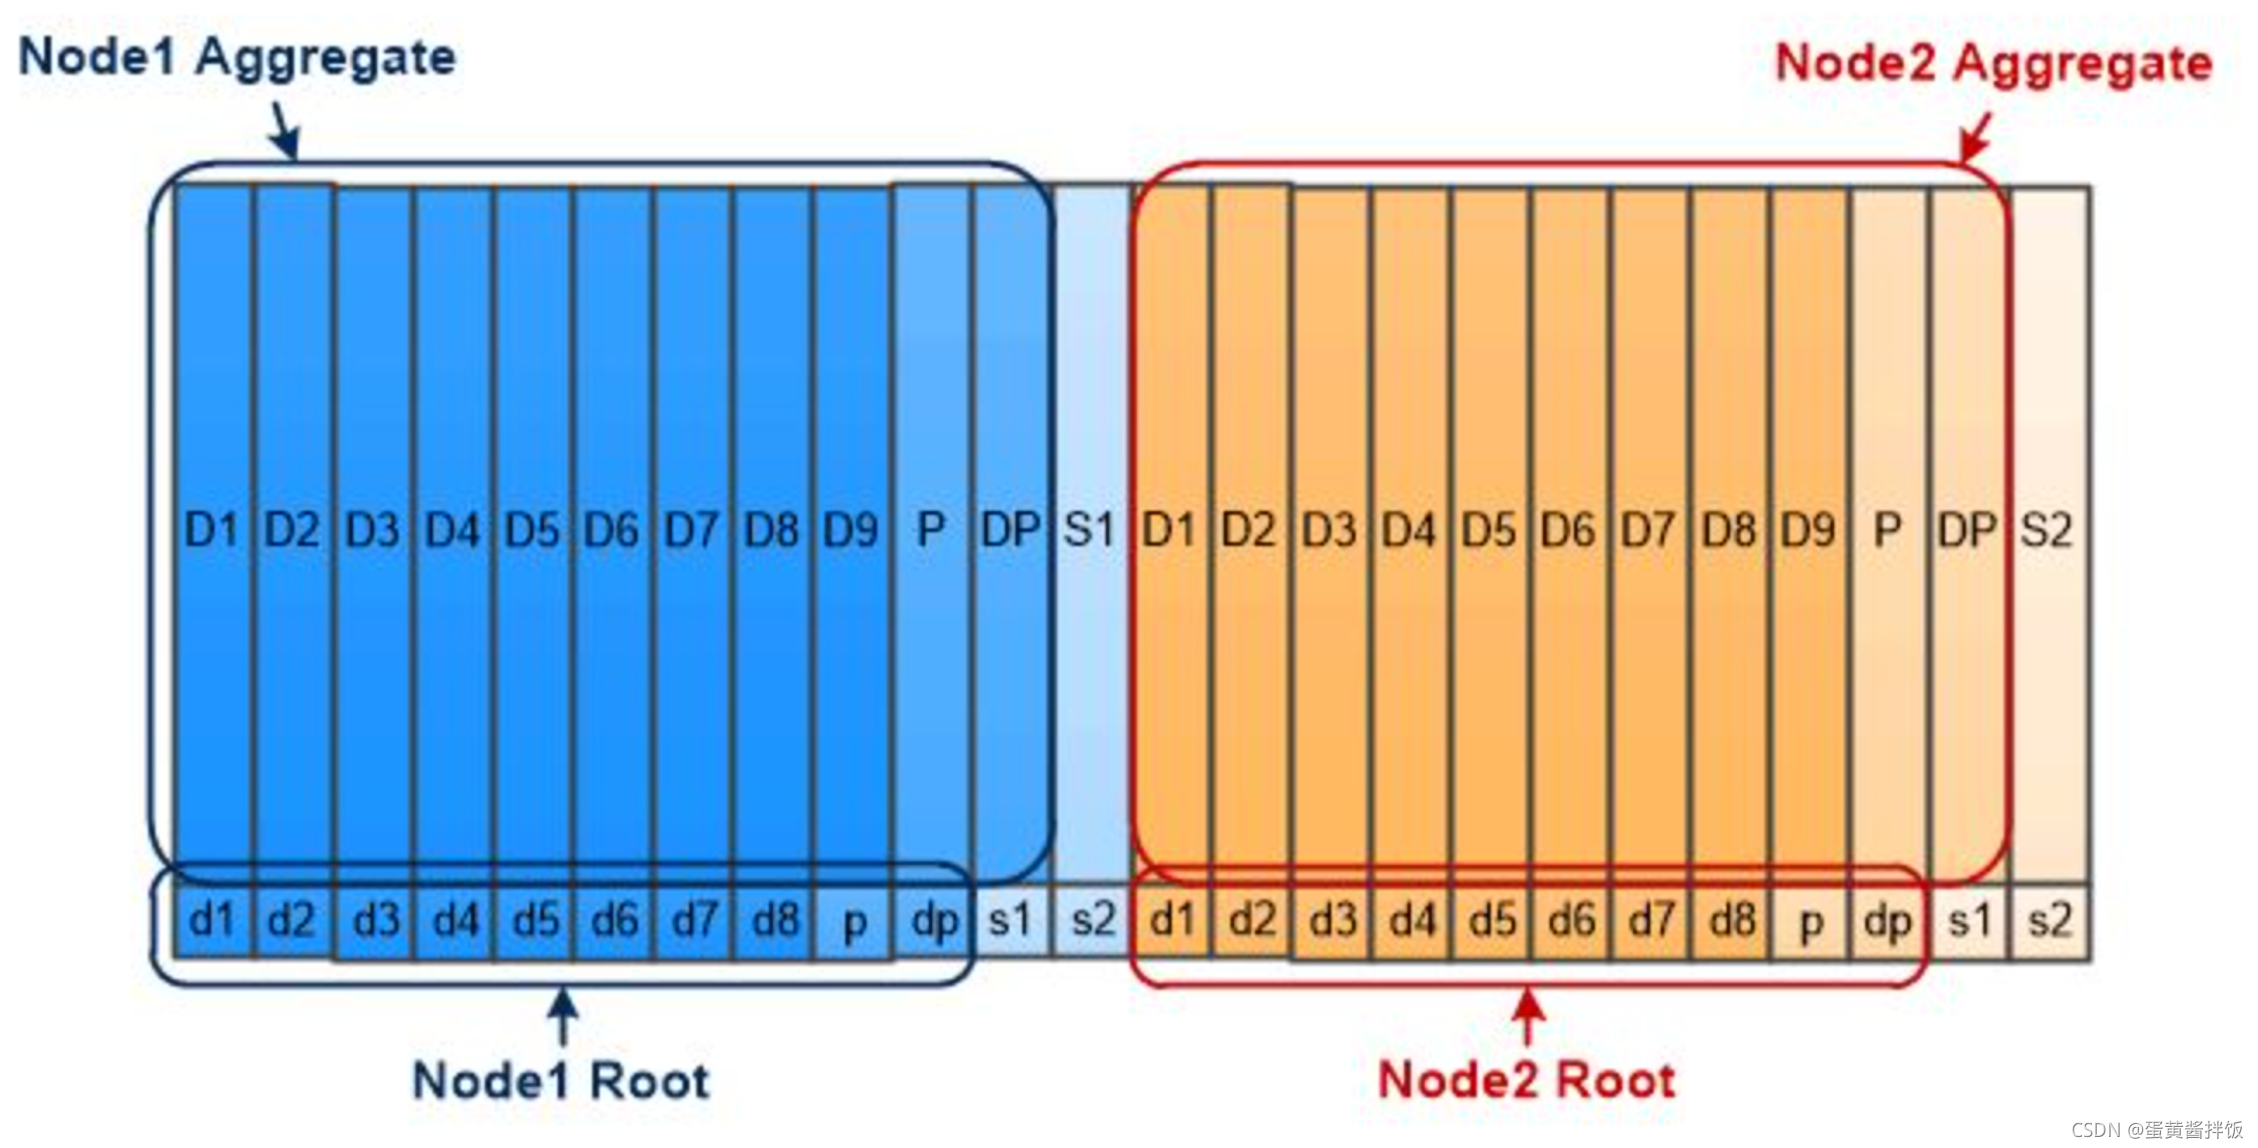
Ontap引入的一个极其有用的概念:ADP(Advanced Drive Partitioning)
首先说说为什么会引入ADP,Ontap的正常运行需要Root AGGR(操作系统)及Data AGGR(数据集),NetApp默认又使用自己的Raid_DP,至少需要3块盘(2块校验盘),在这种情况下,我们拿一台12盘位的NetApp为例:
每个控制器各需要3块盘安装OS,那数据盘能使用的就剩6块,6块数据盘在全划分给一个控制器的情况下组Raid_DP,同时至少需要一块热备盘,这样又去掉3快盘容量,最终实际可用容量就剩3块盘,使用率25%,浪费极其严重
引入ADP后,每块硬盘会被分割为两部分(某些型号会默认切为三部分),简称大盘和小盘,同样12块盘的NetApp,使用ADP后12块小盘用来安装OS,剩下的12块大盘全部可以用来创建AGGR,在保证数据的可用情况下做到了空间利用的最大化
同时关于ADP需要注意以下事项:
1.ADP的划分比例无法自定义
2.ADP的大盘可小盘可以归属于不同的控制器
3.ADP模式于整盘模式可以在初始化之前进行转换(数据会清零)
配置流程
初步了解以上概念后,正式进入初始化配置
设备连线
按照上一节的内容进行连线,包括:SAS线,集群线,管理线,业务线,连接完成后加电
注意:e0M必须连通,否则会导致管理内核模块无法正常启动,导致初始化失败
加电完成后将Console线连接至其中一个控制器Console口,设置如下:

初始化集群及控制器
配置控制器A管理地址
Welcome to the cluster setup wizard.

You can enter the following commands at any time:
  "help" or "?" - if you want to have a question clarified,
  "back" - if you want to change previously answered questions, and
  "exit" or "quit" - if you want to quit the cluster setup wizard.
     Any changes you made before quitting will be saved.

You can return to cluster setup at any time by typing "cluster setup".
To accept a default or omit a question, do not enter a value.

This system will send event messages and periodic reports to NetApp Technical
Support. To disable this feature, enter
autosupport modify -support disable
within 24 hours.

Enabling AutoSupport can significantly speed problem determination and
resolution, should a problem occur on your system.
For further information on AutoSupport, see:
http://support.netapp.com/autosupport/

Type yes to confirm and continue {yes}: yes

Enter the node management interface port [e0M]:
Enter the node management interface IP address: x.x.x.84
Enter the node management interface netmask: 255.255.255.0
Enter the node management interface default gateway: x.x.x.254
A node management interface on port e0M with IP address x.x.x.84 has been created.

Use your web browser to complete cluster setup by accessing
https://x.x.x.84

Otherwise, press Enter to complete cluster setup using the command line
interface:
通过控制器A创建集群
Do you want to create a new cluster or join an existing cluster? {create, join}:
create


Do you intend for this node to be used as a single node cluster? {yes, no} [no]:


Existing cluster interface configuration found:

Port    MTU     IP              Netmask
e0a     9000    169.254.193.4   255.255.0.0
e0b     9000    169.254.17.144  255.255.0.0

Do you want to use this configuration? {yes, no} [yes]:

Enter the cluster administrator's (username "admin") password:

Retype the password:


Step 1 of 5: Create a Cluster
You can type "back", "exit", or "help" at any question.

Enter the cluster name: FAS2750

Creating cluster FAS2750

Starting cluster support services ........

Cluster FAS2750 has been created.


Step 2 of 5: Add Feature License Keys
You can type "back", "exit", or "help" at any question.

Enter an additional license key []:


Step 3 of 5: Set Up a Vserver for Cluster Administration
You can type "back", "exit", or "help" at any question.


Enter the cluster management interface port [e0d]: e0M
Enter the cluster management interface IP address: x.x.x.88
Enter the cluster management interface netmask: 255.255.255.0

Warning: The configured failover-group has no valid failover targets for the
         LIF's failover-policy. To view the failover targets for a LIF, use the
         "network interface show -failover" command.
Enter the cluster management interface default gateway [x.x.x.254]:


A cluster management interface on port e0M with IP address x.x.x.88 has been created.  You can use this address to connect to and manage the cluster.

Enter the DNS domain names: x.x.x.7
Enter the name server IP addresses: x.x.x.7
DNS lookup for the admin Vserver will use the x.x.x.7 domain.

Step 4 of 5: Configure Storage Failover (SFO)
You can type "back", "exit", or "help" at any question.


SFO will be enabled when the partner joins the cluster.


Step 5 of 5: Set Up the Node
You can type "back", "exit", or "help" at any question.

Where is the controller located []: SZ


Cluster "FAS2750" has been created.

To complete cluster setup, you must join each additional node to the cluster
by running "system node show-discovered" and "cluster add-node" from a node in the cluster.

To complete system configuration, you can use either OnCommand System Manager
or the Data ONTAP command-line interface.

To access OnCommand System Manager, point your web browser to the cluster
management IP address (https://x.x.x.88).

To access the command-line interface, connect to the cluster management
IP address (for example, ssh admin@x.x.x.88).
将Console线插到控制器B,配置管理地址
Welcome to the cluster setup wizard.

You can enter the following commands at any time:
  "help" or "?" - if you want to have a question clarified,
  "back" - if you want to change previously answered questions, and
  "exit" or "quit" - if you want to quit the cluster setup wizard.
     Any changes you made before quitting will be saved.

You can return to cluster setup at any time by typing "cluster setup".
To accept a default or omit a question, do not enter a value.

This system will send event messages and periodic reports to NetApp Technical
Support. To disable this feature, enter
autosupport modify -support disable
within 24 hours.

Enabling AutoSupport can significantly speed problem determination and
resolution, should a problem occur on your system.
For further information on AutoSupport, see:
http://support.netapp.com/autosupport/

Type yes to confirm and continue {yes}: yes

Enter the node management interface port [e0M]:
Enter the node management interface IP address: x.x.x.85
Enter the node management interface netmask: 255.255.255.0
Enter the node management interface default gateway: x.x.x.254
A node management interface on port e0M with IP address x.x.x.85 has been created.

Use your web browser to complete cluster setup by accessing
https://x.x.x.85

Otherwise, press Enter to complete cluster setup using the command line
interface:

This node's storage failover partner is already a member of a cluster.
Storage failover partners must be members of the same cluster.
The cluster setup wizard will default to the cluster join dialog.
B控制器加入集群
Do you want to create a new cluster or join an existing cluster? {join}:
join


Existing cluster interface configuration found:

Port    MTU     IP              Netmask
e0a     9000    169.254.136.236 255.255.0.0
e0b     9000    169.254.220.127 255.255.0.0

Do you want to use this configuration? {yes, no} [yes]:


Step 1 of 3: Join an Existing Cluster
You can type "back", "exit", or "help" at any question.


Enter the IP address of an interface on the private cluster network from the
cluster you want to join: 169.254.17.144

Joining cluster at address 169.254.17.144

Starting cluster support services ..........................

This node has joined the cluster FAS2750.


Step 2 of 3: Configure Storage Failover (SFO)
You can type "back", "exit", or "help" at any question.


SFO is enabled.


Step 3 of 3: Set Up the Node
You can type "back", "exit", or "help" at any question.


This node has been joined to cluster "FAS2750".

To complete cluster setup, you must join each additional node to the cluster
by running "system node show-discovered" and "cluster add-node" from a node in the cluster.

To complete system configuration, you can use either OnCommand System Manager
or the Data ONTAP command-line interface.

To access OnCommand System Manager, point your web browser to the cluster
management IP address (https://x.x.x.88).

To access the command-line interface, connect to the cluster management
IP address (for example, ssh admin@x.x.x.88).


Notice: HA is configured in management.
完成后登陆并确认集群状态正常
Fri Oct 29 14:07:25 UTC 2021
login: admin
Password:
******************************************************
* This is a serial console session. Output from this *
* session is mirrored on the SP console session.     *
******************************************************
FAS2750::> cluster show
Node                  Health  Eligibility
--------------------- ------- ------------
FAS2750-01            true    true
FAS2750-02            true    true
2 entries were displayed.
磁盘归属划分
本例为12块1.2TB SAS硬盘,默认使用ADP,所有的大小盘都平均分配到两个控制器,为使空间最大化利用同时IO也最大化,需要将12块ADP大盘划分至同一控制器
通过A空查看下磁盘的ADP情况,可以看到P1为大盘,因此规划将B控制器大盘全部划分给A控制器
FAS2750::> run -node FAS2750-01 -command sysconfig -r
Aggregate aggr0_FAS2750_01 (online, raid_dp) (block checksums)
  Plex /aggr0_FAS2750_01/plex0 (online, normal, active, pool0)
    RAID group /aggr0_FAS2750_01/plex0/rg0 (normal, block checksums)

      RAID Disk Device          HA  SHELF BAY CHAN Pool Type  RPM  Used (MB/blks)    Phys (MB/blks)
      --------- ------          ------------- ---- ---- ---- ----- --------------    --------------
      dparity   0a.00.1P2       0a    0   1   SA:B   0   SAS 10000 63849/130764288   63857/130780672
      parity    0b.00.2P2       0b    0   2   SA:A   0   SAS 10000 63849/130764288   63857/130780672
      data      0b.00.4P2       0b    0   4   SA:A   0   SAS 10000 63849/130764288   63857/130780672
      data      0a.00.7P2       0a    0   7   SA:B   0   SAS 10000 63849/130764288   63857/130780672
      data      0a.00.9P2       0a    0   9   SA:B   0   SAS 10000 63849/130764288   63857/130780672


Pool1 spare disks (empty)

Pool0 spare disks

RAID Disk       Device          HA  SHELF BAY CHAN Pool Type  RPM  Used (MB/blks)    Phys (MB/blks)
---------       ------          ------------- ---- ---- ---- ----- --------------    --------------
Spare disks for block checksum
spare           0a.00.11P2      0a    0   11  SA:B   0   SAS 10000 63849/130764288   63857/130780672
spare           0a.00.1P1       0a    0   1   SA:B   0   SAS 10000 1078466/2208698368 1078474/2208714752
spare           0a.00.7P1       0a    0   7   SA:B   0   SAS 10000 1078466/2208698368 1078474/2208714752
spare           0a.00.9P1       0a    0   9   SA:B   0   SAS 10000 1078466/2208698368 1078474/2208714752
spare           0a.00.11P1      0a    0   11  SA:B   0   SAS 10000 1078466/2208698368 1078474/2208714752
spare           0b.00.2P1       0b    0   2   SA:A   0   SAS 10000 1078466/2208698368 1078474/2208714752
spare           0b.00.4P1       0b    0   4   SA:A   0   SAS 10000 1078466/2208698368 1078474/2208714752

Partner disks

RAID Disk       Device          HA  SHELF BAY CHAN Pool Type  RPM  Used (MB/blks)    Phys (MB/blks)
---------       ------          ------------- ---- ---- ---- ----- --------------    --------------
partner         0b.00.6P2       0b    0   6   SA:A   0   SAS 10000 0/0               63857/130780672
partner         0b.00.10P2      0b    0   10  SA:A   0   SAS 10000 0/0               63857/130780672
partner         0b.00.8P2       0b    0   8   SA:A   0   SAS 10000 0/0               63857/130780672
partner         0b.00.0P2       0b    0   0   SA:A   0   SAS 10000 0/0               63857/130780672
partner         0a.00.3P2       0a    0   3   SA:B   0   SAS 10000 0/0               63857/130780672
partner         0a.00.5P2       0a    0   5   SA:B   0   SAS 10000 0/0               63857/130780672
partner         0b.00.8P1       0b    0   8   SA:A   0   SAS 10000 0/0               1078474/2208714752
partner         0a.00.5P1       0a    0   5   SA:B   0   SAS 10000 0/0               1078474/2208714752
partner         0b.00.6P1       0b    0   6   SA:A   0   SAS 10000 0/0               1078474/2208714752
partner         0b.00.10P1      0b    0   10  SA:A   0   SAS 10000 0/0               1078474/2208714752
partner         0a.00.3P1       0a    0   3   SA:B   0   SAS 10000 0/0               1078474/2208714752
partner         0b.00.0P1       0b    0   0   SA:A   0   SAS 10000 0/0               1078474/2208714752
划分之前关闭两个控制器磁盘的自动注册(重要)
FAS2750::> disk option modify -node FAS2750-01 -bkg-firmware-update on -autocopy on -autoassign off

FAS2750::> disk option modify -node FAS2750-02 -bkg-firmware-update on -autocopy on -autoassign off
移除控制器B上的磁盘归属(需进入特权模式)
FAS2750-02> priv set advanced
Warning: These advanced commands are potentially dangerous; use
         them only when directed to do so by NetApp
         personnel.
FAS2750-02*> disk remove_ownership 0a.00.3P1
Volumes must be taken offline. Are all impacted volumes offline(y/n)?? y
FAS2750-02*> disk remove_ownership 0a.00.5P1
Volumes must be taken offline. Are all impacted volumes offline(y/n)?? y
FAS2750-02*> disk remove_ownership 0b.00.0P1
Volumes must be taken offline. Are all impacted volumes offline(y/n)?? y
FAS2750-02*> disk remove_ownership 0b.00.6P1
Volumes must be taken offline. Are all impacted volumes offline(y/n)?? y
FAS2750-02*> disk remove_ownership 0b.00.8P1
Volumes must be taken offline. Are all impacted volumes offline(y/n)?? y
FAS2750-02*> disk remove_ownership 0b.00.10P1
Volumes must be taken offline. Are all impacted volumes offline(y/n)?? y
将spare盘划分至控制器A并确认
FAS2750-02*> disk assign 0a.00.3P1 -o FAS2750-01
FAS2750-02*> disk assign 0a.00.5P1 -o FAS2750-01
FAS2750-02*> disk assign 0b.00.0P1 -o FAS2750-01
FAS2750-02*> disk assign 0b.00.6P1 -o FAS2750-01
FAS2750-02*> disk assign 0b.00.8P1 -o FAS2750-01
FAS2750-02*> disk assign 0b.00.10P1 -o FAS2750-01

FAS2750::> run -node FAS2750-01 -command sysconfig -r
Aggregate aggr0_FAS2750_01 (online, raid_dp) (block checksums)
  Plex /aggr0_FAS2750_01/plex0 (online, normal, active, pool0)
    RAID group /aggr0_FAS2750_01/plex0/rg0 (normal, block checksums)

      RAID Disk Device          HA  SHELF BAY CHAN Pool Type  RPM  Used (MB/blks)    Phys (MB/blks)
      --------- ------          ------------- ---- ---- ---- ----- --------------    --------------
      dparity   0a.00.1P2       0a    0   1   SA:B   0   SAS 10000 63849/130764288   63857/130780672
      parity    0b.00.2P2       0b    0   2   SA:A   0   SAS 10000 63849/130764288   63857/130780672
      data      0b.00.4P2       0b    0   4   SA:A   0   SAS 10000 63849/130764288   63857/130780672
      data      0a.00.7P2       0a    0   7   SA:B   0   SAS 10000 63849/130764288   63857/130780672
      data      0a.00.9P2       0a    0   9   SA:B   0   SAS 10000 63849/130764288   63857/130780672


Pool1 spare disks (empty)

Pool0 spare disks

RAID Disk       Device          HA  SHELF BAY CHAN Pool Type  RPM  Used (MB/blks)    Phys (MB/blks)
---------       ------          ------------- ---- ---- ---- ----- --------------    --------------
Spare disks for block checksum
spare           0a.00.11P2      0a    0   11  SA:B   0   SAS 10000 63849/130764288   63857/130780672
spare           0a.00.1P1       0a    0   1   SA:B   0   SAS 10000 1078466/2208698368 1078474/2208714752
spare           0a.00.3P1       0a    0   3   SA:B   0   SAS 10000 1078466/2208698368 1078474/2208714752
spare           0a.00.5P1       0a    0   5   SA:B   0   SAS 10000 1078466/2208698368 1078474/2208714752
spare           0a.00.7P1       0a    0   7   SA:B   0   SAS 10000 1078466/2208698368 1078474/2208714752
spare           0a.00.9P1       0a    0   9   SA:B   0   SAS 10000 1078466/2208698368 1078474/2208714752
spare           0a.00.11P1      0a    0   11  SA:B   0   SAS 10000 1078466/2208698368 1078474/2208714752
spare           0b.00.0P1       0b    0   0   SA:A   0   SAS 10000 1078466/2208698368 1078474/2208714752
spare           0b.00.2P1       0b    0   2   SA:A   0   SAS 10000 1078466/2208698368 1078474/2208714752
spare           0b.00.4P1       0b    0   4   SA:A   0   SAS 10000 1078466/2208698368 1078474/2208714752
spare           0b.00.6P1       0b    0   6   SA:A   0   SAS 10000 1078466/2208698368 1078474/2208714752
spare           0b.00.8P1       0b    0   8   SA:A   0   SAS 10000 1078466/2208698368 1078474/2208714752
spare           0b.00.10P1      0b    0   10  SA:A   0   SAS 10000 1078466/2208698368 1078474/2208714752

Partner disks

RAID Disk       Device          HA  SHELF BAY CHAN Pool Type  RPM  Used (MB/blks)    Phys (MB/blks)
---------       ------          ------------- ---- ---- ---- ----- --------------    --------------
partner         0b.00.6P2       0b    0   6   SA:A   0   SAS 10000 0/0               63857/130780672
partner         0b.00.10P2      0b    0   10  SA:A   0   SAS 10000 0/0               63857/130780672
partner         0b.00.8P2       0b    0   8   SA:A   0   SAS 10000 0/0               63857/130780672
partner         0b.00.0P2       0b    0   0   SA:A   0   SAS 10000 0/0               63857/130780672
partner         0a.00.3P2       0a    0   3   SA:B   0   SAS 10000 0/0               63857/130780672
partner         0a.00.5P2       0a    0   5   SA:B   0   SAS 10000 0/0               63857/130780672
至此磁盘归属划分完成
创建AGGR
AGGR可以包含多个RAID GROUP,可以理解成存储池,是整台NetApp提供数据的基础,创建时注意以下事项:
-diskcount为aggr内的磁盘数
-maxraidsize建议改为24-28(DP最多为28),如果低于24,在磁盘满配的情况下就会有多个group
-正常初次建议在命令后添加参数-simulate,模拟最终生成AGGR的参数,确认无误后再运行命令
FAS2750::> aggr create -aggregate AGGR -diskcount 12 -maxraidsize 24 -raidtype raid_dp

Info: The layout for aggregate "AGGR" on node "FAS2750-01" would be:

      First Plex

        RAID Group rg0, 12 disks (block checksum, raid_dp)
                                                            Usable Physical
          Position   Disk                      Type           Size     Size
          ---------- ------------------------- ---------- -------- --------
          shared     1.0.0                     SAS               -        -
          shared     1.0.3                     SAS               -        -
          shared     1.0.5                     SAS          1.03TB   1.03TB
          shared     1.0.6                     SAS          1.03TB   1.03TB
          shared     1.0.8                     SAS          1.03TB   1.03TB
          shared     1.0.10                    SAS          1.03TB   1.03TB
          shared     1.0.11                    SAS          1.03TB   1.03TB
          shared     1.0.4                     SAS          1.03TB   1.03TB
          shared     1.0.7                     SAS          1.03TB   1.03TB
          shared     1.0.9                     SAS          1.03TB   1.03TB
          shared     1.0.2                     SAS          1.03TB   1.03TB
          shared     1.0.1                     SAS          1.03TB   1.03TB

      Aggregate capacity available for volume use would be 9.26TB.

Do you want to continue? {y|n}: y
[Job 30] Job succeeded: DONE

FAS2750::> aggr show


Aggregate     Size Available Used% State   #Vols  Nodes            RAID Status
--------- -------- --------- ----- ------- ------ ---------------- ------------
AGGR        9.26TB    9.26TB    0% online       0 FAS2750-01       raid_dp,
                                                                   normal
aggr0_FAS2750_01
           159.9GB    7.75GB   95% online       1 FAS2750-01       raid_dp,
                                                                   normal
aggr0_FAS2750_02
           159.9GB    7.75GB   95% online       1 FAS2750-02       raid_dp,
                                                                   normal
3 entries were displayed.
AGGR创建完成
SVM及VOL的创建
本文不涉及具体的业务配置,但由于配置Interface必须关联SVM,所以这边先进行创建,具体的业务配置以后再别的文章中再做分享
具体SVM的卷类型和数据协议根据实际业务需求配置
FAS2750::> vserver create -vserver SVM -subtype default -rootvolume SVM_root -rootvolume-security-style mixed -language C.UTF-8 -snapshot-policy default -data-services data-nfs,data-cifs -foreground true
[Job 31] Job succeeded: Success
Vserver creation completed.
配置卷
FAS2750::> vol create -volume VOL -aggregate AGGR -size 9TB -state online -policy default -unix-permissions ---rwxr-xr-x -type RW -snapshot-policy default -foreground true -tiering-policy auto -analytics-state off -vserver SVM -security-style mixed
[Job 33] Job succeeded: Successful

FAS2750::> vol show
Vserver   Volume       Aggregate    State      Type       Size  Available Used%
--------- ------------ ------------ ---------- ---- ---------- ---------- -----
FAS2750-01
          vol0         aggr0_FAS2750_01
                                    online     RW      151.3GB    128.9GB   10%
FAS2750-02
          vol0         aggr0_FAS2750_02
                                    online     RW      151.3GB    128.9GB   10%
SVM       SVM_root     AGGR         online     RW          1GB    972.5MB    0%
SVM       VOL          AGGR         online     RW          9TB     8.55TB    0%
4 entries were displayed.
网络配置
回到网络配置,首先配置业务网络的绑定,通常为e0c,e0d先进行绑定
首先创建绑定接口,需要主机三种绑定模式:
-single:双接口为冗余模式,双接口仅单口跑流量,对端交换机不需要配置,运行较为稳定
-multiple:双接口为负载模式,对端交换机不需要配置,可能有兼容性问题,建议用NetApp兼容性列表的交换机
-LACP:这个不多说了,对端交换机需要配置portchannel及LACP,现在Cisco主流的vPC模式可以考虑
FAS2750::> network port ifgrp create -node FAS2750-01 -ifgrp a0a -distr-func ip -mode singlemode

FAS2750::> network port ifgrp create -node FAS2750-02 -ifgrp a0a -distr-func ip -mode singlemode
将物理接口加入绑定接口,需要注意,一般物理接口会进入默认的广播域,需要先移除出广播域后加入
FAS2750::> network port broadcast-domain show
IPspace Broadcast                                         Update
Name    Domain Name    MTU  Port List                     Status Details
------- ----------- ------  ----------------------------- --------------
Cluster Cluster       9000
                            FAS2750-01:e0a                complete
                            FAS2750-01:e0b                complete
                            FAS2750-02:e0a                complete
                            FAS2750-02:e0b                complete
Default Default       1500
                            FAS2750-01:e0M                complete
                            FAS2750-02:e0M                complete
        Default-1     1500
                            FAS2750-01:e0d                complete
                            FAS2750-02:e0d                complete
3 entries were displayed.

FAS2750::> network port broadcast-domain remove-ports -broadcast-domain Default-1 -ports FAS2750-01:e0d

FAS2750::> network port broadcast-domain remove-ports -broadcast-domain Default-1 -ports FAS2750-02:e0d


FAS2750::> network port ifgrp add-port -node FAS2750-01 -ifgrp a0a -port e0c

FAS2750::> network port ifgrp add-port -node FAS2750-01 -ifgrp a0a -port e0d

FAS2750::> network port ifgrp add-port -node FAS2750-02 -ifgrp a0a -port e0d

FAS2750::> network port ifgrp add-port -node FAS2750-02 -ifgrp a0a -port e0c

FAS2750::> network port ifgrp show
         Port       Distribution                   Active
Node     IfGrp      Function     MAC Address       Ports   Ports
-------- ---------- ------------ ----------------- ------- -------------------
FAS2750-01
         a0a        ip           d2:39:ea:36:e0:9f partial e0c, e0d
FAS2750-02
         a0a        ip           d2:39:ea:37:b4:c6 partial e0c, e0d
2 entries were displayed.
创建vlan接口(可选)
FAS2750::> network port vlan create -node FAS2750-01 -vlan-name a0a-101

FAS2750::> network port vlan create -node FAS2750-01 -vlan-name a0a-103

FAS2750::> network port vlan create -node FAS2750-02 -vlan-name a0a-101

FAS2750::> network port vlan create -node FAS2750-02 -vlan-name a0a-103
调整及配置故障域,根据实际情况进行remove/add/split等等操作,使每个业务均使用独立的故障域
需要说明,故障域在NetApp是个重要又容易被忽视的概念,发生故障时物理口和逻辑接口会在同一个故障域内进行故障转移,若不进行配置,例如某个控制器管理口物理中断后可能漂移到不同网段的业务物理口,导致通讯异常
FAS2750::> network port broadcast-domain rename -broadcast-domain Default-1 -new-name Server

FAS2750::> network port broadcast-domain rename -broadcast-domain Default -new-name MGT

FAS2750::> network port broadcast-domain show
IPspace Broadcast                                         Update
Name    Domain Name    MTU  Port List                     Status Details
------- ----------- ------  ----------------------------- --------------
Cluster Cluster       9000
                            FAS2750-01:e0a                complete
                            FAS2750-01:e0b                complete
                            FAS2750-02:e0a                complete
                            FAS2750-02:e0b                complete
Default MGT           1500
                            FAS2750-01:e0M                complete
                            FAS2750-02:e0M                complete
        SVM           1500
                            FAS2750-01:a0a                complete
                            FAS2750-02:a0a                complete
        SVM-CIFS      1500
                            FAS2750-01:a0a-101            complete
                            FAS2750-02:a0a-101            complete
        SVM-NFS       1500
                            FAS2750-01:a0a-103            complete
                            FAS2750-02:a0a-103            complete
5 entries were displayed.
其他相关配置
回到最之前的提到的SP接口的配置:
FAS2750::> system service-processor network modify -node FAS2750-01 -address-family IPv4 -enable true -ip-address x.x.x.86 -netmask 255.255.255.0 -gateway x.x.x.254
FAS2750::> system service-processor network modify -node FAS2750-02 -address-family IPv4 -enable true -ip-address x.x.x.87 -netmask 255.255.255.0 -gateway x.x.x.254

FAS2750::> system service-processor show
                               IP           Firmware
Node          Type Status      Configured   Version   IP Address
------------- ---- ----------- ------------ --------- -------------------------
FAS2750-01    BMC  online      true         11.6      x.x.x.86
FAS2750-02    BMC  online      true         11.6      x.x.x.87
2 entries were displayed.
时间配置,虽然时间配置最主要会影响CIFS环境,但在任何IT架构中,统一的时间设定都不应该被忽视
配置NTP及时区
FAS2750::> cluster time-service ntp server create -server x.x.x.7

FAS2750::> timezone -timezone Asia/Shanghai -version true
1 entry modified

FAS2750::> date
Node      Date                     Time zone
--------- ------------------------ -------------------------
FAS2750-01
          Fri Oct 29 15:23:22 2021 Asia/Shanghai
FAS2750-02
          Fri Oct 29 15:23:22 2021 Asia/Shanghai
2 entries were displayed.
结语
因为实际的业务场景及需求多样,本文不涉及具体的业务配置,各位朋友在实际初始化及其他配置中碰到问题的也欢迎留言交流


 2080
2080

 被折叠的 条评论
为什么被折叠?
被折叠的 条评论
为什么被折叠?
 到【灌水乐园】发言


