


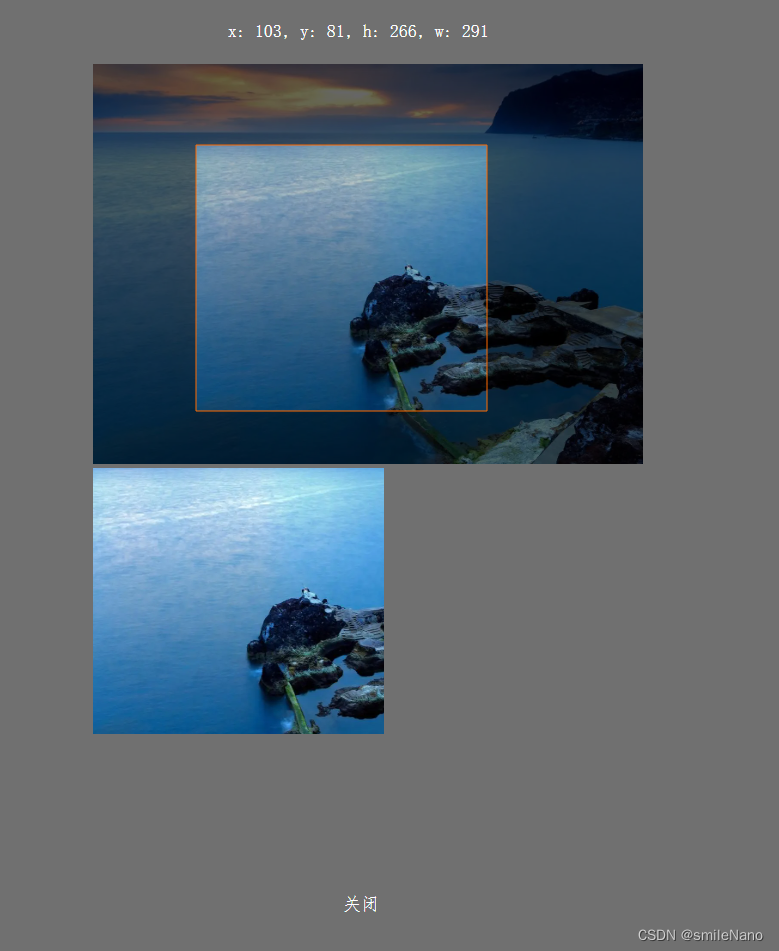
展示:
完整代码:
imgSrc 放置自己的图像
<template>
    <div>
      <div v-if="!images" @click="outClick" style="cursor: pointer;">截取</div>
      <div class="canvas-background" v-if="images">
      <!-- 截取区域 -->
        <canvas id="canvas-cuts"></canvas>
			  <canvas id="canvas-cut" @mousedown="onmousedown" @mouseup="onmouseup" @mousemove="onmousemove"></canvas>
        <!--回显区域-->
        <div class="canvas-coordinate" v-if="clipArea">
          <div>x: {{clipArea.x}}, y: {{clipArea.y}}, h: {{clipArea.h}}, w: {{clipArea.w}}</div>
        </div>
        <div class="canvas-img">
          <img id="cutImg" :src="cutImgSrc">
        </div>
        <div class="canvas-close" @click="closeClick">关闭</div>
      </div>
    </div>
</template>

<script>
export default {
  name: 'HelloWorld',
  data () {
    return {
      images: false,
      // 图像层
      imgSrc: '', // 放置原图像
      ucanvas: null,
      uctx: null,
      img: null,
      // 遮罩层
      canvas: null,
      ctx: null,
      clipArea: null, // 最终坐标点数据
      start: null, // 绘制过程作为判断节点
      // 回显区域
      cutImg: null,
      cutCtx: null,
      cutImgSrc: null
    }
  },
  mounted() {

  },
  methods: {
    outClick() {
      let that = this
      that.images = true
      setTimeout(() => {
        // 图像
        const SRC= that.imgSrc;
		    that.ucanvas = document.getElementById('canvas-cuts');
        that.ucanvas.width='550';
        that.ucanvas.height='400';
        that.uctx = that.ucanvas.getContext('2d');
		    that.img = new Image();
		    that.img.src = SRC;
        that.img.crossOrigin = '' // 图像跨域处理 (ps:不跨域不用加)
        that.img.onload = function() {
		      that.uctx.drawImage(that.img,0,0,that.ucanvas.width, that.ucanvas.height);
		    };
        // 遮罩层
		    that.canvas = document.getElementById('canvas-cut');
        that.canvas.width='550';
        that.canvas.height='400';
		    that.ctx = that.canvas.getContext('2d');
        that.ctx.fillStyle = 'rgba(0,0,0,0.6)';
        that.ctx.strokeStyle="rgba(255,106,0,1)";
        // 回显
        that.cutImg = document.getElementById("cutImg");
      },100)
    },
    // 按下
    onmousedown(e) {
      this.start = {
        x:e.offsetX,
        y:e.offsetY
      };
    },
    // 抬起
    onmouseup(e) {
      let that = this
      if(that.start){
        that.start = null;
         var url = that.startClip(that.clipArea);
         that.cutImg.src= url;
         //生成base64格式的图
         that.cutImgSrc = url;
      }
    },
    // 移动
    onmousemove(e) {
      if(this.start){
        this.fill(this.start.x,this.start.y,e.offsetX-this.start.x,e.offsetY-this.start.y) // 调起遮罩层
      }
    },
    // 遮罩层
    fill(x,y,w,h){
      let that = this
      that.ctx.clearRect(0,0,that.canvas.width,that.canvas.height);
      that.ctx.beginPath();
      //遮罩层
      that.ctx.globalCompositeOperation = "source-over"; //在目标图像上显示源图像
      that.ctx.fillRect(0,0,that.canvas.width,that.canvas.height);
      //画框
      that.ctx.globalCompositeOperation = 'destination-out'; //在目标图像之外显示源图像
      that.ctx.fillRect(x,y,w,h);
      //描边
      that.ctx.globalCompositeOperation = "source-over"; //在目标图像上显示源图像
      that.ctx.moveTo(x,y);
      that.ctx.lineTo(x+w,y);
      that.ctx.lineTo(x+w,y+h);
      that.ctx.lineTo(x,y+h);
      that.ctx.lineTo(x,y);
      that.ctx.stroke();
      that.ctx.closePath();
      // 存入最终坐标点数据
      that.clipArea = {
          x,
          y,
          w,
          h
      };
    },
    // 图像转化--截取后的图像
    startClip(area){
      let that = this
      var canvas = document.createElement("canvas");
      canvas.width = area.w;
      canvas.height = area.h;
      var data = that.uctx.getImageData(area.x,area.y,area.w,area.h);
      var context = canvas.getContext("2d");
      context.putImageData(data,0,0);
      return canvas.toDataURL("image/png",1);
    },
    // 关闭截取
    closeClick() {
      this.images = false
      // 数据重置
      this.imgSrc ='',
      this.ucanvas = null,
      this.uctx = null,
      this.img = null,
      this.canvas = null,
      this.ctx = null,
      this.clipArea = null,
      this.start = null,
      this.cutImg = null,
      this.cutCtx = null,
      this.cutImgSrc = null
    }
 }
}
</script>

<style scoped>
 .canvas-background {
  width: 100%;
  height: 100vh;
  background: #0000008f;
  text-align: center;
  position: absolute;
 }
#canvas-cuts {
  position: absolute;
  z-index: 1;
  left: 37%;
  top: 7%;
}
#canvas-cut {
  position: absolute;
  z-index: 999;
  left: 37%;
  top: 7%;
}
.canvas-coordinate {
  color: #ffffff;
  line-height: 69px;
  font-family: fangsong;
  font-size: 18px;
  position: absolute;
  left: 44%;
}
.canvas-img {
  width: 250px;
  height: 250px;
  position: absolute;
  left: 37%;
  bottom: 25%;
}
.canvas-close {
  color: #ffffff;
  line-height: 69px;
  font-family: fangsong;
  font-size: 18px;
  position: absolute;
  bottom: 2%;
  left:50%;
  cursor: pointer;
}
</style>


 4475
4475


 被折叠的 条评论
为什么被折叠?
被折叠的 条评论
为什么被折叠?
 到【灌水乐园】发言


